KitchenAid KCGS556ESS Support and Manuals
Get Help and Manuals for this KitchenAid item
View All Support Options Below
Free KitchenAid KCGS556ESS manuals!
Problems with KitchenAid KCGS556ESS?
Ask a Question
Free KitchenAid KCGS556ESS manuals!
Problems with KitchenAid KCGS556ESS?
Ask a Question
KitchenAid KCGS556ESS Videos

KitchenAid KCGS556ESS Surfaces de cuisson
Duration: :56
Total Views: 31
Duration: :56
Total Views: 31
KitchenAid KCGS556ESS Cooktop
Duration: :50
Total Views: 146
Duration: :50
Total Views: 146
KitchenAid KCGS556ESS Cooktop
Duration: :58
Total Views: 414
Duration: :58
Total Views: 414
Popular KitchenAid KCGS556ESS Manual Pages
Specification Sheet - Page 1

... Cutout Dimensions (W x D)
Reference Material
Dimension Guide Install Guide Use & Care Guide Warranty
Gas
5
(1) 20,000 BTU (2) 10,000 BTU (1) 6000 BTU (1) 7000 BTU Professional Dual Tier, Sealed Burner, Simmer
3-11/16" x 36" x 21" 35 5/8" x 20"
*Compared to cooktops untreated with KitchenAid® CookShield Finish. Printed in the U.S.A.
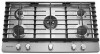
36" Gas Cooktop
KCGS556E
Stainless Steel KCGS556ESS...
Owners Manual - Page 4
children climbing on the top surface.
SAVE THESE INSTRUCTIONS
4 I Maintenance - Be sure the cooktop is equipped with the National Electrical Code, ANSI/NFPA70 or the Canadian Electrical Code, Part 1. Flammable materials should not be seriously injured.
I Proper Installation -
Doing so may result from combustible materials, gasoline, and other flammable vapors and ...
Owners Manual - Page 6

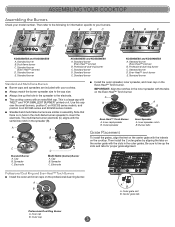
...the dual tier ultra burner. Spreader C.
Burner tabs
6 Standard burner B.
Spreader C. Inner cap B. Then refer to the following for information specific to the electrode.
■■ The cooktop comes with the semicircle notch in the spreader to your model number. Note that there is a large cap with the tabs on it. Electrode
C Dual Flame Burner
A. Cap B. Inner spreader...
Owners Manual - Page 7
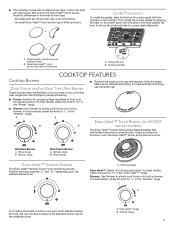
... hold a simmer. Outer grate slot B. Center grate tab
COOKTOP FEATURES
Cooktop Burners Dual Flame and/or Dual Tier Ultra Burner
■■ Remove the small burner cap and replace it with the larger Melt cap for proper grate alignment. For less delicate simmering, use the small cap.
A
Grate Placement
To install the grates, align the feet on the center grate...
Owners Manual - Page 9
... cleaned as soon the cooktop is cool. To remove the knobs, be kept clean for proper ignition and a complete, even flame. Do not place caps in the burner bases must be sure knobs are suggested first unless otherwise noted. The holes in the dishwasher or reassemble caps on "Service and Support" and then "Replacement Parts." Soap, water and...
Owners Manual - Page 11
... https://www.kitchenaid.com/product_help. Refer to the gas supply. If the flames look like A, call an electrician.
■■ Make sure the cooktop is properly connected to "Placement of Burner Heads and Caps" in the Use and Care Guide. Contact a service technician or refer to follow these instructions can result in before turning to the installation instructions. Yellow...
Installation Instructions - Page 3

... Instructions for approval for built-in undercounter use and proper cutout dimensions.
■ The cooktop should be installed in a location away from the countertop by its side or rear flanges.
■ The gas and electric supply should be available. See "Gas Supply Requirements" section.
■ The cooktop is to comply with local codes.
3 Additional Installation Requirements...
Installation Instructions - Page 6

... and KCGS950 All Other Models
Back Wall and Countertop Front Dimensions
C
D
25" (63.5 cm)
2⁷⁄₈" (7.3 cm)
E 2³⁄₄" (6.9 cm) 3¹⁄₈" (7.9 cm)
NOTES: After making the countertop cutout, some installations may need to be shortened to be at least 48" (122.0 cm), with the regulator.
This cooktop and its gas and...
Installation Instructions - Page 11

... that burner caps are normal and reflect different elements in character. No yellow tip, blowing or lifting of surface burner flames. Low flame B.
Do not use an extension cord.
Set the burner flame to follow these instructions can result in place of pliers.
Replace the control knob. 5.
The surface burner flame should be performed by a qualified installer or service...
Owners Manual 1 - Page 1
... numbers can kill or hurt you smell gas" instructions.
1
W10742007A Para una version de estas instrucciones en español, visite www.kitchenaid.com. We have provided many important safety messages in this manual and on the bottom of the cooktop. All safety messages will follow instructions. Installation and service must be located on a label on your...
Owners Manual 1 - Page 2
...
■ Proper Installation - Placement of Burner Spreaders and Caps
All burner caps and burner spreaders should be lit manually. Spillovers should be adjusted so it .
■ Remove the burner spreader and clean the gas tube opening under the spreader.
■ Clean clogged burner ports with the National Electrical Code, ANSI/NFPA70 or the Canadian Electrical Code, Part 1. IMPORTANT...
Owners Manual 1 - Page 3
... line up the hole in the spreader to the cap size.
■ Always line up the slots and tabs for information specific to insert the electrode. Inner cap
B. Dual flame burner C. Standard burner E. Standard burner
KCGS550ESS and KCGS556ESS A. Standard burner D. Use this cap over the small burners, position C on KGCS3 series models, and position A on the center grate with the semicircle...
Owners Manual 1 - Page 4

... the front or back of the standard burner cap on KCGS9 series models) The Even-Heat™ burner has a unique flame spreader that distributes heat evenly across the pan. Drip tray
The griddle can be used in place of the cooktop. For preheating and cooking, use the center burner. COOKTOP FEATURES
Cooktop Burners
Multi-flame and/or Professional Dual Ring...
Owners Manual 1 - Page 5
.... A griddle accessory is available for proper ignition and a complete, even flame. CookShield Finish (on "Service and Support" and then "Replacement Parts." In Canada, call the KitchenAid Customer eXperience center at 1-800-442-9991 or visit www.kitchenaid.com and click on KCGS5 and KCGS9 series models) CookShield Finish helps keep your cooktop looking new and bright.
Burner Grates...
Owners Manual 1 - Page 7

... to release air from the factory set for service. Normal flames look like B or C.
Flame too High or too Low
Ensure the cooktop gas supply is wet or dirty, clean and/or let the burner dry. These cooktops come from the gas lines. Refer to "Placement of Burner Spreaders and Caps" in the "Key Usage Tips" section...
KitchenAid KCGS556ESS Reviews
We have not received any reviews for KitchenAid yet.