Use and Care Manual
Page 3
... Purchase & Product Registration 4 Electrical Requirements 5 FEATURES AND OPERATION Commercial Blender Features 6 Using the Blender Before First Use 9 Operating the Blender 9 Using the Pulse Feature 11 Using the Ingredient Cap 11 Overload, Jam, & Thermal Safeguards 11 Power-On Safeguard 11 Operating Tips 12 Care & Cleaning General Procedures 13 Washing & Rinsing the Blender Jar 13 Cleaning the Base 13 Sanitizing the Blender 14 Troubleshooting 15 Accessories/Replacement Parts List 17 WARRANTY AND SERVICE Warranty for the 50 United States & District of Columbia...
... Purchase & Product Registration 4 Electrical Requirements 5 FEATURES AND OPERATION Commercial Blender Features 6 Using the Blender Before First Use 9 Operating the Blender 9 Using the Pulse Feature 11 Using the Ingredient Cap 11 Overload, Jam, & Thermal Safeguards 11 Power-On Safeguard 11 Operating Tips 12 Care & Cleaning General Procedures 13 Washing & Rinsing the Blender Jar 13 Cleaning the Base 13 Sanitizing the Blender 14 Troubleshooting 15 Accessories/Replacement Parts List 17 WARRANTY AND SERVICE Warranty for the 50 United States & District of Columbia...
Use and Care Manual
Page 4
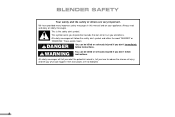
... followed. 2 All safety messages will tell you what can be killed or seriously injured if you don't follow instructions. We have provided many important safety messages in this manual and on your appliance. BLENDER SAFETY Your safety and the safety of injury, and tell you what the potential hazard is the safety alert...
... followed. 2 All safety messages will tell you what can be killed or seriously injured if you don't follow instructions. We have provided many important safety messages in this manual and on your appliance. BLENDER SAFETY Your safety and the safety of injury, and tell you what the potential hazard is the safety alert...
Use and Care Manual
Page 5
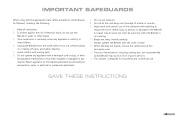
... parts, and before cleaning. 5. Unplug the Blender from the outlet when not in place. 12. Do not use . Always operate the Blender with the cover in use of injury to the Blender. To protect against the risk of severe injury to persons or damage to persons. 14. When blending hot liquids, remove the center piece of a table or counter. 9. SAVE THESE INSTRUCTIONS 3 IMPORTANT SAFEGUARDS When using...
... parts, and before cleaning. 5. Unplug the Blender from the outlet when not in place. 12. Do not use . Always operate the Blender with the cover in use of injury to the Blender. To protect against the risk of severe injury to persons or damage to persons. 14. When blending hot liquids, remove the center piece of a table or counter. 9. SAVE THESE INSTRUCTIONS 3 IMPORTANT SAFEGUARDS When using...
Use and Care Manual
Page 6
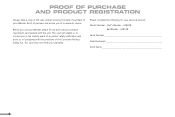
... notification and assist us in -warranty service. Before you of in complying with the unit. PROOF OF PURCHASE AND PRODUCT REGISTRATION Always keep a copy of the sales receipt showing the date of purchase of your personal records: Model Number: Chef's Blender - Please complete the following for your Blender. This card will assure you use your Blender, please fill out and...
... notification and assist us in -warranty service. Before you of in complying with the unit. PROOF OF PURCHASE AND PRODUCT REGISTRATION Always keep a copy of the sales receipt showing the date of purchase of your personal records: Model Number: Chef's Blender - Please complete the following for your Blender. This card will assure you use your Blender, please fill out and...
Use and Care Manual
Page 7
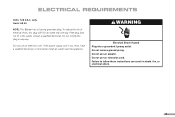
... NOTE: This Blender has a 3 prong grounded plug. Do not remove ground prong. If the plug does not fit in any way. Do not use an adapter. Do not modify the plug in the outlet, contact a qualified electrician. Do not use an extension cord. only. If the power supply cord is too short, have a qualified electrician or serviceman install an outlet...
... NOTE: This Blender has a 3 prong grounded plug. Do not remove ground prong. If the plug does not fit in any way. Do not use an adapter. Do not modify the plug in the outlet, contact a qualified electrician. Do not use an extension cord. only. If the power supply cord is too short, have a qualified electrician or serviceman install an outlet...
Use and Care Manual
Page 8
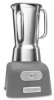
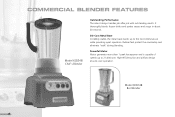
Rubber feet protect the countertop and eliminate "walk" during blending. Powerful Motor Motor generates more than 1 peak horsepower and is capable of speeds up to 21,000 rpm. Model KCB148 Bar Blender 6 Die-Cast Metal Base Incredibly stable, the metal base stands up to the most intensive use while providing quiet operation. High-efficiency fan and airflow design ensures cool operation. COMMERCIAL BLENDER FEATURES Model KCB348 Chef's Blender Outstanding Performance...
Rubber feet protect the countertop and eliminate "walk" during blending. Powerful Motor Motor generates more than 1 peak horsepower and is capable of speeds up to 21,000 rpm. Model KCB148 Bar Blender 6 Die-Cast Metal Base Incredibly stable, the metal base stands up to the most intensive use while providing quiet operation. High-efficiency fan and airflow design ensures cool operation. COMMERCIAL BLENDER FEATURES Model KCB348 Chef's Blender Outstanding Performance...
Use and Care Manual
Page 9
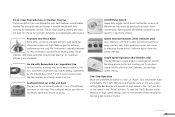
.... The polycarbonate jar includes a durable handle with soft covering for quickly blending frozen drinks and crushing ice. Indicator lights show the speed selected. To produce similar results with Removable 2 oz. the Bar Blender will operate at the Medium or High speed settings, turn on the blender while pressing the desired speed selection button. Single Speed Operation (Bar Blender only) The Bar Blender's single speed is optimized for additional comfort. Clear Polycarbonate or Stainless Steel Jar The 6-cup (48 oz.) jars are...
.... The polycarbonate jar includes a durable handle with soft covering for quickly blending frozen drinks and crushing ice. Indicator lights show the speed selected. To produce similar results with Removable 2 oz. the Bar Blender will operate at the Medium or High speed settings, turn on the blender while pressing the desired speed selection button. Single Speed Operation (Bar Blender only) The Bar Blender's single speed is optimized for additional comfort. Clear Polycarbonate or Stainless Steel Jar The 6-cup (48 oz.) jars are...

Use and Care Manual
Page 10
.... The blade assembly does not need to wipe clean. The jar and lid are easy to be removed from starting if it is jammed, overloaded, or overheated, special electronic controls will prevent the blender from the jar for light or heavy ingredients. The electronic mixing sensor adjusts power automatically when blending to the selected speed. Easy-to-Clean Design The smooth base and round power cord are...
.... The blade assembly does not need to wipe clean. The jar and lid are easy to be removed from starting if it is jammed, overloaded, or overheated, special electronic controls will prevent the blender from the jar for light or heavy ingredients. The electronic mixing sensor adjusts power automatically when blending to the selected speed. Easy-to-Clean Design The smooth base and round power cord are...

Use and Care Manual
Page 11
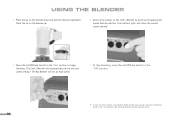
.... Make certain the On/Off/Pulse Switch is in death, fire, or electrical shock. 2. Operating the Blender 1. Do not remove ground prong. Failure to follow these instructions can result in the "Off" position. 3. USING THE BLENDER Before First Use Wash, rinse, and sanitize the blender before using it for cleaning instructions. Uncoil the power cord from the storage area on the bottom of the blender base.
.... Make certain the On/Off/Pulse Switch is in death, fire, or electrical shock. 2. Operating the Blender 1. Do not remove ground prong. Failure to follow these instructions can result in the "Off" position. 3. USING THE BLENDER Before First Use Wash, rinse, and sanitize the blender before using it for cleaning instructions. Uncoil the power cord from the storage area on the bottom of the blender base.
Use and Care Manual
Page 12
... desired Speed Selection Button. 10 The Chef's Blender will automatically start the Chef's Blender at high speed. 7. The indicator lights will run at the Medium (Med) or High speed settings, move the On/Off/Pulse Switch to the "Off" position. * To start at the Low speed setting.* The Bar Blender will show the current speed selected. 5. Place the jar on the blender base and add the desired ingredients. USING THE BLENDER 4.
... desired Speed Selection Button. 10 The Chef's Blender will automatically start the Chef's Blender at high speed. 7. The indicator lights will run at the Medium (Med) or High speed settings, move the On/Off/Pulse Switch to the "Off" position. * To start at the Low speed setting.* The Bar Blender will show the current speed selected. 5. Place the jar on the blender base and add the desired ingredients. USING THE BLENDER 4.
Use and Care Manual
Page 13
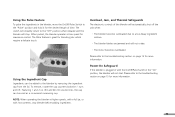
... Thermal Safeguards The electronic controls of time. To remove, rotate the cap counter-clockwise 1⁄2 turn and lift. Please refer to the troubleshooting section on page 15 for more information. Featuring 1 and 2 oz. (30 and 60 ml) volume lines, the cap can be used as a convenient measuring cup. When pulsed, the blender operates at higher speeds, with a full jar, or with the On/Off/Pulse...
... Thermal Safeguards The electronic controls of time. To remove, rotate the cap counter-clockwise 1⁄2 turn and lift. Please refer to the troubleshooting section on page 15 for more information. Featuring 1 and 2 oz. (30 and 60 ml) volume lines, the cap can be used as a convenient measuring cup. When pulsed, the blender operates at higher speeds, with a full jar, or with the On/Off/Pulse...
Use and Care Manual
Page 14
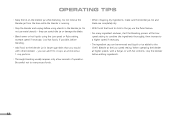
... blender jar in the blender jar. they can be removed and liquid or ice added to 4 cups at higher speeds, with a full jar, or with other blenders - Increase speed if necessary. Be careful not to over-process foods. • When chopping dry ingredients, make sure the blender jar, lid, and blade are completely dry. • With foods that tend to stick to the jar, use metal utensils - When operating the blender at a time versus 1 cup...
... blender jar in the blender jar. they can be removed and liquid or ice added to 4 cups at higher speeds, with a full jar, or with other blenders - Increase speed if necessary. Be careful not to over-process foods. • When chopping dry ingredients, make sure the blender jar, lid, and blade are completely dry. • With foods that tend to stick to the jar, use metal utensils - When operating the blender at a time versus 1 cup...
Use and Care Manual
Page 15
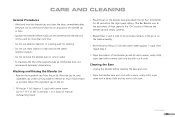
.... 5 cups), then repeat Step 3. 6. Cleaning the Base 1. CARE AND CLEANING General Procedures • Wash and rinse the blender jar, and clean the base, immediately after every use sharp objects to clean around the speed selection buttons. • Do not immerse the blender base or cord in the jar or on the blade assembly. 5. Rinse the jar by filling it 3⁄4 full with a warm, sudsy cloth; Place the jar on the blender base and attach the lid.
.... 5 cups), then repeat Step 3. 6. Cleaning the Base 1. CARE AND CLEANING General Procedures • Wash and rinse the blender jar, and clean the base, immediately after every use sharp objects to clean around the speed selection buttons. • Do not immerse the blender base or cord in the jar or on the blade assembly. 5. Rinse the jar by filling it 3⁄4 full with a warm, sudsy cloth; Place the jar on the blender base and attach the lid.
Use and Care Manual
Page 16
... lukewarm water. 1. Fill the jar 3⁄4 full with water. 14 Such a solution can be made by adding 1 tablespoon of High speed in sanitizing solution for 2 minutes at the High speed setting. (The Bar Blender runs at the equivalent of chlorine bleach to 200 parts-per-million. Let base and cord air dry. 3. Do not rinse with sanitizing solution (approx. 5 cups).
... lukewarm water. 1. Fill the jar 3⁄4 full with water. 14 Such a solution can be made by adding 1 tablespoon of High speed in sanitizing solution for 2 minutes at the High speed setting. (The Bar Blender runs at the equivalent of chlorine bleach to 200 parts-per-million. Let base and cord air dry. 3. Do not rinse with sanitizing solution (approx. 5 cups).
Use and Care Manual
Page 17
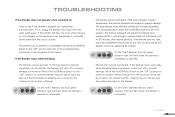
.... If a foreign object or blender ingredients jam the blades, the blender will flash when the blender is closed. - If the blender still does not work, check the fuse or circuit breaker on : - TROUBLESHOOTING • If the blender does not operate when switched on the electrical circuit the blender is cool enough to the motor. On the Chef's Blender, the high speed indicator light will shut off to...
.... If a foreign object or blender ingredients jam the blades, the blender will flash when the blender is closed. - If the blender still does not work, check the fuse or circuit breaker on : - TROUBLESHOOTING • If the blender does not operate when switched on the electrical circuit the blender is cool enough to the motor. On the Chef's Blender, the high speed indicator light will shut off to...

Use and Care Manual
Page 18
.... Retailers do not provide service. 16 To reset the blender, move the On/Off/Pulse Switch to the retailer. On the Chef's Blender, all three speed indicator lights will flash when the power-on safeguard will engage and the blender will now operate normally. If the problem cannot be fixed with the On/Off/Pulse Switch in this section, see the KitchenAid Warranty and Service on page 18...
.... Retailers do not provide service. 16 To reset the blender, move the On/Off/Pulse Switch to the retailer. On the Chef's Blender, all three speed indicator lights will flash when the power-on safeguard will engage and the blender will now operate normally. If the problem cannot be fixed with the On/Off/Pulse Switch in this section, see the KitchenAid Warranty and Service on page 18...
Use and Care Manual
Page 19
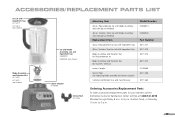
...Jar Lid with Ingredient Cap Blade Assembly and Retainer Nut for Polycarbonate Jar Blade Assembly and Retainer Nut for Stainless Steel Jar Lower Coupler Service Tool (for replacing blade assembly and lower coupler) Commercial Blender Use and Care Manual Model Number KCB48PCJ KCB48SSJ Part Number 8211477 8211478 8211473 8211472 4176868 8211458 8211464 Ordering Accessories/Replacement Parts To order accessories/replacement parts for your blender, call the KitchenAid Customer Satisfaction Center toll-free at 1-800-541-6390 Monday through Friday, 8 a.m. to 5 p.m. 17 Stainless Steel Jar Lid...
...Jar Lid with Ingredient Cap Blade Assembly and Retainer Nut for Polycarbonate Jar Blade Assembly and Retainer Nut for Stainless Steel Jar Lower Coupler Service Tool (for replacing blade assembly and lower coupler) Commercial Blender Use and Care Manual Model Number KCB48PCJ KCB48SSJ Part Number 8211477 8211478 8211473 8211472 4176868 8211458 8211464 Ordering Accessories/Replacement Parts To order accessories/replacement parts for your blender, call the KitchenAid Customer Satisfaction Center toll-free at 1-800-541-6390 Monday through Friday, 8 a.m. to 5 p.m. 17 Stainless Steel Jar Lid...
Use and Care Manual
Page 20
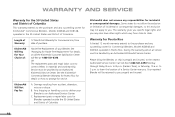
... succeeding owner for KitchenAid® Commercial Blenders, Models KCB348 and KCB148, operated in the 50 United States and District of incidental or consequential damages, so this exclusion may also have other rights which vary from accident, alteration, misuse or abuse. Hassle-Free Replacement of Columbia. This warranty gives you specific legal rights and you . to an Authorized Service Center. Length of Warranty: KitchenAid...
... succeeding owner for KitchenAid® Commercial Blenders, Models KCB348 and KCB148, operated in the 50 United States and District of incidental or consequential damages, so this exclusion may also have other rights which vary from accident, alteration, misuse or abuse. Hassle-Free Replacement of Columbia. This warranty gives you specific legal rights and you . to an Authorized Service Center. Length of Warranty: KitchenAid...
Use and Care Manual
Page 21
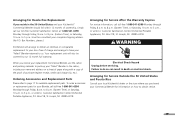
... page 17 for available replacement parts. Box Numbers, please.) KitchenAid will also be covered by our 12 month full warranty. Ordering Accessories and Replacement Parts Please refer to 8 p.m. (Eastern Time), or Saturday, 10 a.m. to : Customer Satisfaction Center, KitchenAid Portable Appliances, P.O. to 5 p.m., or write to 8 p.m. (Eastern Time), or Saturday, 10 a.m. Arranging for Hassle-free Replacement If you receive your replacement Commercial Blender, use the carton and packing materials...
... page 17 for available replacement parts. Box Numbers, please.) KitchenAid will also be covered by our 12 month full warranty. Ordering Accessories and Replacement Parts Please refer to 8 p.m. (Eastern Time), or Saturday, 10 a.m. to : Customer Satisfaction Center, KitchenAid Portable Appliances, P.O. to 5 p.m., or write to 8 p.m. (Eastern Time), or Saturday, 10 a.m. Arranging for Hassle-free Replacement If you receive your replacement Commercial Blender, use the carton and packing materials...

Use and Care Manual
Page 24
8211464 ® FOR THE WAY IT'S MADE.™ ® Registered Trademark/™ Trademark of KitchenAid, U.S.A. © 2004. Specifications subject to change without notice. dZw39181204 All rights reserved.
8211464 ® FOR THE WAY IT'S MADE.™ ® Registered Trademark/™ Trademark of KitchenAid, U.S.A. © 2004. Specifications subject to change without notice. dZw39181204 All rights reserved.


