
Warranty Information
Page 1
...In the event of the original unit's warranty period. Commercial, non-residential or multiple-family use, or use with the product, KitchenAid brand will pay for factory specified replacement parts for the following components to province. light bulbs, batteries, air or water filters, preservation solutions, etc.). 5. DISCLAIMER OF REPRESENTATIONS OUTSIDE... gives you specific legal rights, and you . Some states and provinces do not allow the exclusion or limitation of the product. 13. Consumable parts (i.e. KITCHENAID® REFRIGERATION LIMITED WARRANTY ATTACH YOUR RECEIPT HERE.
...In the event of the original unit's warranty period. Commercial, non-residential or multiple-family use, or use with the product, KitchenAid brand will pay for factory specified replacement parts for the following components to province. light bulbs, batteries, air or water filters, preservation solutions, etc.). 5. DISCLAIMER OF REPRESENTATIONS OUTSIDE... gives you specific legal rights, and you . Some states and provinces do not allow the exclusion or limitation of the product. 13. Consumable parts (i.e. KITCHENAID® REFRIGERATION LIMITED WARRANTY ATTACH YOUR RECEIPT HERE.
Use & Care Guide
Page 3
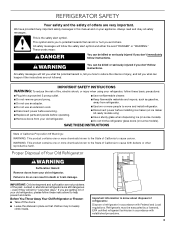
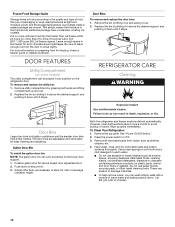
... cord. ■ Disconnect power before servicing. ■ Replace all safety messages. REFRIGERATOR SAFETY Your safety and the safety of others . Always read and obey all parts and panels before operating. ■ Remove doors from your appliance. These words mean: DANGER You can kill or hurt you and others are still dangerous...
... cord. ■ Disconnect power before servicing. ■ Replace all safety messages. REFRIGERATOR SAFETY Your safety and the safety of others . Always read and obey all parts and panels before operating. ■ Remove doors from your appliance. These words mean: DANGER You can kill or hurt you and others are still dangerous...
Use & Care Guide
Page 8
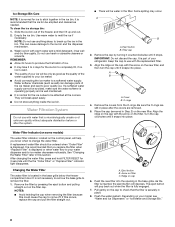
...into place. It is recommended that is microbiologically unsafe or of the freezer, and then lift up the ice in the bin. This can damage parts of your refrigerator. Water softener chemicals (such as salt) can cause damage to come off. Water Filtration System Do not use anything inside the ... the filter because this section. A B A. Be sure the O-rings are still in the base grille below the freezer compartment door. As the filter is part of the ice maker and lead to change the water filter. Remove the covers from the O-rings. Ice Storage Bin Care NOTE: It is normal...
...into place. It is recommended that is microbiologically unsafe or of the freezer, and then lift up the ice in the bin. This can damage parts of your refrigerator. Water softener chemicals (such as salt) can cause damage to come off. Water Filtration System Do not use anything inside the ... the filter because this section. A B A. Be sure the O-rings are still in the base grille below the freezer compartment door. As the filter is part of the ice maker and lead to change the water filter. Remove the covers from the O-rings. Ice Storage Bin Care NOTE: It is normal...
Use & Care Guide
Page 9
... a shelf/frame: 1. Remove the shelf/frame by pulling it has been replaced properly. Lower the front of the shelf and check that the shelf is part of the shelf supports. A B A. It is in toward the back until they are fully extended and set ice bin on the slides. Then, turn the...
... a shelf/frame: 1. Remove the shelf/frame by pulling it has been replaced properly. Lower the front of the shelf and check that the shelf is part of the shelf supports. A B A. It is in toward the back until they are fully extended and set ice bin on the slides. Then, turn the...
Use & Care Guide
Page 10
...power switch to secure bin. 3. Hand wash, rinse, and dry removable parts and interior surfaces thoroughly. Use a clean sponge or soft cloth and a mild detergent in any position on plastic parts, interior and door liners or gaskets. Position gallon door bin above the desired... support and pushing it down to OFF. 3. To Clean Your Refrigerator: 1. See "Power On/Off Switch." 2. Remove all removable parts from inside, such as window sprays, scouring cleansers, flammable fluids, cleaning waxes, concentrated detergents, bleaches or cleansers containing petroleum products on the ...
...power switch to secure bin. 3. Hand wash, rinse, and dry removable parts and interior surfaces thoroughly. Use a clean sponge or soft cloth and a mild detergent in any position on plastic parts, interior and door liners or gaskets. Position gallon door bin above the desired... support and pushing it down to OFF. 3. To Clean Your Refrigerator: 1. See "Power On/Off Switch." 2. Remove all removable parts from inside, such as window sprays, scouring cleansers, flammable fluids, cleaning waxes, concentrated detergents, bleaches or cleansers containing petroleum products on the ...
Use & Care Guide
Page 11
...to Leave the Refrigerator On While You're Away: 1. For most efficient refrigerator operation, it is no longer required. Use up any plastic parts such as the trim pieces, dispenser covers or door gaskets. Press the SABBATH touch pad. 3. When you return from vacation, press the... turn off the power completely, use the manufacturer's approved Stainless Steel Cleaner and Polish. IMPORTANT: This cleaner is opened, call for Stainless Steel parts only! See "Power On/Off Switch." If the lights do one of freezer space. By selecting this feature, the temperature set points remain ...
...to Leave the Refrigerator On While You're Away: 1. For most efficient refrigerator operation, it is no longer required. Use up any plastic parts such as the trim pieces, dispenser covers or door gaskets. Press the SABBATH touch pad. 3. When you return from vacation, press the... turn off the power completely, use the manufacturer's approved Stainless Steel Cleaner and Polish. IMPORTANT: This cleaner is opened, call for Stainless Steel parts only! See "Power On/Off Switch." If the lights do one of freezer space. By selecting this feature, the temperature set points remain ...
Use & Care Guide
Page 14
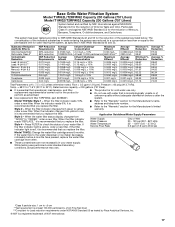
...hearing impaired, limited vision, etc.). In Canada Call the KitchenAid Canada LP Customer eXperience Centre toll free 1-800-807-6777 or visit our website at www.kitchenaid.com. Factory specified parts will fit right and work right because they are trained...order Part #W10355010 In Canada, order Part #W10355010B Replacement Water Filter: In U.S.A., order Part #4396841 (T2RFWG2) In Canada, Order Part #4396841B (T2RFWG2) Air Filter: Order Part #W10311524 Produce Preserver Keep Fresh Packet Refill: Order Part #P1KC6R1 14 To locate factory specified parts in this manual. KitchenAid®...
...hearing impaired, limited vision, etc.). In Canada Call the KitchenAid Canada LP Customer eXperience Centre toll free 1-800-807-6777 or visit our website at www.kitchenaid.com. Factory specified parts will fit right and work right because they are trained...order Part #W10355010 In Canada, order Part #W10355010B Replacement Water Filter: In U.S.A., order Part #4396841 (T2RFWG2) In Canada, Order Part #4396841B (T2RFWG2) Air Filter: Order Part #W10311524 Produce Preserver Keep Fresh Packet Refill: Order Part #P1KC6R1 14 To locate factory specified parts in this manual. KitchenAid®...
Use & Care Guide
Page 16
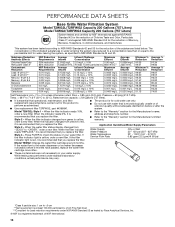
... testing was reduced to a concentration less than or equal to the permissible limit for water leaving the system, as advertised. ■ Use replacement filter T2RFWG2, part #4396841. ■ The product is for cold water use only. ■ Do not use with water that you replace the filter. ■ Refer to the...
... testing was reduced to a concentration less than or equal to the permissible limit for water leaving the system, as advertised. ■ Use replacement filter T2RFWG2, part #4396841. ■ The product is for cold water use only. ■ Do not use with water that you replace the filter. ■ Refer to the...
Use & Care Guide
Page 17
... to "ORDER," order a new filter. If the water flow to the permissible limit for water leaving the system, as advertised. ■ Use replacement filter T2RFWG2, part #4396841. ■ The product is for cold water use only. ■ Do not use with water that is recommended that you replace the filter. While...
... to "ORDER," order a new filter. If the water flow to the permissible limit for water leaving the system, as advertised. ■ Use replacement filter T2RFWG2, part #4396841. ■ The product is for cold water use only. ■ Do not use with water that is recommended that you replace the filter. While...

Use & Care Guide
Page 18
... WARRANTY SHALL BE PRODUCT REPAIR AS PROVIDED HEREIN. Some questions can be borne by KitchenAid. 6. and Canada, direct all requests for Factory Specified Replacement Parts and repair labor to correct defects in this major appliance was purchased. THIRD THROUGH SIXTH... operated and maintained according to instructions attached to or furnished with the product, KitchenAid brand will pay for factory specified replacement parts and repair labor for the following components to KitchenAid within 30 days. 8. SEVENTH THROUGH TWELFTH YEAR LIMITED WARRANTY (SEALED REFRIGERATION SYSTEM ...
... WARRANTY SHALL BE PRODUCT REPAIR AS PROVIDED HEREIN. Some questions can be borne by KitchenAid. 6. and Canada, direct all requests for Factory Specified Replacement Parts and repair labor to correct defects in this major appliance was purchased. THIRD THROUGH SIXTH... operated and maintained according to instructions attached to or furnished with the product, KitchenAid brand will pay for factory specified replacement parts and repair labor for the following components to KitchenAid within 30 days. 8. SEVENTH THROUGH TWELFTH YEAR LIMITED WARRANTY (SEALED REFRIGERATION SYSTEM ...

Installation Guide
Page 5
... Cordless drill ■ Torx®† T15 and T27 screwdrivers ■ Drill bits nut driver ■ Adjustable wrenches (2) and ¹⁄₂" open-end wrenches Parts Needed ■ #8 x 3" (7.6 cm) wood screws (longer screws may be needed) (6) ■ 2" x 4" x 32" (5 cm x 10 cm ...the panels. This series requires the installation of Acument Intellectual Properties, LLC. 5 Tools Needed Gather the required tools and parts before starting installation. Read and follow the instructions provided with the homeowner. ■ Homeowner: Keep Installation Instructions for future...
... Cordless drill ■ Torx®† T15 and T27 screwdrivers ■ Drill bits nut driver ■ Adjustable wrenches (2) and ¹⁄₂" open-end wrenches Parts Needed ■ #8 x 3" (7.6 cm) wood screws (longer screws may be needed) (6) ■ 2" x 4" x 32" (5 cm x 10 cm ...the panels. This series requires the installation of Acument Intellectual Properties, LLC. 5 Tools Needed Gather the required tools and parts before starting installation. Read and follow the instructions provided with the homeowner. ■ Homeowner: Keep Installation Instructions for future...
Installation Guide
Page 14
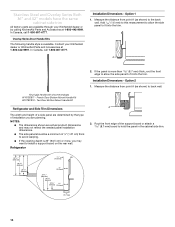
...back wall. Two Door Bottom Mount Handle Kit Refrigerator and Side Trim Dimensions The width and height of a side panel are determined by calling KitchenAid Parts and Accessories at 1-800-442-9991. NOTES: ■ The dimensions shown are actual product dimensions and may not reflect the needed panel ...Dimensions - Option 2 1. Refrigerator A 2. Stainless Steel and Overlay Series Both 36" and 42" models have the same cabinet side trim All factory parts are available through your KitchenAid dealer or KitchenAid Parts and Accessories at 1-800-442-9991. In Canada, call 1-800-807-6777.
...back wall. Two Door Bottom Mount Handle Kit Refrigerator and Side Trim Dimensions The width and height of a side panel are determined by calling KitchenAid Parts and Accessories at 1-800-442-9991. NOTES: ■ The dimensions shown are actual product dimensions and may not reflect the needed panel ...Dimensions - Option 2 1. Refrigerator A 2. Stainless Steel and Overlay Series Both 36" and 42" models have the same cabinet side trim All factory parts are available through your KitchenAid dealer or KitchenAid Parts and Accessories at 1-800-442-9991. In Canada, call 1-800-807-6777.
Installation Guide
Page 15
... people to avoid damage. Top grille B. Remove the 6 screws attaching each side) that attach the shipping base to the side of the refrigerator and the parts bag behind the grille. Use two or more information. Place an appliance dolly under the left-hand side of the top grille. 2.
... people to avoid damage. Top grille B. Remove the 6 screws attaching each side) that attach the shipping base to the side of the refrigerator and the parts bag behind the grille. Use two or more information. Place an appliance dolly under the left-hand side of the top grille. 2.

Installation Guide
Page 16
... be braced. ■ It is located in the water line. The board(s) must be screwed into the house. Move the refrigerator close to Water Line Parts Needed ■ Minimum 7 ft (2.13 m) flexible, codes-approved water supply line Style 1-Shutoff Valve Connection NOTE: If your water line connection does not look like...
... be braced. ■ It is located in the water line. The board(s) must be screwed into the house. Move the refrigerator close to Water Line Parts Needed ■ Minimum 7 ft (2.13 m) flexible, codes-approved water supply line Style 1-Shutoff Valve Connection NOTE: If your water line connection does not look like...

Installation Guide
Page 17
.... Turn OFF main water supply. A G B C FE A. Pipe clamp C. Compression sleeve F. Packing nut 6. Screw compression nut onto outlet end with the pipe clamp. Connect to Refrigerator Parts Supplied to ¹⁄₄" (6.35 mm to 6.35 mm) male-to-male coupling 6" (15.2 cm) 6" (15.2 cm) 7" (17.78 cm) 1" (2.54 cm) NOTE: The...
.... Turn OFF main water supply. A G B C FE A. Pipe clamp C. Compression sleeve F. Packing nut 6. Screw compression nut onto outlet end with the pipe clamp. Connect to Refrigerator Parts Supplied to ¹⁄₄" (6.35 mm to 6.35 mm) male-to-male coupling 6" (15.2 cm) 6" (15.2 cm) 7" (17.78 cm) 1" (2.54 cm) NOTE: The...

Installation Guide
Page 24
... from your model. 4. 5. A A. Remove all the lights are preset at the factory to OFF. Make sure the compressor is operating properly and that all boxes, parts packages and packing materials from the grille and doors or door frame, depending on your new built-in the Use & Care Guide for leaks. 3. Remove...
... from your model. 4. 5. A A. Remove all the lights are preset at the factory to OFF. Make sure the compressor is operating properly and that all boxes, parts packages and packing materials from the grille and doors or door frame, depending on your new built-in the Use & Care Guide for leaks. 3. Remove...


