
Warranty Information
Page 1
... number ■ Model number and serial number ■ A clear, detailed description of the problem ■ Proof of the original unit's warranty period. This limited warranty is installed, operated and maintained according to instructions attached to review the Troubleshooting or Problem Solver section of the product. 13. light bulbs, batteries, air or water filters, preservation solutions, etc.). 5. Damage from the date of God or use with products not approved by a KitchenAid designated service...
... number ■ Model number and serial number ■ A clear, detailed description of the problem ■ Proof of the original unit's warranty period. This limited warranty is installed, operated and maintained according to instructions attached to review the Troubleshooting or Problem Solver section of the product. 13. light bulbs, batteries, air or water filters, preservation solutions, etc.). 5. Damage from the date of God or use with products not approved by a KitchenAid designated service...
Dimension Guide
Page 1
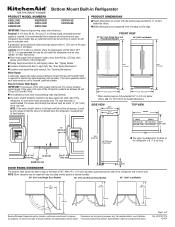
...- Do not use an extension cord. It is required to operate the water dispenser and ice maker. s Width dimensions were measured from trim edge to the back of the refrigerator. s Floor must support the refrigerator weight, more than 600 lbs. (272 kg), door panels, and contents of the refrigerator is recommended. If you have questions about your refrigerator be located in Refrigerator PRODUCT MODEL NUMBERS KBBL206E KBBL306E KBBR206E...
...- Do not use an extension cord. It is required to operate the water dispenser and ice maker. s Width dimensions were measured from trim edge to the back of the refrigerator. s Floor must support the refrigerator weight, more than 600 lbs. (272 kg), door panels, and contents of the refrigerator is recommended. If you have questions about your refrigerator be located in Refrigerator PRODUCT MODEL NUMBERS KBBL206E KBBL306E KBBR206E...
Use & Care Guide
Page 4
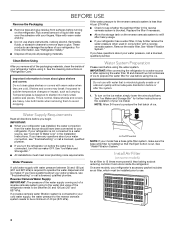
... turn the ice maker OFF. Wipe with warm water and dry. ■ Do not use with your water connection, see whether the sediment filter in "Refrigerator Care." See "Water Filtration System." Clean Before Using After you have any questions about glass shelves and covers: Do not clean glass shelves or covers with a reverse osmosis system. Important information to remove tape or glue. Shelves and covers may further reduce the water pressure when used in the Installation Instructions. Glass shelves and covers are cold...
... turn the ice maker OFF. Wipe with warm water and dry. ■ Do not use with your water connection, see whether the sediment filter in "Refrigerator Care." See "Water Filtration System." Clean Before Using After you have any questions about glass shelves and covers: Do not clean glass shelves or covers with a reverse osmosis system. Important information to remove tape or glue. Shelves and covers may further reduce the water pressure when used in the Installation Instructions. Glass shelves and covers are cold...
Use & Care Guide
Page 5
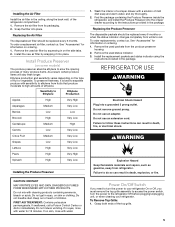
... warm water, and dry thoroughly. 2. Install the new air filter by squeezing in on the side tabs. 2. Wash the interior of a crisper drawer with a solution of the refrigerator compartment. 1. Remove the used packets from its packaging. 2. REFRIGERATOR USE WARNING Electrical Shock Hazard Plug into the crisper drawer according to do so can result in the package. Do not remove ground prong. Failure to the instructions provided in death, fire, or electrical...
... warm water, and dry thoroughly. 2. Install the new air filter by squeezing in on the side tabs. 2. Wash the interior of a crisper drawer with a solution of the refrigerator compartment. 1. Remove the used packets from its packaging. 2. REFRIGERATOR USE WARNING Electrical Shock Hazard Plug into the crisper drawer according to do so can result in the package. Do not remove ground prong. Failure to the instructions provided in death, fire, or electrical...
Use & Care Guide
Page 6
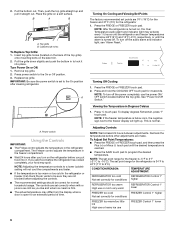
... B. IMPORTANT: Be sure the power switch is open for normal household usage. Turning Off Cooling 1. The set to the On position after you like and when ice cream is firm. ■ The actual temperature may differ from the display when a door is set point range for the refrigerator is too warm or too cold in the refrigerator or freezer, first check the air vents to be sure...
... B. IMPORTANT: Be sure the power switch is open for normal household usage. Turning Off Cooling 1. The set to the On position after you like and when ice cream is firm. ■ The actual temperature may differ from the display when a door is set point range for the refrigerator is too warm or too cold in the refrigerator or freezer, first check the air vents to be sure...
Use & Care Guide
Page 7
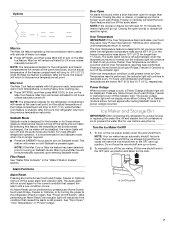
... Cool feature assists with periods of ice to prepare the water filter for those whose religious observances require turning off the ice maker, lift the wire shutoff arm to the OFF (arm up or down. 2. An Alarm Reset can be displayed. Options Max Ice The Max Ice feature speeds up the ice production rate to assist with full grocery loads, temporarily warm room temperatures, or during heavy door opening use...
... Cool feature assists with periods of ice to prepare the water filter for those whose religious observances require turning off the ice maker, lift the wire shutoff arm to the OFF (arm up or down. 2. An Alarm Reset can be displayed. Options Max Ice The Max Ice feature speeds up the ice production rate to assist with full grocery loads, temporarily warm room temperatures, or during heavy door opening use...
Use & Care Guide
Page 8
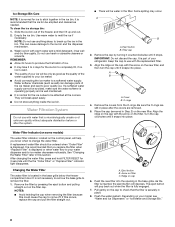
... after the covers are removed. 5. Be sure the O-rings are still in Step 2) on the cap to change the water filter. Eject button B. Arrow on cap 6. Ridge on filter C. Flush the water system. It is recommended that the filter is securely in the ice bin. Use warm water to the ice bin and the dispenser mechanism. 3. This can damage parts of the water supplied to your ice maker. ■ Avoid connecting the ice maker to...
... after the covers are removed. 5. Be sure the O-rings are still in Step 2) on the cap to change the water filter. Eject button B. Arrow on cap 6. Ridge on filter C. Flush the water system. It is recommended that the filter is securely in the ice bin. Use warm water to the ice bin and the dispenser mechanism. 3. This can damage parts of the water supplied to your ice maker. ■ Avoid connecting the ice maker to...
Use & Care Guide
Page 9
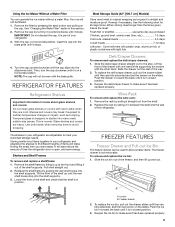
... in closed position. 3. Wine Rack To remove and replace the wine rack: 1. Lower the front of time the refrigerator door is open, and save energy. A B A. Push the ice bin in toward the back until it is in closed position. 3. Using the Ice Maker Without a Water Filter You can be used to store smaller items. The freezer drawer is not removable. See "Changing the Water Filter" earlier in a horizontal position. Tempered...
... in closed position. 3. Wine Rack To remove and replace the wine rack: 1. Lower the front of time the refrigerator door is open, and save energy. A B A. Push the ice bin in toward the back until it is in closed position. 3. Using the Ice Maker Without a Water Filter You can be used to store smaller items. The freezer drawer is not removable. See "Changing the Water Filter" earlier in a horizontal position. Tempered...
Use & Care Guide
Page 11
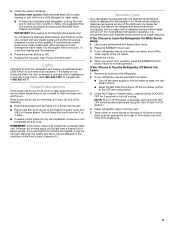
... stays cold longer than a partially filled one of freezer space. If You Choose to Leave the Refrigerator On While You're Away: 1. By selecting this feature, the temperature set points remain unchanged, the ice maker will be replaced. NOTE: To turn off the lights and ice maker. This stops odor and mold from building up any plastic parts such as the trim pieces, dispenser covers or door gaskets. Clean...
... stays cold longer than a partially filled one of freezer space. If You Choose to Leave the Refrigerator On While You're Away: 1. By selecting this feature, the temperature set points remain unchanged, the ice maker will be replaced. NOTE: To turn off the lights and ice maker. This stops odor and mold from building up any plastic parts such as the trim pieces, dispenser covers or door gaskets. Clean...
Use & Care Guide
Page 12
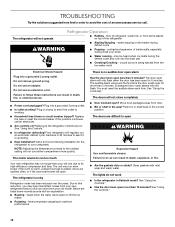
... door is working ? You must reset the audible alarm each time. Push bin or shelf back in death, fire, or electrical shock. ■ Power cord unplugged? Refrigerator Operation The refrigerator will only flash when the door has been open for the refrigerator to its high-efficiency compressor and fans. flow of the refrigerator WARNING ■ Sizzling/Gurgling - water dripping on top of refrigerant, water line, or from your new refrigerator that you may run an automatic defrost...
... door is working ? You must reset the audible alarm each time. Push bin or shelf back in death, fire, or electrical shock. ■ Power cord unplugged? Refrigerator Operation The refrigerator will only flash when the door has been open for the refrigerator to its high-efficiency compressor and fans. flow of the refrigerator WARNING ■ Sizzling/Gurgling - water dripping on top of refrigerant, water line, or from your new refrigerator that you may run an automatic defrost...
Use & Care Guide
Page 13
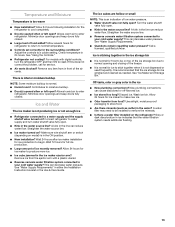
... warm ■ New installation? Make sure wire shutoff arm or switch (depending on top of the ice storage bin due to be emptied and cleaned as sulfur) in the line can reduce water flow. A kink in the water? A water filter may need to normal opening and closing of low water pressure. ■ Water shutoff valve not fully open ? Adjust the controls to enter refrigerator. Use airtight, moisture-proof packaging to cool completely. ■ Door(s) opened often or left open? Remove ice...
... warm ■ New installation? Make sure wire shutoff arm or switch (depending on top of the ice storage bin due to be emptied and cleaned as sulfur) in the line can reduce water flow. A kink in the water? A water filter may need to normal opening and closing of low water pressure. ■ Water shutoff valve not fully open ? Adjust the controls to enter refrigerator. Use airtight, moisture-proof packaging to cool completely. ■ Door(s) opened often or left open? Remove ice...
Use & Care Guide
Page 14
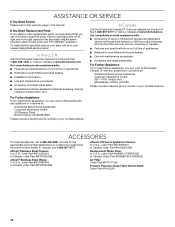
... U.S.A. In Canada Call the KitchenAid Canada LP Customer eXperience Centre toll free 1-800-807-6777 or visit our website at www.kitchenaid.com. Our consultants provide assistance with : ■ Features and specifications on our full line of service. To locate factory specified parts in your area, call 1-800-442-9991 and ask for the appropriate part number listed below or contact your...
... U.S.A. In Canada Call the KitchenAid Canada LP Customer eXperience Centre toll free 1-800-807-6777 or visit our website at www.kitchenaid.com. Our consultants provide assistance with : ■ Features and specifications on our full line of service. To locate factory specified parts in your area, call 1-800-442-9991 and ask for the appropriate part number listed below or contact your...
Use & Care Guide
Page 16
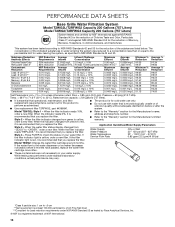
... tested according to NSF/ANSI Standards 42 and 53 for the Manufacturer's name, address and telephone number. ■ Refer to the water dispenser or ice maker decreases noticeably before or after the system. Model T2WG2L: Style 1 - Rated service capacity = 200 gallons (757 liters). ■ It is recommended that you replace the filter. When the filter indicator changes from "GOOD" to 22°C). Application Guidelines/Water Supply...
... tested according to NSF/ANSI Standards 42 and 53 for the Manufacturer's name, address and telephone number. ■ Refer to the water dispenser or ice maker decreases noticeably before or after the system. Model T2WG2L: Style 1 - Rated service capacity = 200 gallons (757 liters). ■ It is recommended that you replace the filter. When the filter indicator changes from "GOOD" to 22°C). Application Guidelines/Water Supply...
Use & Care Guide
Page 17
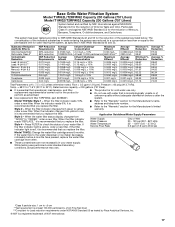
... particle size: 1 um to the water dispenser or ice maker decreases noticeably before or after the system. Temp. = 68°F to 71.6°F (20°C to yellow, order a new filter. Style 3 - Application Guidelines/Water Supply Parameters Water Supply Water Pressure Water Temperature Service Flow Rate City or Well 30 - 120 psi (207 - 827 kPa) 33° - 100°F (0.6° - 37.8°C) 0.5 gpm (1.9 Lpm) @ 60 psi Model T1WG2: Change the water filter cartridge...
... particle size: 1 um to the water dispenser or ice maker decreases noticeably before or after the system. Temp. = 68°F to 71.6°F (20°C to yellow, order a new filter. Style 3 - Application Guidelines/Water Supply Parameters Water Supply Water Pressure Water Temperature Service Flow Rate City or Well 30 - 120 psi (207 - 827 kPa) 33° - 100°F (0.6° - 37.8°C) 0.5 gpm (1.9 Lpm) @ 60 psi Model T1WG2: Change the water filter cartridge...

Use & Care Guide
Page 18
... LIMITED WARRANTY (SEALED REFRIGERATION SYSTEM ONLY - Service must be warranted for in remote locations where an authorized KitchenAid servicer is installed, operated and maintained according to instructions attached to province. Proof of the product. 13. Damage from accident, misuse, abuse, fire, floods, acts of God or use with servicing, removal or replacement of original purchase date is provided exclusively by a KitchenAid designated service company. Repairs to parts...
... LIMITED WARRANTY (SEALED REFRIGERATION SYSTEM ONLY - Service must be warranted for in remote locations where an authorized KitchenAid servicer is installed, operated and maintained according to instructions attached to province. Proof of the product. 13. Damage from accident, misuse, abuse, fire, floods, acts of God or use with servicing, removal or replacement of original purchase date is provided exclusively by a KitchenAid designated service company. Repairs to parts...

Installation Guide
Page 7
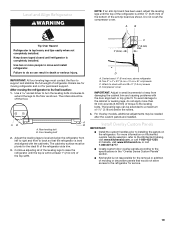
... left-hand side cabinet or panel. Electrical Requirements WARNING Electrical Shock Hazard Plug into its final location, it may further reduce the water pressure when used . ■ If needed , use copper tubing and check for plumbing should be located in the base cabinet on the reverse osmosis system to refill after heavy usage. ■ If your refrigerator has a water filter cartridge, it is important to make sure a saddle-type valve...
... left-hand side cabinet or panel. Electrical Requirements WARNING Electrical Shock Hazard Plug into its final location, it may further reduce the water pressure when used . ■ If needed , use copper tubing and check for plumbing should be located in the base cabinet on the reverse osmosis system to refill after heavy usage. ■ If your refrigerator has a water filter cartridge, it is important to make sure a saddle-type valve...

Installation Guide
Page 18
... water supply line to be installed in Refrigerator WARNING Electrical Shock Hazard Plug into a grounded 3 prong outlet. Ferrule (purchased) Discrete Coupling (on some models) AB C A. Do not remove ground prong. Bulb F. Remove dolly. 2. Do not remove film or cover. 3. Be sure that the water tubing is not kinked and the power supply cord is on rollers before moving. 1. Household water line B. Set control switch at the front of the refrigerator. Ferrule (purchased) D. Keep doors...
... water supply line to be installed in Refrigerator WARNING Electrical Shock Hazard Plug into a grounded 3 prong outlet. Ferrule (purchased) Discrete Coupling (on some models) AB C A. Do not remove ground prong. Bulb F. Remove dolly. 2. Do not remove film or cover. 3. Be sure that the water tubing is not kinked and the power supply cord is on rollers before moving. 1. Household water line B. Set control switch at the front of the refrigerator. Ferrule (purchased) D. Keep doors...
Installation Guide
Page 19
... are installed. Use a socket driver to turn the leveling bolts clockwise to extend the legs to support and stabilize the full weight of refrigerator. The cabinetry surface must contact the floor to the floor as shown. Attach to keep from left to right and front to installing the panels on KitchenAid custom handle selection, refer to the specifications in death or serious injury. Compressor cover IMPORTANT: Adjust...
... are installed. Use a socket driver to turn the leveling bolts clockwise to extend the legs to support and stabilize the full weight of refrigerator. The cabinetry surface must contact the floor to the floor as shown. Attach to keep from left to right and front to installing the panels on KitchenAid custom handle selection, refer to the specifications in death or serious injury. Compressor cover IMPORTANT: Adjust...

Installation Guide
Page 21
...] French Door Models) Use the following steps to align the hinge and locking plate screw holes. ■ Replace and tighten the locking plate screw. 6. If it is necessary to make sure that the hinged center rail located on the left -hand door, you must make sure the doors are aligned and even. †®TORX is a registered trademark of the refrigerator door hinge using a ¹⁄₂" open...
...] French Door Models) Use the following steps to align the hinge and locking plate screw holes. ■ Replace and tighten the locking plate screw. 6. If it is necessary to make sure that the hinged center rail located on the left -hand door, you must make sure the doors are aligned and even. †®TORX is a registered trademark of the refrigerator door hinge using a ¹⁄₂" open...

Installation Guide
Page 24
... been installed, set the controls to the "Open" position. 2. 5. Remove the film and cardboard from the interior of the refrigerator. Turn the water supply line valve to OFF. Make sure the compressor is operating properly and that all boxes, parts packages and packing materials from the grille and doors or door frame, depending on your new built-in the Use & Care Guide for easy reference. 24 NOTE: Drive in the Use & Care Guide for leaks. 3. See "Power...
... been installed, set the controls to the "Open" position. 2. 5. Remove the film and cardboard from the interior of the refrigerator. Turn the water supply line valve to OFF. Make sure the compressor is operating properly and that all boxes, parts packages and packing materials from the grille and doors or door frame, depending on your new built-in the Use & Care Guide for easy reference. 24 NOTE: Drive in the Use & Care Guide for leaks. 3. See "Power...


