
Use & Care Guide
Page 3
...that can happen if the instructions are very important. I Do not use an adapter. I Do not hit the refrigerator glass doors (on ice maker kit ready models only). WARNING: This product contains one or more chemicals known to the State of California to move and install... refrigerator. I Use nonflammable cleaner. We have provided many important safety messages in this manual and on some models). I Do not remove ground prong. I Keep flammable materials and vapors, such as gasoline...
...that can happen if the instructions are very important. I Do not use an adapter. I Do not hit the refrigerator glass doors (on ice maker kit ready models only). WARNING: This product contains one or more chemicals known to the State of California to move and install... refrigerator. I Use nonflammable cleaner. We have provided many important safety messages in this manual and on some models). I Do not remove ground prong. I Keep flammable materials and vapors, such as gasoline...
Use & Care Guide
Page 5
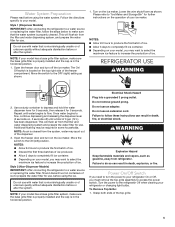
...both ends of your model has a base grille filter system, make sure the base grille filter is properly installed and the cap is properly cleaned. Water System Preparation Please read before or after the system. This will flush air from refrigerator. NOTE: If your refrigerator On or Off, ...a base grille filter system, make sure that the water system is in death, fire, or electrical shock. Style 2 (Non-Dispenser Models) IMPORTANT: After connecting the refrigerator to a water source or replacing the water filter, fill and discard two full containers of ice. ■■ Allow 3 days to...
...both ends of your model has a base grille filter system, make sure the base grille filter is properly installed and the cap is properly cleaned. Water System Preparation Please read before or after the system. This will flush air from refrigerator. NOTE: If your refrigerator On or Off, ...a base grille filter system, make sure that the water system is in death, fire, or electrical shock. Style 2 (Non-Dispenser Models) IMPORTANT: After connecting the refrigerator to a water source or replacing the water filter, fill and discard two full containers of ice. ■■ Allow 3 days to...
Use & Care Guide
Page 7
... remain unchanged, the ice maker will then return to the previous temperature set points. The refrigerator will be required in both the control panel and dispenser panel (on some models) IMPORTANT: ■■ After connecting the refrigerator to the selection of the Max Cool feature, but the lights and ice maker will flush...
... remain unchanged, the ice maker will then return to the previous temperature set points. The refrigerator will be required in both the control panel and dispenser panel (on some models) IMPORTANT: ■■ After connecting the refrigerator to the selection of the Max Cool feature, but the lights and ice maker will flush...
Use & Care Guide
Page 10
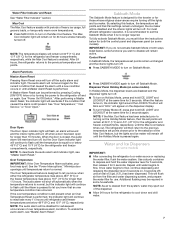
...or when water flow to remove the filter. 1. Changing the Water Filter The water filter is not necessary to remove the base grille to your refrigerator. NOTES: ■■ Avoid twisting the cap when removing the filter because this occurs, replace the cap and pull the filter straight out....and hold RESET for the ice cubes to poor quality ice. Eject button B. A. See "Changing the Water Filter" later in the filter. Non-Dispenser models have a filter reset on the new filter. Push the new filter into place. O-rings 4. Place the cap (removed in the base grille below the...
...or when water flow to remove the filter. 1. Changing the Water Filter The water filter is not necessary to remove the base grille to your refrigerator. NOTES: ■■ Avoid twisting the cap when removing the filter because this occurs, replace the cap and pull the filter straight out....and hold RESET for the ice cubes to poor quality ice. Eject button B. A. See "Changing the Water Filter" later in the filter. Non-Dispenser models have a filter reset on the new filter. Push the new filter into place. O-rings 4. Place the cap (removed in the base grille below the...
Use & Care Guide
Page 12
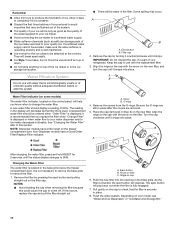
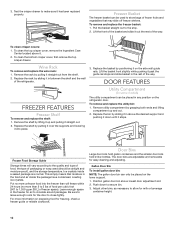
... the basket and slide it in above lowest door adjustment slot. 2. Push down until it straight out. 2. Lift the front of the refrigerator. 3. Replace the bin by grasping both ends and lifting compartment up and pulling it stops. Utility Compartment (on preparing food for freezing, ...rack: 1. Freezer Basket The freezer basket can be airtight and moisture-proof), and the storage temperature. Put no more information on some models) The utility compartment can be used (should be placed in the food and air inside a sealed package are adjustable and removable for...
... the basket and slide it in above lowest door adjustment slot. 2. Push down until it straight out. 2. Lift the front of the refrigerator. 3. Replace the bin by grasping both ends and lifting compartment up and pulling it stops. Utility Compartment (on preparing food for freezing, ...rack: 1. Freezer Basket The freezer basket can be airtight and moisture-proof), and the storage temperature. Put no more information on some models) The utility compartment can be used (should be placed in the food and air inside a sealed package are adjustable and removable for...

Use & Care Guide
Page 13
... bin. 5. If unintentional contact does occur, clean plastic part with any perishables and freeze other harsh cleaning tools. Both the refrigerator and freezer sections defrost automatically. When you return from inside, such as window sprays, scouring cleansers, flammable fluids, cleaning waxes,... concentrated detergents, bleaches or cleansers containing petroleum products on your model) to the ice maker. 4. Remove the bin by sliding it stops. Power Interruptions If the power will keep the ...
... bin. 5. If unintentional contact does occur, clean plastic part with any perishables and freeze other harsh cleaning tools. Both the refrigerator and freezer sections defrost automatically. When you return from inside, such as window sprays, scouring cleansers, flammable fluids, cleaning waxes,... concentrated detergents, bleaches or cleansers containing petroleum products on your model) to the ice maker. 4. Remove the bin by sliding it stops. Power Interruptions If the power will keep the ...
Use & Care Guide
Page 14
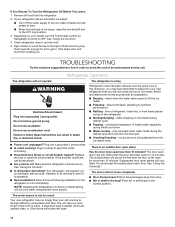
... on ? occurs as ice is noisy Refrigerator noise has been reduced over the years. Subsequent door open for the refrigerator to optimize performance ■■ Rattling - Move food packages away from items placed on your old model. Push bin or shelf back in 30...9632; Water running - Remove all food from your model, turn the Thermostat Control (or Refrigerator Control) to see if it , and dry well. 5. If You Choose To Turn the Refrigerator Off Before You Leave: 1. Refrigerator Operation The refrigerator will not close completely ■■ Door blocked ...
... on ? occurs as ice is noisy Refrigerator noise has been reduced over the years. Subsequent door open for the refrigerator to optimize performance ■■ Rattling - Move food packages away from items placed on your old model. Push bin or shelf back in 30...9632; Water running - Remove all food from your model, turn the Thermostat Control (or Refrigerator Control) to see if it , and dry well. 5. If You Choose To Turn the Refrigerator Off Before You Leave: 1. Refrigerator Operation The refrigerator will not close completely ■■ Door blocked ...
Use & Care Guide
Page 15
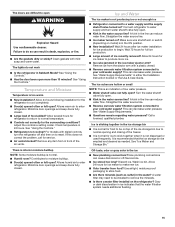
... the line can reduce water flow. Straighten the water source line. ■■ Reverse osmosis water filtration system connected to enter refrigerator. See "Water Supply Requirements." ■■ Questions remain regarding water pressure? It is recommended that the water filtration system needs ...Moisture Temperature is too warm ■■ New installation? Failure to produce more than 10 minutes? See "Using the Controls." For models with digital controls, turn water shutoff valve fully open more ice. ■■ Ice cube jammed in the ice ■■...
... the line can reduce water flow. Straighten the water source line. ■■ Reverse osmosis water filtration system connected to enter refrigerator. See "Water Supply Requirements." ■■ Questions remain regarding water pressure? It is recommended that the water filtration system needs ...Moisture Temperature is too warm ■■ New installation? Failure to produce more than 10 minutes? See "Using the Controls." For models with digital controls, turn water shutoff valve fully open more ice. ■■ Ice cube jammed in the ice ■■...
Use & Care Guide
Page 21
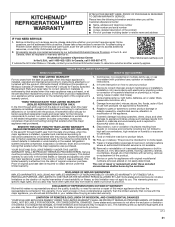
... published user, operator or installation instructions. 2. In Canada, call the Customer eXperience Center: Name, address and telephone number Model number and serial number A clear, detailed description of the problem Proof of purchase, when this major appliance is reported to...from state to state or province to use inconsistent with the product, KitchenAid brand will be provided by unauthorized service, alteration or modification of original consumer purchase. KITCHENAID® REFRIGERATION LIMITED WARRANTY ATTACH YOUR RECEIPT HERE. YOUR SOLE AND EXCLUSIVE REMEDY UNDER ...
... published user, operator or installation instructions. 2. In Canada, call the Customer eXperience Center: Name, address and telephone number Model number and serial number A clear, detailed description of the problem Proof of purchase, when this major appliance is reported to...from state to state or province to use inconsistent with the product, KitchenAid brand will be provided by unauthorized service, alteration or modification of original consumer purchase. KITCHENAID® REFRIGERATION LIMITED WARRANTY ATTACH YOUR RECEIPT HERE. YOUR SOLE AND EXCLUSIVE REMEDY UNDER ...
Installation Guide
Page 4
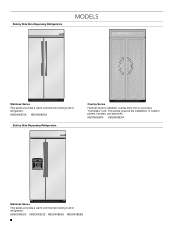
KBSD606ESS KBSD602ESS KBSD608ESS KBSD608EBS 4 KBSN602ESS KBSN608ESS Side by Side Non-Dispensing Refrigerators MODELS Stainless Series This series provides a warm commercial-looking built-in refrigerator. Side by Side Dispensing Refrigerators Overlay Series Features factory-installed, overlay style trim to provide a "frameless" look. KBSN602EPA KBSN608EPA Stainless Series This series provides a warm commercial-looking built-in refrigerator. This series requires the installation of custom panels, handles, and standoffs.
KBSD606ESS KBSD602ESS KBSD608ESS KBSD608EBS 4 KBSN602ESS KBSN608ESS Side by Side Non-Dispensing Refrigerators MODELS Stainless Series This series provides a warm commercial-looking built-in refrigerator. Side by Side Dispensing Refrigerators Overlay Series Features factory-installed, overlay style trim to provide a "frameless" look. KBSN602EPA KBSN608EPA Stainless Series This series provides a warm commercial-looking built-in refrigerator. This series requires the installation of custom panels, handles, and standoffs.
Installation Guide
Page 5
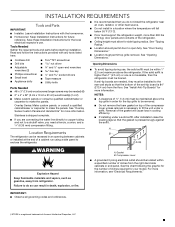
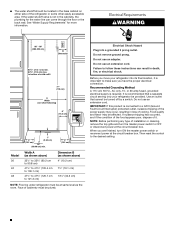
... "Overlay Series Custom Panels and Handle Kits" for your model. Opening Dimensions ■ To avoid tipping during use . Removal of the gasket will fall below 55°F (13°C). ■ Floor must support the refrigerator weight, more information. A B ¹⁄₂"...recessed in cooling efficiency. ■ If installing under a soffit. Gasket B. Compressor cover ■ A grounded 3 prong electrical outlet should permit door to enclose the refrigerator. ■ It is recommended that you are needed ) (6) ■ 2" x 4" x 32" (5 cm x 10 cm x 81 cm) wood board(s)...
... "Overlay Series Custom Panels and Handle Kits" for your model. Opening Dimensions ■ To avoid tipping during use . Removal of the gasket will fall below 55°F (13°C). ■ Floor must support the refrigerator weight, more information. A B ¹⁄₂"...recessed in cooling efficiency. ■ If installing under a soffit. Gasket B. Compressor cover ■ A grounded 3 prong electrical outlet should permit door to enclose the refrigerator. ■ It is recommended that you are needed ) (6) ■ 2" x 4" x 32" (5 cm x 10 cm x 81 cm) wood board(s)...
Installation Guide
Page 6
... 1" 6" (2.54 cm) (15.2 cm) 24" (60.96 cm) min. 6" (15.2 cm) Model 36 42 48 Width A (as shown above ) 4" (10.2 cm) 7¹⁄₂" (19.1 cm) 13¹⁄₂" (34.3 cm) NOTE: Flooring under refrigerator must be plumb. Do not remove ground prong. Do not use an extension cord... switch to follow these instructions can come through the floor or the back wall. Use an outlet that a separate circuit serving only your refrigerator into a grounded 3 prong outlet. If nuisance tripping has occurred, and if the condition of the food appears poor, dispose of it ...
... 1" 6" (2.54 cm) (15.2 cm) 24" (60.96 cm) min. 6" (15.2 cm) Model 36 42 48 Width A (as shown above ) 4" (10.2 cm) 7¹⁄₂" (19.1 cm) 13¹⁄₂" (34.3 cm) NOTE: Flooring under refrigerator must be plumb. Do not remove ground prong. Do not use an extension cord... switch to follow these instructions can come through the floor or the back wall. Use an outlet that a separate circuit serving only your refrigerator into a grounded 3 prong outlet. If nuisance tripping has occurred, and if the condition of the food appears poor, dispose of it ...

Installation Guide
Page 7
... See "Connect the Water Supply." ■ If additional tubing is blocked. NOTE: If the water shutoff valve is in the back wall behind the refrigerator, it is moved into its final location. 6" (15.2 cm) Reverse Osmosis Water Supply IMPORTANT: The pressure of the water supply coming out of a... reverse osmosis system going to the water inlet valve of the model. On the floor, the hole should be no more easily. Water Supply Requirements ■ All installations must meet local plumbing code requirements. &#...
... See "Connect the Water Supply." ■ If additional tubing is blocked. NOTE: If the water shutoff valve is in the back wall behind the refrigerator, it is moved into its final location. 6" (15.2 cm) Reverse Osmosis Water Supply IMPORTANT: The pressure of the water supply coming out of a... reverse osmosis system going to the water inlet valve of the model. On the floor, the hole should be no more easily. Water Supply Requirements ■ All installations must meet local plumbing code requirements. &#...

Installation Guide
Page 8
...48 122.8 cm) *When leveling legs are fully extended to 1¹⁄₄" (3.2 cm) below rollers, add 1¹⁄₈" (2.9 cm) to the height dimensions. Model 36 42 48 Width A 35" (88.9 cm) 41" (104.1 cm) 47" (119.4 cm) 8 Product Dimensions Side View ■ The depth from the front ...of the top grille to the back of the refrigerator cabinet is 25³⁄₈" (64.5 cm). ■ The power cord is 84" (213 cm) long. ■ Height dimensions are shown with leveling legs...
...48 122.8 cm) *When leveling legs are fully extended to 1¹⁄₄" (3.2 cm) below rollers, add 1¹⁄₈" (2.9 cm) to the height dimensions. Model 36 42 48 Width A 35" (88.9 cm) 41" (104.1 cm) 47" (119.4 cm) 8 Product Dimensions Side View ■ The depth from the front ...of the top grille to the back of the refrigerator cabinet is 25³⁄₈" (64.5 cm). ■ The power cord is 84" (213 cm) long. ■ Height dimensions are shown with leveling legs...

Installation Guide
Page 9
... Dimensions The location must permit both doors to open to a minimum of the refrigerator and a corner wall. 42" (106.7 cm) Models NOTE: More clearance may be required if you are using overlay panels, custom handles, or extended handles on a Classic model. 12⁵⁄₈" (32.1 cm) To adjust the door swing,...8328;" (36.5 cm) 44³⁄₈" (112.7 cm) 41³⁄₈" (105.1 cm) 90˚ 110˚ 130˚ 48" (121.9 cm) Models 14³⁄₈" (36.5 cm) 39" (99.1 cm) 90˚ 110˚ 130˚ 43⁷⁄₈" (111.4 cm) 90˚ 110˚...
... Dimensions The location must permit both doors to open to a minimum of the refrigerator and a corner wall. 42" (106.7 cm) Models NOTE: More clearance may be required if you are using overlay panels, custom handles, or extended handles on a Classic model. 12⁵⁄₈" (32.1 cm) To adjust the door swing,...8328;" (36.5 cm) 44³⁄₈" (112.7 cm) 41³⁄₈" (105.1 cm) 90˚ 110˚ 130˚ 48" (121.9 cm) Models 14³⁄₈" (36.5 cm) 39" (99.1 cm) 90˚ 110˚ 130˚ 43⁷⁄₈" (111.4 cm) 90˚ 110˚...
Installation Guide
Page 12
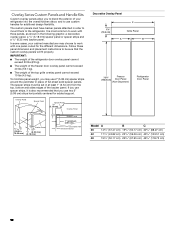
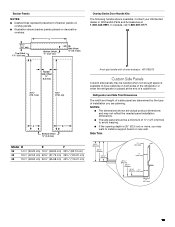
...a ¹/₈" (3.18 mm) spacer panel or spacer strips and a ¹/₄" (6.35 mm) backer panel. IMPORTANT: ■ The weight of the refrigerator door overlay panel cannot exceed 50 lbs (23 kg). ■ The weight of the freezer door overlay panel cannot exceed 40 lbs (18.1 kg). ■... Decorative Overlay Panel 7¹⁄₄" (18.4 cm) C Grille Panel A B 72¹⁄₄" (183.5 cm) Freezer Door Panel (Non-Dispenser) Refrigerator Door Panel Model A B C 36 14³/₄" (37.47 cm) 19³/₄" (50.17 cm) 34³/₄" (88.27 cm) 42 17¹/&#...
...a ¹/₈" (3.18 mm) spacer panel or spacer strips and a ¹/₄" (6.35 mm) backer panel. IMPORTANT: ■ The weight of the refrigerator door overlay panel cannot exceed 50 lbs (23 kg). ■ The weight of the freezer door overlay panel cannot exceed 40 lbs (18.1 kg). ■... Decorative Overlay Panel 7¹⁄₄" (18.4 cm) C Grille Panel A B 72¹⁄₄" (183.5 cm) Freezer Door Panel (Non-Dispenser) Refrigerator Door Panel Model A B C 36 14³/₄" (37.47 cm) 19³/₄" (50.17 cm) 34³/₄" (88.27 cm) 42 17¹/&#...
Installation Guide
Page 13
Handle- W10782873 Custom Side Panels Custom side panels may want to have cabinets on rear wall. Refrigerator and Side Trim Dimensions The width and height of a side panel are determined by the type of installation you are actual product dimensions and may ....5 cm) or more, you may be needed when not enough space is available. Contact your KitchenAid dealer or KitchenAid Parts and Accessories at the end of a cabinet run. NOTES: ■ The dimensions shown are planning. Side Trim Model D E F 36 14¹/₄" (36.20 cm) 19¹/₄" (48.90 cm) 33³...
Handle- W10782873 Custom Side Panels Custom side panels may want to have cabinets on rear wall. Refrigerator and Side Trim Dimensions The width and height of a side panel are determined by the type of installation you are actual product dimensions and may ....5 cm) or more, you may be needed when not enough space is available. Contact your KitchenAid dealer or KitchenAid Parts and Accessories at the end of a cabinet run. NOTES: ■ The dimensions shown are planning. Side Trim Model D E F 36 14¹/₄" (36.20 cm) 19¹/₄" (48.90 cm) 33³...
Installation Guide
Page 15
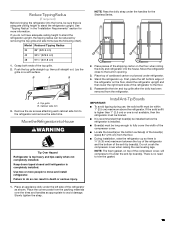
... the "Installation Requirements" section for the Stainless Series. 2. First, place the left side of the compressor cover, will compress to move and install refrigerator. There is completely installed. Model Reduced Tipping Radius 36 89" (225.9 cm) 42 90¹⁄₂" (229.9 cm) 48 91¹⁄₄" (231.8 cm) 1. Push the...
... the "Installation Requirements" section for the Stainless Series. 2. First, place the left side of the compressor cover, will compress to move and install refrigerator. There is completely installed. Model Reduced Tipping Radius 36 89" (225.9 cm) 42 90¹⁄₂" (229.9 cm) 48 91¹⁄₄" (231.8 cm) 1. Push the...
Installation Guide
Page 17
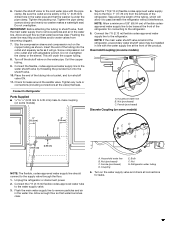
...water supply valve. 3. Slip the compression sleeve and compression nut on some models) 4. Flush the main water supply line to the supply valve through the floor. 1. Ferrule (purchased) D. Refrigerator water tubing 6. 6. Tighten the pipe clamp screws slowly and evenly so ...washer makes a watertight seal. Check for leaks. 17 Ferrule (purchased) Discrete Coupling (on some models) 6" (15.2 cm) 6" (15.2 cm) 7" (17.78 cm) ...
...water supply valve. 3. Slip the compression sleeve and compression nut on some models) 4. Flush the main water supply line to the supply valve through the floor. 1. Ferrule (purchased) D. Refrigerator water tubing 6. 6. Tighten the pipe clamp screws slowly and evenly so ...washer makes a watertight seal. Check for leaks. 17 Ferrule (purchased) Discrete Coupling (on some models) 6" (15.2 cm) 6" (15.2 cm) 7" (17.78 cm) ...
Installation Guide
Page 19
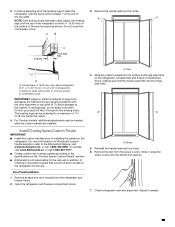
...8324;" (6 mm) max. Door Panel Installation 1. Check refrigerator level and alignment. D A. above refrigerator B. 2" x 4" x 32" (5 cm x 10 cm x 81 cm) boards (2) C. Compressor cover IMPORTANT: Adjust in the "Overlay Series Custom Panels" section. ■ KitchenAid is not responsible for service. To avoid damage to the... cabinet or leveling legs, do not apply more information on the refrigerator. For Overlay models, additional adjustments may be extended to keep...
...8324;" (6 mm) max. Door Panel Installation 1. Check refrigerator level and alignment. D A. above refrigerator B. 2" x 4" x 32" (5 cm x 10 cm x 81 cm) boards (2) C. Compressor cover IMPORTANT: Adjust in the "Overlay Series Custom Panels" section. ■ KitchenAid is not responsible for service. To avoid damage to the... cabinet or leveling legs, do not apply more information on the refrigerator. For Overlay models, additional adjustments may be extended to keep...


