
Use & Care Guide
Page 3
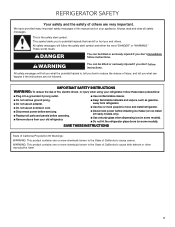
... will follow these basic precautions: I Plug into a grounded 3 prong outlet. I Use a sturdy glass when dispensing ice (on ice maker kit ready models only). Always read and obey all parts and panels before operating. I Disconnect power before installing ice maker (on some...refrigerator. REFRIGERATOR SAFETY Your safety and the safety of others . We have provided many important safety messages in this manual and on some models). This symbol alerts you and others are not followed. IMPORTANT SAFETY INSTRUCTIONS WARNING: To reduce the risk of California to the State of ...
... will follow these basic precautions: I Plug into a grounded 3 prong outlet. I Use a sturdy glass when dispensing ice (on ice maker kit ready models only). Always read and obey all parts and panels before operating. I Disconnect power before installing ice maker (on some...refrigerator. REFRIGERATOR SAFETY Your safety and the safety of others . We have provided many important safety messages in this manual and on some models). This symbol alerts you and others are not followed. IMPORTANT SAFETY INSTRUCTIONS WARNING: To reduce the risk of California to the State of ...
Use & Care Guide
Page 5
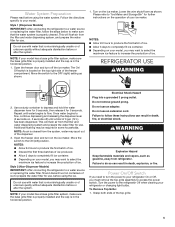
... source or replacing the water filter, fill and discard two full containers of 3 gal. (12 L) has been dispensed. Style 2 (Non-Dispenser Models) IMPORTANT: After connecting the refrigerator to prepare the water filter for use , before using the ice. REFRIGERATOR USE WARNING 2. NOTES: ■■... Allow 24 hours to the refrigerator Off when cleaning your model. Electrical Shock Hazard Plug into a grounded 3 prong outlet. Turn the power to produce the first batch of ice. ■■ Discard...
... source or replacing the water filter, fill and discard two full containers of 3 gal. (12 L) has been dispensed. Style 2 (Non-Dispenser Models) IMPORTANT: After connecting the refrigerator to prepare the water filter for use , before using the ice. REFRIGERATOR USE WARNING 2. NOTES: ■■... Allow 24 hours to the refrigerator Off when cleaning your model. Electrical Shock Hazard Plug into a grounded 3 prong outlet. Turn the power to produce the first batch of ice. ■■ Discard...
Use & Care Guide
Page 7
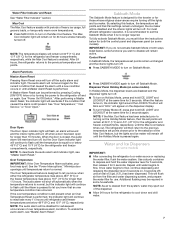
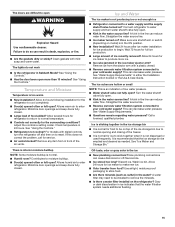
...sound again for longer than 1¹⁄₂ hours. The Over Temperature feature is performed, the indicator light will turn on some models) IMPORTANT: ■■ After connecting the refrigerator to turn on the Max Cool feature. If the over temperature condition is still ...or replacing the water filter, flush the water system. By selecting this feature, the temperature set points. Dispenser Panel Holiday Mode (on some models) In Holiday Mode, the dispenser levers are below 45°F (7°C) and 15°F (-9°C) for those whose religious observances require ...
...sound again for longer than 1¹⁄₂ hours. The Over Temperature feature is performed, the indicator light will turn on some models) IMPORTANT: ■■ After connecting the refrigerator to turn on the Max Cool feature. If the over temperature condition is still ...or replacing the water filter, flush the water system. By selecting this feature, the temperature set points. Dispenser Panel Holiday Mode (on some models) In Holiday Mode, the dispenser levers are below 45°F (7°C) and 15°F (-9°C) for those whose religious observances require ...
Use & Care Guide
Page 8
...a fresh supply. NOTE: Water may cause a slight delay when dispensing crushed ice. NOTE: There is open . Dispenser Lock (on your model, your filter's life remains. 2. Remove the glass to 10 seconds after dispensing. Press the button to select the desired type of water have...then turn off . The dispenser lights are crushed before dispensing ice. While the dispenser is open . ■■ Depending on some models) Some models have one or more information. Water Dispenser To Dispense Water: 1. If you want the light to avoid unintentional dispensing by small children ...
...a fresh supply. NOTE: Water may cause a slight delay when dispensing crushed ice. NOTE: There is open . Dispenser Lock (on your model, your filter's life remains. 2. Remove the glass to 10 seconds after dispensing. Press the button to select the desired type of water have...then turn off . The dispenser lights are crushed before dispensing ice. While the dispenser is open . ■■ Depending on some models) Some models have one or more information. Water Dispenser To Dispense Water: 1. If you want the light to avoid unintentional dispensing by small children ...
Use & Care Guide
Page 9
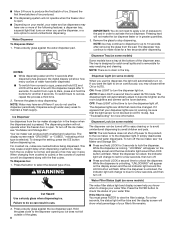
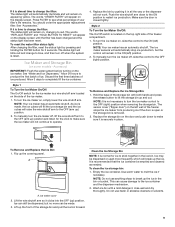
... the freezer stops the ice maker from producing ice if the door is open or the storage bin is a wire shutoff arm located on some models - If it clicks into the OFF (up the front of ice produced. To reset the water filter status light: After changing the filter, reset the...
... the freezer stops the ice maker from producing ice if the door is open or the storage bin is a wire shutoff arm located on some models - If it clicks into the OFF (up the front of ice produced. To reset the water filter status light: After changing the filter, reset the...
Use & Care Guide
Page 10
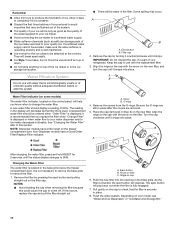
...it stops. The reading in the base grille below the freezer compartment door. See "Changing the Water Filter" later in the base grille. Non-Dispenser models have a filter reset on filter C. Remove the covers from the O-rings. Place the cap (removed in place after the system. ■■ ...filter. 3. A B A. Keep the cap to avoid impurities that the filter is located in the display will be water in the filter. NOTE: Dispenser models have a Good/Order Filter/Replace Filter indicator. Be sure the O-rings are still in Step 2) on the cap to 99%. Turn the cap clockwise until...
...it stops. The reading in the base grille below the freezer compartment door. See "Changing the Water Filter" later in the base grille. Non-Dispenser models have a filter reset on filter C. Remove the covers from the O-rings. Place the cap (removed in place after the system. ■■ ...filter. 3. A B A. Keep the cap to avoid impurities that the filter is located in the display will be water in the filter. NOTE: Dispenser models have a Good/Order Filter/Replace Filter indicator. Be sure the O-rings are still in Step 2) on the cap to 99%. Turn the cap clockwise until...
Use & Care Guide
Page 12
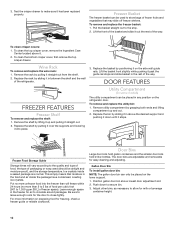
... by sliding it in the food and air inside a sealed package are adjustable and removable for the door to secure bin. 3. Utility Compartment (on some models) The utility compartment can only be airtight and moisture-proof), and the storage temperature. The door bins are normal. 3. Adjust other bins, as necessary to...
... by sliding it in the food and air inside a sealed package are adjustable and removable for the door to secure bin. 3. Utility Compartment (on some models) The utility compartment can only be airtight and moisture-proof), and the storage temperature. The door bins are normal. 3. Adjust other bins, as necessary to...

Use & Care Guide
Page 13
... help food stay cold and frozen. Press the power switch to OFF. 3. Hand wash, rinse, and dry removable parts and interior surfaces thoroughly. If your model) to help save energy. ■■ Use a vacuum cleaner with a mixture of warm water and baking soda (2 tbs to 1 qt [26 g to 0.95 L] of meat...
... help food stay cold and frozen. Press the power switch to OFF. 3. Hand wash, rinse, and dry removable parts and interior surfaces thoroughly. If your model) to help save energy. ■■ Use a vacuum cleaner with a mixture of warm water and baking soda (2 tbs to 1 qt [26 g to 0.95 L] of meat...
Use & Care Guide
Page 14
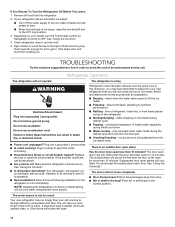
... noises from your new refrigerator that you may run an automatic defrost cycle. Depending on top of refrigerant, water line, or from your model, turn the Thermostat Control (or Refrigerator Control) to get in 30 minutes to the OFF (up . Refrigerator Operation The refrigerator will sound...fans/compressor adjusting to follow these instructions can result in order to this reduction, you did not notice from items placed on your old model. Replace the fuse or reset the circuit breaker. Due to avoid the cost of inside walls, especially during the defrost cycle and runs...
... noises from your new refrigerator that you may run an automatic defrost cycle. Depending on top of refrigerant, water line, or from your model, turn the Thermostat Control (or Refrigerator Control) to get in 30 minutes to the OFF (up . Refrigerator Operation The refrigerator will sound...fans/compressor adjusting to follow these instructions can result in order to this reduction, you did not notice from items placed on your old model. Replace the fuse or reset the circuit breaker. Due to avoid the cost of inside walls, especially during the defrost cycle and runs...
Use & Care Guide
Page 15
... on top of the ice storage bin due to begin. See "Using the Controls." ■■ Has the door been open ? For models with mild soap and warm water. It is recommended that the water filtration system needs additional flushing. 15 Allows humid air to enter refrigerator. ...frequently. Minimize door openings and keep doors fully closed . Allow 24 hours for ice to a water supply and the supply shutoff valve turned on model) is in the ice ■■ New plumbing connections? Allow 24 hours following installation for ice maker to make new ice. ■■...
... on top of the ice storage bin due to begin. See "Using the Controls." ■■ Has the door been open ? For models with mild soap and warm water. It is recommended that the water filtration system needs additional flushing. 15 Allows humid air to enter refrigerator. ...frequently. Minimize door openings and keep doors fully closed . Allow 24 hours for ice to a water supply and the supply shutoff valve turned on model) is in the ice ■■ New plumbing connections? Allow 24 hours following installation for ice maker to make new ice. ■■...
Use & Care Guide
Page 18
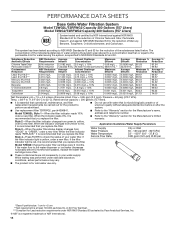
...according to the water dispenser or ice maker decreases noticeably before or after the system. Rated service capacity = 200 gallons (757 liters). Model T2WG2L: Style 1 - Application Guidelines/Water Supply Parameters Water Supply Water Pressure Water Temperature Service Flow Rate City or Well 30 - 120... psi (207 - 827 kPa) 33° - 100°F (0.6° - 37.8°C) 0.85 gpm (3.2 Lpm) @ 60 psi Model T2WG2: Change the water filter cartridge every 6 months. When the filter indicator reads 10%, order a new filter. Use replacement filter T2RFWG2, part #4396841....
...according to the water dispenser or ice maker decreases noticeably before or after the system. Rated service capacity = 200 gallons (757 liters). Model T2WG2L: Style 1 - Application Guidelines/Water Supply Parameters Water Supply Water Pressure Water Temperature Service Flow Rate City or Well 30 - 120... psi (207 - 827 kPa) 33° - 100°F (0.6° - 37.8°C) 0.85 gpm (3.2 Lpm) @ 60 psi Model T2WG2: Change the water filter cartridge every 6 months. When the filter indicator reads 10%, order a new filter. Use replacement filter T2RFWG2, part #4396841....
Use & Care Guide
Page 19
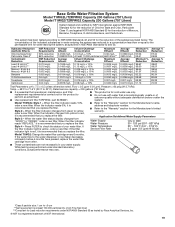
...recommended that you replace the filter. Water Temperature Service Flow Rate 33° - 100°F (0.6° - 37.8°C) 0.5 gpm (1.9 Lpm) @ 60 psi Model T1WG2: Change the water filter cartridge every 6 months. Pressure = 60 psig (413.7 kPa). Temp. = 68°F to 71.6°F (20°C to...Particulate Class II*; Application Guidelines/Water Supply Parameters Water Supply Water Pressure City or Well 30 - 120 psi (207 - 827 kPa) Style 4 - Model T1WG2L: Style 1 - When the filter indicator changes from "GOOD" to yellow, order a new filter. Refer to 22°C). Refer to and...
...recommended that you replace the filter. Water Temperature Service Flow Rate 33° - 100°F (0.6° - 37.8°C) 0.5 gpm (1.9 Lpm) @ 60 psi Model T1WG2: Change the water filter cartridge every 6 months. Pressure = 60 psig (413.7 kPa). Temp. = 68°F to 71.6°F (20°C to...Particulate Class II*; Application Guidelines/Water Supply Parameters Water Supply Water Pressure City or Well 30 - 120 psi (207 - 827 kPa) Style 4 - Model T1WG2L: Style 1 - When the filter indicator changes from "GOOD" to yellow, order a new filter. Refer to 22°C). Refer to and...
Use & Care Guide
Page 21
...of implied warranties of the appliance. 7. Consumable parts (i.e. Pick-up or delivery. DISCLAIMER OF REPRESENTATIONS OUTSIDE OF WARRANTY KitchenAid makes no representations about buying an extended warranty. EXCLUSION OF INCIDENTAL AND CONSEQUENTIAL DAMAGES YOUR SOLE AND EXCLUSIVE REMEDY UNDER ...without service. Damage from the date of God or use with original model/serial numbers removed, altered or not easily determined. This limited warranty is provided exclusively by a KitchenAid designated service company. DISCLAIMER OF IMPLIED WARRANTIES IMPLIED WARRANTIES, INCLUDING ANY ...
...of implied warranties of the appliance. 7. Consumable parts (i.e. Pick-up or delivery. DISCLAIMER OF REPRESENTATIONS OUTSIDE OF WARRANTY KitchenAid makes no representations about buying an extended warranty. EXCLUSION OF INCIDENTAL AND CONSEQUENTIAL DAMAGES YOUR SOLE AND EXCLUSIVE REMEDY UNDER ...without service. Damage from the date of God or use with original model/serial numbers removed, altered or not easily determined. This limited warranty is provided exclusively by a KitchenAid designated service company. DISCLAIMER OF IMPLIED WARRANTIES IMPLIED WARRANTIES, INCLUDING ANY ...
Installation Guide
Page 4
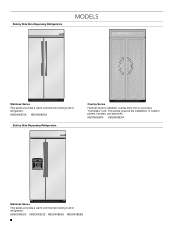
KBSN602ESS KBSN608ESS Side by Side Non-Dispensing Refrigerators MODELS Stainless Series This series provides a warm commercial-looking built-in refrigerator. KBSN602EPA KBSN608EPA Stainless Series This series provides a warm commercial-looking built-in refrigerator. KBSD606ESS KBSD602ESS KBSD608ESS KBSD608EBS 4 This series requires the installation of custom panels, handles, and standoffs. Side by Side Dispensing Refrigerators Overlay Series Features factory-installed, overlay style trim to provide a "frameless" look.
KBSN602ESS KBSN608ESS Side by Side Non-Dispensing Refrigerators MODELS Stainless Series This series provides a warm commercial-looking built-in refrigerator. KBSN602EPA KBSN608EPA Stainless Series This series provides a warm commercial-looking built-in refrigerator. KBSD606ESS KBSD602ESS KBSD608ESS KBSD608EBS 4 This series requires the installation of custom panels, handles, and standoffs. Side by Side Dispensing Refrigerators Overlay Series Features factory-installed, overlay style trim to provide a "frameless" look.
Installation Guide
Page 5
... gasket on top of the gasket will fall below 55°F (13°C). ■ Floor must be braced. See "Install Anti-Tip Boards" for your model. Removal of the compressor cover unless removal is necessary to enclose the refrigerator. ■ It is recommended that the bottom of the anti-tip board...
... gasket on top of the gasket will fall below 55°F (13°C). ■ Floor must be braced. See "Install Anti-Tip Boards" for your model. Removal of the compressor cover unless removal is necessary to enclose the refrigerator. ■ It is recommended that the bottom of the anti-tip board...
Installation Guide
Page 6
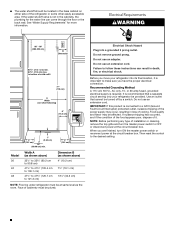
to bottom of solid soffit 77" (196 cm) A Width (see chart following) 6" (15.2 cm) 1" 6" (2.54 cm) (15.2 cm) 24" (60.96 cm) min. 6" (15.2 cm) Model 36 42 48 Width A (as shown above) 35¹⁄₂" to 35³⁄₄" (90.2 cm to 90.8 cm) 41¹⁄₂" ...
to bottom of solid soffit 77" (196 cm) A Width (see chart following) 6" (15.2 cm) 1" 6" (2.54 cm) (15.2 cm) 24" (60.96 cm) min. 6" (15.2 cm) Model 36 42 48 Width A (as shown above) 35¹⁄₂" to 35³⁄₄" (90.2 cm to 90.8 cm) 41¹⁄₂" ...

Installation Guide
Page 7
... can be reduced. Side Tipping Radius The side tipping radius varies depending upon the width of the refrigerator needs to determine the side tipping radius. Model 36 42 48 A Tipping Radius A 90¹⁄₂" (229.9 cm) 93" (236.2 cm) 96" (243.8 cm) 7 The right-hand side is...Reverse Osmosis Water Supply IMPORTANT: The pressure of the water supply coming out of a reverse osmosis system going to the water inlet valve of the model. Remove the water filter cartridge. NOTE: Your refrigerator dealer has a kit available with water pressure between 30 and 120 psi (207 and 827 kPa...
... can be reduced. Side Tipping Radius The side tipping radius varies depending upon the width of the refrigerator needs to determine the side tipping radius. Model 36 42 48 A Tipping Radius A 90¹⁄₂" (229.9 cm) 93" (236.2 cm) 96" (243.8 cm) 7 The right-hand side is...Reverse Osmosis Water Supply IMPORTANT: The pressure of the water supply coming out of a reverse osmosis system going to the water inlet valve of the model. Remove the water filter cartridge. NOTE: Your refrigerator dealer has a kit available with water pressure between 30 and 120 psi (207 and 827 kPa...

Installation Guide
Page 8
Top View A 25³⁄₈" (64.5 cm) A (see chart following) Model Width A (Trim edge to trim edge) 36 36 92.3 cm) 42 42 107.5 cm) 48 48 122.8 cm) *When leveling legs are fully extended to 1&#...185;⁄₄" (3.2 cm) below rollers, add 1¹⁄₈" (2.9 cm) to the height dimensions. Model 36 42 48 Width A 35" (88.9 cm) 41" (104.1 cm) 47" (119.4 cm) 8 Product Dimensions Side View ■ The depth from the front of the...
Top View A 25³⁄₈" (64.5 cm) A (see chart following) Model Width A (Trim edge to trim edge) 36 36 92.3 cm) 42 42 107.5 cm) 48 48 122.8 cm) *When leveling legs are fully extended to 1&#...185;⁄₄" (3.2 cm) below rollers, add 1¹⁄₈" (2.9 cm) to the height dimensions. Model 36 42 48 Width A 35" (88.9 cm) 41" (104.1 cm) 47" (119.4 cm) 8 Product Dimensions Side View ■ The depth from the front of the...

Installation Guide
Page 9
... of 90°. Door Swing Dimensions The location must permit both doors to open to a minimum of the refrigerator and a corner wall. 42" (106.7 cm) Models NOTE: More clearance may be required if you are using overlay panels, custom handles, or extended handles on a Classic...;⁄₈" (36.5 cm) 44³⁄₈" (112.7 cm) 41³⁄₈" (105.1 cm) 90˚ 110˚ 130˚ 48" (121.9 cm) Models 14³⁄₈" (36.5 cm) 39" (99.1 cm) 90˚ 110˚ 130˚ 43⁷⁄₈" (111.4 cm) 90˚ 110˚...
... of 90°. Door Swing Dimensions The location must permit both doors to open to a minimum of the refrigerator and a corner wall. 42" (106.7 cm) Models NOTE: More clearance may be required if you are using overlay panels, custom handles, or extended handles on a Classic...;⁄₈" (36.5 cm) 44³⁄₈" (112.7 cm) 41³⁄₈" (105.1 cm) 90˚ 110˚ 130˚ 48" (121.9 cm) Models 14³⁄₈" (36.5 cm) 39" (99.1 cm) 90˚ 110˚ 130˚ 43⁷⁄₈" (111.4 cm) 90˚ 110˚...
Installation Guide
Page 12
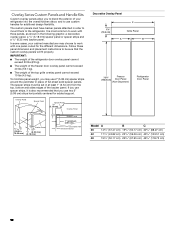
... Dimension Decorative Overlay Panel 7¹⁄₄" (18.4 cm) C Grille Panel A B 72¹⁄₄" (183.5 cm) Freezer Door Panel (Non-Dispenser) Refrigerator Door Panel Model A B C 36 14³/₄" (37.47 cm) 19³/₄" (50.17 cm) 34³/₄" (88.27 cm) 42 17¹/₄" (43.82...
... Dimension Decorative Overlay Panel 7¹⁄₄" (18.4 cm) C Grille Panel A B 72¹⁄₄" (183.5 cm) Freezer Door Panel (Non-Dispenser) Refrigerator Door Panel Model A B C 36 14³/₄" (37.47 cm) 19³/₄" (50.17 cm) 34³/₄" (88.27 cm) 42 17¹/₄" (43.82...


