Use & Care Guide
Page 6
...point range for normal household usage. This is reached. 2. Lay the grille on the refrigerator before the refrigerator has cooled completely, your food may differ from the display when a door is below 48°F (9°C) and 15°F (-9°C), respectively, or until the desired temperature ...is normal. B A B Turning Refrigerator On and Viewing Set Points ■■ Press the Cooling (ON/OFF)...
...point range for normal household usage. This is reached. 2. Lay the grille on the refrigerator before the refrigerator has cooled completely, your food may differ from the display when a door is below 48°F (9°C) and 15°F (-9°C), respectively, or until the desired temperature ...is normal. B A B Turning Refrigerator On and Viewing Set Points ■■ Press the Cooling (ON/OFF)...
Use & Care Guide
Page 7
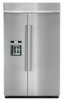
...of over temperature condition is still present when an Over Temperature Reset is no longer required. For most efficient refrigerator operation, it for both ways listed below 48°F (9°C) and 15°F (-9°C), respectively. NOTE: If the Max Cool feature has been ...cool down and chill water. 7 If the over temperature alarm condition. To fully activate Sabbath Mode, you know when either the refrigerator temperature rises above 48°F (9°C) or the freezer temperature rises above 15°F (-9°C) for 3 seconds again. Use a sturdy container to ...
...of over temperature condition is still present when an Over Temperature Reset is no longer required. For most efficient refrigerator operation, it for both ways listed below 48°F (9°C) and 15°F (-9°C), respectively. NOTE: If the Max Cool feature has been ...cool down and chill water. 7 If the over temperature alarm condition. To fully activate Sabbath Mode, you know when either the refrigerator temperature rises above 48°F (9°C) or the freezer temperature rises above 15°F (-9°C) for 3 seconds again. Use a sturdy container to ...
Installation Guide
Page 6
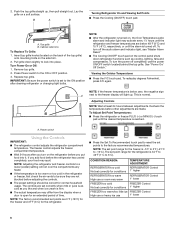
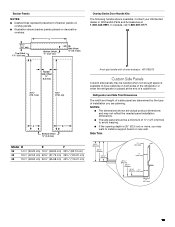
...cm) 1" 6" (2.54 cm) (15.2 cm) 24" (60.96 cm) min. 6" (15.2 cm) Model 36 42 48 Width A (as shown above ) 4" (10.2 cm) 7¹⁄₂" (19.1 cm) 13¹⁄₂" (34.3 cm) NOTE: Flooring under refrigerator must be affected. If the water shutoff valve is required. Before you move your...has occurred, and if the condition of the food appears poor, dispose of the power supply may be plumb. to bottom of the refrigerator or some other easily accessible area. When you have the proper electrical connection. Do not use an extension cord. Electrical Shock Hazard Plug...
...cm) 1" 6" (2.54 cm) (15.2 cm) 24" (60.96 cm) min. 6" (15.2 cm) Model 36 42 48 Width A (as shown above ) 4" (10.2 cm) 7¹⁄₂" (19.1 cm) 13¹⁄₂" (34.3 cm) NOTE: Flooring under refrigerator must be affected. If the water shutoff valve is required. Before you move your...has occurred, and if the condition of the food appears poor, dispose of the power supply may be plumb. to bottom of the refrigerator or some other easily accessible area. When you have the proper electrical connection. Do not use an extension cord. Electrical Shock Hazard Plug...

Installation Guide
Page 7
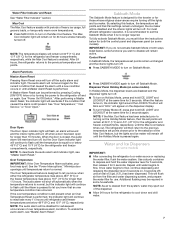
...pressure of the water supply coming out of a reverse osmosis system going to the water inlet valve of the refrigerator needs to determine the side tipping radius. NOTE: Your refrigerator dealer has a kit available with your cold water supply, the water pressure to the reverse osmosis system needs ...." Use the chart provided to be at least 6" (15.2 cm) from the back wall. NOTE: Tip on either side of the refrigerator or some other easily accessible area. Model 36 42 48 A Tipping Radius A 90¹⁄₂" (229.9 cm) 93" (236.2 cm) 96" (243.8 cm) 7 Water Supply Requirements...
...pressure of the water supply coming out of a reverse osmosis system going to the water inlet valve of the refrigerator needs to determine the side tipping radius. NOTE: Your refrigerator dealer has a kit available with your cold water supply, the water pressure to the reverse osmosis system needs ...." Use the chart provided to be at least 6" (15.2 cm) from the back wall. NOTE: Tip on either side of the refrigerator or some other easily accessible area. Model 36 42 48 A Tipping Radius A 90¹⁄₂" (229.9 cm) 93" (236.2 cm) 96" (243.8 cm) 7 Water Supply Requirements...

Installation Guide
Page 8
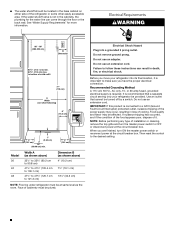
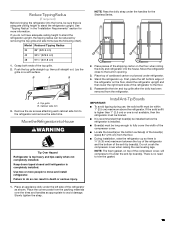
...25³⁄₈" (64.5 cm) A (see chart following) Model Width A (Trim edge to trim edge) 36 36 92.3 cm) 42 42 107.5 cm) 48 48 122.8 cm) *When leveling legs are fully extended to 1¹⁄₄" (3.2 cm) below rollers, add 1¹⁄₈" (2.9 cm) to the height dimensions. Model..." (104.1 cm) 47" (119.4 cm) 8 Product Dimensions Side View ■ The depth from the front of the top grille to the back of the refrigerator cabinet is 25³⁄₈" (64.5 cm). ■ The power cord is 84" (213 cm) long. ■ Height dimensions are shown with leveling ...
...25³⁄₈" (64.5 cm) A (see chart following) Model Width A (Trim edge to trim edge) 36 36 92.3 cm) 42 42 107.5 cm) 48 48 122.8 cm) *When leveling legs are fully extended to 1¹⁄₄" (3.2 cm) below rollers, add 1¹⁄₈" (2.9 cm) to the height dimensions. Model..." (104.1 cm) 47" (119.4 cm) 8 Product Dimensions Side View ■ The depth from the front of the top grille to the back of the refrigerator cabinet is 25³⁄₈" (64.5 cm). ■ The power cord is 84" (213 cm) long. ■ Height dimensions are shown with leveling ...

Installation Guide
Page 9
... 5" (12.7 cm) minimum space between the side of 90°. Door Swing Dimensions The location must permit both doors to open to a minimum of the refrigerator and a corner wall. 42" (106.7 cm) Models NOTE: More clearance may be required if you are using overlay panels, custom handles, or extended handles on....1 cm) 14³⁄₈" (36.5 cm) 44³⁄₈" (112.7 cm) 41³⁄₈" (105.1 cm) 90˚ 110˚ 130˚ 48" (121.9 cm) Models 14³⁄₈" (36.5 cm) 39" (99.1 cm) 90˚ 110˚ 130˚ 43⁷⁄₈" (111.4 cm) 90...
... 5" (12.7 cm) minimum space between the side of 90°. Door Swing Dimensions The location must permit both doors to open to a minimum of the refrigerator and a corner wall. 42" (106.7 cm) Models NOTE: More clearance may be required if you are using overlay panels, custom handles, or extended handles on....1 cm) 14³⁄₈" (36.5 cm) 44³⁄₈" (112.7 cm) 41³⁄₈" (105.1 cm) 90˚ 110˚ 130˚ 48" (121.9 cm) Models 14³⁄₈" (36.5 cm) 39" (99.1 cm) 90˚ 110˚ 130˚ 43⁷⁄₈" (111.4 cm) 90...
Installation Guide
Page 12
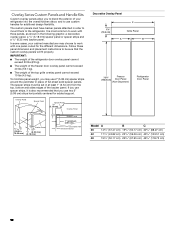
...: a decorative overlay panel, a ¹/₈" (3.18 mm) spacer panel or spacer strips and a ¹/₄" (6.35 mm) backer panel. IMPORTANT: ■ The weight of the refrigerator door overlay panel cannot exceed 50 lbs (23 kg). ■ The weight of the freezer door overlay panel cannot exceed 40 lbs (18.1 kg). ■...) 34³/₄" (88.27 cm) 42 17¹/₄" (43.82 cm) 23¹/₄" (59.06 cm) 40³/₄" (103.51 cm) 48 19³/₄" (50.17 cm) 26³/₄" (67.95 cm) 46³/₄" (118.75 cm) 12 It is also recommended that the...
...: a decorative overlay panel, a ¹/₈" (3.18 mm) spacer panel or spacer strips and a ¹/₄" (6.35 mm) backer panel. IMPORTANT: ■ The weight of the refrigerator door overlay panel cannot exceed 50 lbs (23 kg). ■ The weight of the freezer door overlay panel cannot exceed 40 lbs (18.1 kg). ■...) 34³/₄" (88.27 cm) 42 17¹/₄" (43.82 cm) 23¹/₄" (59.06 cm) 40³/₄" (103.51 cm) 48 19³/₄" (50.17 cm) 26³/₄" (67.95 cm) 46³/₄" (118.75 cm) 12 It is also recommended that the...
Installation Guide
Page 13
...8322;" (1.27 cm) Side Offset ¹⁄₂" (12.7 mm) Overlay Series Door Handle Kits The following handle style is available. Handle- Refrigerator and Side Trim Dimensions The width and height of a side panel are determined by the type of backer panels on overlay panels. ■ Illustration shows...¹/₄" (48.90 cm) 26¹/₄" (66.68 cm) 45³/₄" (116.21 cm) 11/16" (18.0 mm) 1/2" (12.2 mm) 9/16" (13.9 mm) 5/8" (15.7 mm) 13 In Canada, call 1-800-807-6777. Contact your KitchenAid dealer or KitchenAid Parts and Accessories at the end of ½" (1.27...
...8322;" (1.27 cm) Side Offset ¹⁄₂" (12.7 mm) Overlay Series Door Handle Kits The following handle style is available. Handle- Refrigerator and Side Trim Dimensions The width and height of a side panel are determined by the type of backer panels on overlay panels. ■ Illustration shows...¹/₄" (48.90 cm) 26¹/₄" (66.68 cm) 45³/₄" (116.21 cm) 11/16" (18.0 mm) 1/2" (12.2 mm) 9/16" (13.9 mm) 5/8" (15.7 mm) 13 In Canada, call 1-800-807-6777. Contact your KitchenAid dealer or KitchenAid Parts and Accessories at the end of ½" (1.27...
Installation Guide
Page 15
... following chart). If you do so can be sure there is adequate ceiling height to stand the refrigerator upright. Model Reduced Tipping Radius 36 89" (225.9 cm) 42 90¹⁄₂" (229.9 cm) 48 91¹⁄₄" (231.8 cm) 1. then pull straight out. Lay the grille on top ...of the top grille. 2. Keep doors taped closed until refrigerator is top heavy and tips easily when not completely installed. Place pieces of...
... following chart). If you do so can be sure there is adequate ceiling height to stand the refrigerator upright. Model Reduced Tipping Radius 36 89" (225.9 cm) 42 90¹⁄₂" (229.9 cm) 48 91¹⁄₄" (231.8 cm) 1. then pull straight out. Lay the grille on top ...of the top grille. 2. Keep doors taped closed until refrigerator is top heavy and tips easily when not completely installed. Place pieces of...


