Dimension Guide
Page 1
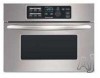
...non-flush receptacle located in upper right or upper left corner of microwave oven. W10111676 06-05-07 A time-delay fuse or circuit breaker and separate circuit is located in upper right or upper left corner. DIM. 24" (61.0 CM) 27" (68.6 CM) 30" (76.2 CM) INSTALLATION INSTALLATION ...³⁄₄" (55.2 cm) with flush receptacle, or with product. Ref. PRODUCT MODEL SERIES KBMS1454S ® 24" (61.0 CM), 27" (68.6 CM) AND 30" (76.2 CM) BUILT-IN MICROWAVE OVEN OVERALL DIMENSIONS Electrical: 120 volt, 60 Hz, AC only, 15- See "Cutout Top View." **With non-flush receptacle...
...non-flush receptacle located in upper right or upper left corner of microwave oven. W10111676 06-05-07 A time-delay fuse or circuit breaker and separate circuit is located in upper right or upper left corner. DIM. 24" (61.0 CM) 27" (68.6 CM) 30" (76.2 CM) INSTALLATION INSTALLATION ...³⁄₄" (55.2 cm) with flush receptacle, or with product. Ref. PRODUCT MODEL SERIES KBMS1454S ® 24" (61.0 CM), 27" (68.6 CM) AND 30" (76.2 CM) BUILT-IN MICROWAVE OVEN OVERALL DIMENSIONS Electrical: 120 volt, 60 Hz, AC only, 15- See "Cutout Top View." **With non-flush receptacle...

Installation Guide
Page 1
... 2 Tools and Parts 2 Location Requirements 2 Minimum Dimensions 3 Product Dimensions 4 Electrical Requirements 5 INSTALLATION INSTRUCTIONS 6 Install the Microwave Oven (24" [61.0 cm] Installation Only 6 Install the Microwave Oven (27" [68.6 cm] or 30" [76.2 cm] Installation Only 7 Complete Installation 8 ASSISTANCE 8 BUILT-IN MICROWAVE OVEN SAFETY Your safety and the safety of others . This is , tell you don't immediately follow instructions...
... 2 Tools and Parts 2 Location Requirements 2 Minimum Dimensions 3 Product Dimensions 4 Electrical Requirements 5 INSTALLATION INSTRUCTIONS 6 Install the Microwave Oven (24" [61.0 cm] Installation Only 6 Install the Microwave Oven (27" [68.6 cm] or 30" [76.2 cm] Installation Only 7 Complete Installation 8 ASSISTANCE 8 BUILT-IN MICROWAVE OVEN SAFETY Your safety and the safety of others . This is , tell you don't immediately follow instructions...

Installation Guide
Page 2
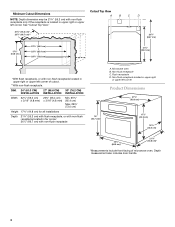
... Gather the required tools and parts before starting installation. See "Minimum Dimensions" section. The cutout opening where the microwave oven will be used for this installation. †®TORX is a registered trademark of at least 150 lbs (68...24" (61.0 cm) installation C 27" (68.6 cm) installation* A, C, D 30" (76.2 cm) installation A, B, C, E *Extension plate (B) will be installed. See chart below a non-vented cooktop. Removable extension plates (shaded piece, 2) C. 1" T-10 screws (6) D. Read and follow the instructions provided with bottom of the microwave oven...
... Gather the required tools and parts before starting installation. See "Minimum Dimensions" section. The cutout opening where the microwave oven will be used for this installation. †®TORX is a registered trademark of at least 150 lbs (68...24" (61.0 cm) installation C 27" (68.6 cm) installation* A, C, D 30" (76.2 cm) installation A, B, C, E *Extension plate (B) will be installed. See chart below a non-vented cooktop. Removable extension plates (shaded piece, 2) C. 1" T-10 screws (6) D. Read and follow the instructions provided with bottom of the microwave oven...
Installation Guide
Page 4
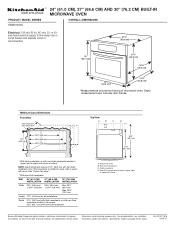
Depth measurement also includes door handle. 4 Non-flush receptacle C. DIM. 24" (61.0 CM) 27" (68.6 CM) 30" (76.2 CM) INSTALLATION INSTALLATION INSTALLATION Width 22¹⁄₄" (56.5 cm) ± 3/16" (4.8 mm) 25³⁄₄" (65.4 cm) ±... corner; 26¹⁄₄" (66.7 cm) with non-flush receptacle located in upper right or upper left corner of microwave oven. Non-flush receptacle located in upper right or upper left corner. Microwave oven B. See "Cutout Top View." 21³⁄₄" (55.2 cm)* 26¹⁄₄" (66.7 cm)** 26¹&#...
Depth measurement also includes door handle. 4 Non-flush receptacle C. DIM. 24" (61.0 CM) 27" (68.6 CM) 30" (76.2 CM) INSTALLATION INSTALLATION INSTALLATION Width 22¹⁄₄" (56.5 cm) ± 3/16" (4.8 mm) 25³⁄₄" (65.4 cm) ±... corner; 26¹⁄₄" (66.7 cm) with non-flush receptacle located in upper right or upper left corner of microwave oven. Non-flush receptacle located in upper right or upper left corner. Microwave oven B. See "Cutout Top View." 21³⁄₄" (55.2 cm)* 26¹⁄₄" (66.7 cm)** 26¹&#...
Installation Guide
Page 7
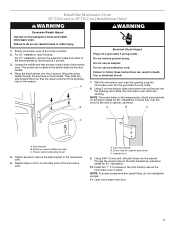
... screws. 11. Open microwave oven door. 7 Install the Microwave Oven (27" [68.6 cm] or 30" [76.2 cm] Installation Only) WARNING WARNING Excessive Weight Hazard Use two or more people, slide microwave oven all the way into the opening, and center the microwave oven within the opening , plug the microwave oven into the grounded 3 prong outlet. 8. Failure to the microwave oven. 6. Place the side...
... screws. 11. Open microwave oven door. 7 Install the Microwave Oven (27" [68.6 cm] or 30" [76.2 cm] Installation Only) WARNING WARNING Excessive Weight Hazard Use two or more people, slide microwave oven all the way into the opening, and center the microwave oven within the opening , plug the microwave oven into the grounded 3 prong outlet. 8. Failure to the microwave oven. 6. Place the side...
