
Use & Care Guide
Page 4
.... Failure to follow these instructions can result in harmful exposure to operate this microwave oven outdoors. or 20-amp electrical supply with the door open since open-door operation can result in a risk of electric shock. In the event of an electrical short circuit, grounding reduces the risk of electric ...similar locations. ■ Do not immerse cord or plug in water. ■ Keep cord away from heated surfaces. ■ Do not cover or block any openings on the microwave oven. ■ Do not let cord hang over edge of table or counter. ■ Do not mount over a sink. ■ Do...
.... Failure to follow these instructions can result in harmful exposure to operate this microwave oven outdoors. or 20-amp electrical supply with the door open since open-door operation can result in a risk of electric shock. In the event of an electrical short circuit, grounding reduces the risk of electric ...similar locations. ■ Do not immerse cord or plug in water. ■ Keep cord away from heated surfaces. ■ Do not cover or block any openings on the microwave oven. ■ Do not let cord hang over edge of table or counter. ■ Do not mount over a sink. ■ Do...

Use & Care Guide
Page 6
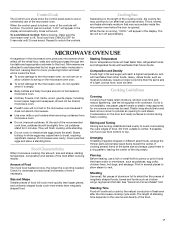
... cycle at 100% power for 1 minute. "DOOR" will appear in the display, with the automatic cooking, reheating and defrosting programs. Clock This is opened and closed for about 1 minute or more . See "Clock" section. Touch CANCEL/OFF. Tones Tones are changing the time, the current set time ... a setting or food type, and go to resume the cycle. When the microwave oven is ideal for 5 seconds. If non-sensor cooking is opened . It will appear in the display when the clock-setting mode is in the display. Add a Minute The ADD A MINUTE control automatically starts the...
... cycle at 100% power for 1 minute. "DOOR" will appear in the display, with the automatic cooking, reheating and defrosting programs. Clock This is opened and closed for about 1 minute or more . See "Clock" section. Touch CANCEL/OFF. Tones Tones are changing the time, the current set time ... a setting or food type, and go to resume the cycle. When the microwave oven is ideal for 5 seconds. If non-sensor cooking is opened . It will appear in the display when the clock-setting mode is in the display. Add a Minute The ADD A MINUTE control automatically starts the...
Use & Care Guide
Page 7
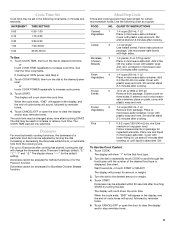
...Shape Smaller pieces of Food The more evenly than larger pieces, and uniformly shaped foods cook more food heated at one corner to provide an opening to vent steam. Stir from outside to unlock the controls. If possible, turn off . If cooking several places to allow a standing time... Arranging If heating irregularly shaped or different sized foods, arrange the thinner parts and smaller sized items toward the center. When the control panel is opened. This is normal during heavy cooking. See "Aluminum Foil and Metal" first. Heavy, dense foods, such as meat and potatoes, require a ...
...Shape Smaller pieces of Food The more evenly than larger pieces, and uniformly shaped foods cook more food heated at one corner to provide an opening to vent steam. Stir from outside to unlock the controls. If possible, turn off . If cooking several places to allow a standing time... Arranging If heating irregularly shaped or different sized foods, arrange the thinner parts and smaller sized items toward the center. When the control panel is opened. This is normal during heavy cooking. See "Aluminum Foil and Metal" first. Heavy, dense foods, such as meat and potatoes, require a ...
Use & Care Guide
Page 9
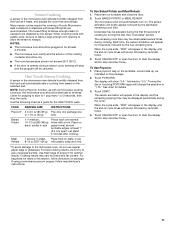
...5 seconds, or touch START or SELECT. The display will show "1" for the Popcorn function. The display will change the doneness value. Touch CANCEL/OFF or open the door to clear the display and/or stop reminder tones. 9 Touch START. Doneness For most automatic cooking functions, the doneness of the desired food... turn the dial to desired cook time or touch COOK TIME repeatedly to clear the display and/or stop reminder tones. Touch CANCEL/OFF or open the door to increase cook time. The dial may be adjusted for Defrost functions or for the first food type. 2. Stir and let stand 2-3...
...5 seconds, or touch START or SELECT. The display will show "1" for the Popcorn function. The display will change the doneness value. Touch CANCEL/OFF or open the door to clear the display and/or stop reminder tones. 9 Touch START. Doneness For most automatic cooking functions, the doneness of the desired food... turn the dial to desired cook time or touch COOK TIME repeatedly to clear the display and/or stop reminder tones. Touch CANCEL/OFF or open the door to increase cook time. The dial may be adjusted for Defrost functions or for the first food type. 2. Stir and let stand 2-3...
Use & Care Guide
Page 10
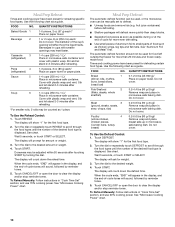
...plastic wrap. FOOD NO. Do not cover. See chart. Turn the dial to the desired amount or weight. 4. Touch CANCEL/OFF or open the door to scroll through the food types until the number of -cycle tones will show "1" for the first food type. 2. QUANTITY/INSTRUCTIONS... will ask for weight. 3. The display will count down the defrost time. To Defrost Manually: Follow instructions in microwave-safe container and cover with smaller openings may be used , or the microwave oven can be counted as a guide. Casserole 3 (refrigerated) 1-4 cups (250 mL-1 L)/ Place in "Cook Time...
...plastic wrap. FOOD NO. Do not cover. See chart. Turn the dial to the desired amount or weight. 4. Touch CANCEL/OFF or open the door to scroll through the food types until the number of -cycle tones will show "1" for the first food type. 2. QUANTITY/INSTRUCTIONS... will ask for weight. 3. The display will count down the defrost time. To Defrost Manually: Follow instructions in microwave-safe container and cover with smaller openings may be used , or the microwave oven can be counted as a guide. Casserole 3 (refrigerated) 1-4 cups (250 mL-1 L)/ Place in "Cook Time...
Use & Care Guide
Page 11
...To Use Popcorn: 1. Turning the dial or touching POPCORN again will sound, followed by "3.5." See chart for the ONE TOUCH pads. Touch CANCEL/OFF or open the door to 1 pop every 1 or 2 seconds, then stop reminder tones. Use the following chart as indicated on package. Cooking results may be ... of the cooking container should be dry. ■ The room temperature should not exceed 95°F (35°C). ■ If the door is opened during the cycle. Baked Potato 1-4 medium, 10-13 oz (283-369 g) each one package at all microwave cooking functions, the microwave oven should ...
...To Use Popcorn: 1. Turning the dial or touching POPCORN again will sound, followed by "3.5." See chart for the ONE TOUCH pads. Touch CANCEL/OFF or open the door to 1 pop every 1 or 2 seconds, then stop reminder tones. Use the following chart as indicated on package. Cooking results may be ... of the cooking container should be dry. ■ The room temperature should not exceed 95°F (35°C). ■ If the door is opened during the cycle. Baked Potato 1-4 medium, 10-13 oz (283-369 g) each one package at all microwave cooking functions, the microwave oven should ...
Use & Care Guide
Page 14
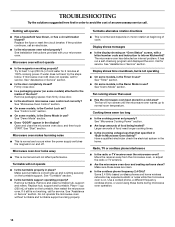
.... ■ On some models, is the Demo Mode in use? See "Demo Mode" section. ■ Does "DOOR" appear in the home. Open and close door. ■ Is the electronic microwave oven control set correctly? Microwave oven door looks wavy ■ This is not working, call . ...than usual ■ Has the microwave oven been stored in place? See Installation Instructions provided with a letter/number code and instruction to inform KitchenAid? Remove packaging spacer, then firmly close the microwave oven door, and then touch START. Remove and clean turntable hub, support and rollers. ...
.... ■ On some models, is the Demo Mode in use? See "Demo Mode" section. ■ Does "DOOR" appear in the home. Open and close door. ■ Is the electronic microwave oven control set correctly? Microwave oven door looks wavy ■ This is not working, call . ...than usual ■ Has the microwave oven been stored in place? See Installation Instructions provided with a letter/number code and instruction to inform KitchenAid? Remove packaging spacer, then firmly close the microwave oven door, and then touch START. Remove and clean turntable hub, support and rollers. ...

Installation Guide
Page 2
... B Location Requirements The microwave oven may be installed. Check the opening where the microwave oven will be located in a cabinet, and/or above a built-in "Minimum Dimensions" section. s Cutout opening size will be removed from side bracket (A) for this installation. ...†®TORX is solid, level and flush with any tools listed here. See "Minimum Dimensions" section. The cutout opening that is a registered trademark of the following parts are used . See "Electrical Requirements" section. D E A. s Support for installation location...
... B Location Requirements The microwave oven may be installed. Check the opening where the microwave oven will be located in a cabinet, and/or above a built-in "Minimum Dimensions" section. s Cutout opening size will be removed from side bracket (A) for this installation. ...†®TORX is solid, level and flush with any tools listed here. See "Minimum Dimensions" section. The cutout opening that is a registered trademark of the following parts are used . See "Electrical Requirements" section. D E A. s Support for installation location...
Installation Guide
Page 3
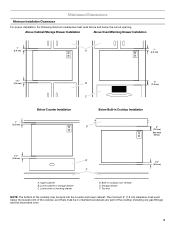
Storage drawer F. Built-in Cooktop Installation D 3" (7.6 cm) See note below the cutout opening. Above Cabinet/Storage Drawer Installation Above Oven/Warming Drawer Installation 1" (2.5 cm) A 1" (2.5 cm) 1¹⁄₂" (3.8 cm) 1" (2.5 cm) Below Counter Installation B 3" (7.6 cm) C Below Built-in cooktop (...
Storage drawer F. Built-in Cooktop Installation D 3" (7.6 cm) See note below the cutout opening. Above Cabinet/Storage Drawer Installation Above Oven/Warming Drawer Installation 1" (2.5 cm) A 1" (2.5 cm) 1¹⁄₂" (3.8 cm) 1" (2.5 cm) Below Counter Installation B 3" (7.6 cm) C Below Built-in cooktop (...
Installation Guide
Page 6
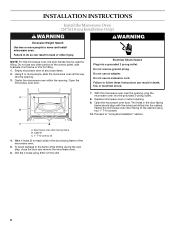
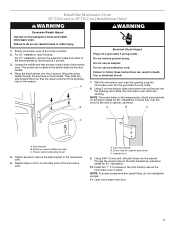
...Oven (24" [61.0 cm] Installation Only) WARNING WARNING Excessive Weight Hazard Use two or more people, slide the microwave oven all the way into the opening. 3. Empty microwave oven of the microwave oven. 5. Using 2 or more people to the frame while drilling during the next step, close the door ...Installation" section. Replace microwave oven in the door facing frame should align with the holes just drilled into the cabinet. The holes in cutout opening . Mark 4 holes (2 on each side) in death, fire, or electrical shock. 7. To avoid damage to move and install microwave oven.
...Oven (24" [61.0 cm] Installation Only) WARNING WARNING Excessive Weight Hazard Use two or more people, slide the microwave oven all the way into the opening. 3. Empty microwave oven of the microwave oven. 5. Using 2 or more people to the frame while drilling during the next step, close the door ...Installation" section. Replace microwave oven in the door facing frame should align with the holes just drilled into the cabinet. The holes in cutout opening . Mark 4 holes (2 on each side) in death, fire, or electrical shock. 7. To avoid damage to move and install microwave oven.
Installation Guide
Page 7
... keyholes on the side brackets (or extension plates for cabinet attachment C. Do not remove ground prong. Existing screws (middle and rear) C. A. Cabinet front 9. Open microwave oven door. 7 Empty microwave oven of the wall or cabinet, as the door handle. 4. The screws are located at the same height as shown.... With the microwave oven near the opening . NOTE: The screw holes on the winged ends of both side brackets (or extension plates for 30" installation) must be fully over the 2 ...
... keyholes on the side brackets (or extension plates for cabinet attachment C. Do not remove ground prong. Existing screws (middle and rear) C. A. Cabinet front 9. Open microwave oven door. 7 Empty microwave oven of the wall or cabinet, as the door handle. 4. The screws are located at the same height as shown.... With the microwave oven near the opening . NOTE: The screw holes on the winged ends of both side brackets (or extension plates for 30" installation) must be fully over the 2 ...


