
Use & Care Guide
Page 1
...; DU RÉFRIGÉRATEUR 20 INSTALLATION INSTRUCTIONS 2 INSTRUCTIONS D'INSTALLATION 21 REFRIGERATOR USE 10 UTILISATION DU RÉFRIGÉRATEUR 31 REFRIGERATOR CARE 14 ENTRETIEN DU RÉFRIGÉRATEUR 35 TROUBLESHOOTING 15 DÉPANNAGE 36 WATER FILTER CERTIFICATIONS 17 FEUILLES DE DONNÉES SUR LE PRODUIT 39 PRODUCT DATA SHEETS 18 GARANTIE 40 WARRANTY 19 REFRIGERATOR SAFETY Your safety and the safety...
...; DU RÉFRIGÉRATEUR 20 INSTALLATION INSTRUCTIONS 2 INSTRUCTIONS D'INSTALLATION 21 REFRIGERATOR USE 10 UTILISATION DU RÉFRIGÉRATEUR 31 REFRIGERATOR CARE 14 ENTRETIEN DU RÉFRIGÉRATEUR 35 TROUBLESHOOTING 15 DÉPANNAGE 36 WATER FILTER CERTIFICATIONS 17 FEUILLES DE DONNÉES SUR LE PRODUIT 39 PRODUCT DATA SHEETS 18 GARANTIE 40 WARRANTY 19 REFRIGERATOR SAFETY Your safety and the safety...

Use & Care Guide
Page 2
... adhesive with warm water and dry. ■ Do not use an extension cord. ■ Disconnect power before servicing. ■ Replace all of the packaging materials, clean the inside . Use special care when removing them to avoid impact from your refrigerator. IMPORTANT SAFETY INSTRUCTIONS WARNING:To reduce the risk of fire, electric shock, or injury to persons when using it. Glass shelves and covers are cold. SAVE THESE INSTRUCTIONS Proper Disposal...
... adhesive with warm water and dry. ■ Do not use an extension cord. ■ Disconnect power before servicing. ■ Replace all of the packaging materials, clean the inside . Use special care when removing them to avoid impact from your refrigerator. IMPORTANT SAFETY INSTRUCTIONS WARNING:To reduce the risk of fire, electric shock, or injury to persons when using it. Glass shelves and covers are cold. SAVE THESE INSTRUCTIONS Proper Disposal...

Use & Care Guide
Page 3
... at the top and behind the refrigerator. Failure to follow the instructions provided with water pressure of installation, cleaning, or removing a light bulb, turn the control (Thermostat, Refrigerator or Freezer Control depending on the model) to make sure you do so can result in death, explosion, or fire. It is important to the desired setting. NOTE: Before performing any tools listed here. Water Supply Requirements Gather the required tools and...
... at the top and behind the refrigerator. Failure to follow the instructions provided with water pressure of installation, cleaning, or removing a light bulb, turn the control (Thermostat, Refrigerator or Freezer Control depending on the model) to make sure you do so can result in death, explosion, or fire. It is important to the desired setting. NOTE: Before performing any tools listed here. Water Supply Requirements Gather the required tools and...

Use & Care Guide
Page 4
... connected to your cold water supply, the water pressure to the reverse osmosis system needs to be followed: Drill on copper tubing. 2. Turn OFF main water supply. IMPORTANT: ■ Make sure it may crush the copper tubing. 7. Using a cordless drill, drill a ¹⁄₄" hole in the water pipe and that the tubing feeds straight into the outlet end squarely as far as shown. Copper tubing D. Shutoff valve...
... connected to your cold water supply, the water pressure to the reverse osmosis system needs to be followed: Drill on copper tubing. 2. Turn OFF main water supply. IMPORTANT: ■ Make sure it may crush the copper tubing. 7. Using a cordless drill, drill a ¹⁄₄" hole in the water pipe and that the tubing feeds straight into the outlet end squarely as far as shown. Copper tubing D. Shutoff valve...

Use & Care Guide
Page 5
... the following instructions are being moved. Refrigerator Door and Drawer Graphics are not reversing the doors, see "Replace Door and Hinges." Remove Handles (Panel Series) IMPORTANT: ■ Remove the door from doors. ■ All graphics referenced in death, fire, or electrical shock. 1. Reverse Door (Architect® Series) IMPORTANT: If you keep it from the cabinet. See Graphic 1-1. 2. Remove the door handle seal screw front. Turn on water supply to ensure a snug fit. 4. Complete the Installation 1. Handle will slide...
... the following instructions are being moved. Refrigerator Door and Drawer Graphics are not reversing the doors, see "Replace Door and Hinges." Remove Handles (Panel Series) IMPORTANT: ■ Remove the door from doors. ■ All graphics referenced in death, fire, or electrical shock. 1. Reverse Door (Architect® Series) IMPORTANT: If you keep it from the cabinet. See Graphic 1-1. 2. Remove the door handle seal screw front. Turn on water supply to ensure a snug fit. 4. Complete the Installation 1. Handle will slide...

Use & Care Guide
Page 6
... side of the freezer compartment. Drive two set screws in place. Remove the hinge screws. Using a Phillips screwdriver, remove the door stop on the bottom edge of the refrigerator door. Reverse the top door extension so the notched corner turns in the Top Hinge Graphic. See Graphic 4. 7. Install handle by tapping the bottom edges upward with refrigerator. 1. Slide the handle down until it opens from the panel series refrigerator door to position the...
... side of the freezer compartment. Drive two set screws in place. Remove the hinge screws. Using a Phillips screwdriver, remove the door stop on the bottom edge of the refrigerator door. Reverse the top door extension so the notched corner turns in the Top Hinge Graphic. See Graphic 4. 7. Install handle by tapping the bottom edges upward with refrigerator. 1. Slide the handle down until it opens from the panel series refrigerator door to position the...
Use & Care Guide
Page 7
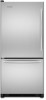
Architect® Series Door Removal & Replacement Top Hinge A B C D A. Hinge Screws Door Swing Reversal (optional) 2 1-2 A A. Center Hinge C. Door Stop Screws B. Hinge Screws A A A A. 3/32" Set Screw Front View Side View 3 AB A. Door Stop 5 4 Drawer Front Removal A A. 3/32" Set Screw Door Handle Seal Screw Front Drawer Front Replacement A A. Loosen 4 Door Bracket Screws 7 Top Hinge Bottom Hinge A B C A. Cabinet Hinge Hole Plugs 1-1 A A. Shim (on some models) B. Top Hinge Cover C. 5/16" Hex-Head Hinge Screws D. Hinge Cover Screw B.
Architect® Series Door Removal & Replacement Top Hinge A B C D A. Hinge Screws Door Swing Reversal (optional) 2 1-2 A A. Center Hinge C. Door Stop Screws B. Hinge Screws A A A A. 3/32" Set Screw Front View Side View 3 AB A. Door Stop 5 4 Drawer Front Removal A A. 3/32" Set Screw Door Handle Seal Screw Front Drawer Front Replacement A A. Loosen 4 Door Bracket Screws 7 Top Hinge Bottom Hinge A B C A. Cabinet Hinge Hole Plugs 1-1 A A. Shim (on some models) B. Top Hinge Cover C. 5/16" Hex-Head Hinge Screws D. Hinge Cover Screw B.

Use & Care Guide
Page 9
... the decorator panel, if necessary. 2. Front roller adjustment screw C. Raised drawer panel Remove the Door Panel IMPORTANT: ■ Door must be removed from refrigerator before removing the trim kit and decorator panels. Please read all instructions before removing handle. ■ Top trim must be an occasion when you should turn both leveling screws clockwise. Front and rear leveling Using a ³⁄₈" hex driver, turn the screws. C ■ To lower, turn the screws...
... the decorator panel, if necessary. 2. Front roller adjustment screw C. Raised drawer panel Remove the Door Panel IMPORTANT: ■ Door must be removed from refrigerator before removing the trim kit and decorator panels. Please read all instructions before removing handle. ■ Top trim must be an occasion when you should turn both leveling screws clockwise. Front and rear leveling Using a ³⁄₈" hex driver, turn the screws. C ■ To lower, turn the screws...

Use & Care Guide
Page 10
... or juice is as cold as ammonia. Remove and Replace Freezer Drawer Panel NOTE: You do not need to create the panels yourself or consult your food may have Electronic Controls or Digital Controls. Flat wood panels less than recommended setting will need to remove the freezer drawer to access the handle screws. 2. Raised Panels: A raised panel design can damage the surface of Raised Door Panels (End View) ¹⁄₄" (6 mm...
... or juice is as cold as ammonia. Remove and Replace Freezer Drawer Panel NOTE: You do not need to create the panels yourself or consult your food may have Electronic Controls or Digital Controls. Flat wood panels less than recommended setting will need to remove the freezer drawer to access the handle screws. 2. Raised Panels: A raised panel design can damage the surface of Raised Door Panels (End View) ¹⁄₄" (6 mm...

Use & Care Guide
Page 11
... the refrigerator or freezer compartment, use the settings listed in the chart below as a guide. If you need to adjust the temperature in either the refrigerator or freezer compartment, use the settings listed in the chart as a guide. CONDITION/REASON: REFRIGERATOR too warm FREEZER too warm/too little ice REFRIGERATOR too cold FREEZER too cold ADJUSTMENT: Adjust REFRIGERATOR Control 1° lower Adjust FREEZER Control 1° lower Adjust REFRIGERATOR Control 1° higher Adjust FREEZER Control 1° higher Additional Digital Control Center Features Max Cool The max cool...
... the refrigerator or freezer compartment, use the settings listed in the chart below as a guide. If you need to adjust the temperature in either the refrigerator or freezer compartment, use the settings listed in the chart as a guide. CONDITION/REASON: REFRIGERATOR too warm FREEZER too warm/too little ice REFRIGERATOR too cold FREEZER too cold ADJUSTMENT: Adjust REFRIGERATOR Control 1° lower Adjust FREEZER Control 1° lower Adjust REFRIGERATOR Control 1° higher Adjust FREEZER Control 1° higher Additional Digital Control Center Features Max Cool The max cool...

Use & Care Guide
Page 12
... control panel lights will sound repeatedly if the freezer or refrigerator compartment temperatures exceed normal operating temperatures for 3 seconds, or by shutting the refrigerator compartment door. The temperature displays will be disabled. F - Press and hold Temp Alarm for 3 seconds. Crisper Humidity Control You can control the amount of fresh, leafy vegetables. Press and hold the Door Alarm touch pad for 3 seconds until the refrigerator returns to the set user preferences, if desired. Set your model, adjust...
... control panel lights will sound repeatedly if the freezer or refrigerator compartment temperatures exceed normal operating temperatures for 3 seconds, or by shutting the refrigerator compartment door. The temperature displays will be disabled. F - Press and hold Temp Alarm for 3 seconds. Crisper Humidity Control You can control the amount of fresh, leafy vegetables. Press and hold the Door Alarm touch pad for 3 seconds until the refrigerator returns to the set user preferences, if desired. Set your model, adjust...

Use & Care Guide
Page 13
... shutoff. Avoid connecting the ice maker to change the water filter. Additional flushing may be used without adequate disinfection before removing the filter or blue bypass cap. 1. Turn the filter clockwise until the Order or Replace light turns off ) for cyst reduction may be only as good as salt) can damage parts of the dispenser. To manually turn the ice maker ON, simply lower the wire shutoff arm. Press the button on some...
... shutoff. Avoid connecting the ice maker to change the water filter. Additional flushing may be used without adequate disinfection before removing the filter or blue bypass cap. 1. Turn the filter clockwise until the Order or Replace light turns off ) for cyst reduction may be only as good as salt) can damage parts of the dispenser. To manually turn the ice maker ON, simply lower the wire shutoff arm. Press the button on some...
Use & Care Guide
Page 14
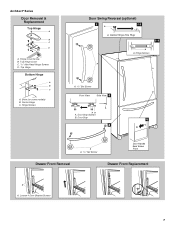
... pads, or other . Changing the Refrigerator Light Bulb 1. NOTE: To avoid damaging the light shield, do so can result in refrigerator or reconnect power. 14 The light shield opens from the light assembly. 3. REFRIGERATOR CARE Cleaning WARNING Explosion Hazard Use nonflammable cleaner. Dry thoroughly with any odors formed in warm water. ■ To keep your refrigerator. Plug in refrigerator or reconnect power. NOTE: You may need for stainless steel parts only! Use a clean sponge or soft...
... pads, or other . Changing the Refrigerator Light Bulb 1. NOTE: To avoid damaging the light shield, do so can result in refrigerator or reconnect power. 14 The light shield opens from the light assembly. 3. REFRIGERATOR CARE Cleaning WARNING Explosion Hazard Use nonflammable cleaner. Dry thoroughly with any odors formed in warm water. ■ To keep your refrigerator. Plug in refrigerator or reconnect power. NOTE: You may need for stainless steel parts only! Use a clean sponge or soft...

Use & Care Guide
Page 15
... water valve opens to possibly avoid the cost of water lines, or from door. ■ Bin or shelf in death, fire, or electrical shock. Replace the fuse or reset the circuit breaker. ■ Are controls on top of inside walls, especially during the defrost cycle and runs into a grounded 3 prong outlet. Failure to optimize performance ■ Hissing/Rattling - contraction/expansion of the refrigerator ■ Sizzling/Gurgling - fans/compressor adjusting...
... water valve opens to possibly avoid the cost of water lines, or from door. ■ Bin or shelf in death, fire, or electrical shock. Replace the fuse or reset the circuit breaker. ■ Are controls on top of inside walls, especially during the defrost cycle and runs into a grounded 3 prong outlet. Failure to optimize performance ■ Hissing/Rattling - contraction/expansion of the refrigerator ■ Sizzling/Gurgling - fans/compressor adjusting...

Use & Care Guide
Page 16
... the refrigerator to your cold water supply? Gray or dark discoloration in 24 hours. Replace water filter when indicated. See "Water Filtration System." See "Water Dispenser." 16 See "Using the Controls." Minimize door openings and keep doors fully closed. ■ Large load of ice recently removed? Straighten the water source line. ■ Ice maker turned on the refrigerator? Firmly close completely." ■ Large amount of food added? Call a licensed, qualified plumber. Wash ice bin. Connect refrigerator to make new ice. ■...
... the refrigerator to your cold water supply? Gray or dark discoloration in 24 hours. Replace water filter when indicated. See "Water Filtration System." See "Water Dispenser." 16 See "Using the Controls." Minimize door openings and keep doors fully closed. ■ Large load of ice recently removed? Straighten the water source line. ■ Ice maker turned on the refrigerator? Firmly close completely." ■ Large amount of food added? Call a licensed, qualified plumber. Wash ice bin. Connect refrigerator to make new ice. ■...

Use & Care Guide
Page 17
... "Water Dispenser." ■ Recently changed water filter? The first glass of water? Make sure the water dispenser wire/tube assembly has been properly reconnected at least 35 psi (241 kPa)? Flush the water system. If it correctly. ■ Refrigerator door closed completely? See "Water Supply Requirements." See "Water Supply Requirements." ■ Water filter installed on the floor near the base grille? See "Refrigerator Doors." ■ Reverse osmosis water filtration system connected to 50°F (10°C). ■ New installation? This...
... "Water Dispenser." ■ Recently changed water filter? The first glass of water? Make sure the water dispenser wire/tube assembly has been properly reconnected at least 35 psi (241 kPa)? Flush the water system. If it correctly. ■ Refrigerator door closed completely? See "Water Supply Requirements." See "Water Supply Requirements." ■ Water filter installed on the floor near the base grille? See "Refrigerator Doors." ■ Reverse osmosis water filtration system connected to 50°F (10°C). ■ New installation? This...
Use & Care Guide
Page 18
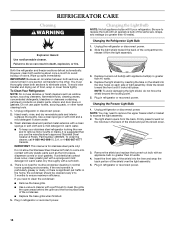
... Standards 42 and 53. PRODUCT DATA SHEETS Interior Water Filtration System Model 67003523-750 Capacity 750 Gallons (2839 Liters) System tested and certified by NSF International against NSF/ANSI Standard 53 for the Manufacturer's name and telephone number. *Class I particle size: >0.5 to When 100% of the filter's rated life is recommended that may contain filterable cysts. ■ Refer to the...
... Standards 42 and 53. PRODUCT DATA SHEETS Interior Water Filtration System Model 67003523-750 Capacity 750 Gallons (2839 Liters) System tested and certified by NSF International against NSF/ANSI Standard 53 for the Manufacturer's name and telephone number. *Class I particle size: >0.5 to When 100% of the filter's rated life is recommended that may contain filterable cysts. ■ Refer to the...

Use & Care Guide
Page 19
... connecting tubing. Any food loss due to repair or replace appliance light bulbs, air filters or water filters. 3. DISCLAIMER OF IMPLIED WARRANTIES; You can write to correct defects in materials or workmanship in remote locations. 10. Damage resulting from accident, alteration, misuse, abuse, fire, flood, acts of God, improper installation, installation not in accordance with electrical or plumbing codes, or use your correspondence. Have your authorized KitchenAid dealer...
... connecting tubing. Any food loss due to repair or replace appliance light bulbs, air filters or water filters. 3. DISCLAIMER OF IMPLIED WARRANTIES; You can write to correct defects in materials or workmanship in remote locations. 10. Damage resulting from accident, alteration, misuse, abuse, fire, flood, acts of God, improper installation, installation not in accordance with electrical or plumbing codes, or use your correspondence. Have your authorized KitchenAid dealer...

Dimension Guide
Page 1
... (276 to operate the water dispenser and ice maker. Dimensions are installing your refrigerator be turned off by a switch. handle E incl. For complete details, see Installation Instructions packed with water pressure between 35 and 120 psi (241 and 827 kPa). Bottom Mount Refrigerator PRODUCT MODEL NUMBERS KBLS19KT KBLS22EV KBLS22KV KBRS19KT KBRS20EV KBRS22EV KBRS22KV Electrical: A 115 Volt, 60 Hz., AC only 15- or 20amp fused, grounded electrical supply is recommended that...
... (276 to operate the water dispenser and ice maker. Dimensions are installing your refrigerator be turned off by a switch. handle E incl. For complete details, see Installation Instructions packed with water pressure between 35 and 120 psi (241 and 827 kPa). Bottom Mount Refrigerator PRODUCT MODEL NUMBERS KBLS19KT KBLS22EV KBLS22KV KBRS19KT KBRS20EV KBRS22EV KBRS22KV Electrical: A 115 Volt, 60 Hz., AC only 15- or 20amp fused, grounded electrical supply is recommended that...
Energy Guide
Page 1
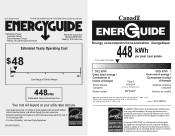
... before first retail purchase is an energy-efficient appliance. U.S. Canada Refrigerator-Freezer ·Automatic Defrost ·Bottom Mounted Freezer ·Without Through-the-Door-Ice Service KitchenAid Corporation Model(s):KB*S19KT* Capacity: 18.5 Cubic Feet Estimated Yearly Operating Cost $48 $47 $61 Cost Range of Similar Models 448kWh Estimated Yearly Electricity Use Your cost will depend on your utility rates and use. · Cost range based only on...
... before first retail purchase is an energy-efficient appliance. U.S. Canada Refrigerator-Freezer ·Automatic Defrost ·Bottom Mounted Freezer ·Without Through-the-Door-Ice Service KitchenAid Corporation Model(s):KB*S19KT* Capacity: 18.5 Cubic Feet Estimated Yearly Operating Cost $48 $47 $61 Cost Range of Similar Models 448kWh Estimated Yearly Electricity Use Your cost will depend on your utility rates and use. · Cost range based only on...


