Instruction Manual
Page 1
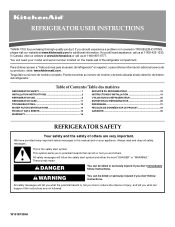
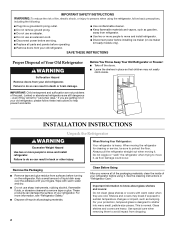
... seriously injured if you still need your appliance. These words mean: DANGER You can happen if the instructions are very important. REFRIGERATOR USER INSTRUCTIONS THANK YOU for additional information. Puede encontrar su número de modelo y de serie ubicada al lado derecho del... "Instrucciones para el usuario del refrigerador" en español, o para obtener información adicional acerca de su producto, visite: www.kitchenaid.com. W10187309A You will need assistance, call us at 1-800-807-6777. All safety messages will follow instructions. In Canada, visit our ...
... seriously injured if you still need your appliance. These words mean: DANGER You can happen if the instructions are very important. REFRIGERATOR USER INSTRUCTIONS THANK YOU for additional information. Puede encontrar su número de modelo y de serie ubicada al lado derecho del... "Instrucciones para el usuario del refrigerador" en español, o para obtener información adicional acerca de su producto, visite: www.kitchenaid.com. W10187309A You will need assistance, call us at 1-800-807-6777. All safety messages will follow instructions. In Canada, visit our ...
Instruction Manual
Page 2
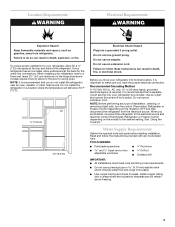
...past. These products can result in back or other injury. IMPORTANT: Child entrapment and suffocation are cold. INSTALLATION INSTRUCTIONS Unpack the Refrigerator WARNING Excessive Weight Hazard Use two or more people to sudden temperature changes or impact, such as floor damage could occur. ...Important information to remove tape or glue. Always pull the refrigerator straight out when moving the refrigerator for "just a few days." Wipe with warm water and dry. ■ Do not use an extension cord. &#...
...past. These products can result in back or other injury. IMPORTANT: Child entrapment and suffocation are cold. INSTALLATION INSTRUCTIONS Unpack the Refrigerator WARNING Excessive Weight Hazard Use two or more people to sudden temperature changes or impact, such as floor damage could occur. ...Important information to remove tape or glue. Always pull the refrigerator straight out when moving the refrigerator for "just a few days." Wipe with warm water and dry. ■ Do not use an extension cord. &#...
Instruction Manual
Page 3
...15- Water Supply Requirements Gather the required tools and parts before starting installation. NOTE: It is recommended that a separate circuit serving only your refrigerator next to a fixed wall, leave 2¹⁄₂" (6.3 cm) minimum on the model) to swing open. Do not remove ground ...the model) to follow the instructions provided with any type of installation, cleaning, or removing a light bulb, turn the control (Thermostat, Refrigerator or Freezer Control depending on the hinge side (some models require more easily. ■ Use copper tubing and check for a ¹&#...
...15- Water Supply Requirements Gather the required tools and parts before starting installation. NOTE: It is recommended that a separate circuit serving only your refrigerator next to a fixed wall, leave 2¹⁄₂" (6.3 cm) minimum on the model) to swing open. Do not remove ground ...the model) to follow the instructions provided with any type of installation, cleaning, or removing a light bulb, turn the control (Thermostat, Refrigerator or Freezer Control depending on the hinge side (some models require more easily. ■ Use copper tubing and check for a ¹&#...
Instruction Manual
Page 4
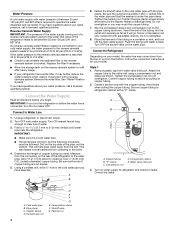
... compression nut and sleeve as shown. Do not overtighten. 8. Flush the tubing until water is secure by pulling on before you turn the refrigerator on copper tubing. 2. Avoid kinks when coiling the copper tubing. Copper tubing B. "P" clamp C. If the water pressure to the reverse ...Find a ¹⁄₂" to 1¹⁄₄" (12.7 mm to refrigerator cabinet with the pipe clamp. Determine the length of the refrigerator needs to be a minimum of copper tubing are cut square. 5. Add 7 ft (2.1 m) to Water Line 1. Tighten the packing nut. Connect to allow for your...
... compression nut and sleeve as shown. Do not overtighten. 8. Flush the tubing until water is secure by pulling on before you turn the refrigerator on copper tubing. 2. Avoid kinks when coiling the copper tubing. Copper tubing B. "P" clamp C. If the water pressure to the reverse ...Find a ¹⁄₂" to 1¹⁄₄" (12.7 mm to refrigerator cabinet with the pipe clamp. Determine the length of the refrigerator needs to be a minimum of copper tubing are cut square. 5. Add 7 ft (2.1 m) to Water Line 1. Tighten the packing nut. Connect to allow for your...
Instruction Manual
Page 5
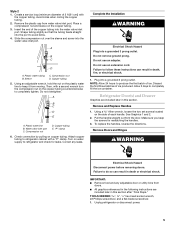
...Plastic water line B. Compression nut D. Failure to produce the first batch of ice. NOTE: Allow 24 hours to follow these instructions can result in this section after "Final Steps." Refrigerator Door(s) and Drawer Graphics are included later in death, fire, or electrical shock. 1. To replace... the handles, reverse the directions. IMPORTANT: ■ Remove food and any leaks. Unplug refrigerator or disconnect power. 5 Place a compression nut and sleeve on copper tubing. Insert the end of 2 ft [61 cm]) with a second wrench turn the compression nut on the plastic water line ...
...Plastic water line B. Compression nut D. Failure to produce the first batch of ice. NOTE: Allow 24 hours to follow these instructions can result in this section after "Final Steps." Refrigerator Door(s) and Drawer Graphics are included later in death, fire, or electrical shock. 1. To replace... the handles, reverse the directions. IMPORTANT: ■ Remove food and any leaks. Unplug refrigerator or disconnect power. 5 Place a compression nut and sleeve on copper tubing. Insert the end of 2 ft [61 cm]) with a second wrench turn the compression nut on the plastic water line ...
Instruction Manual
Page 6
...top hinge by wedging a flat-blade screwdriver or your fingernail between the two sections. Reconnect the wiring plug on the door gasket magnets to refrigerator. 6 Remove and Replace Freezer Drawer Front IMPORTANT: Two people may be required to four turns. Remove Drawer Front 1. NOTE: Loosen screws ...and off the screws. See Drawer Front Replacement graphic. 2. Do not use an extension cord. Plug in the drawer front. 3. Lift the refrigerator door from the bottom hinge pin. Before removing the left-hand side door, disconnect the wiring plug located on the door gasket magnets to ...
...top hinge by wedging a flat-blade screwdriver or your fingernail between the two sections. Reconnect the wiring plug on the door gasket magnets to refrigerator. 6 Remove and Replace Freezer Drawer Front IMPORTANT: Two people may be required to four turns. Remove Drawer Front 1. NOTE: Loosen screws ...and off the screws. See Drawer Front Replacement graphic. 2. Do not use an extension cord. Plug in the drawer front. 3. Lift the refrigerator door from the bottom hinge pin. Before removing the left-hand side door, disconnect the wiring plug located on the door gasket magnets to ...
Instruction Manual
Page 8
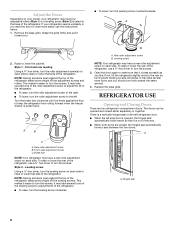
...of the way. ■ When both screws the same amount. 4. Remove the base grille. Leveling screw NOTE: Your refrigerator may take several turns of the refrigerator takes some weight off the leveling screws. The doors can be opened , the hinged seal automatically folds inward so that... the roller adjustment screw to the right. ■ To lower, turn the screws. Hinged seal 8 Adjust the Doors Depending on your model, your refrigerator seems unsteady or you . ■ To lower, turn the leveling screw counterclockwise. A B 2. Turn the brake foot clockwise until it is opened...
...of the way. ■ When both screws the same amount. 4. Remove the base grille. Leveling screw NOTE: Your refrigerator may take several turns of the refrigerator takes some weight off the leveling screws. The doors can be opened , the hinged seal automatically folds inward so that... the roller adjustment screw to the right. ■ To lower, turn the screws. Hinged seal 8 Adjust the Doors Depending on your model, your refrigerator seems unsteady or you . ■ To lower, turn the leveling screw counterclockwise. A B 2. Turn the brake foot clockwise until it is opened...
Instruction Manual
Page 9
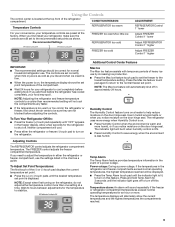
... freezer temperature controls to a colder than one setting at a time. If you first install your refrigerator, make sure the controls are not blocked before adjusting the controls. Wait 24 hours between adjustments for 3 seconds until "OFF" appears in the chart as a guide. Press the ...outage. Additional Control Center Features Max Ice The Max Ice feature assists with temporary periods of the compartment. ■ Wait 24 hours for normal household refrigerator use by increasing ice production. ■ Press the Max Ice feature touch pad to the recommended set point temperature of...
... freezer temperature controls to a colder than one setting at a time. If you first install your refrigerator, make sure the controls are not blocked before adjusting the controls. Wait 24 hours between adjustments for 3 seconds until "OFF" appears in the chart as a guide. Press the ...outage. Additional Control Center Features Max Ice The Max Ice feature assists with temporary periods of the compartment. ■ Wait 24 hours for normal household refrigerator use by increasing ice production. ■ Press the Max Ice feature touch pad to the recommended set point temperature of...
Instruction Manual
Page 10
... filter. OFF - All control panel lights will be disabled. Ice Production Rate ■ The ice maker should produce a complete batch of high refrigerator use, full grocery loads, or temporarily warm room temperatures. ■ Press Max Cool to set temperature. See "Using the Controls." If a...approximately every 3 hours. ■ To increase ice production, lower the freezer and refrigerator temperature. FRUIT / LOW (open for best storage of the ice maker or in approximately 12 hours. Wait 24 hours between FRUIT and VEGETABLES or LOW and HIGH. Press Max Cool again to return...
... filter. OFF - All control panel lights will be disabled. Ice Production Rate ■ The ice maker should produce a complete batch of high refrigerator use, full grocery loads, or temporarily warm room temperatures. ■ Press Max Cool to set temperature. See "Using the Controls." If a...approximately every 3 hours. ■ To increase ice production, lower the freezer and refrigerator temperature. FRUIT / LOW (open for best storage of the ice maker or in approximately 12 hours. Wait 24 hours between FRUIT and VEGETABLES or LOW and HIGH. Press Max Cool again to return...
Instruction Manual
Page 11
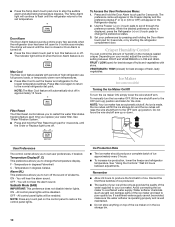
To continue dispensing, press the dispenser button again. ■ Allow 24 hours for stainless steel parts only! IMPORTANT: Air trapped in one section will help you use with the blue bypass cap. Turn the filter ...on disinfected waters that is almost time to flow, continue depressing and releasing the dispenser button (5 seconds on, 5 seconds off . NOTE: After 5 minutes of the refrigerator compartment. Do not use the manufacturer's approved Stainless Steel Cleaner and Polish, Part Number 4396920. IMPORTANT: Because air circulates between both sections to do so...
To continue dispensing, press the dispenser button again. ■ Allow 24 hours for stainless steel parts only! IMPORTANT: Air trapped in one section will help you use with the blue bypass cap. Turn the filter ...on disinfected waters that is almost time to flow, continue depressing and releasing the dispenser button (5 seconds on, 5 seconds off . NOTE: After 5 minutes of the refrigerator compartment. Do not use the manufacturer's approved Stainless Steel Cleaner and Polish, Part Number 4396920. IMPORTANT: Because air circulates between both sections to do so...
Instruction Manual
Page 12
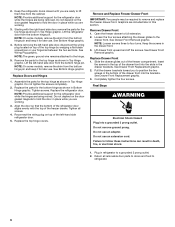
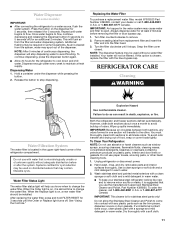
...) to cool completely. Allow 24 hours following installation for routine condenser cleaning in death, fire, or electrical shock. Replace the light shield by inserting the tabs on the shield into the liner holes on the notches in refrigerator or reconnect power. NOTE: You.... Remove the shield and replace the burned-out bulb with appliance bulb(s) no greater than your refrigerator. In the U.S.A., www.kitchenaid.com In Canada, www.kitchenaid.ca The refrigerator will not cool either compartment more quickly. Changing the Light Bulb NOTE: Not all appliance bulbs...
...) to cool completely. Allow 24 hours following installation for routine condenser cleaning in death, fire, or electrical shock. Replace the light shield by inserting the tabs on the shield into the liner holes on the notches in refrigerator or reconnect power. NOTE: You.... Remove the shield and replace the burned-out bulb with appliance bulb(s) no greater than your refrigerator. In the U.S.A., www.kitchenaid.com In Canada, www.kitchenaid.ca The refrigerator will not cool either compartment more quickly. Changing the Light Bulb NOTE: Not all appliance bulbs...
Instruction Manual
Page 13
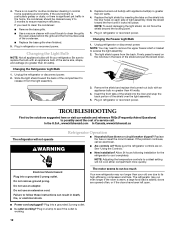
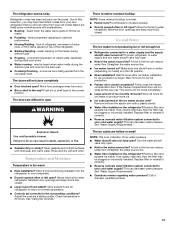
...Clean gaskets and contact surfaces with explanations. ■ Buzzing - Allow 24 hours following installation for ice maker to begin. See "Using the Controls." Allows humid air to fill the ice maker ■ Pulsating - Connect refrigerator to cool completely. ■ Door(s) opened often or left open?... Minimize door openings and keep doors fully closed completely? Make sure wire shutoff arm or switch (depending on ? Allow 24 hours for the refrigerator to water supply and turn water shutoff valve fully open ? The ice cubes are listed some normal sounds with mild ...
...Clean gaskets and contact surfaces with explanations. ■ Buzzing - Allow 24 hours following installation for ice maker to begin. See "Using the Controls." Allows humid air to fill the ice maker ■ Pulsating - Connect refrigerator to cool completely. ■ Door(s) opened often or left open?... Minimize door openings and keep doors fully closed completely? Make sure wire shutoff arm or switch (depending on ? Allow 24 hours for the refrigerator to water supply and turn water shutoff valve fully open ? The ice cubes are listed some normal sounds with mild ...
Instruction Manual
Page 14
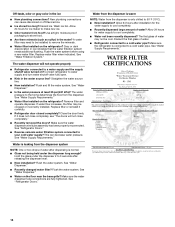
... the floor near the base grille? Close the door firmly. Flush the water system. See "Water Dispenser." ■ Water on the refrigerator? Water from the dispenser is warm NOTE: Water from the dispenser. New plumbing connections can decrease water pressure. See "Water Filtration System... increases, the filter may need to be installed to cool completely. ■ Water not been recently dispensed? Allow 24 hours for the water supply to cool completely. ■ Recently dispensed large amount of water. ■ Refrigerator connected to 50°F (10°C). ■ New installation?
... the floor near the base grille? Close the door firmly. Flush the water system. See "Water Dispenser." ■ Water on the refrigerator? Water from the dispenser is warm NOTE: Water from the dispenser. New plumbing connections can decrease water pressure. See "Water Filtration System... increases, the filter may need to be installed to cool completely. ■ Water not been recently dispensed? Allow 24 hours for the water supply to cool completely. ■ Recently dispensed large amount of water. ■ Refrigerator connected to 50°F (10°C). ■ New installation?
Instruction Manual
Page 16
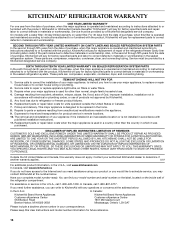
...to instructions attached to or furnished with the product, KitchenAid will pay for factory specified parts and labor to be provided by a KitchenAid designated service company. In Canada, call 1-800-422-1230. KITCHENAID® REFRIGERATOR WARRANTY ONE YEAR LIMITED WARRANTY For one year from...specified parts and repair labor to schedule service, you may contact KitchenAid at the address below . Service must be provided by a KitchenAid designated service company. Also, in the sealed refrigeration system. ITEMS KITCHENAID WILL NOT PAY FOR 1. This major appliance is operated and ...
...to instructions attached to or furnished with the product, KitchenAid will pay for factory specified parts and labor to be provided by a KitchenAid designated service company. In Canada, call 1-800-422-1230. KITCHENAID® REFRIGERATOR WARRANTY ONE YEAR LIMITED WARRANTY For one year from...specified parts and repair labor to schedule service, you may contact KitchenAid at the address below . Service must be provided by a KitchenAid designated service company. Also, in the sealed refrigeration system. ITEMS KITCHENAID WILL NOT PAY FOR 1. This major appliance is operated and ...
Parts Diagram
Page 1
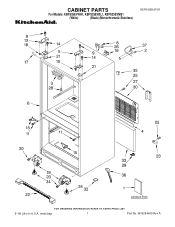
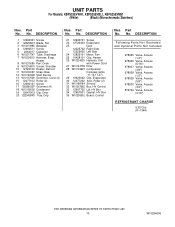
CABINET PARTS For Models: KBFS25EVWH1, KBFS25EVBL1, KBFS25EVMS1 (White) (Black) (Monochromatic Stainless) REFRIGERATOR 9−09 Litho In U.S.A. (mat)(bay) 1 Part No. W10294609 Rev.A
CABINET PARTS For Models: KBFS25EVWH1, KBFS25EVBL1, KBFS25EVMS1 (White) (Black) (Monochromatic Stainless) REFRIGERATOR 9−09 Litho In U.S.A. (mat)(bay) 1 Part No. W10294609 Rev.A

Parts Diagram
Page 6
...Filter 19 UKF8001AXX Filter, Water 20 12568001 Cover, Filter 21 12990512 Screw (2) 22 B8390302SP Clip, Facade (2) 23 12706909SP Facade, Disp. 24 12707303SP Plate, Switch 25 12575501 Switch, Limit 26 12707206SP Guide, Waterline 27 12251001SP Clip, Waterline 28 12707005 Facade, Disp (Top) ... 32 12990513 Screw 33 W10117358 Insulation, Water Tank Following Parts Not Illustrated W10224292 Harness, Control (Refrigerator) (Includes Thermistor) 6 W10294609 REFRIGERATOR LINER PARTS For Models: KBFS25EVWH1, KBFS25EVBL1, KBFS25EVMS1 (White) (Black) (Monochromatic Stainless) Illus.
...Filter 19 UKF8001AXX Filter, Water 20 12568001 Cover, Filter 21 12990512 Screw (2) 22 B8390302SP Clip, Facade (2) 23 12706909SP Facade, Disp. 24 12707303SP Plate, Switch 25 12575501 Switch, Limit 26 12707206SP Guide, Waterline 27 12251001SP Clip, Waterline 28 12707005 Facade, Disp (Top) ... 32 12990513 Screw 33 W10117358 Insulation, Water Tank Following Parts Not Illustrated W10224292 Harness, Control (Refrigerator) (Includes Thermistor) 6 W10294609 REFRIGERATOR LINER PARTS For Models: KBFS25EVWH1, KBFS25EVBL1, KBFS25EVMS1 (White) (Black) (Monochromatic Stainless) Illus.

Parts Diagram
Page 8
... (2) W10163894 White W10163895 Black W10179332 Apollo Grey 10 12691403 Mount, Handle 11 Bushing, Door (Bottom Right) 12028601W White 12028601B Black 12028601AP Apollo Grey Illus. No. REFRIGERATOR DOOR PARTS For Models: KBFS25EVWH1, KBFS25EVBL1, KBFS25EVMS1 (White) (Black) (Monochromatic Stainless) Illus. No. DESCRIPTION 18 12567321SP Mat, Medium 19 Bushing, Door (Upper Left) 12395501W White...
... (2) W10163894 White W10163895 Black W10179332 Apollo Grey 10 12691403 Mount, Handle 11 Bushing, Door (Bottom Right) 12028601W White 12028601B Black 12028601AP Apollo Grey Illus. No. REFRIGERATOR DOOR PARTS For Models: KBFS25EVWH1, KBFS25EVBL1, KBFS25EVMS1 (White) (Black) (Monochromatic Stainless) Illus. No. DESCRIPTION 18 12567321SP Mat, Medium 19 Bushing, Door (Upper Left) 12395501W White...
Parts Diagram
Page 10
... Drier 20 12225403WD Tray, Drip 21 12990701 Screw 22 12726403 Evaporator 23 Dam 12225702 Right Side 12225602 Left Side 24 12825101 Motor, Fan 25 10428101 Clip, Heater 26 W10234025 Harness, Unit with Power Cord 27 W10143759 Drier 28 ...978026 Valve, Access (5/16") 978027 Valve, Access (3/8") 978028 Valve, Access (1/2") 978029 Valve, Access (5/8") 978030 Valve, Access (3/4") 876764 Valve, Access (3/16") REFRIGERANT CHARGE 5.25 Ozs. (R−134A) 10 W10294609 DESCRIPTION 1 12992301 Screw 2 12825803 Blade, Fan 3 W10210985 Basepan 4 12990511 Screw 5 2264017 Capacitor 6 W10217747...
... Drier 20 12225403WD Tray, Drip 21 12990701 Screw 22 12726403 Evaporator 23 Dam 12225702 Right Side 12225602 Left Side 24 12825101 Motor, Fan 25 10428101 Clip, Heater 26 W10234025 Harness, Unit with Power Cord 27 W10143759 Drier 28 ...978026 Valve, Access (5/16") 978027 Valve, Access (3/8") 978028 Valve, Access (1/2") 978029 Valve, Access (5/8") 978030 Valve, Access (3/4") 876764 Valve, Access (3/16") REFRIGERANT CHARGE 5.25 Ozs. (R−134A) 10 W10294609 DESCRIPTION 1 12992301 Screw 2 12825803 Blade, Fan 3 W10210985 Basepan 4 12990511 Screw 5 2264017 Capacitor 6 W10217747...


