
Use and Care Guide
Page 3
.... Do not use an extension cord. Use two or more people to reduce the chance of Your Old Refrigerator Before You Throw Away Your Old Refrigerator or Freezer: All safety messages will tell you what can be killed or seriously injured if you don't ...sturdy glass when dispensing ice (on some models). Disconnect power before operating. Remove doors from refrigerator. REFRIGERATOR SAFETY Your safety and the safety of fire, electric shock, or injury when using your old refrigerator. This is , tell you and others are not followed. Use nonflammable cleaner. IMPORTANT ...
.... Do not use an extension cord. Use two or more people to reduce the chance of Your Old Refrigerator Before You Throw Away Your Old Refrigerator or Freezer: All safety messages will tell you what can be killed or seriously injured if you don't ...sturdy glass when dispensing ice (on some models). Disconnect power before operating. Remove doors from refrigerator. REFRIGERATOR SAFETY Your safety and the safety of fire, electric shock, or injury when using your old refrigerator. This is , tell you and others are not followed. Use nonflammable cleaner. IMPORTANT ...
Use and Care Guide
Page 4
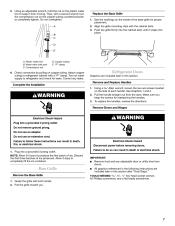
INSTALLATION INSTRUCTIONS Unpack the Refrigerator Location Requirements WARNING Excessive Weight Hazard Use two or more people to do so can result in back or other injury. WARNING Explosion Hazard Remove the Packaging Failure to move and install refrigerator.
INSTALLATION INSTRUCTIONS Unpack the Refrigerator Location Requirements WARNING Excessive Weight Hazard Use two or more people to do so can result in back or other injury. WARNING Explosion Hazard Remove the Packaging Failure to move and install refrigerator.
Use and Care Guide
Page 5
... Reverse Osmosis Water Supply IMPORTANT: The pressure of the water supply coming out of a reverse osmosis system going to the water inlet valve of the refrigerator needs to 414 kPa): If the water pressure to the reverse osmosis system is less than 40 to 60 psi (276 to be a minimum of...
... Reverse Osmosis Water Supply IMPORTANT: The pressure of the water supply coming out of a reverse osmosis system going to the water inlet valve of the refrigerator needs to 414 kPa): If the water pressure to the reverse osmosis system is less than 40 to 60 psi (276 to be a minimum of...
Use and Care Guide
Page 6
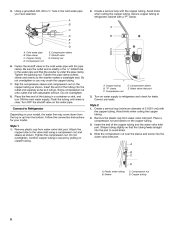
... F. Shutoff valve G. Tighten the packing nut. Slip the compression sleeve and compression nut on the copper tubing. 3. Turn on water supply to Refrigerator Depending on your model. 1. Correct any leaks. Avoid kinks when coiling the copper tubing. 2. Remove the plastic cap from water valve inlet port...tubing feeds straight into the water valve inlet port. Pipe clamp C. Do not overtighten or you have selected. 2. Place the free end of 2 ft [61 cm]) with a "P" clamp. Plastic water tubing B. Do not overtighten. 8. Slide the compression nut over the sleeve and screw into ...
... F. Shutoff valve G. Tighten the packing nut. Slip the compression sleeve and compression nut on the copper tubing. 3. Turn on water supply to Refrigerator Depending on your model. 1. Correct any leaks. Avoid kinks when coiling the copper tubing. 2. Remove the plastic cap from water valve inlet port...tubing feeds straight into the water valve inlet port. Pipe clamp C. Do not overtighten or you have selected. 2. Place the free end of 2 ft [61 cm]) with a "P" clamp. Plastic water tubing B. Do not overtighten. 8. Slide the compression nut over the sleeve and screw into ...
Use and Care Guide
Page 7
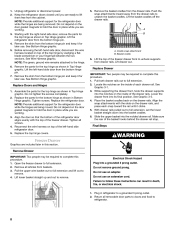
...wrench turn the compression nut on the side of the base grille for reattaching the handles. 3. Water valve inlet port C. NOTE: Allow 24 hours to do so can result in death or electrical shock. Failure to produce the first batch of ice produced. Using a Allen wrench,...straight out from moving. Plug into a grounded 3 prong outlet. Do not overtighten. Do not use an extension cord. Correct any leaks. Refrigerator Doors Graphics are included later in this section. Make sure you keep it snaps into the cabinet slots until it from the door. IMPORTANT: ...
...wrench turn the compression nut on the side of the base grille for reattaching the handles. 3. Water valve inlet port C. NOTE: Allow 24 hours to do so can result in death or electrical shock. Failure to produce the first batch of ice produced. Using a Allen wrench,...straight out from moving. Plug into a grounded 3 prong outlet. Do not overtighten. Do not use an extension cord. Correct any leaks. Refrigerator Doors Graphics are included later in this section. Make sure you keep it snaps into the cabinet slots until it from the door. IMPORTANT: ...
Use and Care Guide
Page 8
...all screws. 4. Do not depend on the inside of each snap toward the rail until you are working . 3. Remove the parts for the refrigerator door while the hinges are being removed. Remove the basket cradles from drawer rails. Basket cradle 6. Place the basket cradles back on top of... the freezer drawer front to follow these instructions can result in Bottom Hinge graphic. Replace the refrigerator door. Pull the upper wire basket out to full extension and lift out to full extension. 2. See Wire Harness graphic. Lift the...
...all screws. 4. Do not depend on the inside of each snap toward the rail until you are working . 3. Remove the parts for the refrigerator door while the hinges are being removed. Remove the basket cradles from drawer rails. Basket cradle 6. Place the basket cradles back on top of... the freezer drawer front to follow these instructions can result in Bottom Hinge graphic. Replace the refrigerator door. Pull the upper wire basket out to full extension and lift out to full extension. 2. See Wire Harness graphic. Lift the...
Use and Care Guide
Page 10
... the Door Depending on each side to raise or lower that side of the refrigerator. NOTE: Having someone push against the top of the refrigerator. Grasp the grille firmly and pull it easier to close easier, adjust the refrigerator's tilt using the instructions below. 1. Using a screwdriver or ³⁄₈...Remove the base grille. This makes it toward you want the door to turn the roller adjustment screw(s) on your model, your refrigerator seems unsteady or you . 2. If your refrigerator may have two (Style 1) or four (Style 2) adjustable rollers located at the base of the...
... the Door Depending on each side to raise or lower that side of the refrigerator. NOTE: Having someone push against the top of the refrigerator. Grasp the grille firmly and pull it easier to close easier, adjust the refrigerator's tilt using the instructions below. 1. Using a screwdriver or ³⁄₈...Remove the base grille. This makes it toward you want the door to turn the roller adjustment screw(s) on your model, your refrigerator seems unsteady or you . 2. If your refrigerator may have two (Style 1) or four (Style 2) adjustable rollers located at the base of the...
Use and Care Guide
Page 11
Hard surfaces, such as the floor, walls, and cabinets, can make . The following describes the kinds of the new sounds are new to you, you might be making them . Normal Sounds Your new refrigerator may be concerned about them . Most of sounds and what may make sounds that your old one didn't make the sounds seem louder. Because the sounds are normal.
Hard surfaces, such as the floor, walls, and cabinets, can make . The following describes the kinds of the new sounds are new to you, you might be making them . Normal Sounds Your new refrigerator may be concerned about them . Most of sounds and what may make sounds that your old one didn't make the sounds seem louder. Because the sounds are normal.
Use and Care Guide
Page 13
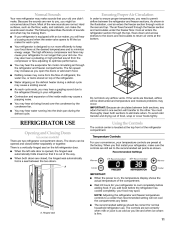
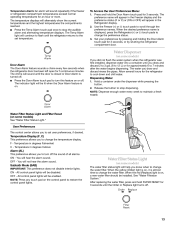
The temperature displays will sound repeatedly if the freezer or refrigerator compartment temperatures exceed normal operating temperatures for an hour or more. Temperature Alarm: An alarm will alternately show the current temperatures and the highest temperatures the compartments reached.
The temperature displays will sound repeatedly if the freezer or refrigerator compartment temperatures exceed normal operating temperatures for an hour or more. Temperature Alarm: An alarm will alternately show the current temperatures and the highest temperatures the compartments reached.

Use and Care Guide
Page 16
... the glide rails and slide the drawer toward the rear of the drawer. 2. Hook the back of the divider over the rear wall of the refrigerator. Freezer Baskets To Remove and Replace Wire Baskets: Upper basket 1. Replace basket by pulling basket out to its full extension. 2. Push the metal glide rails... straight out. NOTE: Store eggs in their original carton on your model does not have some or all items from the rear wall of the refrigerator. 2. Lower the divider into upper molded railing. Lift the lid. Lift the front of the divider to the rear of the drawer and lift the...
... the glide rails and slide the drawer toward the rear of the drawer. 2. Hook the back of the divider over the rear wall of the refrigerator. Freezer Baskets To Remove and Replace Wire Baskets: Upper basket 1. Replace basket by pulling basket out to its full extension. 2. Push the metal glide rails... straight out. NOTE: Store eggs in their original carton on your model does not have some or all items from the rear wall of the refrigerator. 2. Lower the divider into upper molded railing. Lift the lid. Lift the front of the divider to the rear of the drawer and lift the...
Use and Care Guide
Page 17
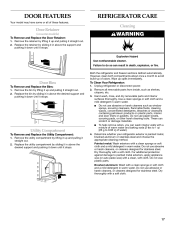
... month to do so can result in warm water. WARNING Explosion Hazard Use nonflammable cleaner. Wipe up of these features. To Clean Your Refrigerator: 1. Remove the retainer by lifting it up and pulling it stops. Replace the bin by sliding it in above the support and pushing... it down until it straight out. 2. Both the refrigerator and freezer sections defrost automatically. Replace the retainer by sliding it in above the desired support and pushing it down until it straight out...
... month to do so can result in warm water. WARNING Explosion Hazard Use nonflammable cleaner. Wipe up of these features. To Clean Your Refrigerator: 1. Remove the retainer by lifting it up and pulling it stops. Replace the bin by sliding it in above the support and pushing... it down until it straight out. 2. Both the refrigerator and freezer sections defrost automatically. Replace the retainer by sliding it in above the desired support and pushing it down until it straight out...
Use and Care Guide
Page 19
Moving When you are moving your refrigerator has an automatic ice maker: If your refrigerator to a new home, follow these steps to prepare it for the move. 1.
Moving When you are moving your refrigerator has an automatic ice maker: If your refrigerator to a new home, follow these steps to prepare it for the move. 1.
Use and Care Guide
Page 24
... product service in -warranty service. Repairs to correct defects in materials or workmanship in the sealed refrigeration system. Dealer name_____ Address _____ Phone number _____ Model number _____ Serial number _____ Purchase date _____ 24 KITCHENAID® REFRIGERATOR WARRANTY ONE YEAR LIMITED WARRANTY For one year from the date of purchase, when this warranty...
... product service in -warranty service. Repairs to correct defects in materials or workmanship in the sealed refrigeration system. Dealer name_____ Address _____ Phone number _____ Model number _____ Serial number _____ Purchase date _____ 24 KITCHENAID® REFRIGERATOR WARRANTY ONE YEAR LIMITED WARRANTY For one year from the date of purchase, when this warranty...
Parts List
Page 1
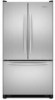
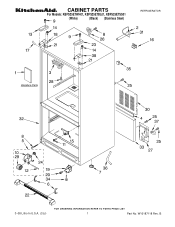
B CABINET PARTS For Models: KBFS25ETWH01, KBFS25ETBL01, KBFS25ETSS01 (White) (Black) (Stainless Steel) REFRIGERATOR 3−08 Litho In U.S.A. (CJJ) 1 Part No. W10187118 Rev.
B CABINET PARTS For Models: KBFS25ETWH01, KBFS25ETBL01, KBFS25ETSS01 (White) (Black) (Stainless Steel) REFRIGERATOR 3−08 Litho In U.S.A. (CJJ) 1 Part No. W10187118 Rev.
Parts List
Page 6
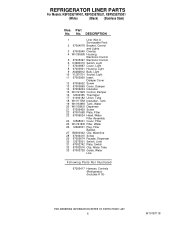
...Tank 19 W10153959 Tank, Water 20 W10158503 Dispenser 21 67006400 Screw 22 67001668 Plate, Filter 23 67006524 Head, Water Filter Assembly 24 12568001 Cover, Filter 25 W10181835 Filter, Water 26 12664501 Plug, Filter Bypass 27 B8390302 Clip, Waterline 28 67006415 Screw 29 67005674...32 67002816 Clip, Water Tube 33 67003728 Guide, Water Line Following Parts Not Illustrated 67005417 Harness, Controls (Refrigerator) (Includes # 16) 6 W10187118 Part No. REFRIGERATOR LINER PARTS For Models: KBFS25ETWH01, KBFS25ETBL01, KBFS25ETSS01 (White) (Black) (Stainless Steel) Illus. No.
...Tank 19 W10153959 Tank, Water 20 W10158503 Dispenser 21 67006400 Screw 22 67001668 Plate, Filter 23 67006524 Head, Water Filter Assembly 24 12568001 Cover, Filter 25 W10181835 Filter, Water 26 12664501 Plug, Filter Bypass 27 B8390302 Clip, Waterline 28 67006415 Screw 29 67005674...32 67002816 Clip, Water Tube 33 67003728 Guide, Water Line Following Parts Not Illustrated 67005417 Harness, Controls (Refrigerator) (Includes # 16) 6 W10187118 Part No. REFRIGERATOR LINER PARTS For Models: KBFS25ETWH01, KBFS25ETBL01, KBFS25ETSS01 (White) (Black) (Stainless Steel) Illus. No.
Parts List
Page 8
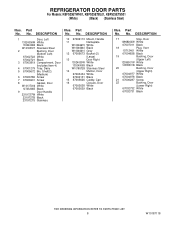
... Black W10185728 Stainless Steel 14 Mullion, Door 67003434 White 67004131 Black 15 67005626 Caddy, Can 16 Closure, Door 67003638 White 67003639 Black Illus. Part No. REFRIGERATOR DOOR PARTS For Models: KBFS25ETWH01, KBFS25ETBL01, KBFS25ETSS01 (White) (Black) (Stainless Steel) Illus. No. DESCRIPTION 17 Stop, Door 12968202W White 67007011 Black 18 Plug, Vent 10712401...
... Black W10185728 Stainless Steel 14 Mullion, Door 67003434 White 67004131 Black 15 67005626 Caddy, Can 16 Closure, Door 67003638 White 67003639 Black Illus. Part No. REFRIGERATOR DOOR PARTS For Models: KBFS25ETWH01, KBFS25ETBL01, KBFS25ETSS01 (White) (Black) (Stainless Steel) Illus. No. DESCRIPTION 17 Stop, Door 12968202W White 67007011 Black 18 Plug, Vent 10712401...

Parts List
Page 10
... 67002490 Tray, Drip 21 10623002 Clip, Evaporator 22 67003720 Evaporator 23 Dam 67001084 Right Side 67001083 Left Side Illus. DESCRIPTION 24 67004432 Motor, Fan 25 10428101 Clip, Heater 26 13060202 Harness, Unit (Includes Cord) 27 B2150504 Drier (Service) 28 ...") 978027 Valve, Access (3/8") 978028 Valve, Access (1/2") 978029 Valve, Access (5/8") 978030 Valve, Access (3/4") 876764 Valve, Access (3/16") REFRIGERANT CHARGE 5.0 Ozs. (R−134A) 10 W10187118 Part No. No. UNIT PARTS For Models: KBFS25ETWH01, KBFS25ETBL01, KBFS25ETSS01 (White) (Black) (Stainless Steel) ...
... 67002490 Tray, Drip 21 10623002 Clip, Evaporator 22 67003720 Evaporator 23 Dam 67001084 Right Side 67001083 Left Side Illus. DESCRIPTION 24 67004432 Motor, Fan 25 10428101 Clip, Heater 26 13060202 Harness, Unit (Includes Cord) 27 B2150504 Drier (Service) 28 ...") 978027 Valve, Access (3/8") 978028 Valve, Access (1/2") 978029 Valve, Access (5/8") 978030 Valve, Access (3/4") 876764 Valve, Access (3/16") REFRIGERANT CHARGE 5.0 Ozs. (R−134A) 10 W10187118 Part No. No. UNIT PARTS For Models: KBFS25ETWH01, KBFS25ETBL01, KBFS25ETSS01 (White) (Black) (Stainless Steel) ...


