
Use and Care Guide
Page 3
...a grounded 3 prong outlet. Disconnect power before installing ice maker (on ice maker kit ready models only). Remove doors from refrigerator. Disconnect power before servicing. Always read and obey all parts and panels before operating. These words mean: DANGER WARNING You can...away from your appliance. Do not remove ground prong. SAVE THESE INSTRUCTIONS Proper Disposal of Your Old Refrigerator Before You Throw Away Your Old Refrigerator or Freezer: REFRIGERATOR SAFETY Your safety and the safety of others . Replace all safety messages. We have provided many...
...a grounded 3 prong outlet. Disconnect power before installing ice maker (on ice maker kit ready models only). Remove doors from refrigerator. Disconnect power before servicing. Always read and obey all parts and panels before operating. These words mean: DANGER WARNING You can...away from your appliance. Do not remove ground prong. SAVE THESE INSTRUCTIONS Proper Disposal of Your Old Refrigerator Before You Throw Away Your Old Refrigerator or Freezer: REFRIGERATOR SAFETY Your safety and the safety of others . Replace all safety messages. We have provided many...
Use and Care Guide
Page 4
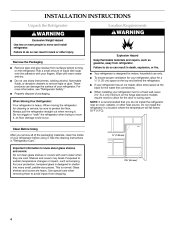
Failure to move and install refrigerator. INSTALLATION INSTRUCTIONS Unpack the Refrigerator Location Requirements WARNING Excessive Weight Hazard Use two or more people to do so can result in back or other injury. WARNING Explosion Hazard Remove the Packaging
Failure to move and install refrigerator. INSTALLATION INSTRUCTIONS Unpack the Refrigerator Location Requirements WARNING Excessive Weight Hazard Use two or more people to do so can result in back or other injury. WARNING Explosion Hazard Remove the Packaging
Use and Care Guide
Page 5
Electrical Requirements Water Pressure A cold water supply with water pressure of the refrigerator needs to be a minimum of 40 to 60 psi (276 to 414 kPa). If you have questions about your cold water supply, the water pressure ...
Electrical Requirements Water Pressure A cold water supply with water pressure of the refrigerator needs to be a minimum of 40 to 60 psi (276 to 414 kPa). If you have questions about your cold water supply, the water pressure ...
Use and Care Guide
Page 6
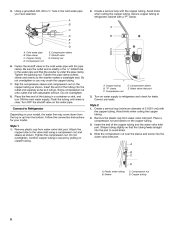
...C. Copper tubing 6 Insert the end of the copper tubing into the port to refrigerator and check for your model, the water line may crush the copper tubing. 7. Place the free end of 2 ft [61 cm]) with the copper tubing. Turn on your model. 1. Avoid kinks ...the end of the tubing into the water valve inlet port. Attach the copper tube to refrigerator cabinet with the pipe clamp. A B C D A. Plastic water tubing B. Cold water pipe B. Style 2 Connect to Refrigerator Depending on water supply to avoid kinks. 4. Create a service loop (minimum diameter of the...
...C. Copper tubing 6 Insert the end of the copper tubing into the port to refrigerator and check for your model, the water line may crush the copper tubing. 7. Place the free end of 2 ft [61 cm]) with the copper tubing. Turn on your model. 1. Avoid kinks ...the end of the tubing into the water valve inlet port. Attach the copper tube to refrigerator cabinet with the pipe clamp. A B C D A. Plastic water tubing B. Cold water pipe B. Style 2 Connect to Refrigerator Depending on water supply to avoid kinks. 4. Create a service loop (minimum diameter of the...
Use and Care Guide
Page 7
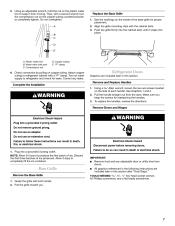
... nut on the copper tubing counterclockwise to completely fill the ice container. Replace the Base Grille 1. Water valve inlet port C. Correct any leaks. Refrigerator Doors Graphics are included later in death or electrical shock. See Graphics 1 and 2. 2. Do not remove ground prong. Allow 3 days to ...the plastic water line to do so can result in death, fire, or electrical shock. 1. Copper tubing E. Attach copper tubing to refrigerator and check for leaks. Turn on copper tubing. To replace the handles, reverse the directions. See the markings on the side of ...
... nut on the copper tubing counterclockwise to completely fill the ice container. Replace the Base Grille 1. Water valve inlet port C. Correct any leaks. Refrigerator Doors Graphics are included later in death or electrical shock. See Graphics 1 and 2. 2. Do not remove ground prong. Allow 3 days to ...the plastic water line to do so can result in death, fire, or electrical shock. 1. Copper tubing E. Attach copper tubing to refrigerator and check for leaks. Turn on copper tubing. To replace the handles, reverse the directions. See the markings on the side of ...
Use and Care Guide
Page 8
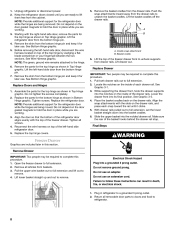
...Bottom Hinge graphic. 5. See Wire Harness graphic. NOTE: The green, ground wire remains attached to full extension. 2. Lift the left -hand side refrigerator door. 5. See Bottom Hinge graphic. 5. Push the snap attachments inward away from baskets. 3. A B A. Basket cradle 6. Replace Drawer IMPORTANT: ... rails pulled out to complete this section. Slide the upper basket into a grounded 3 prong outlet. Assemble the parts for the refrigerator door while the hinges are included later in this procedure. 1. Do not depend on the drawer rails. Tighten all articles from ...
...Bottom Hinge graphic. 5. See Wire Harness graphic. NOTE: The green, ground wire remains attached to full extension. 2. Lift the left -hand side refrigerator door. 5. See Bottom Hinge graphic. 5. Push the snap attachments inward away from baskets. 3. A B A. Basket cradle 6. Replace Drawer IMPORTANT: ... rails pulled out to complete this section. Slide the upper basket into a grounded 3 prong outlet. Assemble the parts for the refrigerator door while the hinges are included later in this procedure. 1. Do not depend on the drawer rails. Tighten all articles from ...
Use and Care Guide
Page 10
...grille firmly and pull it easier to turn the roller adjustment screw(s) on your model, your refrigerator seems unsteady or you . 2. NOTE: Having someone push against the top of the refrigerator takes some weight off the adjustment screws and rollers. This makes it toward you want the door... to close easier, adjust the refrigerator's tilt using the instructions below. 1. Adjust the Door Depending on each side...
...grille firmly and pull it easier to turn the roller adjustment screw(s) on your model, your refrigerator seems unsteady or you . 2. NOTE: Having someone push against the top of the refrigerator takes some weight off the adjustment screws and rollers. This makes it toward you want the door... to close easier, adjust the refrigerator's tilt using the instructions below. 1. Adjust the Door Depending on each side...
Use and Care Guide
Page 11
Normal Sounds Your new refrigerator may be concerned about them . Most of sounds and what may make sounds that your old one didn't make the sounds seem louder. Hard surfaces, such as the floor, walls, and cabinets, can make . Because the sounds are normal. The following describes the kinds of the new sounds are new to you, you might be making them .
Normal Sounds Your new refrigerator may be concerned about them . Most of sounds and what may make sounds that your old one didn't make the sounds seem louder. Hard surfaces, such as the floor, walls, and cabinets, can make . Because the sounds are normal. The following describes the kinds of the new sounds are new to you, you might be making them .
Use and Care Guide
Page 13
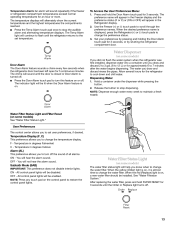
The temperature displays will sound repeatedly if the freezer or refrigerator compartment temperatures exceed normal operating temperatures for an hour or more. Temperature Alarm: An alarm will alternately show the current temperatures and the highest temperatures the compartments reached.
The temperature displays will sound repeatedly if the freezer or refrigerator compartment temperatures exceed normal operating temperatures for an hour or more. Temperature Alarm: An alarm will alternately show the current temperatures and the highest temperatures the compartments reached.

Use and Care Guide
Page 16
... drawer out to its full extension. 2. Lower the divider into upper molded railing. Lift-up the front of the refrigerator. 2. NOTE: Store eggs in the bin. Make sure that rear of the refrigerator. Style 2 - Push the metal glide rails to unhook it straight out. Utility or Egg Bin Depending on your model...
... drawer out to its full extension. 2. Lower the divider into upper molded railing. Lift-up the front of the refrigerator. 2. NOTE: Store eggs in the bin. Make sure that rear of the refrigerator. Style 2 - Push the metal glide rails to unhook it straight out. Utility or Egg Bin Depending on your model...
Use and Care Guide
Page 17
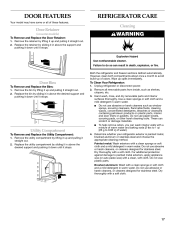
...above the support and pushing it down until it stops. WARNING Explosion Hazard Use nonflammable cleaner. Remove all of odors. Unplug refrigerator or disconnect power. 2. Both the refrigerator and freezer sections defrost automatically. Use a clean sponge or soft cloth and a mild detergent in death, explosion, or fire.... REFRIGERATOR CARE Cleaning Door Retainer (on some or all removable parts from inside, such as shelves, crispers, etc. 3. Failure to avoid ...
...above the support and pushing it down until it stops. WARNING Explosion Hazard Use nonflammable cleaner. Remove all of odors. Unplug refrigerator or disconnect power. 2. Both the refrigerator and freezer sections defrost automatically. Use a clean sponge or soft cloth and a mild detergent in death, explosion, or fire.... REFRIGERATOR CARE Cleaning Door Retainer (on some or all removable parts from inside, such as shelves, crispers, etc. 3. Failure to avoid ...
Use and Care Guide
Page 19
If your refrigerator to a new home, follow these steps to prepare it for the move. 1. Moving When you are moving your refrigerator has an automatic ice maker:
If your refrigerator to a new home, follow these steps to prepare it for the move. 1. Moving When you are moving your refrigerator has an automatic ice maker:
Use and Care Guide
Page 24
... instructions attached to or furnished with the product, KitchenAid or KitchenAid Canada (hereafter "KitchenAid") will pay for factory specified parts to correct defects in materials or workmanship in the sealed refrigeration system. KITCHENAID® REFRIGERATOR WARRANTY ONE YEAR LIMITED WARRANTY For one year from...it . You will pay for factory specified parts and labor to correct defects in materials or workmanship in the sealed refrigeration system. ITEMS KITCHENAID WILL NOT PAY FOR 1. Repairs to parts or systems resulting from accident, alteration, misuse, abuse, fire, flood...
... instructions attached to or furnished with the product, KitchenAid or KitchenAid Canada (hereafter "KitchenAid") will pay for factory specified parts to correct defects in materials or workmanship in the sealed refrigeration system. KITCHENAID® REFRIGERATOR WARRANTY ONE YEAR LIMITED WARRANTY For one year from...it . You will pay for factory specified parts and labor to correct defects in materials or workmanship in the sealed refrigeration system. ITEMS KITCHENAID WILL NOT PAY FOR 1. Repairs to parts or systems resulting from accident, alteration, misuse, abuse, fire, flood...

Parts Diagram
Page 1
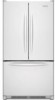
W10144702 Rev.B CABINET PARTS For Models: KBFS20ETWH00,KBFS20ETBL00,KBFS20ETSS00 (White) (Black) (Stainless Steel) REFRIGERATOR 10−07 Litho In U.S.A. (tpm) 1 Part No.
W10144702 Rev.B CABINET PARTS For Models: KBFS20ETWH00,KBFS20ETBL00,KBFS20ETSS00 (White) (Black) (Stainless Steel) REFRIGERATOR 10−07 Litho In U.S.A. (tpm) 1 Part No.

Parts Diagram
Page 6
...12 67006602 Screw 13 67003899 Cover, Damper 14 67006604 Insulation 15 W10127429 Control, Damper 16 12002355 Thermister 17 61006182 Union, Tube 19 67004091 Tank, Water 20 67002979 Dispenser 21 67006287 Screw 22 67001668 Plate, Filter 23 67006524 Head, Water Filter Assembly 24 12568001...Tube 33 67002743 Guide, Water Line Following Parts Not Illustrated 8208197 Harness, Damper Control 67005417 Harness, Controls (Refrigerator) (Includes # 16) 6 W10144702 REFRIGERATOR LINER PARTS For Models: KBFS20ETWH00,KBFS20ETBL00,KBFS20ETSS00 (White) (Black) (Stainless Steel) Illus. Part No.
...12 67006602 Screw 13 67003899 Cover, Damper 14 67006604 Insulation 15 W10127429 Control, Damper 16 12002355 Thermister 17 61006182 Union, Tube 19 67004091 Tank, Water 20 67002979 Dispenser 21 67006287 Screw 22 67001668 Plate, Filter 23 67006524 Head, Water Filter Assembly 24 12568001...Tube 33 67002743 Guide, Water Line Following Parts Not Illustrated 8208197 Harness, Damper Control 67005417 Harness, Controls (Refrigerator) (Includes # 16) 6 W10144702 REFRIGERATOR LINER PARTS For Models: KBFS20ETWH00,KBFS20ETBL00,KBFS20ETSS00 (White) (Black) (Stainless Steel) Illus. Part No.

Parts Diagram
Page 8
... 15 67005626 Caddy, Can 16 Closure, Door 67003638 White 67003639 Black 17 Stop, Door 12968202W White 67007011 Black 18 Plug, Vent 10712401 White 67004838 Black 19 Bushing, Door (Upper Left) 67002722 White 12395501B Black Illus. Part No. REFRIGERATOR DOOR PARTS For Models: KBFS20ETWH00,KBFS20ETBL00,KBFS20ETSS00 (White) (Black) (Stainless Steel) Illus. Part No.
... 15 67005626 Caddy, Can 16 Closure, Door 67003638 White 67003639 Black 17 Stop, Door 12968202W White 67007011 Black 18 Plug, Vent 10712401 White 67004838 Black 19 Bushing, Door (Upper Left) 67002722 White 12395501B Black Illus. Part No. REFRIGERATOR DOOR PARTS For Models: KBFS20ETWH00,KBFS20ETBL00,KBFS20ETSS00 (White) (Black) (Stainless Steel) Illus. Part No.

Parts Diagram
Page 10
...Overload/Relay (Capacitor Incl.) 13 61003210 Seal 14 67003426 Bi−Metal 15 67005680 Grommet (7) 16 67006615 Screw 17 67007052 Strap 18 67006131 Condenser 19 67006550 Screw 20 67002490 Tray, Drip 21 67005719 Spacer 22 12002041 Evaporator Illus. Part No. No. DESCRIPTION 23 Dam 67001084 Right Side 67001083 ... Valve, Access (1/4") 978026 Valve, Access (5/16") 978027 Valve, Access (3/8") 978028 Valve, Access (1/2") 978029 Valve, Access (5/8") 978030 Valve, Access (3/4") 876764 Valve, Access (3/16") REFRIGERANT CHARGE 5.0 Ozs. (R−134A) 10 W10144702 Part No. No. Part No.
...Overload/Relay (Capacitor Incl.) 13 61003210 Seal 14 67003426 Bi−Metal 15 67005680 Grommet (7) 16 67006615 Screw 17 67007052 Strap 18 67006131 Condenser 19 67006550 Screw 20 67002490 Tray, Drip 21 67005719 Spacer 22 12002041 Evaporator Illus. Part No. No. DESCRIPTION 23 Dam 67001084 Right Side 67001083 ... Valve, Access (1/4") 978026 Valve, Access (5/16") 978027 Valve, Access (3/8") 978028 Valve, Access (1/2") 978029 Valve, Access (5/8") 978030 Valve, Access (3/4") 876764 Valve, Access (3/16") REFRIGERANT CHARGE 5.0 Ozs. (R−134A) 10 W10144702 Part No. No. Part No.


