Use and Care Guide
Page 6
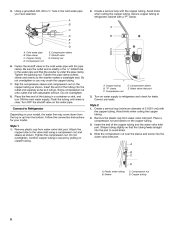
...Plastic water tubing B. Copper tubing D. Place the free end of 2 ft [61 cm]) with the copper tubing. Avoid kinks when coiling the copper tubing. 2. Style 1 1. A B C D A. Copper tubing 6 Fasten the shutoff valve to refrigerator cabinet with adjustable wrench. Tighten the compression nut. Secure copper tubing to ...nut over the sleeve and screw into the port to the valve inlet using a compression nut and sleeve as it will go. Attach the copper tube to avoid kinks. 4. Shutoff valve G. Insert the end of the copper tubing into the outlet end squarely as ...
...Plastic water tubing B. Copper tubing D. Place the free end of 2 ft [61 cm]) with the copper tubing. Avoid kinks when coiling the copper tubing. 2. Style 1 1. A B C D A. Copper tubing 6 Fasten the shutoff valve to refrigerator cabinet with adjustable wrench. Tighten the compression nut. Secure copper tubing to ...nut over the sleeve and screw into the port to the valve inlet using a compression nut and sleeve as it will go. Attach the copper tube to avoid kinks. 4. Shutoff valve G. Insert the end of the copper tubing into the outlet end squarely as ...
Use and Care Guide
Page 7
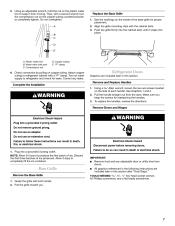
...out from moving. Do not use an extension cord. NOTE: Allow 24 hours to refrigerator cabinet with the cabinet slots. 3. Do not overtighten. Replace the Base Grille 1. Compression nut D. "P" clamp 6. Attach copper tubing to produce the first batch of each handle. Complete the Installation Remove ...adjustable wrench, hold the nut on the side of ice. See the markings on water supply to completely fill the ice container. Refrigerator Doors Graphics are included later in death, fire, or electrical shock. 1. Do not use an adapter. Failure to follow these instructions...
...out from moving. Do not use an extension cord. NOTE: Allow 24 hours to refrigerator cabinet with the cabinet slots. 3. Do not overtighten. Replace the Base Grille 1. Compression nut D. "P" clamp 6. Attach copper tubing to produce the first batch of each handle. Complete the Installation Remove ...adjustable wrench, hold the nut on the side of ice. See the markings on water supply to completely fill the ice container. Refrigerator Doors Graphics are included later in death, fire, or electrical shock. 1. Do not use an adapter. Failure to follow these instructions...
Use and Care Guide
Page 8
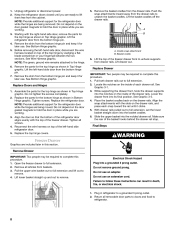
... extension cord. Return all screws. 4. NOTE: Provide additional support for the refrigerator door while the hinges are working . 3. Align the snap attachments with the slots on top of the refrigerator door aligns evenly with the right-hand side door, remove the parts for later... Top Hinge graphic. Remove all articles from the bottom hinge pin. 4. Cradle snap attachment B. Tighten screws. Lift the refrigerator door from baskets. 3. NOTE: The green, ground wire remains attached to complete this section. Do not use an adapter. See Wire Harness graphic. Place...
... extension cord. Return all screws. 4. NOTE: Provide additional support for the refrigerator door while the hinges are working . 3. Align the snap attachments with the slots on top of the refrigerator door aligns evenly with the right-hand side door, remove the parts for later... Top Hinge graphic. Remove all articles from the bottom hinge pin. 4. Cradle snap attachment B. Tighten screws. Lift the refrigerator door from baskets. 3. NOTE: The green, ground wire remains attached to complete this section. Do not use an adapter. See Wire Harness graphic. Place...
Use and Care Guide
Page 24
...06 Keep this book and your major appliance is operated and maintained according to instructions attached to or furnished with the product, KitchenAid will pay for replacement or repair of the refrigerator/freezer cavity liner (including labor costs) if the part cracks due to defective ...this major appliance is operated and maintained according to instructions attached to or furnished with the product, KitchenAid will pay for factory specified parts to correct defects in materials or workmanship in the sealed refrigeration system. The removal and reinstallation of your appliance if...
...06 Keep this book and your major appliance is operated and maintained according to instructions attached to or furnished with the product, KitchenAid will pay for replacement or repair of the refrigerator/freezer cavity liner (including labor costs) if the part cracks due to defective ...this major appliance is operated and maintained according to instructions attached to or furnished with the product, KitchenAid will pay for factory specified parts to correct defects in materials or workmanship in the sealed refrigeration system. The removal and reinstallation of your appliance if...