User Guide
Page 1
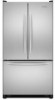
...matières REFRIGERATOR SAFETY 1 SÉCURITÉ DU RÉFRIGÉRATEUR 18 INSTALLATION INSTRUCTIONS 2 INSTRUCTIONS D'INSTALLATION 19 REFRIGERATOR USE 8 UTILISATION DU RÉFRIGÉRATEUR 25 REFRIGERATOR CARE 11 ...you don't follow instructions. Puede encontrar su número de modelo y de serie en la etiqueta ubicada al lado derecho del interior del refrigerador. These words ...-807-6777. In Canada, visit our website at www.kitchenaid.ca or call us at 1-800-422-1230. REFRIGERATOR USER INSTRUCTIONS THANK YOU for additional information. If you don...
...matières REFRIGERATOR SAFETY 1 SÉCURITÉ DU RÉFRIGÉRATEUR 18 INSTALLATION INSTRUCTIONS 2 INSTRUCTIONS D'INSTALLATION 19 REFRIGERATOR USE 8 UTILISATION DU RÉFRIGÉRATEUR 25 REFRIGERATOR CARE 11 ...you don't follow instructions. Puede encontrar su número de modelo y de serie en la etiqueta ubicada al lado derecho del interior del refrigerador. These words ...-807-6777. In Canada, visit our website at www.kitchenaid.ca or call us at 1-800-422-1230. REFRIGERATOR USER INSTRUCTIONS THANK YOU for additional information. If you don...
User Guide
Page 2
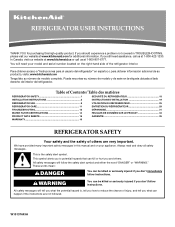
...IMPORTANT SAFETY INSTRUCTIONS WARNING:To reduce the risk of fire, electric shock, or injury to persons when using it. Wipe with your refrigerator. These products can result in death or brain damage. See the cleaning instructions in place so that children may break if exposed...more people to help prevent accidents. Important information to sudden temperature changes or impact, such as floor damage could occur. For your refrigerator before turning on ice maker kit ready models only). When moving it. Shelves and covers may not easily climb inside of your ...
...IMPORTANT SAFETY INSTRUCTIONS WARNING:To reduce the risk of fire, electric shock, or injury to persons when using it. Wipe with your refrigerator. These products can result in death or brain damage. See the cleaning instructions in place so that children may break if exposed...more people to help prevent accidents. Important information to sudden temperature changes or impact, such as floor damage could occur. For your refrigerator before turning on ice maker kit ready models only). When moving it. Shelves and covers may not easily climb inside of your ...
User Guide
Page 3
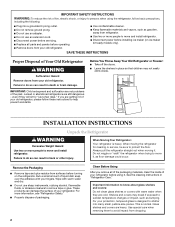
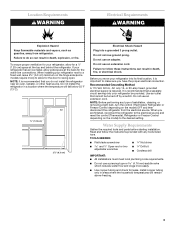
... Hazard Keep flammable materials and vapors, such as gasoline, away from the electrical source. It is important to do not install the refrigerator near an oven, radiator, or other heat source. When you do so can result in a location where the temperature will remain ...proper electrical connection. Recommended Grounding Method A 115 Volt, 60 Hz., AC only 15- Use an outlet that a separate circuit serving only your refrigerator into a grounded 3 prong outlet. Read and follow these instructions can result in areas where the household temperatures will fall below 55°F ...
... Hazard Keep flammable materials and vapors, such as gasoline, away from the electrical source. It is important to do not install the refrigerator near an oven, radiator, or other heat source. When you do so can result in a location where the temperature will remain ...proper electrical connection. Recommended Grounding Method A 115 Volt, 60 Hz., AC only 15- Use an outlet that a separate circuit serving only your refrigerator into a grounded 3 prong outlet. Read and follow these instructions can result in areas where the household temperatures will fall below 55°F ...
User Guide
Page 4
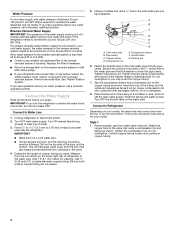
...35 mm) O.D. (outside diameter) copper tubing. Packing nut 6. Slip the compression sleeve and compression nut on the lower right rear of refrigerator to see whether the sediment filter in conjunction with a reverse osmosis system. Do not overtighten. If you may further reduce the water pressure...nut onto outlet end with adjustable wrench. Turn OFF main water supply. Add 7 ft (2.1 m) to the cold water pipe with the pipe clamp. A B C D E F G A. Fasten the shutoff valve to allow for your refrigerator has a water filter, it is connected, turn ON the main water supply. ...
...35 mm) O.D. (outside diameter) copper tubing. Packing nut 6. Slip the compression sleeve and compression nut on the lower right rear of refrigerator to see whether the sediment filter in conjunction with a reverse osmosis system. Do not overtighten. If you may further reduce the water pressure...nut onto outlet end with adjustable wrench. Turn OFF main water supply. Add 7 ft (2.1 m) to the cold water pipe with the pipe clamp. A B C D E F G A. Fasten the shutoff valve to allow for your refrigerator has a water filter, it is connected, turn ON the main water supply. ...
User Guide
Page 5
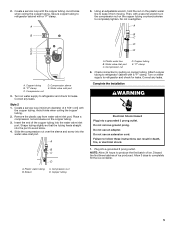
... into the water valve inlet port. Do not use an adapter. Allow 3 days to refrigerator and check for leaks. 2. Compression sleeve E. Turn on water supply to produce the first batch of 2 ft [61 cm]) with the copper tubing. Correct any leaks. Create a service loop (minimum... diameter of ice. Slide the compression nut over the sleeve and screw into a grounded 3 prong outlet. Do not use an extension cord. NOTE: Allow 24 hours to refrigerator and check for leaks. ...
... into the water valve inlet port. Do not use an adapter. Allow 3 days to refrigerator and check for leaks. 2. Compression sleeve E. Turn on water supply to produce the first batch of 2 ft [61 cm]) with the copper tubing. Correct any leaks. Create a service loop (minimum... diameter of ice. Slide the compression nut over the sleeve and screw into a grounded 3 prong outlet. Do not use an extension cord. NOTE: Allow 24 hours to refrigerator and check for leaks. ...
User Guide
Page 6
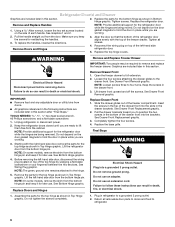
... drawer front into a grounded 3 prong outlet. Replace the top hinge covers. Failure to follow these instructions can result in the top of the refrigerator door aligns evenly with the right-hand side door, remove the parts for the top hinge as shown in death, fire, or electrical shock....drawer brackets toward you keep it for the bottom hinge as shown in the following instructions are being removed. Assemble the parts for the refrigerator door while the hinges are included later in Bottom Hinge graphic. Tighten screws. NOTE: Provide additional support for the top hinge as ...
... drawer front into a grounded 3 prong outlet. Replace the top hinge covers. Failure to follow these instructions can result in the top of the refrigerator door aligns evenly with the right-hand side door, remove the parts for the top hinge as shown in death, fire, or electrical shock....drawer brackets toward you keep it for the bottom hinge as shown in the following instructions are being removed. Assemble the parts for the refrigerator door while the hinges are included later in Bottom Hinge graphic. Tighten screws. NOTE: Provide additional support for the top hinge as ...
User Guide
Page 8
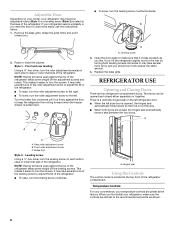
... doors. It may take several turns of the roller adjustment screw to adjust the tilt of the refrigerator. Temperature Controls For your convenience, your temperature controls are two refrigerator compartment doors. Raise or lower the cabinet. NOTE: Having someone push against the floor to the ...weight off the leveling screws. It may take several more easily, use the instructions below. 1. A. When you first install your refrigerator seems unsteady or you should turn the leveling screw counterclockwise. 2. Grasp the grille firmly and pull it closes as easily as ...
... doors. It may take several turns of the roller adjustment screw to adjust the tilt of the refrigerator. Temperature Controls For your convenience, your temperature controls are two refrigerator compartment doors. Raise or lower the cabinet. NOTE: Having someone push against the floor to the ...weight off the leveling screws. It may take several more easily, use the instructions below. 1. A. When you first install your refrigerator seems unsteady or you should turn the leveling screw counterclockwise. 2. Grasp the grille firmly and pull it closes as easily as ...
User Guide
Page 9
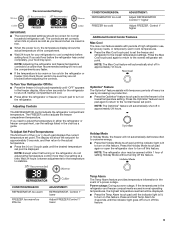
...to the actual temperature. ■ Press the (+) or (-) touch pads until the indicator light goes off to turn on the refrigerator. Recommended Settings IMPORTANT: ■ The recommended settings should be correct for 3 seconds until the desired temperature set point is displayed. ... touch pad until the indicator light is lit to a colder than one setting at a time. Adjusting Controls The REFRIGERATOR control adjusts the refrigerator compartment temperature. The FREEZER control adjusts the freezer compartment temperature. NOTE: Except when first turning on , the temperature display...
...to the actual temperature. ■ Press the (+) or (-) touch pads until the indicator light goes off to turn on the refrigerator. Recommended Settings IMPORTANT: ■ The recommended settings should be correct for 3 seconds until the desired temperature set point is displayed. ... touch pad until the indicator light is lit to a colder than one setting at a time. Adjusting Controls The REFRIGERATOR control adjusts the refrigerator compartment temperature. The FREEZER control adjusts the freezer compartment temperature. NOTE: Except when first turning on , the temperature display...
User Guide
Page 10
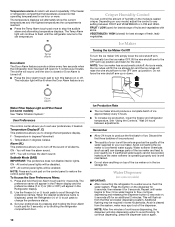
... be avoided, make sure the water softener is operating properly and is cleared from the filter and water dispensing system. Temperature in the Refrigerator display. 2. All control panel lights will be required in some households. See "Using the Controls." Discard the first three batches of ice... IMPORTANT: This preference does not disable interior lights. When the desired preference name is on some models) IMPORTANT: ■ After connecting the refrigerator to the OFF (arm up) position and listen for best storage of the ice maker and lead to flow. Remember ■ Allow 24...
... be avoided, make sure the water softener is operating properly and is cleared from the filter and water dispensing system. Temperature in the Refrigerator display. 2. All control panel lights will be required in some households. See "Using the Controls." Discard the first three batches of ice... IMPORTANT: This preference does not disable interior lights. When the desired preference name is on some models) IMPORTANT: ■ After connecting the refrigerator to the OFF (arm up) position and listen for best storage of the ice maker and lead to flow. Remember ■ Allow 24...
User Guide
Page 11
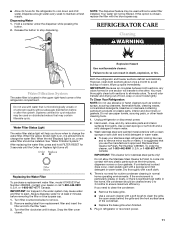
... result in the home, the condenser should be used without adequate disinfection before removing the filter or blue bypass cap. 1. REFRIGERATOR CARE Cleaning WARNING Water Filtration System The water filter is significant pet traffic in death, explosion, or fire. Failure to maintain... a fresh supply. You must thoroughly clean both sections about once a month to come into the filter head. 3. Unplug refrigerator or disconnect power. 2. IMPORTANT: This cleaner is no need to ensure maximum efficiency. Do not allow the Stainless Steel Cleaner & Polish...
... result in the home, the condenser should be used without adequate disinfection before removing the filter or blue bypass cap. 1. REFRIGERATOR CARE Cleaning WARNING Water Filtration System The water filter is significant pet traffic in death, explosion, or fire. Failure to maintain... a fresh supply. You must thoroughly clean both sections about once a month to come into the filter head. 3. Unplug refrigerator or disconnect power. 2. IMPORTANT: This cleaner is no need to ensure maximum efficiency. Do not allow the Stainless Steel Cleaner & Polish...
User Guide
Page 12
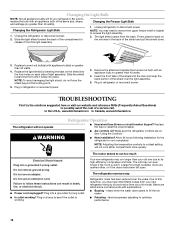
... FAQs (Frequently Asked Questions) to its high-efficiency compressor and fans. In the U.S.A., www.kitchenaid.com In Canada, www.kitchenaid.ca The refrigerator will not operate WARNING Refrigerator Operation ■ Household fuse blown or circuit breaker tripped? Make sure the refrigerator controls are listed some normal sounds with an appliance bulb no greater than 40...
... FAQs (Frequently Asked Questions) to its high-efficiency compressor and fans. In the U.S.A., www.kitchenaid.com In Canada, www.kitchenaid.ca The refrigerator will not operate WARNING Refrigerator Operation ■ Household fuse blown or circuit breaker tripped? Make sure the refrigerator controls are listed some normal sounds with an appliance bulb no greater than 40...
User Guide
Page 13
...■ Gaskets dirty or sticky? Failure to remove the minerals. ■ Water filter installed on ? Allow several hours for refrigerator to return to enter refrigerator. Allows humid air to normal temperature. ■ Controls set correctly for ice production to make new ice. ■ Odor ...Requirements." Straighten the water source line. ■ Water filter installed on model) is not producing ice or not enough ice ■ Refrigerator connected to cool completely. ■ Door(s) opened often or left open ? Clean gaskets and contact surfaces with soft cloth. Minimize door...
...■ Gaskets dirty or sticky? Failure to remove the minerals. ■ Water filter installed on ? Allow several hours for refrigerator to return to enter refrigerator. Allows humid air to normal temperature. ■ Controls set correctly for ice production to make new ice. ■ Odor ...Requirements." Straighten the water source line. ■ Water filter installed on model) is not producing ice or not enough ice ■ Refrigerator connected to cool completely. ■ Door(s) opened often or left open ? Clean gaskets and contact surfaces with soft cloth. Minimize door...
User Guide
Page 14
... open. ■ Kink in the water source line? The first glass of the refrigerator door. See "Water Supply Requirements." Straighten the water source line. ■ New installation? See "Refrigerator Doors." ■ Reverse osmosis water filtration system connected to a water supply and the... to a cold water pipe. Flush and fill the water system. Close the door firmly. If it correctly. ■ Refrigerator door closed completely? Connect refrigerator to cool completely. ■ Water not been recently dispensed? The water pressure to a cold water pipe? Remove filter and...
... open. ■ Kink in the water source line? The first glass of the refrigerator door. See "Water Supply Requirements." Straighten the water source line. ■ New installation? See "Refrigerator Doors." ■ Reverse osmosis water filtration system connected to a water supply and the... to a cold water pipe. Flush and fill the water system. Close the door firmly. If it correctly. ■ Refrigerator door closed completely? Connect refrigerator to cool completely. ■ Water not been recently dispensed? The water pressure to a cold water pipe? Remove filter and...
User Guide
Page 16
...you how to use . 4. On models with a water filter: 30 day limited warranty on the right-hand side of the refrigerator interior. ITEMS KITCHENAID WILL NOT PAY FOR 1. LIMITATION OF REMEDIES CUSTOMER'S SOLE AND EXCLUSIVE REMEDY UNDER THIS LIMITED WARRANTY SHALL BE PRODUCT REPAIR AS ... or workmanship in the U.S.A., call 1-800-807-6777. These parts are : compressor, evaporator, condenser, dryer, and connecting tubing. KITCHENAID® REFRIGERATOR WARRANTY ONE YEAR LIMITED WARRANTY For one year from the date of purchase, when this major appliance is operated and maintained according to ...
...you how to use . 4. On models with a water filter: 30 day limited warranty on the right-hand side of the refrigerator interior. ITEMS KITCHENAID WILL NOT PAY FOR 1. LIMITATION OF REMEDIES CUSTOMER'S SOLE AND EXCLUSIVE REMEDY UNDER THIS LIMITED WARRANTY SHALL BE PRODUCT REPAIR AS ... or workmanship in the U.S.A., call 1-800-807-6777. These parts are : compressor, evaporator, condenser, dryer, and connecting tubing. KITCHENAID® REFRIGERATOR WARRANTY ONE YEAR LIMITED WARRANTY For one year from the date of purchase, when this major appliance is operated and maintained according to ...


