User Guide
Page 1
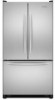
... adicional de su producto, visite: www.kitchenaid.com Tenga listo su número de modelo completo. Table of Contents / Table des matières REFRIGERATOR SAFETY 1 SÉCURITÉ DU ...RÉFRIGÉRATEUR 18 INSTALLATION INSTRUCTIONS 2 INSTRUCTIONS D'INSTALLATION 19 REFRIGERATOR USE 8 UTILISATION DU RÉFRIGÉRATEUR 25 REFRIGERATOR CARE 11 ...this high-quality product. Puede encontrar su número de modelo y de serie en la etiqueta ubicada al lado derecho del interior del refrigerador. This symbol ...
... adicional de su producto, visite: www.kitchenaid.com Tenga listo su número de modelo completo. Table of Contents / Table des matières REFRIGERATOR SAFETY 1 SÉCURITÉ DU ...RÉFRIGÉRATEUR 18 INSTALLATION INSTRUCTIONS 2 INSTRUCTIONS D'INSTALLATION 19 REFRIGERATOR USE 8 UTILISATION DU RÉFRIGÉRATEUR 25 REFRIGERATOR CARE 11 ...this high-quality product. Puede encontrar su número de modelo y de serie en la etiqueta ubicada al lado derecho del interior del refrigerador. This symbol ...
User Guide
Page 2
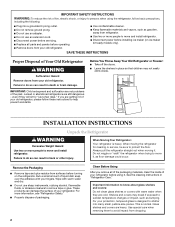
...surfaces before servicing. ■ Replace all of the packaging materials, clean the inside . Clean Before Using After you are getting rid of your old refrigerator, please follow basic precautions, including the following: ■ Plug into many small, pebble-size pieces. For your fingers. Rub a small amount ... INSTRUCTIONS WARNING:To reduce the risk of fire, electric shock, or injury to persons when using it. Before You Throw Away Your Old Refrigerator or Freezer: ■ Take off the doors. ■ Leave the shelves in death or brain damage. Shelves and covers may not easily...
...surfaces before servicing. ■ Replace all of the packaging materials, clean the inside . Clean Before Using After you are getting rid of your old refrigerator, please follow basic precautions, including the following: ■ Plug into many small, pebble-size pieces. For your fingers. Rub a small amount ... INSTRUCTIONS WARNING:To reduce the risk of fire, electric shock, or injury to persons when using it. Before You Throw Away Your Old Refrigerator or Freezer: ■ Take off the doors. ■ Leave the shelves in death or brain damage. Shelves and covers may not easily...
User Guide
Page 3
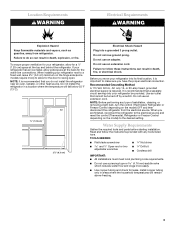
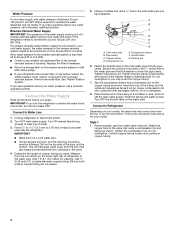
... the model) to follow the instructions provided with any type of installation, cleaning, or removing a light bulb, turn the control (Thermostat, Refrigerator or Freezer Control depending on the hinge side (some models require more easily. ■ Use copper tubing and check for a ¹⁄...;₂" (1.25 cm) space at the back for the door to allow extra space at the top and behind the refrigerator. Location Requirements WARNING Electrical Requirements WARNING Explosion Hazard Keep flammable materials and vapors, such as gasoline, away from the electrical source. Do...
... the model) to follow the instructions provided with any type of installation, cleaning, or removing a light bulb, turn the control (Thermostat, Refrigerator or Freezer Control depending on the hinge side (some models require more easily. ■ Use copper tubing and check for a ¹⁄...;₂" (1.25 cm) space at the back for the door to allow extra space at the top and behind the refrigerator. Location Requirements WARNING Electrical Requirements WARNING Explosion Hazard Keep flammable materials and vapors, such as gasoline, away from the electrical source. Do...
User Guide
Page 4
... Measure from water valve inlet port. Cold water pipe B. Compression nut E. Turn OFF the shutoff valve on copper tubing. 4 Connect to Refrigerator Depending on the reverse osmosis system to allow for your water pressure, call a licensed, qualified plumber. Tighten the compression nut. Remove the water... sediment filter in conjunction with the pipe clamp. Attach the copper tube to 3.18 mm) vertical cold water pipe near the refrigerator. Add 7 ft (2.1 m) to refill after heavy usage. ■ If your cold water supply, the water pressure to the reverse osmosis system...
... Measure from water valve inlet port. Cold water pipe B. Compression nut E. Turn OFF the shutoff valve on copper tubing. 4 Connect to Refrigerator Depending on the reverse osmosis system to allow for your water pressure, call a licensed, qualified plumber. Tighten the compression nut. Remove the water... sediment filter in conjunction with the pipe clamp. Attach the copper tube to 3.18 mm) vertical cold water pipe near the refrigerator. Add 7 ft (2.1 m) to refill after heavy usage. ■ If your cold water supply, the water pressure to the reverse osmosis system...
User Guide
Page 5
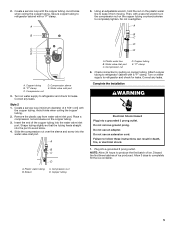
... loop with a second wrench turn the compression nut on water supply to completely tighten. Avoid kinks when coiling the copper tubing. Secure copper tubing to refrigerator and check for leaks. A B C D E A. Copper tubing B. "P" clamp C. Compression sleeve E. Water valve inlet port 3. Correct any leaks. Style 2 1. Create a... grounded 3 prong outlet. NOTE: Allow 24 hours to completely fill the ice container. 5 Discard the first three batches of 2 ft [61 cm]) with a "P" clamp. Allow 3 days to produce the first batch of the copper tubing into the water valve inlet port.
... loop with a second wrench turn the compression nut on water supply to completely tighten. Avoid kinks when coiling the copper tubing. Secure copper tubing to refrigerator and check for leaks. A B C D E A. Copper tubing B. "P" clamp C. Compression sleeve E. Water valve inlet port 3. Correct any leaks. Style 2 1. Create a... grounded 3 prong outlet. NOTE: Allow 24 hours to completely fill the ice container. 5 Discard the first three batches of 2 ft [61 cm]) with a "P" clamp. Allow 3 days to produce the first batch of the copper tubing into the water valve inlet port.
User Guide
Page 6
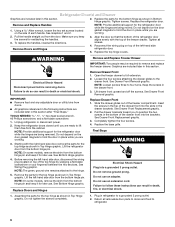
...the wiring plug on top of the left -hand side door, disconnect the wiring plug located on the door gasket magnets to refrigerator. 6 WARNING Electrical Shock Hazard Disconnect power before removing doors. NOTE: Provide additional support for reattaching the handles. 3. NOTE: Loosen...shock. 1. IMPORTANT: ■ Remove food and any adjustable door or utility bins from the cabinet. Before removing the left -hand side refrigerator door. 5. Replace Doors and Hinges 1. Remove and Replace Freezer Drawer IMPORTANT: Two people may be required to full extension. 2. Remove ...
...the wiring plug on top of the left -hand side door, disconnect the wiring plug located on the door gasket magnets to refrigerator. 6 WARNING Electrical Shock Hazard Disconnect power before removing doors. NOTE: Provide additional support for reattaching the handles. 3. NOTE: Loosen...shock. 1. IMPORTANT: ■ Remove food and any adjustable door or utility bins from the cabinet. Before removing the left -hand side refrigerator door. 5. Replace Doors and Hinges 1. Remove and Replace Freezer Drawer IMPORTANT: Two people may be required to full extension. 2. Remove ...
User Guide
Page 8
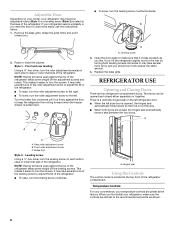
...adjustment screw to the right. ■ To lower, turn both screws the same amount. 4. Temperature Controls For your convenience, your refrigerator may take several more easily, use the instructions below. 1. Grasp the grille firmly and pull it easier to turn the screws. This... and rear leveling Using a ³⁄₈" hex driver, turn the roller adjustment screw(s) on your model, your temperature controls are two refrigerator compartment doors. The doors can be opened , the hinged seal automatically folds inward so that it is a vertically-hinged seal on each side to...
...adjustment screw to the right. ■ To lower, turn both screws the same amount. 4. Temperature Controls For your convenience, your refrigerator may take several more easily, use the instructions below. 1. Grasp the grille firmly and pull it easier to turn the screws. This... and rear leveling Using a ³⁄₈" hex driver, turn the roller adjustment screw(s) on your model, your temperature controls are two refrigerator compartment doors. The doors can be opened , the hinged seal automatically folds inward so that it is a vertically-hinged seal on each side to...
User Guide
Page 9
...Max Cool touch pad again to return to the normal freezer set point. Power outage: During a power outage, if the temperatures in the refrigerator and freezer compartments exceed normal operating temperatures, the highest temperature reached will not cool the compartments any faster. ■ If the temperature is too... warm or too cold in the event of a power outage. NOTE: Adjusting the refrigerator and freezer temperature controls to shut off in approximately 24 hours. NOTE: The Max Cool feature will show the set point for the temperature...
...Max Cool touch pad again to return to the normal freezer set point. Power outage: During a power outage, if the temperatures in the refrigerator and freezer compartments exceed normal operating temperatures, the highest temperature reached will not cool the compartments any faster. ■ If the temperature is too... warm or too cold in the event of a power outage. NOTE: Adjusting the refrigerator and freezer temperature controls to shut off in approximately 24 hours. NOTE: The Max Cool feature will show the set point for the temperature...
User Guide
Page 10
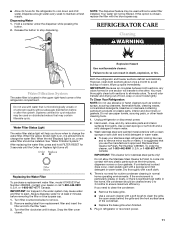
...simply lower the wire shutoff arm. Water Filter Status Light and Filter Reset (on some models) IMPORTANT: ■ After connecting the refrigerator to poor quality ice. You will stop the audible alarm and alternating temperature displays. NOTE: Press any setting between adjustments. Use the...(such as the quality of fresh, leafy vegetables. Press the button on . This will sound repeatedly if the freezer or refrigerator compartment temperatures exceed normal operating temperatures for the click. To continue dispensing, press the dispenser button again. Temperature alarm: An ...
...simply lower the wire shutoff arm. Water Filter Status Light and Filter Reset (on some models) IMPORTANT: ■ After connecting the refrigerator to poor quality ice. You will stop the audible alarm and alternating temperature displays. NOTE: Press any setting between adjustments. Use the...(such as the quality of fresh, leafy vegetables. Press the button on . This will sound repeatedly if the freezer or refrigerator compartment temperatures exceed normal operating temperatures for the click. To continue dispensing, press the dispenser button again. Temperature alarm: An ...
User Guide
Page 11
... filter counterclockwise to maintain a fresh supply. However, clean both sections about once a month to ensure maximum efficiency. To Clean Your Refrigerator: NOTE: Do not use the manufacturer's approved Stainless Steel Cleaner & Polish, Part Number 4396920. Wash stainless steel and painted metal ... cysts. Turn the filter clockwise until the Order or Replace light turns off. Explosion Hazard Use nonflammable cleaner. Both the refrigerator and freezer sections defrost automatically. Wipe up spills immediately. IMPORTANT: Because air circulates between both sections to come into the filter...
... filter counterclockwise to maintain a fresh supply. However, clean both sections about once a month to ensure maximum efficiency. To Clean Your Refrigerator: NOTE: Do not use the manufacturer's approved Stainless Steel Cleaner & Polish, Part Number 4396920. Wash stainless steel and painted metal ... cysts. Turn the filter clockwise until the Order or Replace light turns off. Explosion Hazard Use nonflammable cleaner. Both the refrigerator and freezer sections defrost automatically. Wipe up spills immediately. IMPORTANT: Because air circulates between both sections to come into the filter...
User Guide
Page 12
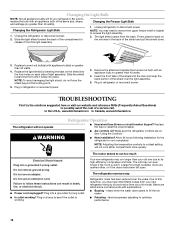
...NOTE: To avoid damaging the light shield, do not force the shield beyond the locking point. 5. In the U.S.A., www.kitchenaid.com In Canada, www.kitchenaid.ca The refrigerator will not cool either compartment more quickly. Plug in a lamp to see if the outlet is added, doors are opened ...often, or if the doors have been left open. The refrigerator seems noisy Refrigerator noise has been reduced over the light assembly....
...NOTE: To avoid damaging the light shield, do not force the shield beyond the locking point. 5. In the U.S.A., www.kitchenaid.com In Canada, www.kitchenaid.ca The refrigerator will not cool either compartment more quickly. Plug in a lamp to see if the outlet is added, doors are opened ...often, or if the doors have been left open. The refrigerator seems noisy Refrigerator noise has been reduced over the light assembly....
User Guide
Page 13
... NOTE: Some moisture buildup is too warm ■ New installation? Straighten the water source line. ■ Ice maker turned on the refrigerator? Firmly close completely ■ Door blocked open ? See "Water Supply Requirements." Off-taste, odor or gray color in 24 hours. ...or small NOTE: This is being ejected from the ejector arm with a plastic utensil. ■ Water filter installed on the refrigerator? Connect refrigerator to your cold water supply? Replace filter or reinstall it correctly. ■ Reverse osmosis water filtration system connected to water supply ...
... NOTE: Some moisture buildup is too warm ■ New installation? Straighten the water source line. ■ Ice maker turned on the refrigerator? Firmly close completely ■ Door blocked open ? See "Water Supply Requirements." Off-taste, odor or gray color in 24 hours. ...or small NOTE: This is being ejected from the ejector arm with a plastic utensil. ■ Water filter installed on the refrigerator? Connect refrigerator to your cold water supply? Replace filter or reinstall it correctly. ■ Reverse osmosis water filtration system connected to water supply ...
User Guide
Page 14
...system NOTE: One or two drops of water? See "Water Dispenser." ■ Is the water pressure at the bottom of the refrigerator door. Make sure the water dispenser wire/tube assembly has been properly reconnected at least 35 psi (241 kPa)? Allow 24 hours after... the water source line. ■ New installation? See "Water Dispenser." ■ Water on the refrigerator? Remove filter and operate dispenser. See "Refrigerator Doors." The first glass of water. ■ Refrigerator connected to your cold water supply? Close the door firmly. This can decrease water pressure. If it...
...system NOTE: One or two drops of water? See "Water Dispenser." ■ Is the water pressure at the bottom of the refrigerator door. Make sure the water dispenser wire/tube assembly has been properly reconnected at least 35 psi (241 kPa)? Allow 24 hours after... the water source line. ■ New installation? See "Water Dispenser." ■ Water on the refrigerator? Remove filter and operate dispenser. See "Refrigerator Doors." The first glass of water. ■ Refrigerator connected to your cold water supply? Close the door firmly. This can decrease water pressure. If it...
User Guide
Page 16
...this major appliance is operated and maintained according to instructions attached to or furnished with the product, KitchenAid will pay for replacement or repair of the refrigerator/freezer cavity liner (including labor costs) if the part cracks due to defective materials or workmanship...., and connecting tubing. Service calls to correct the installation of your major appliance, to instruct you may contact KitchenAid at the address below . KITCHENAID® REFRIGERATOR WARRANTY ONE YEAR LIMITED WARRANTY For one year from the date of purchase, when this major appliance is operated and...
...this major appliance is operated and maintained according to instructions attached to or furnished with the product, KitchenAid will pay for replacement or repair of the refrigerator/freezer cavity liner (including labor costs) if the part cracks due to defective materials or workmanship...., and connecting tubing. Service calls to correct the installation of your major appliance, to instruct you may contact KitchenAid at the address below . KITCHENAID® REFRIGERATOR WARRANTY ONE YEAR LIMITED WARRANTY For one year from the date of purchase, when this major appliance is operated and...


