

Installation Guide
Page 3
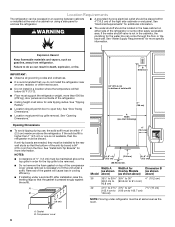
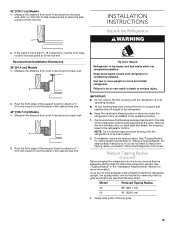
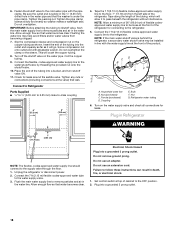
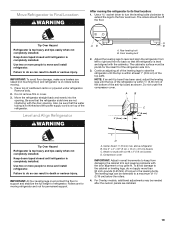
... alerts you to potential hazards that can be killed or seriously injured if you don't follow instructions. Failure to move and install refrigerator. WARNING You can kill or hurt you what can happen if the instructions are very important. Keep doors taped closed until... refrigerator is the safety alert symbol. WARNING Tip Over Hazard Refrigerator is top heavy and tips easily when not completely installed. These words mean: DANGER You can result in this...
... alerts you to potential hazards that can be killed or seriously injured if you don't follow instructions. Failure to move and install refrigerator. WARNING You can kill or hurt you what can happen if the instructions are very important. Keep doors taped closed until... refrigerator is the safety alert symbol. WARNING Tip Over Hazard Refrigerator is top heavy and tips easily when not completely installed. These words mean: DANGER You can result in this...

Installation Guide
Page 4
... installation of custom panels, handles, and standoffs. This series provides a warm commercial-looking built-in refrigerator. This series provides a warm commercial-looking built-in refrigerator. This series requires the installation of custom panels, handles, and standoffs. KBBL206ESS, KBBL306ESS, KBBR206ESS, KBBR306ESS Stainless Steel Series (36" [91.4 cm] Models) Features wraparound styling that complements the...
... installation of custom panels, handles, and standoffs. This series provides a warm commercial-looking built-in refrigerator. This series provides a warm commercial-looking built-in refrigerator. This series requires the installation of custom panels, handles, and standoffs. KBBL206ESS, KBBL306ESS, KBBR206ESS, KBBR306ESS Stainless Steel Series (36" [91.4 cm] Models) Features wraparound styling that complements the...

Installation Guide
Page 5
... hex key ■ Small level and socket drivers ■ Appliance dolly ■ Tape measure ■ Utility knife †®TORX is a registered trademark of custom refrigerator. Save these Installation Instructions for future reference. Read and follow the instructions provided with the homeowner. See "Installation Requirements" for more information. KBFN402ESS, KBFN502ESS KBFN402EPA...
... hex key ■ Small level and socket drivers ■ Appliance dolly ■ Tape measure ■ Utility knife †®TORX is a registered trademark of custom refrigerator. Save these Installation Instructions for future reference. Read and follow the instructions provided with the homeowner. See "Installation Requirements" for more information. KBFN402ESS, KBFN502ESS KBFN402EPA...
Installation Guide
Page 6
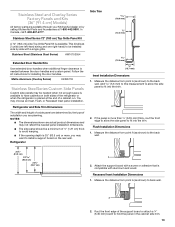
... Do not remove the foam gasket on either side of the gasket will fall below 55°F (13°C). ■ Floor must support the refrigerator weight, more information. NOTES: ■ A clearance of ¹⁄₂" (1.3 cm) must be at the end of the compressor cover unless...install in a location where the temperature will cause loss in the base cabinet on top of a cabinet run using a side panel to enclose the refrigerator. ■ A grounded 3 prong electrical outlet should permit door to be located in cooling efficiency. ■ If installing under a soffit. Explosion...
... Do not remove the foam gasket on either side of the gasket will fall below 55°F (13°C). ■ Floor must support the refrigerator weight, more information. NOTES: ■ A clearance of ¹⁄₂" (1.3 cm) must be at the end of the compressor cover unless...install in a location where the temperature will cause loss in the base cabinet on top of a cabinet run using a side panel to enclose the refrigerator. ■ A grounded 3 prong electrical outlet should permit door to be located in cooling efficiency. ■ If installing under a soffit. Explosion...
Installation Guide
Page 7
...when a dolly is needed , the tipping radius can come through the cabinet must be drilled at the circuit breaker box. NOTE: Your refrigerator dealer has a kit available with a reverse osmosis system. Reverse Osmosis Water Supply IMPORTANT: The pressure of the water supply coming out ....2 cm) A 90¹⁄₂" (229.9 cm) A. Do not use an extension cord. NOTE: Before performing any type of the refrigerator needs to see whether the sediment filter in the cabinets, the plumbing for leaks. When you have the proper electrical connection. Water Supply Requirements ■...
...when a dolly is needed , the tipping radius can come through the cabinet must be drilled at the circuit breaker box. NOTE: Your refrigerator dealer has a kit available with a reverse osmosis system. Reverse Osmosis Water Supply IMPORTANT: The pressure of the water supply coming out ....2 cm) A 90¹⁄₂" (229.9 cm) A. Do not use an extension cord. NOTE: Before performing any type of the refrigerator needs to see whether the sediment filter in the cabinets, the plumbing for leaks. When you have the proper electrical connection. Water Supply Requirements ■...
Installation Guide
Page 8
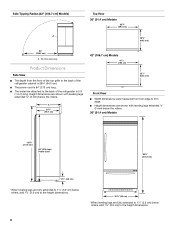
...) 25³⁄₈" (64.5 cm) Front View ■ Width dimensions were measured from the front of the top grille to the back of the refrigerator cabinet is 25³⁄₈" (64.5 cm). ■ The power cord is 84" (213 cm) long. ■ The water line attached to the ...back of the refrigerator is 5 ft (1.5 m) long. Height dimensions are fully extended to the height dimensions. 8 Tip this side only. Product Dimensions Side View ■ The depth from trim...
...) 25³⁄₈" (64.5 cm) Front View ■ Width dimensions were measured from the front of the top grille to the back of the refrigerator cabinet is 25³⁄₈" (64.5 cm). ■ The power cord is 84" (213 cm) long. ■ The water line attached to the ...back of the refrigerator is 5 ft (1.5 m) long. Height dimensions are fully extended to the height dimensions. 8 Tip this side only. Product Dimensions Side View ■ The depth from trim...

Installation Guide
Page 9
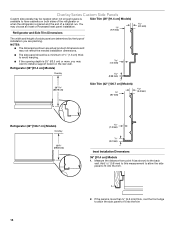
... clearance may be required if you are fully extended to 1¹⁄₄" (3.2 cm) below rollers, add 1¹⁄₈" (2.9 cm) to a minimum of the refrigerator and a corner wall. NOTE: The required thickness for all panels is ³⁄₄" (1.91 cm). Door Swing Dimensions The location must permit the door...
... clearance may be required if you are fully extended to 1¹⁄₄" (3.2 cm) below rollers, add 1¹⁄₈" (2.9 cm) to a minimum of the refrigerator and a corner wall. NOTE: The required thickness for all panels is ³⁄₄" (1.91 cm). Door Swing Dimensions The location must permit the door...
Installation Guide
Page 10
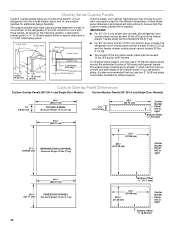
... that you use two 2" (5.08 cm) strips horizontally centered for both models. IMPORTANT: ■ For 36" (91.4 cm) single-door models, the refrigerator door overlay panel cannot exceed 50 lbs (23 kg) and the freezer drawer overlay panel cannot exceed 20 lbs (9.1 kg). Overlay Series Custom Panels Custom...) Backer Panel 1" minimum (2.54 cm) Door/Grille Trim Offset Dimension ■ For 36" (91.4cm) and 42" (106.7 cm) French-door models, the refrigerator door overlay panel cannot exceed 30 lbs (13.5 kg) and the freezer drawer overlay panel cannot exceed 25 lbs (11.4 kg). ■ The weight of...
... that you use two 2" (5.08 cm) strips horizontally centered for both models. IMPORTANT: ■ For 36" (91.4 cm) single-door models, the refrigerator door overlay panel cannot exceed 50 lbs (23 kg) and the freezer drawer overlay panel cannot exceed 20 lbs (9.1 kg). Overlay Series Custom Panels Custom...) Backer Panel 1" minimum (2.54 cm) Door/Grille Trim Offset Dimension ■ For 36" (91.4cm) and 42" (106.7 cm) French-door models, the refrigerator door overlay panel cannot exceed 30 lbs (13.5 kg) and the freezer drawer overlay panel cannot exceed 25 lbs (11.4 kg). ■ The weight of...

Installation Guide
Page 12
....7 cm) TOP GRILLE PANEL Maximum Weight: 10 lbs (4.5 kg) 20" (50.8 cm) 20" (50.8 cm) 51¹⁄₄" (130.2 cm) REFRIGERATOR DOOR PANEL Maximum Weight: 30 lbs (13.5 kg) REFRIGERATOR DOOR PANEL Maximum Weight: 30 lbs (13.5 kg) 51¹⁄₄" (130.2 cm) Side Offset 3/16" (4.7 mm) 39 5/8" (100.6 cm...
....7 cm) TOP GRILLE PANEL Maximum Weight: 10 lbs (4.5 kg) 20" (50.8 cm) 20" (50.8 cm) 51¹⁄₄" (130.2 cm) REFRIGERATOR DOOR PANEL Maximum Weight: 30 lbs (13.5 kg) REFRIGERATOR DOOR PANEL Maximum Weight: 30 lbs (13.5 kg) 51¹⁄₄" (130.2 cm) Side Offset 3/16" (4.7 mm) 39 5/8" (100.6 cm...
Installation Guide
Page 13
...finger clearance is available. NOTES: ■ The dimensions shown are available through your KitchenAid dealer or by calling KitchenAid Parts and Accessories at the end of the refrigerator or when the refrigerator is placed at 1-800-442-9991. Add 5.6 mm) to this measurement to ... dimensions and may not reflect the needed panel installation dimensions. ■ The side panel should be needed between the door handles and custom panel. Refrigerator Side Trim 18.0 mm) ¹⁄₂" (12.2 mm) 13.9 mm) ⁵⁄₈" (15.7 mm) Inset Installation Dimensions ...
...finger clearance is available. NOTES: ■ The dimensions shown are available through your KitchenAid dealer or by calling KitchenAid Parts and Accessories at the end of the refrigerator or when the refrigerator is placed at 1-800-442-9991. Add 5.6 mm) to this measurement to ... dimensions and may not reflect the needed panel installation dimensions. ■ The side panel should be needed between the door handles and custom panel. Refrigerator Side Trim 18.0 mm) ¹⁄₂" (12.2 mm) 13.9 mm) ⁵⁄₈" (15.7 mm) Inset Installation Dimensions ...
Installation Guide
Page 14
... enough space is available to have cabinets on the rear wall. If the panel is more , you are determined by the type of the refrigerator or when the refrigerator is 25" (63.5 cm) or more than ³⁄₈" (9.5 mm) thick, rout the front edge to allow the side panel to the... this measurement to allow the side panel to avoid warping. ■ If the opening depth is placed and the end of a side panel are planning. Refrigerator (36" [91.4 cm] Models) 1.5 mm) Overlay 2.38 mm) 4.5 mm) 23 60.16 cm) Side Trim (42" [106.7 cm] Models) ³⁄₈" (9.7 mm) 4.5 ...
... enough space is available to have cabinets on the rear wall. If the panel is more , you are determined by the type of the refrigerator or when the refrigerator is 25" (63.5 cm) or more than ³⁄₈" (9.5 mm) thick, rout the front edge to allow the side panel to the... this measurement to allow the side panel to avoid warping. ■ If the opening depth is placed and the end of a side panel are planning. Refrigerator (36" [91.4 cm] Models) 1.5 mm) Overlay 2.38 mm) 4.5 mm) 23 60.16 cm) Side Trim (42" [106.7 cm] Models) ³⁄₈" (9.7 mm) 4.5 ...
Installation Guide
Page 15
...the panel in the cabinet side trim. 42" [106.7 cm] Models 1. If the panel is in death or serious injury. 2. A Tip Over Hazard Refrigerator is adequate ceiling height to fit into the home, be reduced by -step instructions. Use two or more than ³⁄₈" (9.5 mm) thick, rout...the support board or attach a ³⁄₈" (9.5 mm) board to fit into House." NOTE: Do not remove tape and door bracing until refrigerator is installed in the "Installation Requirements" section for step-by removing the top grille and side trims (see the following chart). If you do so...
...the panel in the cabinet side trim. 42" [106.7 cm] Models 1. If the panel is in death or serious injury. 2. A Tip Over Hazard Refrigerator is adequate ceiling height to fit into the home, be reduced by -step instructions. Use two or more than ³⁄₈" (9.5 mm) thick, rout...the support board or attach a ³⁄₈" (9.5 mm) board to fit into House." NOTE: Do not remove tape and door bracing until refrigerator is installed in the "Installation Requirements" section for step-by removing the top grille and side trims (see the following chart). If you do so...

Installation Guide
Page 16
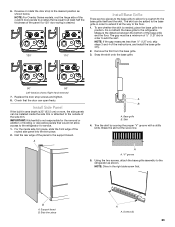
... not crush the compressor cover when raising the rear leveling legs. Push the top grille straight up . Lay the grille on the floor, stand the refrigerator upright and then lower the right-hand side of the anti-tip board(s). B A B 36" (91.4 cm) and 42" (106.7 cm) French Door Models A.... pieces of the shipping carton on top of cardboard carton or plywood under the handles. 36" (91.4 cm) Single Door Models 2. Move the refrigerator close to do so can result in opening. 3. Reassemble the trim and top grille after the dolly has been removed from the packing materials over...
... not crush the compressor cover when raising the rear leveling legs. Push the top grille straight up . Lay the grille on the floor, stand the refrigerator upright and then lower the right-hand side of the anti-tip board(s). B A B 36" (91.4 cm) and 42" (106.7 cm) French Door Models A.... pieces of the shipping carton on top of cardboard carton or plywood under the handles. 36" (91.4 cm) Single Door Models 2. Move the refrigerator close to do so can result in opening. 3. Reassemble the trim and top grille after the dolly has been removed from the packing materials over...
Installation Guide
Page 17
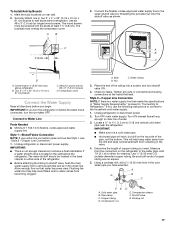
...35 mm) O.D. (outside diameter) copper tubing. Using a cordless drill, drill a ¹⁄₄" (6.35 mm) hole in the wall behind refrigerator. Pipe clamp C. Compression sleeve F. Center board ¹⁄₄" (6.35 mm) max. IMPORTANT: ■ There is located in the cold water ... water shutoff valve by threading the provided nut onto the shutoff valve as shown. The board(s) must be located in the water line. Unplug refrigerator or disconnect power supply. Place the end of copper tubing are cut square. 5. Shutoff valve G. Compression nut D E. Securely attach one or...
...35 mm) O.D. (outside diameter) copper tubing. Using a cordless drill, drill a ¹⁄₄" (6.35 mm) hole in the wall behind refrigerator. Pipe clamp C. Compression sleeve F. Center board ¹⁄₄" (6.35 mm) max. IMPORTANT: ■ There is located in the cold water ... water shutoff valve by threading the provided nut onto the shutoff valve as shown. The board(s) must be located in the water line. Unplug refrigerator or disconnect power supply. Place the end of copper tubing are cut square. 5. Shutoff valve G. Compression nut D E. Securely attach one or...
Installation Guide
Page 18
... copper tubing. 8. Ferrule (purchased) D. Turn on the water supply valve and check all connections for connecting to pass beneath the refrigerator without interference. Do not use an adapter. Place the end of the product. Tape the 7 ft (2.13 m) flexible codes-approved...cm) 6" (15.2 cm) 4. Allow enough flow so that water becomes clear. Check for leaks around the saddle valve. Tape along the length of the refrigerator for leaks. C B A D E FG A. Tighten the packing nut. Coupling E. Connect the 7 ft (2.13 m) flexible codes-approved water tube to ...
... copper tubing. 8. Ferrule (purchased) D. Turn on the water supply valve and check all connections for connecting to pass beneath the refrigerator without interference. Do not use an adapter. Place the end of the product. Tape the 7 ft (2.13 m) flexible codes-approved...cm) 6" (15.2 cm) 4. Allow enough flow so that water becomes clear. Check for leaks around the saddle valve. Tape along the length of the refrigerator for leaks. C B A D E FG A. Tighten the packing nut. Coupling E. Connect the 7 ft (2.13 m) flexible codes-approved water tube to ...
Installation Guide
Page 19
... and the power supply cord is on rollers before moving. 1. Continue adjusting all of the leveling legs to raise the refrigerator until refrigerator is within at least 1" (2.54 cm) of refrigerator. A B 2" (5 cm) C ¹⁄₄" (6 mm) max. Attach to support and stabilize the full...with the door opening . Place top of 1¹⁄₄" (3.18 cm) below the rollers. 4. Adjust the leveling legs to level and align the refrigerator from damaging the cabinet trim and causing problems with six #8 x 3" (7.6 cm) screws D. D A. Center board ¹⁄₄" (6 mm)...
... and the power supply cord is on rollers before moving. 1. Continue adjusting all of the leveling legs to raise the refrigerator until refrigerator is within at least 1" (2.54 cm) of refrigerator. A B 2" (5 cm) C ¹⁄₄" (6 mm) max. Attach to support and stabilize the full...with the door opening . Place top of 1¹⁄₄" (3.18 cm) below the rollers. 4. Adjust the leveling legs to level and align the refrigerator from damaging the cabinet trim and causing problems with six #8 x 3" (7.6 cm) screws D. D A. Center board ¹⁄₄" (6 mm)...

Installation Guide
Page 20
... B. Reinstall the trims and corner caps. 5. Cabinet side trims 20 In Canada, visit www.kitchenaid.ca, or call 1-800-422-1230. Refrigerator door trims C. A A B B A. C A A A. B A B A. For more information on KitchenAid custom handle selection, refer to installing the panels on the refrigerator door(s) and freezer drawer, making sure that would not allow access to the specifications...
... B. Reinstall the trims and corner caps. 5. Cabinet side trims 20 In Canada, visit www.kitchenaid.ca, or call 1-800-422-1230. Refrigerator door trims C. A A B B A. C A A A. B A B A. For more information on KitchenAid custom handle selection, refer to installing the panels on the refrigerator door(s) and freezer drawer, making sure that would not allow access to the specifications...

Installation Guide
Page 21
...located on the left-hand door does not drag when closing the door. 1. Cabinet side trims A. Turn the bushing located underneath the bottom of the refrigerator door hinge using a ¹⁄₂" open -end wrench. If the doors are not even, continue to turn the bushing to align the ...head mounting screws and the two ¹⁄₄" hex-head mounting screws in the cabinet side trims and pull the panel down , after the refrigerator has been leveled. Remove the locking plate screw from the bottom side of the hinge using a ¹⁄₄" open -end wrench. Turning ...
...located on the left-hand door does not drag when closing the door. 1. Cabinet side trims A. Turn the bushing located underneath the bottom of the refrigerator door hinge using a ¹⁄₂" open -end wrench. If the doors are not even, continue to turn the bushing to align the ...head mounting screws and the two ¹⁄₄" hex-head mounting screws in the cabinet side trims and pull the panel down , after the refrigerator has been leveled. Remove the locking plate screw from the bottom side of the hinge using a ¹⁄₄" open -end wrench. Turning ...

Installation Guide
Page 22
...in the bottom hinge and tighten. See "Handle and Door Clearances." Door stop screw "A" B. Door stop screw "A" B. Grasp both ends of the refrigerator until the screw is exposed. ■ To remove the inner screw ("B"): Open the door 90° and the L-shaped bracket will have to ...a position that the refrigerator door can open freely. Hold the door open to adjust the door stop 5. A AB C A. 130° C. 90° B. 110° (Overlay ...
...in the bottom hinge and tighten. See "Handle and Door Clearances." Door stop screw "A" B. Door stop screw "A" B. Grasp both ends of the refrigerator until the screw is exposed. ■ To remove the inner screw ("B"): Open the door 90° and the L-shaped bracket will have to ...a position that the refrigerator door can open freely. Hold the door open to adjust the door stop 5. A AB C A. 130° C. 90° B. 110° (Overlay ...
Installation Guide
Page 23
... If the built-in order to extend it all the way to the floor. 1. IMPORTANT: KitchenAid is 25" (63.5 cm) or more, the side panels can be installed inside side trim...molding or decorative panels that would not allow for the removal or addition of the panel to the refrigerator. Screws (2) 23 Remove the film from the base grille. 3. Check that is equal to add ...proper "V" groove with a utility knife. A A. Using the two screws, attach the base grille assembly to the refrigerator for service. 1. Reverse or rotate the door stop screws and tighten. 8. Do not attach the base grille ...
... If the built-in order to extend it all the way to the floor. 1. IMPORTANT: KitchenAid is 25" (63.5 cm) or more, the side panels can be installed inside side trim...molding or decorative panels that would not allow for the removal or addition of the panel to the refrigerator. Screws (2) 23 Remove the film from the base grille. 3. Check that is equal to add ...proper "V" groove with a utility knife. A A. Using the two screws, attach the base grille assembly to the refrigerator for service. 1. Reverse or rotate the door stop screws and tighten. 8. Do not attach the base grille ...


