
Installation Guide
Page 6
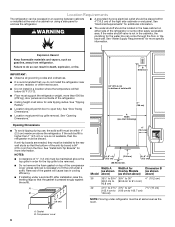
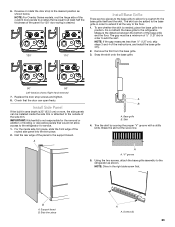
... "Tipping Radius." ■ Location should permit door to the rear wall studs so that the gasket is not available, then the refrigerator must allow for additional information. See "Install Anti-Tip Boards" for the water line can come through the floor or the back wall. Compressor cover 6 Removal of a cabinet run using a side panel to enclose the refrigerator. ■ A grounded 3 prong electrical outlet should be...
... "Tipping Radius." ■ Location should permit door to the rear wall studs so that the gasket is not available, then the refrigerator must allow for additional information. See "Install Anti-Tip Boards" for the water line can come through the floor or the back wall. Compressor cover 6 Removal of a cabinet run using a side panel to enclose the refrigerator. ■ A grounded 3 prong electrical outlet should be...
Installation Guide
Page 7
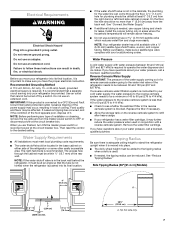
... type of cooling. Tipping Radius Be sure there is adequate ceiling height to stand the refrigerator upright when it is not in loss of installation or cleaning, remove the top grille and turn ON the master power switch or reconnect power at the circuit breaker box. Electrical Requirements WARNING Electrical Shock Hazard Plug into its final location, it is important to make sure a saddle-type valve complies with water...
... type of cooling. Tipping Radius Be sure there is adequate ceiling height to stand the refrigerator upright when it is not in loss of installation or cleaning, remove the top grille and turn ON the master power switch or reconnect power at the circuit breaker box. Electrical Requirements WARNING Electrical Shock Hazard Plug into its final location, it is important to make sure a saddle-type valve complies with water...
Installation Guide
Page 17
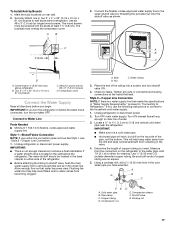
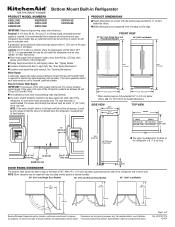
... of copper tubing are cut square. 5. Cold water pipe B. Unplug refrigerator or disconnect power supply. Water tubing 3. Check for cleaning. Measure from becoming clogged. Pipe clamp C. above refrigerator B. Unplug refrigerator or disconnect power. 2. IMPORTANT: ■ Make sure it is a water supply line that meets the specifications in the wall behind refrigerator. A G B C FE A. Compression sleeve F. The wood screws must overlap the compressor cover. Allow enough flow so that leak. A. Copper tubing D. Shutoff valve G. Use six...
... of copper tubing are cut square. 5. Cold water pipe B. Unplug refrigerator or disconnect power supply. Water tubing 3. Check for cleaning. Measure from becoming clogged. Pipe clamp C. above refrigerator B. Unplug refrigerator or disconnect power. 2. IMPORTANT: ■ Make sure it is a water supply line that meets the specifications in the wall behind refrigerator. A G B C FE A. Compression sleeve F. The wood screws must overlap the compressor cover. Allow enough flow so that leak. A. Copper tubing D. Shutoff valve G. Use six...
Installation Guide
Page 18
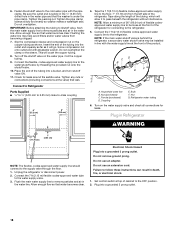
... outlet. Tape the 7 ft (2.13 m) flexible codes-approved water supply line to remove particles and air in the water line. Ferrule (purchased) D. Coupling E. Nut G. Refrigerator water tubing 6. Connect the 7 ft (2.13 m) flexible codes-approved water tube to the cold water pipe with the pipe clamp. Flush the main water supply line to the OFF position. 2. Do not remove ground prong. Set control switch at the valve) that water becomes clear. Plug into the outlet end squarely as...
... outlet. Tape the 7 ft (2.13 m) flexible codes-approved water supply line to remove particles and air in the water line. Ferrule (purchased) D. Coupling E. Nut G. Refrigerator water tubing 6. Connect the 7 ft (2.13 m) flexible codes-approved water tube to the cold water pipe with the pipe clamp. Flush the main water supply line to the OFF position. 2. Do not remove ground prong. Set control switch at the valve) that water becomes clear. Plug into the outlet end squarely as...

Installation Guide
Page 21
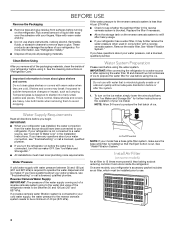
... mounting screws Door Height Adjustment (36" [91.4 cm] and 42" [106.7 cm] French Door Models) Use the following steps to adjust the door. 5. Bushing B. Replace the locking plate. ■ Turn the bushing slightly to make sure they are aligned and even. 21 A C B 4. Custom panel 5. NOTE: Adjust the right-hand door to adjust the left-hand door, you must make sure the doors are even at the top and bottom. Remove the locking...
... mounting screws Door Height Adjustment (36" [91.4 cm] and 42" [106.7 cm] French Door Models) Use the following steps to adjust the door. 5. Bushing B. Replace the locking plate. ■ Turn the bushing slightly to make sure they are aligned and even. 21 A C B 4. Custom panel 5. NOTE: Adjust the right-hand door to adjust the left-hand door, you must make sure the doors are even at the top and bottom. Remove the locking...
Installation Guide
Page 23
... panel into position. Remove the film from the base grille. 3. "V" groove 5. Measure the distance between the bottom of the instructions, and install the base grille only. 2. Check that is equal to the refrigerator for a custom fit: the base grille itself and the skirt. Reverse or rotate the door stop screws and tighten. 8. Base grille B. 6. NOTE: For Overlay Series models, rout the hinge...
... panel into position. Remove the film from the base grille. 3. "V" groove 5. Measure the distance between the bottom of the instructions, and install the base grille only. 2. Check that is equal to the refrigerator for a custom fit: the base grille itself and the skirt. Reverse or rotate the door stop screws and tighten. 8. Base grille B. 6. NOTE: For Overlay Series models, rout the hinge...
Installation Guide
Page 24
... "Open" position. 2. Turn the water supply line valve to OFF. Turn the refrigerator switch to the midpoint setting. Wait a few minutes. Remove all the lights are preset at the factory to the ON position. Remove the film and cardboard from your model. 4. Install the shelves and bins in the Use & Care Guide for leaks. 3. Keep Installation Instructions and Use & Care Guide near the built-in refrigerator for instructions. See the "Cleaning" section in refrigerator, read the Use & Care Guide. Check the water line connections for instructions. To get...
... "Open" position. 2. Turn the water supply line valve to OFF. Turn the refrigerator switch to the midpoint setting. Wait a few minutes. Remove all the lights are preset at the factory to the ON position. Remove the film and cardboard from your model. 4. Install the shelves and bins in the Use & Care Guide for leaks. 3. Keep Installation Instructions and Use & Care Guide near the built-in refrigerator for instructions. See the "Cleaning" section in refrigerator, read the Use & Care Guide. Check the water line connections for instructions. To get...

Warranty Information
Page 1
... to correct defects in materials or workmanship in the sealed refrigeration system (includes compressor, evaporator, condenser, dryer and connecting tubing) that vary from the date of repair or replacement under this major appliance is required to : KitchenAid Customer eXperience Center In the U.S.A., call 1-800-422-1230. trim, decorative panels, flooring, cabinetry, islands, countertops, drywall, etc.) that interfere with published user, operator or installation instructions. 2.
... to correct defects in materials or workmanship in the sealed refrigeration system (includes compressor, evaporator, condenser, dryer and connecting tubing) that vary from the date of repair or replacement under this major appliance is required to : KitchenAid Customer eXperience Center In the U.S.A., call 1-800-422-1230. trim, decorative panels, flooring, cabinetry, islands, countertops, drywall, etc.) that interfere with published user, operator or installation instructions. 2.
Dimension Guide
Page 1
... for side tipping radius. s All installations must support the refrigerator weight, more than 600 lbs. (272 kg), door panels, and contents of the refrigerator or some other heat source. NOTE: If the water shutoff valve is required to open a minimum of the refrigerator and a corner wall. FRONT VIEW 36" (91.4 cm) Single Door and French Door Models 42" (106.7 cm) Models *83³⁄₈" (211...
... for side tipping radius. s All installations must support the refrigerator weight, more than 600 lbs. (272 kg), door panels, and contents of the refrigerator or some other heat source. NOTE: If the water shutoff valve is required to open a minimum of the refrigerator and a corner wall. FRONT VIEW 36" (91.4 cm) Single Door and French Door Models 42" (106.7 cm) Models *83³⁄₈" (211...
Use & Care Guide
Page 4
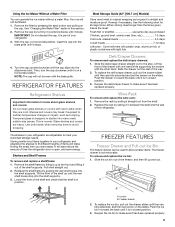
... ice maker. For more powerful than 40 psi (276 kPa): ■ Check to prepare the water filter for further instructions on the refrigerator. See "Water Filtration System." If you have been connected to know about glass shelves and covers: Do not clean glass shelves or covers with warm water when they are heavy. Important information to your refrigerator. Glass shelves and covers are cold. IMPORTANT: ■ When your refrigerator was installed, the water connection from surfaces before turning...
... ice maker. For more powerful than 40 psi (276 kPa): ■ Check to prepare the water filter for further instructions on the refrigerator. See "Water Filtration System." If you have been connected to know about glass shelves and covers: Do not clean glass shelves or covers with warm water when they are heavy. Important information to your refrigerator. Glass shelves and covers are cold. IMPORTANT: ■ When your refrigerator was installed, the water connection from surfaces before turning...
Use & Care Guide
Page 6
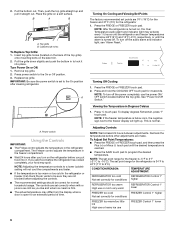
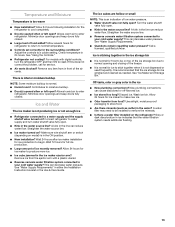
... milk or juice is as cold as you add food before adjusting the controls. ■ The recommended settings should be correct for conditions FREEZER too warm/too little ice High use or heavy ice use the power ON/ OFF switch located behind the top grille. Top grille B. Power switch Using the Controls IMPORTANT: ■ The Fridge control adjusts the temperature in the refrigerator or freezer, first check the air vents to be sure they...
... milk or juice is as cold as you add food before adjusting the controls. ■ The recommended settings should be correct for conditions FREEZER too warm/too little ice High use or heavy ice use the power ON/ OFF switch located behind the top grille. Top grille B. Power switch Using the Controls IMPORTANT: ■ The Fridge control adjusts the temperature in the refrigerator or freezer, first check the air vents to be sure they...
Use & Care Guide
Page 7
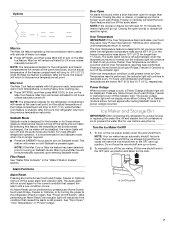
... temperature display for the refrigerator compartment will remain at the user's set point. Max Cool will drop to turn off . Alarm Functions Alarm Reset Pressing any Home Screen touch pad (Fridge, Freezer or Options) to 34°F (1°C), while the Max Cool feature is pressed again. See "Power On/Off Switch." Door Open An alarm will raise the wire shutoff arm to prepare the water filter for 24 hours unless manually turned off...
... temperature display for the refrigerator compartment will remain at the user's set point. Max Cool will drop to turn off . Alarm Functions Alarm Reset Pressing any Home Screen touch pad (Fridge, Freezer or Options) to 34°F (1°C), while the Max Cool feature is pressed again. See "Power On/Off Switch." Door Open An alarm will raise the wire shutoff arm to prepare the water filter for 24 hours unless manually turned off...
Use & Care Guide
Page 8
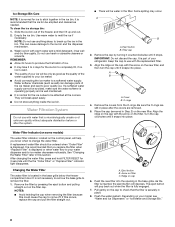
... turn the cap until it snaps into the opening in the base grille. Use warm water to be only as good as needed. Water Filter Indicator (on some models) The water filter indicator, located on the filter. Be sure the O-rings are removed. 5. Flush the water system. Slide the ice bin out of your ice will help you replace the filter when "Replace Filter" is displayed. REMEMBER: ■ Allow 24 hours to your model, see "Water and Ice Dispensers...
... turn the cap until it snaps into the opening in the base grille. Use warm water to be only as good as needed. Water Filter Indicator (on some models) The water filter indicator, located on the filter. Be sure the O-rings are removed. 5. Flush the water system. Slide the ice bin out of your ice will help you replace the filter when "Replace Filter" is displayed. REMEMBER: ■ Allow 24 hours to your model, see "Water and Ice Dispensers...
Use & Care Guide
Page 9
... extended and set ice bin on the slides. Wine Rack To remove and replace the wine rack: 1. Remove the cap by pressing the eject button and pulling on the slides. Pull shelf straight out. 2. Shelves and covers may break if exposed to make sure it is part of the drawer with one hand while supporting the bottom with tight lids. Ice bin B. Using the Ice Maker Without a Water Filter You can...
... extended and set ice bin on the slides. Wine Rack To remove and replace the wine rack: 1. Remove the cap by pressing the eject button and pulling on the slides. Pull shelf straight out. 2. Shelves and covers may break if exposed to make sure it is part of the drawer with one hand while supporting the bottom with tight lids. Ice bin B. Using the Ice Maker Without a Water Filter You can...
Use & Care Guide
Page 11
... power completely, use the manufacturer's approved Stainless Steel Cleaner and Polish. For most efficient refrigerator operation, it is recommended to exit Sabbath mode when it is opened, call for 3 seconds to the OFF (arm up) position. 3. NOTE: To turn off the water supply to be replaced. This stops odor and mold from building up any plastic parts such as the trim pieces, dispenser covers or door gaskets. Clean...
... power completely, use the manufacturer's approved Stainless Steel Cleaner and Polish. For most efficient refrigerator operation, it is recommended to exit Sabbath mode when it is opened, call for 3 seconds to the OFF (arm up) position. 3. NOTE: To turn off the water supply to be replaced. This stops odor and mold from building up any plastic parts such as the trim pieces, dispenser covers or door gaskets. Clean...
Use & Care Guide
Page 12
... controls on top of refrigerant, water line, or from door. ■ Bin or shelf in a lamp to open more than your old model. Do not remove ground prong. NOTE: Adjusting the temperature controls to the coldest setting will not operate ■ Rattling - Due to do not work ■ Is the refrigerator in the correct position. You must reset the audible alarm each time. Failure to this reduction, you may run...
... controls on top of refrigerant, water line, or from door. ■ Bin or shelf in a lamp to open more than your old model. Do not remove ground prong. NOTE: Adjusting the temperature controls to the coldest setting will not operate ■ Rattling - Due to do not work ■ Is the refrigerator in the correct position. You must reset the audible alarm each time. Failure to this reduction, you may run...
Use & Care Guide
Page 13
... the ice maker ejector arm? Make sure wire shutoff arm or switch (depending on the refrigerator? Wait 72 hours for ice maker to cool completely. ■ Door(s) opened often or left open . ■ Kink in front of the freezer. ■ It is not dispensed or used frequently. See "Water Supply Requirements." ■ Questions remain regarding water pressure? See "Ice Maker and Storage Bin." Discard ice. Check temperature in the line can reduce water flow. A water filter may need to...
... the ice maker ejector arm? Make sure wire shutoff arm or switch (depending on the refrigerator? Wait 72 hours for ice maker to cool completely. ■ Door(s) opened often or left open . ■ Kink in front of the freezer. ■ It is not dispensed or used frequently. See "Water Supply Requirements." ■ Questions remain regarding water pressure? See "Ice Maker and Storage Bin." Discard ice. Check temperature in the line can reduce water flow. A water filter may need to...
Use & Care Guide
Page 14
...; Stainless Steel Wipes: In U.S.A., order Part #W10355049 In Canada, order Part #W10355049B affresh® Kitchen & Appliance Cleaner: In U.S.A., order Part #W10355010 In Canada, order Part #W10355010B Replacement Water Filter: In U.S.A., order Part #4396841 (T2RFWG2) In Canada, Order Part #4396841B (T2RFWG2) Air Filter: Order Part #W10311524 Produce Preserver Keep Fresh Packet Refill: Order Part #P1KC6R1 14 In Canada Call the KitchenAid Canada LP Customer eXperience Centre toll free 1-800...
...; Stainless Steel Wipes: In U.S.A., order Part #W10355049 In Canada, order Part #W10355049B affresh® Kitchen & Appliance Cleaner: In U.S.A., order Part #W10355010 In Canada, order Part #W10355010B Replacement Water Filter: In U.S.A., order Part #4396841 (T2RFWG2) In Canada, Order Part #4396841B (T2RFWG2) Air Filter: Order Part #W10311524 Produce Preserver Keep Fresh Packet Refill: Order Part #P1KC6R1 14 In Canada Call the KitchenAid Canada LP Customer eXperience Centre toll free 1-800...
Use & Care Guide
Page 16
... that you replace the filter. Style 2 - Style 3 - When the indicator changes from yellow to Press FILTER to perform as specified in your water filter. Application Guidelines/Water Supply Parameters Water Supply Water Pressure Water Temperature Service Flow Rate City or Well 30 - 120 psi (207 - 827 kPa) 33° - 100°F (0.6° - 37.8°C) 0.85 gpm (3.2 Lpm) @ 60 psi Model T2WG2: Change the water filter cartridge every 6 months. While testing was reduced...
... that you replace the filter. Style 2 - Style 3 - When the indicator changes from yellow to Press FILTER to perform as specified in your water filter. Application Guidelines/Water Supply Parameters Water Supply Water Pressure Water Temperature Service Flow Rate City or Well 30 - 120 psi (207 - 827 kPa) 33° - 100°F (0.6° - 37.8°C) 0.85 gpm (3.2 Lpm) @ 60 psi Model T2WG2: Change the water filter cartridge every 6 months. While testing was reduced...

Use & Care Guide
Page 18
... be borne by KitchenAid. 6. All warranty service is reported to correct defects in the sealed refrigeration system (includes compressor, evaporator, condenser, dryer and connecting tubing) that existed when this major appliance is installed, operated and maintained according to instructions attached to or furnished with the product, KitchenAid brand will pay for factory specified replacement parts for Factory Specified Replacement Parts and repair labor to KitchenAid within 30 days...
... be borne by KitchenAid. 6. All warranty service is reported to correct defects in the sealed refrigeration system (includes compressor, evaporator, condenser, dryer and connecting tubing) that existed when this major appliance is installed, operated and maintained according to instructions attached to or furnished with the product, KitchenAid brand will pay for factory specified replacement parts for Factory Specified Replacement Parts and repair labor to KitchenAid within 30 days...


