

Operation Manual
Page 5
...with each user's purpose of the power sourcing. {page 4-1} The latest firmware and its corresponding instruction manual, in writing, prior to the specifications and designs described below . 1 Press the main power switch (I/O) located on this manual comply with the front panel facing up as it...same way as illustrated above. Specifications are two [M.IN] keys on the rear panel, to the "I" (ON) position to apply power to the product and the software. Contents Index III To protect the transceiver from the following URL: http://www.kenwood.com/i/products/info/amateur/software_download...
...with each user's purpose of the power sourcing. {page 4-1} The latest firmware and its corresponding instruction manual, in writing, prior to the specifications and designs described below . 1 Press the main power switch (I/O) located on this manual comply with the front panel facing up as it...same way as illustrated above. Specifications are two [M.IN] keys on the rear panel, to the "I" (ON) position to apply power to the product and the software. Contents Index III To protect the transceiver from the following URL: http://www.kenwood.com/i/products/info/amateur/software_download...

Operation Manual
Page 7
...your PC. Refer to transporting the transceiver for after-sales servicing, contact KENWOOD service center for further details. {page 2-1} V Prior to the help texts supplied with the ARCP-990 and ARHP-990 for any damages or losses. NOTATIONS APPLIED TO THIS MANUAL This transceiver has...operation of this manual without prior notice. JVC KENWOOD Corporation is entirely free from any responsibilities for any losses or damages caused by yourself and stored in connection with your purpose of use and, unless specifically described in this manual may differ from any responsibilities...
...your PC. Refer to transporting the transceiver for after-sales servicing, contact KENWOOD service center for further details. {page 2-1} V Prior to the help texts supplied with the ARCP-990 and ARHP-990 for any damages or losses. NOTATIONS APPLIED TO THIS MANUAL This transceiver has...operation of this manual without prior notice. JVC KENWOOD Corporation is entirely free from any responsibilities for any losses or damages caused by yourself and stored in connection with your purpose of use and, unless specifically described in this manual may differ from any responsibilities...

Operation Manual
Page 9
Press Press [ESC]. Press momentarily to activate the unique function of the key or the function assigned to activate or enable the specific function or behavior, until the key is open, the MENU screen closes. PRIOR TO YOUR FIRST QSO Contents Index VII Example Press Press [MENU]. Press ...
Press Press [ESC]. Press momentarily to activate the unique function of the key or the function assigned to activate or enable the specific function or behavior, until the key is open, the MENU screen closes. PRIOR TO YOUR FIRST QSO Contents Index VII Example Press Press [MENU]. Press ...

Operation Manual
Page 14
...PKS SIGNAL POLARITY 16-29 CROSSBAND REPEATER 16-29 PREPARATION 16-29 OPERATION 16-30 SKY COMMAND SYSTEM II 16-30 PREPARATION 16-30 TS-990S + TH-D72A/E, TM-D710GA/E, TM-D710A/E, or TM-D700A (G) (Transporter) Configuration 16-31 CONTROLLING THE LINEAR AMPLIFIER 16-31 ...PC AND NETWORK 18-11 SYMPTOMS ENCOUNTERED DURING RECORDING AND PLAYING....18-13 19 MISCELLANEOUS PRIME OPTIONAL ACCESSORIES 19-1 DEDICATED APPLICATIONS 19-1 PRODUCT SPECIFICATIONS 19-2 Index 19-3 XII Index TABLE OF CONTENTS CONFIGURING THE TEXT STRING FOR THE SCREEN SAVER....16-2 TOUCHING THE SCREEN TO SELECT ...
...PKS SIGNAL POLARITY 16-29 CROSSBAND REPEATER 16-29 PREPARATION 16-29 OPERATION 16-30 SKY COMMAND SYSTEM II 16-30 PREPARATION 16-30 TS-990S + TH-D72A/E, TM-D710GA/E, TM-D710A/E, or TM-D700A (G) (Transporter) Configuration 16-31 CONTROLLING THE LINEAR AMPLIFIER 16-31 ...PC AND NETWORK 18-11 SYMPTOMS ENCOUNTERED DURING RECORDING AND PLAYING....18-13 19 MISCELLANEOUS PRIME OPTIONAL ACCESSORIES 19-1 DEDICATED APPLICATIONS 19-1 PRODUCT SPECIFICATIONS 19-2 Index 19-3 XII Index TABLE OF CONTENTS CONFIGURING THE TEXT STRING FOR THE SCREEN SAVER....16-2 TOUCHING THE SCREEN TO SELECT ...
Operation Manual
Page 19
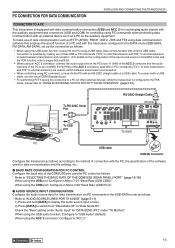
..." {page 5-51}. To RS-232C Serial Port RS-232C Straight Cable (female) To USB port TS-990S PC USB cable USB (B) Connector Configure the transceiver as follows according to the method of connection with the PC, the specification of the software used for data communication and the settings, etc. ■ BAUD RATE CONFIGURATION...
..." {page 5-51}. To RS-232C Serial Port RS-232C Straight Cable (female) To USB port TS-990S PC USB cable USB (B) Connector Configure the transceiver as follows according to the method of connection with the PC, the specification of the software used for data communication and the settings, etc. ■ BAUD RATE CONFIGURATION...
Operation Manual
Page 23
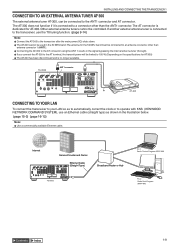
... Note: ◆◆Use a commercially available Ethernet cable. The AT connector is no longer available. TS-990S ANT 1 connector AT-300 CONNECTING TO YOUR LAN To connect the transceiver to a connector other than ...an Ethernet cable (straight type) as to automatically correct the clock or to operate with KNS (KENWOOD NETWORK COMMAND SYSTEM), use the TX tuning function. {page 9-14} Note: ◆◆Connect ...down. ◆◆The AT-300 cannot be limited to 100 W. (Depending on the specifications for AT-300) ◆◆The AT-300 has been discontinued and is dedicated for the...
... Note: ◆◆Use a commercially available Ethernet cable. The AT connector is no longer available. TS-990S ANT 1 connector AT-300 CONNECTING TO YOUR LAN To connect the transceiver to a connector other than ...an Ethernet cable (straight type) as to automatically correct the clock or to operate with KNS (KENWOOD NETWORK COMMAND SYSTEM), use the TX tuning function. {page 9-14} Note: ◆◆Connect ...down. ◆◆The AT-300 cannot be limited to 100 W. (Depending on the specifications for AT-300) ◆◆The AT-300 has been discontinued and is dedicated for the...
Operation Manual
Page 36
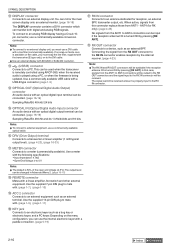
... OUT connectors will be received unless it is available on the cable, you can be used when the transceiver is remotely controlled using ARCP-990, when the received audio is played using a PC, or when the firmware is turned ON by pressing [RX ANT]. When active, ... be connected. {page 16-19} Sampling Rate/Bit: 48 kHz/ 24 bits o OPTICAL IN (Optical Digital Audio Input) connector An audio device with the following specifications: • Input Impedance: 4.7kΩ • Open End Voltage: 0 to ANT4 connectors can use a commercially available optical cable. Note: ◆◆To...
... OUT connectors will be received unless it is available on the cable, you can be used when the transceiver is remotely controlled using ARCP-990, when the received audio is played using a PC, or when the firmware is turned ON by pressing [RX ANT]. When active, ... be connected. {page 16-19} Sampling Rate/Bit: 48 kHz/ 24 bits o OPTICAL IN (Optical Digital Audio Input) connector An audio device with the following specifications: • Input Impedance: 4.7kΩ • Open End Voltage: 0 to ANT4 connectors can use a commercially available optical cable. Note: ◆◆To...

Operation Manual
Page 130
... from the Menu screen. 2 Access Menu 06, "FSK Spacing". 3 Press [SELECT] (F4) to allow editing of the parameter box. 4 Press [-] (F4) or [+] (F5) to the specifications of the ACC 2 connector. If you use an external device for Menu 2-08, "FSK Tone Frequency". 5 ASSISTING YOUR SMOOTH QSO CONFIGURING THE RTTY SHIFT WIDTH...
... from the Menu screen. 2 Access Menu 06, "FSK Spacing". 3 Press [SELECT] (F4) to allow editing of the parameter box. 4 Press [-] (F4) or [+] (F5) to the specifications of the ACC 2 connector. If you use an external device for Menu 2-08, "FSK Tone Frequency". 5 ASSISTING YOUR SMOOTH QSO CONFIGURING THE RTTY SHIFT WIDTH...
Operation Manual
Page 198
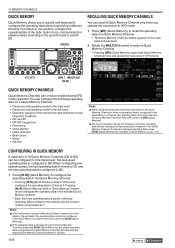
... Memory. {page 10-8} CONFIGURING IN QUICK MEMORY A maximum of [MR] (Quick Memory). ◆◆You can only be communicated in advance when searching in the specific band to configure the operating data in the Quick Memory Channel. • Pressing [M.IN] (Quick Memory) while in VFO mode configures the operating data in...
... Memory. {page 10-8} CONFIGURING IN QUICK MEMORY A maximum of [MR] (Quick Memory). ◆◆You can only be communicated in advance when searching in the specific band to configure the operating data in the Quick Memory Channel. • Pressing [M.IN] (Quick Memory) while in VFO mode configures the operating data in...
Operation Manual
Page 201
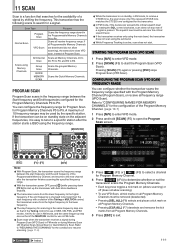
...scans the Program Memory Channels. • Each key press toggles a tick mark on the adjacent frequencies, it is easy to tune to a specific station after the transceiver finishes scanning the specified frequency range. ◆◆With the transceiver power OFF, press [ ] while pressing down [...A] to select a channel for the transceiver. ◆◆In FM mode, if the transceiver exceeds the critical squelch level by the specific station. Note: ◆◆With Program Scan, the transceiver scans the frequency range between the Start frequency and End frequencies configured for the...
...scans the Program Memory Channels. • Each key press toggles a tick mark on the adjacent frequencies, it is easy to tune to a specific station after the transceiver finishes scanning the specified frequency range. ◆◆With the transceiver power OFF, press [ ] while pressing down [...A] to select a channel for the transceiver. ◆◆In FM mode, if the transceiver exceeds the critical squelch level by the specific station. Note: ◆◆With Program Scan, the transceiver scans the frequency range between the Start frequency and End frequencies configured for the...
Operation Manual
Page 207
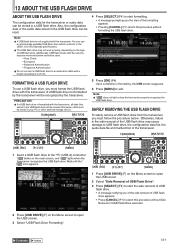
... other external storage device. ' 5 Press [OK] (F4). FORMATTING A USB FLASH DRIVE To use a commercially available USB flash drive which conforms to the USB1.1/2.0 (Full Speed) specifications. ◆◆The USB flash drive may cause damage to USB flash drive, the configuration data file, the audio data file and malfunction of the...
... other external storage device. ' 5 Press [OK] (F4). FORMATTING A USB FLASH DRIVE To use a commercially available USB flash drive which conforms to the USB1.1/2.0 (Full Speed) specifications. ◆◆The USB flash drive may cause damage to USB flash drive, the configuration data file, the audio data file and malfunction of the...
Operation Manual
Page 258
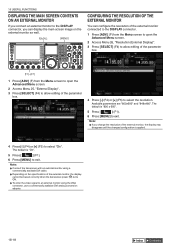
16 USEFUL FUNCTIONS DISPLAYING THE MAIN SCREEN CONTENTS ON AN EXTERNAL MONITOR If you connect an external monitor to the DISPLAY connector, you can display the main screen image on the external monitor as well. '
16 USEFUL FUNCTIONS DISPLAYING THE MAIN SCREEN CONTENTS ON AN EXTERNAL MONITOR If you connect an external monitor to the DISPLAY connector, you can display the main screen image on the external monitor as well. '
Operation Manual
Page 262
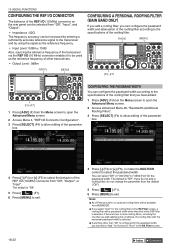
... select "Off" or "300 [Hz]" to select the passband width. Note: ◆◆As of February 2019, no optional roofing filters will be available from KENWOOD. ◆◆If you select "Auto" for the roofing filter on the rear panel can be selected from "Off", "Input", and "Output". • Impedance : 50...) or [+] (F5) to select the behavior of the DSP filter is "Off". CONFIGURING THE PASSBAND WIDTH You can configure the passband width according to the specifications of the roofing filter that you can select "Add."
... select "Off" or "300 [Hz]" to select the passband width. Note: ◆◆As of February 2019, no optional roofing filters will be available from KENWOOD. ◆◆If you select "Auto" for the roofing filter on the rear panel can be selected from "Off", "Input", and "Output". • Impedance : 50...) or [+] (F5) to select the behavior of the DSP filter is "Off". CONFIGURING THE PASSBAND WIDTH You can configure the passband width according to the specifications of the roofing filter that you can select "Add."
Operation Manual
Page 263
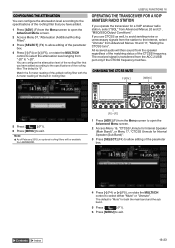
... FUNCTIONS 16 OPERATING THE TRANSCEIVER FOR A VOIP AMATEUR RADIO STATION If you have added according to the specifications of the roofing filter. The received signal is "0". You can configure the attenuation level according to the specifications of the roofing filter that you have added. 1 Press [ADV.] (F) from the Menu screen to open...
... FUNCTIONS 16 OPERATING THE TRANSCEIVER FOR A VOIP AMATEUR RADIO STATION If you have added according to the specifications of the roofing filter. The received signal is "0". You can configure the attenuation level according to the specifications of the roofing filter that you have added. 1 Press [ADV.] (F) from the Menu screen to open...

Operation Manual
Page 266
... frequency is added to the transferring receive frequency. The displayed operating data is registered with quick memory channel 0 of the specifications. 16 USEFUL FUNCTIONS QUICK DATA TRANSFER You can transfer the operating data such as the receive frequency and operating mode to ..., refer to "CONNECTING TO AN APPLICABLE TRANSCEIVER (QUICK DATA TRANSFER)". {page 1-6} • TS-990S • TS-890S • TS-590S • TS-590SG • TS-480 Series • TS-2000 Series • TS-570 Series • TS-870S If the operating data is configured in a contest. Select "On" in the Menu ...
... frequency is added to the transferring receive frequency. The displayed operating data is registered with quick memory channel 0 of the specifications. 16 USEFUL FUNCTIONS QUICK DATA TRANSFER You can transfer the operating data such as the receive frequency and operating mode to ..., refer to "CONNECTING TO AN APPLICABLE TRANSCEIVER (QUICK DATA TRANSFER)". {page 1-6} • TS-990S • TS-890S • TS-590S • TS-590SG • TS-480 Series • TS-2000 Series • TS-570 Series • TS-870S If the operating data is configured in a contest. Select "On" in the Menu ...
Operation Manual
Page 290
... transceiver The USB flash drive does not conform to the ACC 2 connector). Remove the USB flash drive following the drive while " " is displayed on the specifications of your Wait until the display may not be stored unnecessary files. If the OS of data {page 4-1} processing by the transceiver can be distinguished...
... transceiver The USB flash drive does not conform to the ACC 2 connector). Remove the USB flash drive following the drive while " " is displayed on the specifications of your Wait until the display may not be stored unnecessary files. If the OS of data {page 4-1} processing by the transceiver can be distinguished...

Operation Manual
Page 294
...amateur band 160m through 6m *2 The AC power cable supplied with the product is only suitable for your country. 19 MISCELLANEOUS PRODUCT SPECIFICATIONS General Frequency range (Transmitter) 160m band 80m band 60m band *5 Frequency range (Receiver) *1 40m band 30m band 20m band 17m...waterfall view). Note: ◆◆Measured values are subject to the measuring method stipulated by Japan Amateur Radio Industries Association. ◆◆Specifications are subject to change due to applicable Amateur Radio regulations for AC 120V (K-type) or AC 220V-240V (E-type). *3 In 160m/80m...
...amateur band 160m through 6m *2 The AC power cable supplied with the product is only suitable for your country. 19 MISCELLANEOUS PRODUCT SPECIFICATIONS General Frequency range (Transmitter) 160m band 80m band 60m band *5 Frequency range (Receiver) *1 40m band 30m band 20m band 17m...waterfall view). Note: ◆◆Measured values are subject to the measuring method stipulated by Japan Amateur Radio Industries Association. ◆◆Specifications are subject to change due to applicable Amateur Radio regulations for AC 120V (K-type) or AC 220V-240V (E-type). *3 In 160m/80m...

Operation Manual
Page 296
...16-2 CONFIGURING THE USB KEYBOARD 16-10 CONFIGURING THE WATERFALL DISPLAY FALL SPEED 7-2 CONNECTING TO YOUR LAN 1-9 CONNECTION TO A PC 1-5 CONNECTION TO OTHER KENWOOD TRANSCEIVERS WITH A TNC TERMINAL 1-8 CONNECTION TO THE APPLICABLE TRANSCEIVER (QUICK DATA TRANSFER 1-6 CONNECTION TO THE LINEAR AMPLIFIER 1-7 CONTROLLING EXTERNAL EQUIPMENT 16-28 ...AUDIO FILE 13-6 PLAYING AND TRANSMITTING A CW MESSAGE........5-27 PREAMP 5-9 PRECAUTIONS II PRECAUTIONS FOR INSTALLATION 1-1 PRESELECTOR 6-1 PRIME OPTIONAL ACCESSORIES 19-1 PRODUCT SPECIFICATIONS 19-2 PROGRAM SCAN 11-1 Contents
...16-2 CONFIGURING THE USB KEYBOARD 16-10 CONFIGURING THE WATERFALL DISPLAY FALL SPEED 7-2 CONNECTING TO YOUR LAN 1-9 CONNECTION TO A PC 1-5 CONNECTION TO OTHER KENWOOD TRANSCEIVERS WITH A TNC TERMINAL 1-8 CONNECTION TO THE APPLICABLE TRANSCEIVER (QUICK DATA TRANSFER 1-6 CONNECTION TO THE LINEAR AMPLIFIER 1-7 CONTROLLING EXTERNAL EQUIPMENT 16-28 ...AUDIO FILE 13-6 PLAYING AND TRANSMITTING A CW MESSAGE........5-27 PREAMP 5-9 PRECAUTIONS II PRECAUTIONS FOR INSTALLATION 1-1 PRESELECTOR 6-1 PRIME OPTIONAL ACCESSORIES 19-1 PRODUCT SPECIFICATIONS 19-2 PROGRAM SCAN 11-1 Contents