Instruction Manual
Page 1
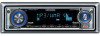
...-TUNER LECTEUR DE CD MODE D'EMPLOI REPRODUCTOR DE DISCOS COMPACTOS RECEPTOR DE FM/AM MANUAL DE INSTRUCCIONES Take the time to the model and serial numbers whenever you obtain the best performance from your Kenwood dealer for information or service on the warranty card, and in the space provided below. Familiarity with...
...-TUNER LECTEUR DE CD MODE D'EMPLOI REPRODUCTOR DE DISCOS COMPACTOS RECEPTOR DE FM/AM MANUAL DE INSTRUCCIONES Take the time to the model and serial numbers whenever you obtain the best performance from your Kenwood dealer for information or service on the warranty card, and in the space provided below. Familiarity with...
Instruction Manual
Page 2
... Scroll HD Radio control features 19 About HD Radio Tuning 2 | English Menu system 20 Menu System Activating Security Code Deactivating Security Code Touch Sensor Tone Manual Clock Adjustment DSI (Disabled System Indicator) Display Illumination Control Dimmer Built-in Amp Setting Supreme Setting CRSC (Clean Reception System Circuit) Receive mode Setting SIRIUS...
... Scroll HD Radio control features 19 About HD Radio Tuning 2 | English Menu system 20 Menu System Activating Security Code Deactivating Security Code Touch Sensor Tone Manual Clock Adjustment DSI (Disabled System Indicator) Display Illumination Control Dimmer Built-in Amp Setting Supreme Setting CRSC (Clean Reception System Circuit) Receive mode Setting SIRIUS...
Instruction Manual
Page 3
...labels on a circuit different from that interference will not occur in a particular installation. English | 3 Kenwood Corporation 2967-3, ISHIKAWA-MACHI, HACHIOJI-SHI TOKYO, JAPAN KENWOOD CORP. The user could lose the authority to operate this equipment may result in hazardous radiation exposure. ...These limits are expressly approved in the instruction manual. NOTE This equipment has been tested and found to ...
...labels on a circuit different from that interference will not occur in a particular installation. English | 3 Kenwood Corporation 2967-3, ISHIKAWA-MACHI, HACHIOJI-SHI TOKYO, JAPAN KENWOOD CORP. The user could lose the authority to operate this equipment may result in hazardous radiation exposure. ...These limits are expressly approved in the instruction manual. NOTE This equipment has been tested and found to ...
Instruction Manual
Page 5
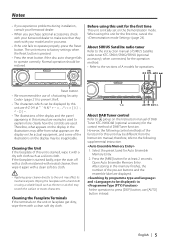
.... 2. Open Auto Ensemble Memory Entry. Notes • If you experience problems during installation, consult your Kenwood dealer. • When you purchase optional accessories, check with your Kenwood dealer to make sure that they work with your model and in your area. • If the ...4 SCRL AUTO ¢ Reset button • We recommend the use [AUTO] button instead. About SIRIUS Satellite radio tuner Refer to the instruction manual of SIRIUS Satellite radio tuner KTC-SR901/SR902/SR903 (optional accessory), when connected, for the operation method. • Refer to A group on ...
.... 2. Open Auto Ensemble Memory Entry. Notes • If you experience problems during installation, consult your Kenwood dealer. • When you purchase optional accessories, check with your Kenwood dealer to make sure that they work with your model and in your area. • If the ...4 SCRL AUTO ¢ Reset button • We recommend the use [AUTO] button instead. About SIRIUS Satellite radio tuner Refer to the instruction manual of SIRIUS Satellite radio tuner KTC-SR901/SR902/SR903 (optional accessory), when connected, for the operation method. • Refer to A group on ...

Instruction Manual
Page 6
... unit can only play a CD-R or CD-RW that are easier to your CD-R/CD-RW writing software, and your CDR/CD-RW recorder instruction manual.) Burrs CD storage • Do not place CDs in direct sunlight (On the seat or dashboard etc.) or where the temperature is high. • Store...
... unit can only play a CD-R or CD-RW that are easier to your CD-R/CD-RW writing software, and your CDR/CD-RW recorder instruction manual.) Burrs CD storage • Do not place CDs in direct sunlight (On the seat or dashboard etc.) or where the temperature is high. • Store...
Instruction Manual
Page 13
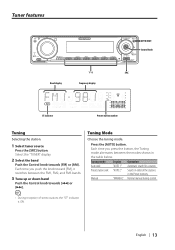
... the modes shown in order of stereo stations the "ST" indicator is ON. Press the [AUTO] button. Tuning mode Auto seek Preset station seek Manual Display "AUTO 1" "AUTO 2" "MANUAL" Operation Automatic search for a station. Each time you press the button, the Tuning mode alternates between the FM1, FM2, and FM3 bands. 3 Tune...
... the modes shown in order of stereo stations the "ST" indicator is ON. Press the [AUTO] button. Tuning mode Auto seek Preset station seek Manual Display "AUTO 1" "AUTO 2" "MANUAL" Operation Automatic search for a station. Each time you press the button, the Tuning mode alternates between the FM1, FM2, and FM3 bands. 3 Tune...

Instruction Manual
Page 20
The Menu system basic operation method is displayed. 2 Select the menu item Push the Control knob towards [4] or [¢]. Example: When you select "BEEP", each time you want to the basic operation method above are displayed, their setting content is the original setting.) Also, the explanation for at least 1 second. functions. The reference for the Menu items and their setting content chart is entered. (Normally the setting listed at the top of them as the setting. Select 1 of the chart is after this operation explanation. 1 Enter Menu mode Press the [MENU] button for items ...
The Menu system basic operation method is displayed. 2 Select the menu item Push the Control knob towards [4] or [¢]. Example: When you select "BEEP", each time you want to the basic operation method above are displayed, their setting content is the original setting.) Also, the explanation for at least 1 second. functions. The reference for the Menu items and their setting content chart is entered. (Normally the setting listed at the top of them as the setting. Select 1 of the chart is after this operation explanation. 1 Enter Menu mode Press the [MENU] button for items ...
Instruction Manual
Page 22
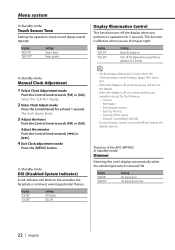
... perform no operation for at night. Display "DSI ON" "DSI OFF" Setting LED flashes. Turns off , you are driving at least 1 second. In Standby mode Manual Clock Adjustment 1 Select Clock Adjustment mode Push the Control knob towards [FM] or [AM]. Function of the KDC-MP4032 In Standby mode Dimmer Dimming this...
... perform no operation for at night. Display "DSI ON" "DSI OFF" Setting LED flashes. Turns off , you are driving at least 1 second. In Standby mode Manual Clock Adjustment 1 Select Clock Adjustment mode Push the Control knob towards [FM] or [AM]. Function of the KDC-MP4032 In Standby mode Dimmer Dimming this...
Instruction Manual
Page 28
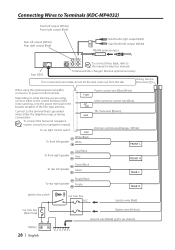
...Gray/Black Gray FRONT R To rear left output (White) FM/AM antenna input To connect these leads, refer to the relevant instruction manuals. Wiring harness (Accessory1) When using , connect either the telephone rings or during conversation. Battery wire (Yellow) Ground wire (Black) ...optional accessory If no connections are using the optional power amplifier, connect to its power control terminal. To connect the Kenwood navigation system, consult your navigation manual. Connecting Wires to Terminals (KDC-MP4032) Front left output (White) Front right output (Red) Rear left output ...
...Gray/Black Gray FRONT R To rear left output (White) FM/AM antenna input To connect these leads, refer to the relevant instruction manuals. Wiring harness (Accessory1) When using , connect either the telephone rings or during conversation. Battery wire (Yellow) Ground wire (Black) ...optional accessory If no connections are using the optional power amplifier, connect to its power control terminal. To connect the Kenwood navigation system, consult your navigation manual. Connecting Wires to Terminals (KDC-MP4032) Front left output (White) Front right output (Red) Rear left output ...
Instruction Manual
Page 29
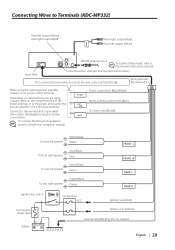
P.CONT ANT. To connect the Kenwood navigation system, consult your navigation manual. CONT MUTE Power control wire (Blue/White) Motor antenna control ... output (White) FRONT FM/AM antenna input To connect these leads, refer to the relevant instruction manuals. Connect to the terminal that is grounded when either to the control terminal of the motor antenna,... what antenna you are made, do not let the wire come out from the tab. Fuse (10A) To Kenwood disc changer/ External optional accessory If no connections are using the optional power amplifier, connect to its power control ...
P.CONT ANT. To connect the Kenwood navigation system, consult your navigation manual. CONT MUTE Power control wire (Blue/White) Motor antenna control ... output (White) FRONT FM/AM antenna input To connect these leads, refer to the relevant instruction manuals. Connect to the terminal that is grounded when either to the control terminal of the motor antenna,... what antenna you are made, do not let the wire come out from the tab. Fuse (10A) To Kenwood disc changer/ External optional accessory If no connections are using the optional power amplifier, connect to its power control ...


