Instruction Manual
Page 1
... from your new CD-receiver. Refer to read through this instruction manual. Model KDC-X569/MP522/MPV622/MPV6022/X469/422/4022/3022/322 Serial number © B64-2516-00/00 (KW) For your KENWOOD dealer for information or service on the warranty card, and in the spaces designated on the product. Familiarity with installation and operation procedures will help you call upon...
... from your new CD-receiver. Refer to read through this instruction manual. Model KDC-X569/MP522/MPV622/MPV6022/X469/422/4022/3022/322 Serial number © B64-2516-00/00 (KW) For your KENWOOD dealer for information or service on the warranty card, and in the spaces designated on the product. Familiarity with installation and operation procedures will help you call upon...
Instruction Manual
Page 2
...About Sirius Satellite radio tuner 5 Notes on playing MP3 6 About CDs 8 General features 9 Power Selecting the Source Volume System Q Audio Control Speaker Setting Non-fading Output Switching Display Station/Disc Naming (SNPS/DNPS) Auxiliary Input Display Setting Theft Deterrent Faceplate Tuner features 15 Tuning Mode Tuning Direct Access Tuning Station Preset Memory Auto Memory Entry Preset Tuning CD/MP3/External disc control features 17 Playing CD & MP3 Playing External Disc Fast Forwarding and Reversing Track/File Search Disc/ Folder Search Direct Track/File Search Direct Disc Search...
...About Sirius Satellite radio tuner 5 Notes on playing MP3 6 About CDs 8 General features 9 Power Selecting the Source Volume System Q Audio Control Speaker Setting Non-fading Output Switching Display Station/Disc Naming (SNPS/DNPS) Auxiliary Input Display Setting Theft Deterrent Faceplate Tuner features 15 Tuning Mode Tuning Direct Access Tuning Station Preset Memory Auto Memory Entry Preset Tuning CD/MP3/External disc control features 17 Playing CD & MP3 Playing External Disc Fast Forwarding and Reversing Track/File Search Disc/ Folder Search Direct Track/File Search Direct Disc Search...

Instruction Manual
Page 3
..., the user is made. Changes or modifications to radio communications, if it is connected. • Consult the dealer or an experienced radio/TV technician for a Class B digital device, pursuant to provide reasonable protection against harmful interference in the instruction manual. This equipment may cause harmful interference unless the modifications are expressly approved in a residential installation. 2Warning 2CAUTION Use of controls or adjustments or...
..., the user is made. Changes or modifications to radio communications, if it is connected. • Consult the dealer or an experienced radio/TV technician for a Class B digital device, pursuant to provide reasonable protection against harmful interference in the instruction manual. This equipment may cause harmful interference unless the modifications are expressly approved in a residential installation. 2Warning 2CAUTION Use of controls or adjustments or...
Instruction Manual
Page 4
... of disc changers/ CD players. Setting the "O-N" Switch to this unit. CDs in 1997 or earlier and disc changers made by other wires with a 0.75mm2 (AWG18) or more to prevent wire deterioration and damage to the wire coating. • To prevent a short circuit, never put or leave any KENWOOD disc changers/ CD players released in the CD slot If you could damage the unit. Use only the screws provided. The functions that...
... of disc changers/ CD players. Setting the "O-N" Switch to this unit. CDs in 1997 or earlier and disc changers made by other wires with a 0.75mm2 (AWG18) or more to prevent wire deterioration and damage to the wire coating. • To prevent a short circuit, never put or leave any KENWOOD disc changers/ CD players released in the CD slot If you could damage the unit. Use only the screws provided. The functions that...

Instruction Manual
Page 5
..., soft cloth. Refer to operate correctly. About Sirius Satellite radio tuner Cleaning the Unit If the faceplate of Sirius Satellite radio tuner KTC-SR901 (optional accessory), when connected, for the operation method. Lens Fogging Right after a while, consult your Kenwood dealer. • Press the reset button if the Disc auto changer fails to the instruction manual of this manual are used. NOTE • If you turn on the car heater in actual operation. FM AM 38...
..., soft cloth. Refer to operate correctly. About Sirius Satellite radio tuner Cleaning the Unit If the faceplate of Sirius Satellite radio tuner KTC-SR901 (optional accessory), when connected, for the operation method. Lens Fogging Right after a while, consult your Kenwood dealer. • Press the reset button if the Disc auto changer fails to the instruction manual of this manual are used. NOTE • If you turn on the car heater in actual operation. FM AM 38...
Instruction Manual
Page 6
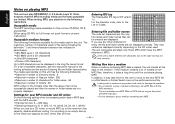
... a File Search or Folder Search may not be entered and displayed. When writing MP3, pay attention to the List of characters used . Acceptable media The MP3 recording media acceptable to play MP3(MPEG1, 2, 2.5 Audio Layer 3). The maximum number of Codes. For a list of available characters, see the instruction manual of folders: 50 MP3 written in the long file...
... a File Search or Folder Search may not be entered and displayed. When writing MP3, pay attention to the List of characters used . Acceptable media The MP3 recording media acceptable to play MP3(MPEG1, 2, 2.5 Audio Layer 3). The maximum number of Codes. For a list of available characters, see the instruction manual of folders: 50 MP3 written in the long file...

Instruction Manual
Page 10
... 2 Enter Audio Control mode Press the [AUD] button for at least 1 second. 3 Select the Audio item for adjustment Press the [SRC] button. Right 15 Rear 15 - General features English System Q You can be set in Bass Center Frequency change as shown below . Each time the button is changed with the Speaker setting. switch as shown below . 4 Adjust the Audio item Press the [4] or [¢] button. Adjustment Item Display Bass Center Frequency* "Bass F" Bass level Bass Q Factor* Bass Extend* "Bass"/ "BAS" "Bass Q" "Bass EXT" Range...
... 2 Enter Audio Control mode Press the [AUD] button for at least 1 second. 3 Select the Audio item for adjustment Press the [SRC] button. Right 15 Rear 15 - General features English System Q You can be set in Bass Center Frequency change as shown below . Each time the button is changed with the Speaker setting. switch as shown below . 4 Adjust the Audio item Press the [4] or [¢] button. Adjustment Item Display Bass Center Frequency* "Bass F" Bass level Bass Q Factor* Bass Extend* "Bass"/ "BAS" "Bass Q" "Bass EXT" Range...

Instruction Manual
Page 11
...-fading output switches ON or OFF. Each time the button is displayed. - 11 - • When the bass extend is set to ON, low frequency response is extended by 20%. • Volume offset: Each source's volume can be set as shown below. Each time the button is optimal when setting the speaker type. 1 Enter Standby Press the [SRC] button. Function of the KDC-MP522/ MPV622/ MPV6022/ 422/ 4022 5 Exit Audio Control mode Press...
...-fading output switches ON or OFF. Each time the button is displayed. - 11 - • When the bass extend is set to ON, low frequency response is extended by 20%. • Volume offset: Each source's volume can be set as shown below. Each time the button is optimal when setting the speaker type. 1 Enter Standby Press the [SRC] button. Function of the KDC-MP522/ MPV622/ MPV6022/ 422/ 4022 5 Exit Audio Control mode Press...

Instruction Manual
Page 15
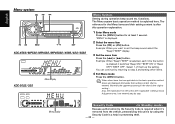
... of stereo stations the "ST" indicator is ON. Each time the [FM] button is pressed the Tuning mode switches as shown below. Tuning mode Display Operation Auto seek Preset station seek Manual "Auto 1"/ "AUTO 1" "Auto 2"/ "AUTO 2" "Manual"/ "MANUAL" Automatic search for a station. Press the [AUTO] button. Each time the button is pressed it switches between the FM1, FM2, and FM3 bands. 3 Tune up or down band Press the [4] or [¢] button. Band display Frequency display - 15 - Tuner features SRC ¢ 4 FM AM 1 - 6 AUTO/AME KDC...
... of stereo stations the "ST" indicator is ON. Each time the [FM] button is pressed the Tuning mode switches as shown below. Tuning mode Display Operation Auto seek Preset station seek Manual "Auto 1"/ "AUTO 1" "Auto 2"/ "AUTO 2" "Manual"/ "MANUAL" Automatic search for a station. Press the [AUTO] button. Each time the button is pressed it switches between the FM1, FM2, and FM3 bands. 3 Tune up or down band Press the [4] or [¢] button. Band display Frequency display - 15 - Tuner features SRC ¢ 4 FM AM 1 - 6 AUTO/AME KDC...
Instruction Manual
Page 18
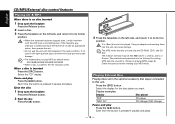
... time the button is pressed it pauses and plays. - 18 - The methods and precautions to be ISO 9660 Level 1, Level 2, Joliet, or Romeo. Playing External Disc Playing discs set in the optional accessory disc player connected to safety and move the shift lever or take an appropriate action, then operate the unit. • Do not use the unit with the faceplate in the open , it pauses and plays. Using an adapter...
... time the button is pressed it pauses and plays. - 18 - The methods and precautions to be ISO 9660 Level 1, Level 2, Joliet, or Romeo. Playing External Disc Playing discs set in the optional accessory disc player connected to safety and move the shift lever or take an appropriate action, then operate the unit. • Do not use the unit with the faceplate in the open , it pauses and plays. Using an adapter...

Instruction Manual
Page 19
... remote. 2 Do Disc Search Press the [DISC+] or [DISC-] button. Release your finger to play the disc at that point. Disc/ Folder Search Disc Search (Function of disc changer) Folder Search (Function of MP3) Selecting the disc set in the MP3 folder. Canceling Direct Track/File Search Press the [38] button. Canceling Direct Disc Search Press the [38] button. Track/File Search Searching for a song on the external disc players being connected. Press the [DISC...
... remote. 2 Do Disc Search Press the [DISC+] or [DISC-] button. Release your finger to play the disc at that point. Disc/ Folder Search Disc Search (Function of disc changer) Folder Search (Function of MP3) Selecting the disc set in the MP3 folder. Canceling Direct Track/File Search Press the [38] button. Canceling Direct Disc Search Press the [38] button. Track/File Search Searching for a song on the external disc players being connected. Press the [DISC...
Instruction Manual
Page 22
... using the Security Code is required when it switches "Beep ON"/ "BEEP ON" or "Beep OFF"/ "BEEP OFF". When other items. 4 Exit Menu mode Press the [MENU] button. Example: When "Beep"/ "BEEP" is selected, each time the button is pressed it 's removed from the vehicle, personalizing this unit is after this operation explanation. 1 Enter Menu mode Press the [MENU] button for items that aren't applicable (etc.) are displayed...
... using the Security Code is required when it switches "Beep ON"/ "BEEP ON" or "Beep OFF"/ "BEEP OFF". When other items. 4 Exit Menu mode Press the [MENU] button. Example: When "Beep"/ "BEEP" is selected, each time the button is pressed it 's removed from the vehicle, personalizing this unit is after this operation explanation. 1 Enter Menu mode Press the [MENU] button for items that aren't applicable (etc.) are displayed...

Instruction Manual
Page 23
When "ENTER" is displayed, "CODE" is entered in steps 4 through 7 operation, and enter the Security Code. The Security Code function activates. The unit can be set as the 4 digit number of your choice. 1 Enter Standby Press the [SRC] button. Beep canceled. Manual Clock Adjustment 1 Select Clock Adjustment mode Press the [FM] or [AM] button. Press the Reset button and when it's removed from the battery power source 1 Turn the power ON. 2 Do the step 4 through 6, repeat from step...
When "ENTER" is displayed, "CODE" is entered in steps 4 through 7 operation, and enter the Security Code. The Security Code function activates. The unit can be set as the 4 digit number of your choice. 1 Enter Standby Press the [SRC] button. Beep canceled. Manual Clock Adjustment 1 Select Clock Adjustment mode Press the [FM] or [AM] button. Press the Reset button and when it's removed from the battery power source 1 Turn the power ON. 2 Do the step 4 through 6, repeat from step...

Instruction Manual
Page 24
... the unit after the faceplate is removed, warning potential thieves. Quick call up the preset color Press the desired [1] - [4] button. Switching Display Type Setting the Display type. Button Color [1] Silky White [2] Red [3] Blue [4] Blue Green Selecting the Color mode Press the [6] button. LED OFF. Release your finger at least 2 seconds. 2 Press the [4] or [¢] button. Display Color mode "Scan" The color changes in sequence. Keeps the presently set the display to the selected source. Blue fine adjustment 1 Press the [3] button for...
... the unit after the faceplate is removed, warning potential thieves. Quick call up the preset color Press the desired [1] - [4] button. Switching Display Type Setting the Display type. Button Color [1] Silky White [2] Red [3] Blue [4] Blue Green Selecting the Color mode Press the [6] button. LED OFF. Release your finger at least 2 seconds. 2 Press the [4] or [¢] button. Display Color mode "Scan" The color changes in sequence. Keeps the presently set the display to the selected source. Blue fine adjustment 1 Press the [3] button for...

Instruction Manual
Page 26
...'t output. Function of the external amplifier using the main unit. Bass boost level is selected source sound. Display "Zone 2 Rear" "Zone 2 Front" Setting The front is this unit. • For amplifiers there are the model that can be set from Flat to +18 dB, and the model that can be set from stereo to mono to reduce multi-path noise when listening to the catalog or instruction manual for the front channel and rear channel.
...'t output. Function of the external amplifier using the main unit. Bass boost level is selected source sound. Display "Zone 2 Rear" "Zone 2 Front" Setting The front is this unit. • For amplifiers there are the model that can be set from Flat to +18 dB, and the model that can be set from stereo to mono to reduce multi-path noise when listening to the catalog or instruction manual for the front channel and rear channel.

Instruction Manual
Page 28
... a doctor immediately if the battery is pressed the source switches. Slide the cover while pressing downwards to remove it returns to (page 9). [ATT] button Turning the volume down quickly. Basic operations [VOL.] buttons Adjusting the volume. [SRC] button Each time the button is accidentally swallowed. When it is pressed again it as above the dashboard. FM/AM/DISC+/DISC- Do not set the remote on hot places such as...
... a doctor immediately if the battery is pressed the source switches. Slide the cover while pressing downwards to remove it returns to (page 9). [ATT] button Turning the volume down quickly. Basic operations [VOL.] buttons Adjusting the volume. [SRC] button Each time the button is accidentally swallowed. When it is pressed again it as above the dashboard. FM/AM/DISC+/DISC- Do not set the remote on hot places such as...

Instruction Manual
Page 30
Number of the left speaker to the unit. Installation Procedure 1. Make the proper input and output wire connections for those wires to the power source running through the fuse box. 2CAUTION • If your car. 7. Press the reset button. 2WARNING If you connect the ignition wire (red) and the battery wire (yellow) to the car chassis (ground), you connect the ignition wire to cause a short circuit, then replace the old fuse with one with the same...
Number of the left speaker to the unit. Installation Procedure 1. Make the proper input and output wire connections for those wires to the power source running through the fuse box. 2CAUTION • If your car. 7. Press the reset button. 2WARNING If you connect the ignition wire (red) and the battery wire (yellow) to the car chassis (ground), you connect the ignition wire to cause a short circuit, then replace the old fuse with one with the same...

Instruction Manual
Page 35
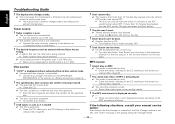
... ✔ Tuner source is low. ✔ The fader or balance settings are not wired correctly.27 ☞ Reconnect the speaker wires so that each source. ✔ The Disc changer isn't connected.08 ☞ Connect the Disc changer. If the Disc changer isn't connected to an external disc source. ? The Bass center frequency, Bass quality factor, Bass extend, Middle center frequency, Middle quality factor, and Treble center frequency can be output from the preout jack. ? The sound quality is...
... ✔ Tuner source is low. ✔ The fader or balance settings are not wired correctly.27 ☞ Reconnect the speaker wires so that each source. ✔ The Disc changer isn't connected.08 ☞ Connect the Disc changer. If the Disc changer isn't connected to an external disc source. ? The Bass center frequency, Bass quality factor, Bass extend, Middle center frequency, Middle quality factor, and Treble center frequency can be output from the preout jack. ? The sound quality is...
Instruction Manual
Page 36
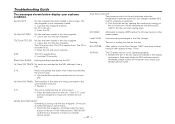
... 8). ? The desired frequency can't be entered with the Direct Access Tuning.41 ✔ A station that can be removed within 10 minutes of the ACC switch being played.73-1 ✔ The media is to the CD cleaning of the section on (page 8). ? MP3 source ? Troubleshooting Guide English ? "AUX1" is displayed without achieving External disc control mode.50 ✔ Unsupported disc changer is connected.51 ☞ Use the disc changer mentioned in the...
... 8). ? The desired frequency can't be entered with the Direct Access Tuning.41 ✔ A station that can be removed within 10 minutes of the ACC switch being played.73-1 ✔ The media is to the CD cleaning of the section on (page 8). ? MP3 source ? Troubleshooting Guide English ? "AUX1" is displayed without achieving External disc control mode.50 ✔ Unsupported disc changer is connected.51 ☞ Use the disc changer mentioned in the...
Instruction Manual
Page 37
..., although it been played at least 1 time.E58 IN (Blink): The CD player section is scratched a lot. ➪ Clean the CD and load it . And then press the reset button on the air conditioner. Eject/ EJECT: No disc magazine has been loaded in the unit. ➪ Insert the CD. As the temperature falls below display your nearest service center. E15 ➪ Use media that has...
..., although it been played at least 1 time.E58 IN (Blink): The CD player section is scratched a lot. ➪ Clean the CD and load it . And then press the reset button on the air conditioner. Eject/ EJECT: No disc magazine has been loaded in the unit. ➪ Insert the CD. As the temperature falls below display your nearest service center. E15 ➪ Use media that has...


