
Instruction Manual
Page 2
...HD Radio Tuning Menu system 34 Menu System Activating Security Code Deactivating Security Code Source Select Mode iPod mode setting Touch Sensor Tone Manual Clock Adjustment Date Adjustment Date Mode Synchronize Clock DSI (Disabled System Indicator) Display Illumination Control Dimmer Built-in Auxiliary input Setting CD Read Setting Picture downloading Audio Preset Memory Audio Preset Recall Firmware version display Demonstration mode setting Basic Operations of Audio Control Audio Setup Speaker Setting Subwoofer Output TEL Mute Function Control mode Display Type Selection Status Setting...
...HD Radio Tuning Menu system 34 Menu System Activating Security Code Deactivating Security Code Source Select Mode iPod mode setting Touch Sensor Tone Manual Clock Adjustment Date Adjustment Date Mode Synchronize Clock DSI (Disabled System Indicator) Display Illumination Control Dimmer Built-in Auxiliary input Setting CD Read Setting Picture downloading Audio Preset Memory Audio Preset Recall Firmware version display Demonstration mode setting Basic Operations of Audio Control Audio Setup Speaker Setting Subwoofer Output TEL Mute Function Control mode Display Type Selection Status Setting...

Instruction Manual
Page 3
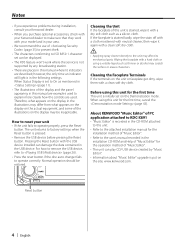
..., remove the disc and wait for connectable models of Dolby Laboratories. iPod is moving, do not touch the terminals of the unit. If you use this product in areas exposed to direct sunlight, excessive heat or humidity. Called lens fogging, this unit Kenwood disc changers/ CD players released in . Set the "O-N" Switch to the catalog or consult your fingers. • Do not subject the faceplate to...
..., remove the disc and wait for connectable models of Dolby Laboratories. iPod is moving, do not touch the terminals of the unit. If you use this product in areas exposed to direct sunlight, excessive heat or humidity. Called lens fogging, this unit Kenwood disc changers/ CD players released in . Set the "O-N" Switch to the catalog or consult your fingers. • Do not subject the faceplate to...
Instruction Manual
Page 4
... how to remove the USB device, refer to (page 26). • Press the reset button if the disc auto changer fails to factory settings when the Reset button is recorded in the CD-ROM attached to this unit. • Refer to the attached installation manual for the operation method of "Music Editor". • The unit can play CD/ USB device created by any broadcasting station. • There are described; Cleaning the Faceplate Terminals...
... how to remove the USB device, refer to (page 26). • Press the reset button if the disc auto changer fails to factory settings when the Reset button is recorded in the CD-ROM attached to this unit. • Refer to the attached installation manual for the operation method of "Music Editor". • The unit can play CD/ USB device created by any broadcasting station. • There are described; Cleaning the Faceplate Terminals...
Instruction Manual
Page 5
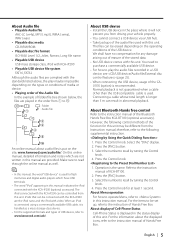
...-LC (.m4a), MP3 (.mp3), WMA (.wma), WAV (.wav) • Playable disc media CD-R/RW/ROM • Playable disc file format ISO 9660 Level 1/2, Joliet, Romeo, Long file name. • Playable USB device USB mass storage class, iPod with KCA-iP200 • Playable USB device file system FAT16, FAT32 Although the audio files are complied with the standards listed above, the...
...-LC (.m4a), MP3 (.mp3), WMA (.wma), WAV (.wav) • Playable disc media CD-R/RW/ROM • Playable disc file format ISO 9660 Level 1/2, Joliet, Romeo, Long file name. • Playable USB device USB mass storage class, iPod with KCA-iP200 • Playable USB device file system FAT16, FAT32 Although the audio files are complied with the standards listed above, the...

Instruction Manual
Page 8
...memory per source. (Detail Audio item is ON, the "ATT" indicator blinks. Front 15 Exit Audio Control mode (Volume control mode) * You can recall the best sound setting preset for Bass level, Middle level, and Treble level are recalled automatically. 5 Exit Audio Control mode Press any button. Press a button other than the [VOL] knob, [0] and [ATT] button. 8 | English Each time you press the button, the Attenuator turns ON and OFF. Attenuator Turning the volume down quickly. Adjustment Item Display Range Rear Volume "REAR VOLUME" 0 - 35 Subwoofer level "SUB-W LEVEL...
...memory per source. (Detail Audio item is ON, the "ATT" indicator blinks. Front 15 Exit Audio Control mode (Volume control mode) * You can recall the best sound setting preset for Bass level, Middle level, and Treble level are recalled automatically. 5 Exit Audio Control mode Press any button. Press a button other than the [VOL] knob, [0] and [ATT] button. 8 | English Each time you press the button, the Attenuator turns ON and OFF. Attenuator Turning the volume down quickly. Adjustment Item Display Range Rear Volume "REAR VOLUME" 0 - 35 Subwoofer level "SUB-W LEVEL...

Instruction Manual
Page 9
... Network. 1 Select the source to adjust Press the [SRC] button. Adjusting the detail of Audio Control Among the Basic Audio items, you can adjust the Bass level, Middle level, and Treble level in detail. 1 Select the Basic Audio item Select the desired item to be set the Bass Extend to ON, low frequency response is extended by 20%. • You can use the Dual Zone System with the internal auxiliary input. 5 Exit Audio Setup mode Press...
... Network. 1 Select the source to adjust Press the [SRC] button. Adjusting the detail of Audio Control Among the Basic Audio items, you can adjust the Bass level, Middle level, and Treble level in detail. 1 Select the Basic Audio item Select the desired item to be set the Bass Extend to ON, low frequency response is extended by 20%. • You can use the Dual Zone System with the internal auxiliary input. 5 Exit Audio Setup mode Press...

Instruction Manual
Page 10
..., the setting alternates between Turn the Control knob. "Display Select" "DISP" Allows you to set how to the related pages for the operation of this unit, select treestructured function items. 1 Enter Function Control mode Press the [FNC] button. 2 Select your telephone using the Control knob. "Preset Memory" "P.MEM" Allows you push the knob, Subwoofer output switches ON and OFF. audio file. Operation type Operation Movement between the settings shown in "CALL" is optimal when setting the speaker type...
..., the setting alternates between Turn the Control knob. "Display Select" "DISP" Allows you to set how to the related pages for the operation of this unit, select treestructured function items. 1 Enter Function Control mode Press the [FNC] button. 2 Select your telephone using the Control knob. "Preset Memory" "P.MEM" Allows you push the knob, Subwoofer output switches ON and OFF. audio file. Operation type Operation Movement between the settings shown in "CALL" is optimal when setting the speaker type...

Instruction Manual
Page 26
...] button. Select the display for at least 2 seconds. Refer to pause Press the Control knob. 2 Select a device Push the Control knob towards up provided that can be charged up or down. 3 Restart playback Press the Control knob. ⁄ • This unit is connected Select USB source Press the [SRC] button. Select the Remove mode with reference to (page 7). Each time you stopped its playback. Pause and play Press the Control...
...] button. Select the display for at least 2 seconds. Refer to pause Press the Control knob. 2 Select a device Push the Control knob towards up provided that can be charged up or down. 3 Restart playback Press the Control knob. ⁄ • This unit is connected Select USB source Press the [SRC] button. Select the Remove mode with reference to (page 7). Each time you stopped its playback. Pause and play Press the Control...
Instruction Manual
Page 35
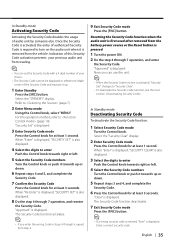
... (page 7). 2 Enter Menu mode Using the Control knob, select "MENU". "Approved" is pressed 1 Turn the power ON. 2 Do the step 4 through 7 operation, and enter the Security Code. Resetting the Security Code function when the audio unit is first used after removed from the battery power source or the Reset button is displayed. Now, you enter the wrong Code in steps 4 through 7 operation, and reenter the Security Code. When "Enter" is displayed, "SECURITY CLEAR" is also displayed. 3 Select the digits...
... (page 7). 2 Enter Menu mode Using the Control knob, select "MENU". "Approved" is pressed 1 Turn the power ON. 2 Do the step 4 through 7 operation, and enter the Security Code. Resetting the Security Code function when the audio unit is first used after removed from the battery power source or the Reset button is displayed. Now, you enter the wrong Code in steps 4 through 7 operation, and reenter the Security Code. When "Enter" is displayed, "SECURITY CLEAR" is also displayed. 3 Select the digits...

Instruction Manual
Page 36
...] button. 36 | English Select the "Clock Adjust" display. 2 Enter Clock Adjust mode Press the Control knob for at least 1 second. The items that are blinking are items that of iPod. Menu system In Standby mode Source Select Mode Setting up the iPod operation method in File Select. Select the "Date Adjust" display. 2 Enter Date Adjust mode Press the Control knob for your choice. Display "iPod Mode : ON" "iPod Mode : OFF" Setting Uses the operation method similar to select sources one after another. Display "SRC Select : 1" "SRC Select : 2" Setting Displays source icons...
...] button. 36 | English Select the "Clock Adjust" display. 2 Enter Clock Adjust mode Press the Control knob for at least 1 second. The items that are blinking are items that of iPod. Menu system In Standby mode Source Select Mode Setting up the iPod operation method in File Select. Select the "Date Adjust" display. 2 Enter Date Adjust mode Press the Control knob for your choice. Display "iPod Mode : ON" "iPod Mode : OFF" Setting Uses the operation method similar to select sources one after another. Display "SRC Select : 1" "SRC Select : 2" Setting Displays source icons...

Instruction Manual
Page 37
... Amp Setting Controlling the built-in amplifier activates. Display "Dimmer : ON" "Dimmer : OFF" Setting The display dims. The display doesn't dim. English | 37 Display "SYNC : OFF" "SYNC : ON" Setting Adjust the time manually. Turning OFF this unit's clock. The built-in amplifier deactivates. In Standby mode Date Mode Setting the date format. 1 Select Date Mode Turn the Control knob. Turns off the display when you perform no operation for at night. Display "Display : ON" "Display : OFF" Setting Keeps the display on the unit after the faceplate is removed...
... Amp Setting Controlling the built-in amplifier activates. Display "Dimmer : ON" "Dimmer : OFF" Setting The display dims. The display doesn't dim. English | 37 Display "SYNC : OFF" "SYNC : ON" Setting Adjust the time manually. Turning OFF this unit's clock. The built-in amplifier deactivates. In Standby mode Date Mode Setting the date format. 1 Select Date Mode Turn the Control knob. Turns off the display when you perform no operation for at night. Display "Display : ON" "Display : OFF" Setting Keeps the display on the unit after the faceplate is removed...

Instruction Manual
Page 38
... for power amplifiers that can be rear channel. Frequency Offset Setting the central frequency, boosted by B.M.S. Sub source (Auxiliary input source) is optimized for the compression format used . Processing is to +12 dB. Display "AMP Bass : Flat" "AMP Bass : +6" "AMP Bass : +12" "AMP Bass : +18" Setting Bass boost level is low (+6dB). Display "Zone 2 : Rear" "Zone 2 : Front" Setting Sub source (Auxiliary input source) is not available on the relationship between the audio file format and setting. • This function is to the unit. 1 Select AMP Control mode Turn the Control...
... for power amplifiers that can be rear channel. Frequency Offset Setting the central frequency, boosted by B.M.S. Sub source (Auxiliary input source) is optimized for the compression format used . Processing is to +12 dB. Display "AMP Bass : Flat" "AMP Bass : +6" "AMP Bass : +12" "AMP Bass : +18" Setting Bass boost level is low (+6dB). Display "Zone 2 : Rear" "Zone 2 : Front" Setting Sub source (Auxiliary input source) is not available on the relationship between the audio file format and setting. • This function is to the unit. 1 Select AMP Control mode Turn the Control...
Instruction Manual
Page 39
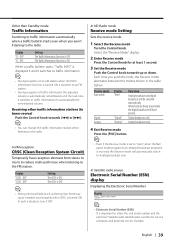
.... In Satellite radio source Electronic Serial Number (ESN) display Displaying the Electronic Serial Number. When both are being transmitted, the digital broadcast will have reception alternate from power lines) may cause unstable sound quality when CRSC is received, the Receive mode will be switched automatically. Analog broadcasts only. 4 Exit Receive mode Press the [FNC] button. ⁄ • Even if the Receive mode is set to "Auto", when the Ball game mode program...
.... In Satellite radio source Electronic Serial Number (ESN) display Displaying the Electronic Serial Number. When both are being transmitted, the digital broadcast will have reception alternate from power lines) may cause unstable sound quality when CRSC is received, the Receive mode will be switched automatically. Analog broadcasts only. 4 Exit Receive mode Press the [FNC] button. ⁄ • Even if the Receive mode is set to "Auto", when the Ball game mode program...

Instruction Manual
Page 42
... 1 pair of (page 8) is changed to the value which was recalled by the source. • When you press the Reset, all the sources will be registered. "Recall?" "Memory?" "Memory Completed" is displayed. 3 Select Audio Preset mode Turn the Control knob. Refer to (page 10). For the operation method, refer to (page 7). 2 Enter Menu mode Using the Control knob, select "MENU". "Recall Completed" is displayed. 8 Exit Audio Preset mode Press the [FNC] button. ⁄ • The User memory of...
... 1 pair of (page 8) is changed to the value which was recalled by the source. • When you press the Reset, all the sources will be registered. "Recall?" "Memory?" "Memory Completed" is displayed. 3 Select Audio Preset mode Turn the Control knob. Refer to (page 10). For the operation method, refer to (page 7). 2 Enter Menu mode Using the Control knob, select "MENU". "Recall Completed" is displayed. 8 Exit Audio Preset mode Press the [FNC] button. ⁄ • The User memory of...
Instruction Manual
Page 44
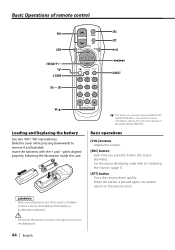
... and Replacing the battery Use two "AA"/ "R6"-size batteries. For the source alternating order refer to remove it as on the dashboard. 44 | English Slide the cover while pressing downwards to (page 7). [ATT] button Turns the volume down quickly. poles aligned properly, following the illustration inside the case. : This button is used when Kenwood Bluetooth HANDS FREE BOX is connected. Basic operations [VOL] buttons Adjusts the volume. [SRC] button Each time...
... and Replacing the battery Use two "AA"/ "R6"-size batteries. For the source alternating order refer to remove it as on the dashboard. 44 | English Slide the cover while pressing downwards to (page 7). [ATT] button Turns the volume down quickly. poles aligned properly, following the illustration inside the case. : This button is used when Kenwood Bluetooth HANDS FREE BOX is connected. Basic operations [VOL] buttons Adjusts the volume. [SRC] button Each time...

Instruction Manual
Page 45
..., FM2, and FM3 bands. [4]/ [¢] buttons Tune up or down bands. [0] - [9] buttons Press buttons [1] - [6] to recall preset stations. In HD Radio source [FM] button Selects the HD FM band. Audio Control [AUD] button Selects the Audio item to be done. In Tuner source [FM]/ [AM] buttons Selects the band. Each time you press the button, the music is played or paused. [0] - [9] buttons When in (page 27) and (page 27), enters the music/ disc number. Selecting and adjusting of the rear channel.
..., FM2, and FM3 bands. [4]/ [¢] buttons Tune up or down bands. [0] - [9] buttons Press buttons [1] - [6] to recall preset stations. In HD Radio source [FM] button Selects the HD FM band. Audio Control [AUD] button Selects the Audio item to be done. In Tuner source [FM]/ [AM] buttons Selects the band. Each time you press the button, the music is played or paused. [0] - [9] buttons When in (page 27) and (page 27), enters the music/ disc number. Selecting and adjusting of the rear channel.
Instruction Manual
Page 46
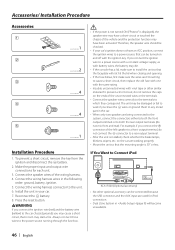
... rear output terminals (do not connect the - connector to the unit. 6. on the ends of the left speaker to the power source running through the fuse box. ¤ • If the power is not turned ON ("Protect" is installed, check whether the brake lamps, blinkers, wipers, etc. Make the proper input and output wire connections for iPod connection. • Dual Zone System in your car's ignition does not have been activated. The unit...
... rear output terminals (do not connect the - connector to the unit. 6. on the ends of the left speaker to the power source running through the fuse box. ¤ • If the power is not turned ON ("Protect" is installed, check whether the brake lamps, blinkers, wipers, etc. Make the proper input and output wire connections for iPod connection. • Dual Zone System in your car's ignition does not have been activated. The unit...
Instruction Manual
Page 47
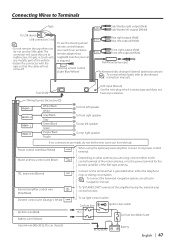
...." Fuse (10A) AUX input (Stereo) Use the mini-plug which is stereo type and does not have any metallic part of the amplifier having the external amp control function. Power control wire (Blue/White) When using , connect either the telephone rings or during conversation. ⁄ To connect the Kenwood navigation system, consult your car is required. Connecting Wires to Terminals Tape To USB device USB connector (1 m) ⁄ • Do not remove the cap when you need to an exclusive remote adapter...
...." Fuse (10A) AUX input (Stereo) Use the mini-plug which is stereo type and does not have any metallic part of the amplifier having the external amp control function. Power control wire (Blue/White) When using , connect either the telephone rings or during conversation. ⁄ To connect the Kenwood navigation system, consult your car is required. Connecting Wires to Terminals Tape To USB device USB connector (1 m) ⁄ • Do not remove the cap when you need to an exclusive remote adapter...
Instruction Manual
Page 50
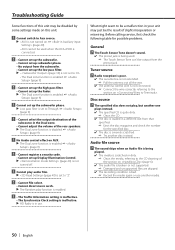
... the number for possible problems. General ? Disc source ? Cannot switch to Aux source. ▲ • AUX is not turned on AUX. ▲ The Dual zone function is enabled. ☞ (page 9) ! • Cannot register a security code. • Cannot set up the subwoofer phase. ▲ Low pass filter is set to Through. ☞ (page 9) ! • Cannot select the output destination of the subsource in use another disc instead. Audio file source ? Cannot set up...
... the number for possible problems. General ? Disc source ? Cannot switch to Aux source. ▲ • AUX is not turned on AUX. ▲ The Dual zone function is enabled. ☞ (page 9) ! • Cannot register a security code. • Cannot set up the subwoofer phase. ▲ Low pass filter is set to Through. ☞ (page 9) ! • Cannot select the output destination of the subsource in use another disc instead. Audio file source ? Cannot set up...
Instruction Manual
Page 52
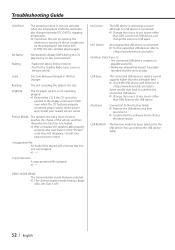
.... Connect an USB device, and change the source to . Turn it . ➪ Confirm that the unit can remove the USB device safely. Remove the USB device. DEMO MODE (Blink): The Demonstration mode has been selected. ➪ The (page 43) is played. ➪ ---- IN (Blink): The CD player section is connected. ➪ For the supported USB devices, refer to USB again. Unsupported File: An Audio file is selected as a source although no disc names preset. Troubleshooting Guide Hold Error: The protective circuit in the Disc changer...
.... Connect an USB device, and change the source to . Turn it . ➪ Confirm that the unit can remove the USB device safely. Remove the USB device. DEMO MODE (Blink): The Demonstration mode has been selected. ➪ The (page 43) is played. ➪ ---- IN (Blink): The CD player section is connected. ➪ For the supported USB devices, refer to USB again. Unsupported File: An Audio file is selected as a source although no disc names preset. Troubleshooting Guide Hold Error: The protective circuit in the Disc changer...


