Instruction Manual
Page 2
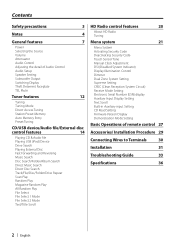
...Power Selecting the Source Volume Attenuator Audio Control Adjusting the detail of Audio Control Audio Setup Speaker Setting Subwoofer Output Switching Display Theft Deterrent Faceplate TEL Mute Tuner features 12 Tuning Tuning Mode Direct Access Tuning Station Preset Memory Auto Memory Entry ... Radio Tuning Menu system 21 Menu System Activating Security Code Deactivating Security Code Touch Sensor Tone Manual Clock Adjustment DSI (Disabled System Indicator) Display Illumination Control Dimmer Dual Zone System Setting Supreme Setting CRSC (Clean Reception System Circuit) Receive Mode ...
...Power Selecting the Source Volume Attenuator Audio Control Adjusting the detail of Audio Control Audio Setup Speaker Setting Subwoofer Output Switching Display Theft Deterrent Faceplate TEL Mute Tuner features 12 Tuning Tuning Mode Direct Access Tuning Station Preset Memory Auto Memory Entry ... Radio Tuning Menu system 21 Menu System Activating Security Code Deactivating Security Code Touch Sensor Tone Manual Clock Adjustment DSI (Disabled System Indicator) Display Illumination Control Dimmer Dual Zone System Setting Supreme Setting CRSC (Clean Reception System Circuit) Receive Mode ...
Instruction Manual
Page 7
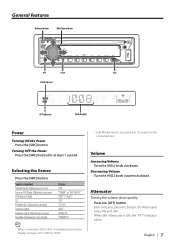
... Tuner or HD Radio (Optional accessory) USB device (iPod) CD External disc (Optional accessory) Auxiliary input Auxiliary input (Optional accessory) Standby (Illumination only mode) Display "SAT" "TUNER" or "HD RADIO" "USB" ("iPod") "CD" "CD CH" "AUX" "AUX EXT" "STANDBY" ⁄ • When ... recognized as CD source on the connected unit. General features Release button VOL/Control knob "55 %*41 43$ LOUD indicator ATT indicator Clock display Power Turning ON the Power Press the [SRC] button. Attenuator Turning the volume down quickly. English | 7 Turning OFF the Power...
... Tuner or HD Radio (Optional accessory) USB device (iPod) CD External disc (Optional accessory) Auxiliary input Auxiliary input (Optional accessory) Standby (Illumination only mode) Display "SAT" "TUNER" or "HD RADIO" "USB" ("iPod") "CD" "CD CH" "AUX" "AUX EXT" "STANDBY" ⁄ • When ... recognized as CD source on the connected unit. General features Release button VOL/Control knob "55 %*41 43$ LOUD indicator ATT indicator Clock display Power Turning ON the Power Press the [SRC] button. Attenuator Turning the volume down quickly. English | 7 Turning OFF the Power...
Instruction Manual
Page 10
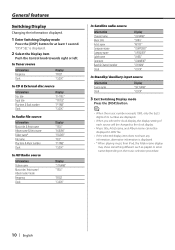
...selection procedure. 10 | English General features Switching Display Changing the information displayed. 1 Enter Switching Display mode Press the [DISP] button for at least 1 second. In Tuner source Information Frequency Clock Display "FREQ" "CLOCK" In CD & External disc source Information ...name Label name Comment Band & Channel number Clock Display "CH NAME" "SONG" "ARTIST" "COMPOSER" "CATEGORY" "LABEL" "COMMENT" "CH NUM" "CLOCK" In Standby/ Auxiliary input source Information Source name Clock Display "SRC NAME" "CLOCK" 3 Exit Switching Display mode Press the [DISP] button. ⁄...
...selection procedure. 10 | English General features Switching Display Changing the information displayed. 1 Enter Switching Display mode Press the [DISP] button for at least 1 second. In Tuner source Information Frequency Clock Display "FREQ" "CLOCK" In CD & External disc source Information ...name Label name Comment Band & Channel number Clock Display "CH NAME" "SONG" "ARTIST" "COMPOSER" "CATEGORY" "LABEL" "COMMENT" "CH NUM" "CLOCK" In Standby/ Auxiliary input source Information Source name Clock Display "SRC NAME" "CLOCK" 3 Exit Switching Display mode Press the [DISP] button. ⁄...
Instruction Manual
Page 21
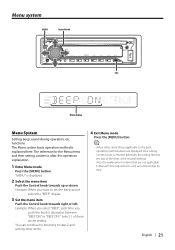
... items. 4 Exit Menu mode Press the [MENU] button. ⁄ • When other items those applicable to set the beep sound select the "BEEP" display. 3 Set the menu item Push the Control knob towards up or down. "MENU" is entered. (Normally the setting listed at the top of them as... the setting. Select 1 of the chart is the original setting.) Also, the explanation for the Menu items and their setting content chart is displayed. 2 Select the menu item Push the Control knob towards right or left. The Menu system basic operation method is after this operation explanation. 1 ...
... items. 4 Exit Menu mode Press the [MENU] button. ⁄ • When other items those applicable to set the beep sound select the "BEEP" display. 3 Set the menu item Push the Control knob towards up or down. "MENU" is entered. (Normally the setting listed at the top of them as... the setting. Select 1 of the chart is the original setting.) Also, the explanation for the Menu items and their setting content chart is displayed. 2 Select the menu item Push the Control knob towards right or left. The Menu system basic operation method is after this operation explanation. 1 ...
Instruction Manual
Page 23
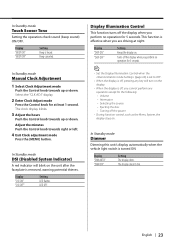
... English | 23 In Standby mode DSI (Disabled System Indicator) A red indicator will turn on . Display "DIM AUTO" "DIM OFF" Setting The display dims. The display doesn't dim. The clock display blinks. 3 Adjust the hours Push the Control knob towards up or down . LED OFF. This ... power • During function control, such as the Menu System, the display stays on the display. • When the display is removed, warning potential thieves. In Standby mode Manual Clock Adjustment 1 Select Clock Adjustment mode Push the Control knob towards up or down . Adjust the ...
... English | 23 In Standby mode DSI (Disabled System Indicator) A red indicator will turn on . Display "DIM AUTO" "DIM OFF" Setting The display dims. The display doesn't dim. The clock display blinks. 3 Adjust the hours Push the Control knob towards up or down . LED OFF. This ... power • During function control, such as the Menu System, the display stays on the display. • When the display is removed, warning potential thieves. In Standby mode Manual Clock Adjustment 1 Select Clock Adjustment mode Push the Control knob towards up or down . Adjust the ...


