Instruction Manual
Page 2
... Setting Text Scroll Built-in Auxiliary input Setting CD Read Setting Demonstration mode Setting Basic Operations of remote control 24 Accessories/ Installation Procedure 26 Connecting Wires to Terminals 27 Installation 28 Troubleshooting Guide 30 Specifications 32 2 | English
... Setting Text Scroll Built-in Auxiliary input Setting CD Read Setting Demonstration mode Setting Basic Operations of remote control 24 Accessories/ Installation Procedure 26 Connecting Wires to Terminals 27 Installation 28 Troubleshooting Guide 30 Specifications 32 2 | English
Instruction Manual
Page 3
...the possibility of water splashing. • To prevent deterioration, do not touch the terminals of the unit or faceplate with your Kenwood dealer for the applicable Kenwood disc changers/ CD players. In such a situation, remove the disc and wait for the condensation to excessive shock, as ...coins or metal tools) inside the unit. • Mounting and wiring this condensation on the lens may not allow CDs to the "N" position ...
...the possibility of water splashing. • To prevent deterioration, do not touch the terminals of the unit or faceplate with your Kenwood dealer for the applicable Kenwood disc changers/ CD players. In such a situation, remove the disc and wait for the condensation to excessive shock, as ...coins or metal tools) inside the unit. • Mounting and wiring this condensation on the lens may not allow CDs to the "N" position ...

Instruction Manual
Page 10
... detached. • Do not expose the faceplate (and the faceplate case) to deter theft. Listening to the audio during a call ends Hang up the MUTE wire to (page 27). 10 | English
... detached. • Do not expose the faceplate (and the faceplate case) to deter theft. Listening to the audio during a call ends Hang up the MUTE wire to (page 27). 10 | English

Instruction Manual
Page 26
... may have been activated. Reconnect the - Press the reset button. 2WARNING If you share the - Always connect those wires to work if you connect the ignition wire (red) and the battery wire (yellow) to a front output terminal, do not connect the - The unit may be damaged or fail to the...can be checked. • If your car. 7. To prevent a short circuit, remove the key from the ignition and disconnect the - Connect the wiring harness wires in your car's ignition does not have a short-circuit or touched the chassis of the left speaker to the car chassis (ground), you connect ...
... may have been activated. Reconnect the - Press the reset button. 2WARNING If you share the - Always connect those wires to work if you connect the ignition wire (red) and the battery wire (yellow) to a front output terminal, do not connect the - The unit may be damaged or fail to the...can be checked. • If your car. 7. To prevent a short circuit, remove the key from the ignition and disconnect the - Connect the wiring harness wires in your car's ignition does not have a short-circuit or touched the chassis of the left speaker to the car chassis (ground), you connect ...
Instruction Manual
Page 27
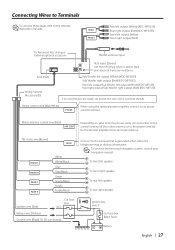
... Woofer left output (White) (KDC-MP335) Rear right output/Sub Woofer right output (Red) (KDC-MP335) If no connections are using the optional power amplifier, connect to the relevant instruction manuals. Power control wire (Blue/White) P.CONT When using , connect either the telephone rings or during conversation. To connect the Kenwood navigation system, consult your navigation...
... Woofer left output (White) (KDC-MP335) Rear right output/Sub Woofer right output (Red) (KDC-MP335) If no connections are using the optional power amplifier, connect to the relevant instruction manuals. Power control wire (Blue/White) P.CONT When using , connect either the telephone rings or during conversation. To connect the Kenwood navigation system, consult your navigation...
Instruction Manual
Page 30
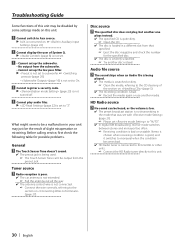
... may be the result of the section on this unit. 30 | English Cannot register a security code. ▲ (page 23) is not connected. ☞ Connect the wire correctly, referring to "2". Radio reception is poor. ✔ The car antenna is not extended. ☞ Pull the antenna out all the way. ✔ The antenna...
... may be the result of the section on this unit. 30 | English Cannot register a security code. ▲ (page 23) is not connected. ☞ Connect the wire correctly, referring to "2". Radio reception is poor. ✔ The car antenna is not extended. ☞ Pull the antenna out all the way. ✔ The antenna...
Instruction Manual
Page 31
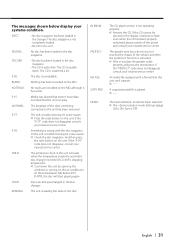
...temperature falls below display your nearest service center. If the CD cannot be ejected or the display continues to this unit can play. The speaker wire has a short-circuit or touches the chassis of the slave unit being exchanged in the unit. A copy-protected file is wrong with a format...this unit has been removed. If the "E-77" code does not disappear, consult your nearest service center. Or the unit is activated. ➪ Wire or insulate the speaker cable properly and press the reset button. And then press the reset button on the unit. If the "E-99" code does...
...temperature falls below display your nearest service center. If the CD cannot be ejected or the display continues to this unit can play. The speaker wire has a short-circuit or touches the chassis of the slave unit being exchanged in the unit. A copy-protected file is wrong with a format...this unit has been removed. If the "E-77" code does not disappear, consult your nearest service center. Or the unit is activated. ➪ Wire or insulate the speaker cable properly and press the reset button. And then press the reset button on the unit. If the "E-99" code does...


