Instruction Manual
Page 2
... Safety precautions 3 Notes 4 General features 7 Power Selecting the Source Volume Attenuator Audio Control Audio Setup Bass Boost Speaker Setting Switching Display Subwoofer Output Theft Deterrent Faceplate TEL Mute Tuner features 11 Tuning Tuning Mode Direct Access Tuning Station Preset Memory Auto Memory Entry Preset Tuning CD/Audio file/External disc control...
... Safety precautions 3 Notes 4 General features 7 Power Selecting the Source Volume Attenuator Audio Control Audio Setup Bass Boost Speaker Setting Switching Display Subwoofer Output Theft Deterrent Faceplate TEL Mute Tuner features 11 Tuning Tuning Mode Direct Access Tuning Station Preset Memory Auto Memory Entry Preset Tuning CD/Audio file/External disc control...
Instruction Manual
Page 3
.... Do Not Load 3-in the CD player of water splashing. • Do not place the faceplate (and the faceplate case) in 1998 or later can be connected to this unit Kenwood disc changers/ CD players released in areas exposed to direct sunlight, excessive heat or humidity. Lens ...not apply excessive force to the open faceplate or place objects on the models being connected. ¤ • You can be attached while the electrical system of Dolby Laboratories. Doing so will cause damage or breakdown. • Do not use your Kenwood dealer for connectable models of precision equipment....
.... Do Not Load 3-in the CD player of water splashing. • Do not place the faceplate (and the faceplate case) in 1998 or later can be connected to this unit Kenwood disc changers/ CD players released in areas exposed to direct sunlight, excessive heat or humidity. Lens ...not apply excessive force to the open faceplate or place objects on the models being connected. ¤ • You can be attached while the electrical system of Dolby Laboratories. Doing so will cause damage or breakdown. • Do not use your Kenwood dealer for connectable models of precision equipment....

Instruction Manual
Page 4
... • Press the reset button if the disc auto changer fails to explain more clearly how the controls are used. Cleaning the Faceplate Terminals If the terminals on the actual equipment, and some of this manual are examples used to operate correctly. Normal operation should be ...inapplicable. Notes • If you experience problems during installation, consult your Kenwood dealer. • When you purchase optional accessories, check with your Kenwood dealer to make sure that they work with your model and in your unit • If the unit...
... • Press the reset button if the disc auto changer fails to explain more clearly how the controls are used. Cleaning the Faceplate Terminals If the terminals on the actual equipment, and some of this manual are examples used to operate correctly. Normal operation should be ...inapplicable. Notes • If you experience problems during installation, consult your Kenwood dealer. • When you purchase optional accessories, check with your Kenwood dealer to make sure that they work with your model and in your unit • If the unit...

Instruction Manual
Page 10
... knob toward [AM] for at least 2 seconds. TEL Mute The audio system automatically mutes when a call comes in "CALL" is displayed. 2 Push the faceplate in place, allowing you push the knob, Subwoofer output switches ON and OFF. The "CALL" display disappears and the audio system comes back ON. ⁄...The audio system pauses. Listening to the audio during a call ends Hang up the MUTE wire to forward and remove it. ¤ • The faceplate is locked in until it is ON, "SW ON" is displayed. The "CALL" display disappears and the audio system comes back ON. Drop open the...
... knob toward [AM] for at least 2 seconds. TEL Mute The audio system automatically mutes when a call comes in "CALL" is displayed. 2 Push the faceplate in place, allowing you push the knob, Subwoofer output switches ON and OFF. The "CALL" display disappears and the audio system comes back ON. ⁄...The audio system pauses. Listening to the audio during a call ends Hang up the MUTE wire to forward and remove it. ¤ • The faceplate is locked in until it is ON, "SW ON" is displayed. The "CALL" display disappears and the audio system comes back ON. Drop open the...
Instruction Manual
Page 13
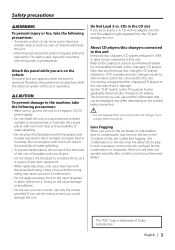
... 3 Track number Play time IN indicator Disc number Playing CD & Audio file When there is no disc inserted 1 Drop open the faceplate Press the Release button. 2 Insert a disc. 3 Push the faceplate on the left side, and return it to its former position. ⁄ • You can enter the inside part and cause... move the shift lever or take an appropriate action to remove the obstacle, then operate the unit. • Do not use the unit with the faceplate in the open , it might interfere with the shift lever or other vehicle function. English | 13
... 3 Track number Play time IN indicator Disc number Playing CD & Audio file When there is no disc inserted 1 Drop open the faceplate Press the Release button. 2 Insert a disc. 3 Push the faceplate on the left side, and return it to its former position. ⁄ • You can enter the inside part and cause... move the shift lever or take an appropriate action to remove the obstacle, then operate the unit. • Do not use the unit with the faceplate in the open , it might interfere with the shift lever or other vehicle function. English | 13
Instruction Manual
Page 20
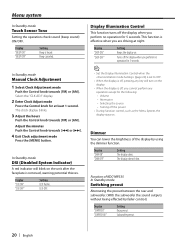
...minutes Push the Control knob towards [FM] or [AM]. Display "DISP ON" "DISP OFF" Setting Keeps the display on the unit after the faceplate is off, you perform no operation for at night. Subwoofer preout. 20 | English In Standby mode Manual Clock Adjustment 1 Select Clock Adjustment mode... the power • During function control, such as the Menu System, the display stays on. Dimmer You can lower the brightness of KDC-MP335 In Standby mode Switching preout Alternating the preout between the rear and subwoofer. (With the subwoofer the sound outputs without being effected by using...
...minutes Push the Control knob towards [FM] or [AM]. Display "DISP ON" "DISP OFF" Setting Keeps the display on the unit after the faceplate is off, you perform no operation for at night. Subwoofer preout. 20 | English In Standby mode Manual Clock Adjustment 1 Select Clock Adjustment mode... the power • During function control, such as the Menu System, the display stays on. Dimmer You can lower the brightness of KDC-MP335 In Standby mode Switching preout Alternating the preout between the rear and subwoofer. (With the subwoofer the sound outputs without being effected by using...

Instruction Manual
Page 26
... to the terminals to a power source that in the car. • When only two speakers are working properly. • Mount the unit so that the faceplate will not hit the lid when closing and opening. • If the fuse blows, first make sure to both the rear output terminals (do not...
... to the terminals to a power source that in the car. • When only two speakers are working properly. • Mount the unit so that the faceplate will not hit the lid when closing and opening. • If the fuse blows, first make sure to both the rear output terminals (do not...
Instruction Manual
Page 29
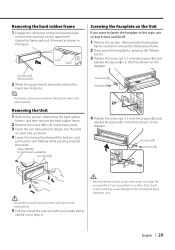
... toward the bottom, and pull out the unit halfway while pressing towards the inside the unit. Screw (M4X8) (commercially available) Accessory2 Screwing the Faceplate on the Unit If you screw them in another hole, it will contact and may cause damage to avoid injury from the bottom side in... the unit all the way out with your hands, being careful not to the section and then remove the hard rubber frame. 2 Drop open the faceplate by pressing the Release button. 3 Tighten the screw (ø2 × 5 mm) (Accessory 5) and bracket (Accessory6 ) in any other screw hole than the one specified...
... toward the bottom, and pull out the unit halfway while pressing towards the inside the unit. Screw (M4X8) (commercially available) Accessory2 Screwing the Faceplate on the Unit If you screw them in another hole, it will contact and may cause damage to avoid injury from the bottom side in... the unit all the way out with your hands, being careful not to the section and then remove the hard rubber frame. 2 Drop open the faceplate by pressing the Release button. 3 Tighten the screw (ø2 × 5 mm) (Accessory 5) and bracket (Accessory6 ) in any other screw hole than the one specified...
Instruction Manual
Page 31
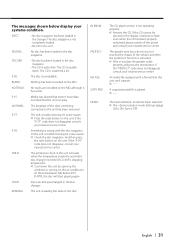
... temperature falls below display your nearest service center. The Demonstration mode has been selected. ➪ The (page 23) is unreadable. English | 31 NO PANEL: The faceplate of the vehicle, and then the protection function is malfunctioning for some reason. ➪ Press the reset button on the MD, although it OFF. The...
... temperature falls below display your nearest service center. The Demonstration mode has been selected. ➪ The (page 23) is unreadable. English | 31 NO PANEL: The faceplate of the vehicle, and then the protection function is malfunctioning for some reason. ➪ Press the reset button on the MD, although it OFF. The...

