Instruction Manual
Page 5
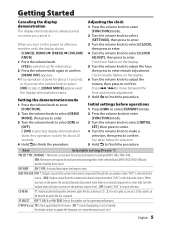
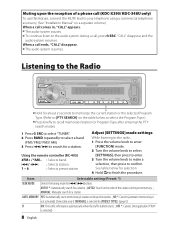
... is selected, display demonstration starts if no operation is done for optimum performance. Clock minutes flashes on how to update the firmware, see: www.kenwood.com/cs/ce/ English 5 ON2: Outputs sound from the connected external component when "AUX" is not activated). SP SELECT OFF */ 5/4/ 6 &#... if an audio file disc is selected as the source. Getting Started Canceling the display demonstration The display demonstration is always turned on unless you turn the volume knob to select [NO] in step 2, [DEMO MODE] appears and the display demonstration starts. OFF: Disables...
... is selected, display demonstration starts if no operation is done for optimum performance. Clock minutes flashes on how to update the firmware, see: www.kenwood.com/cs/ce/ English 5 ON2: Outputs sound from the connected external component when "AUX" is not activated). SP SELECT OFF */ 5/4/ 6 &#... if an audio file disc is selected as the source. Getting Started Canceling the display demonstration The display demonstration is always turned on unless you turn the volume knob to select [NO] in step 2, [DEMO MODE] appears and the display demonstration starts. OFF: Disables...
Instruction Manual
Page 6
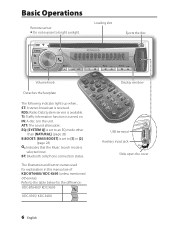
... not expose to the table below for explanation in the unit. ST: A stereo broadcast is turned on. TI: Traffic Information function is received. The illustration and button names used for the difference: KDC-BT648U/ KDC-X695 KDC-X395/ KDC-348U Display window USB terminal Auxiliary input jack Slide open the cover 6 English RDS: Radio Data System... Volume knob Detaches the faceplate The following indicator lights up when... BT: Bluetooth cell-phone connection status. IN: A disc is in this manual are of KDC-BT648U/ KDC-X695 (unless mentioned otherwise).
... not expose to the table below for explanation in the unit. ST: A stereo broadcast is turned on. TI: Traffic Information function is received. The illustration and button names used for the difference: KDC-BT648U/ KDC-X695 KDC-X395/ KDC-348U Display window USB terminal Auxiliary input jack Slide open the cover 6 English RDS: Radio Data System... Volume knob Detaches the faceplate The following indicator lights up when... BT: Bluetooth cell-phone connection status. IN: A disc is in this manual are of KDC-BT648U/ KDC-X695 (unless mentioned otherwise).
Instruction Manual
Page 7
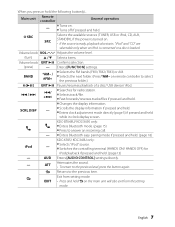
...General operation - ■ Turns on. ■ Turns off if pressed and held . ■ Changes the display information. Exit from the setting mode. English 7 on remote controller to answer an incoming call. - ■ Enters Bluetooth easy pairing mode if pressed and held. (page 18) KDC-X395/ KDC-348U only: iPod ■ ... main unit will also exit from setting mode. SRC Selects the available sources (TUNER, USB or iPod, CD, AUX, SRC STANDBY), if the power is turned on. • If the source is loaded. BAND ■ Selects the FM bands (FM1/ FM2/ FM3) or AM. *AM- / ■ ...
...General operation - ■ Turns on. ■ Turns off if pressed and held . ■ Changes the display information. Exit from the setting mode. English 7 on remote controller to answer an incoming call. - ■ Enters Bluetooth easy pairing mode if pressed and held. (page 18) KDC-X395/ KDC-348U only: iPod ■ ... main unit will also exit from setting mode. SRC Selects the available sources (TUNER, USB or iPod, CD, AUX, SRC STANDBY), if the power is turned on. • If the source is loaded. BAND ■ Selects the FM bands (FM1/ FM2/ FM3) or AM. *AM- / ■ ...
Instruction Manual
Page 8
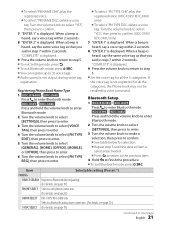
... a station. AUTO MEMORY YES: Automatically starts memorizing 6 stations with good reception. ; AUTO2: Search in the order of a phone call (KDC-X395/ KDC-348U only) To use this feature, connect the MUTE lead to your telephone using a commercial telephone accessory. (See "Installation Manual" on the table... [SETTINGS] mode settings While listening to the radio... 1 Press the volume knob to enter [FUNCTION] mode. 2 Turn the volume knob to select [SETTINGS], then press to enter. 3 Turn the volume knob to make a selection, then press to confirm. When a call ends, "CALL" disappear. ■...
... a station. AUTO MEMORY YES: Automatically starts memorizing 6 stations with good reception. ; AUTO2: Search in the order of a phone call (KDC-X395/ KDC-348U only) To use this feature, connect the MUTE lead to your telephone using a commercial telephone accessory. (See "Installation Manual" on the table... [SETTINGS] mode settings While listening to the radio... 1 Press the volume knob to enter [FUNCTION] mode. 2 Turn the volume knob to select [SETTINGS], then press to enter. 3 Turn the volume knob to make a selection, then press to confirm. When a call ends, "CALL" disappear. ■...

Instruction Manual
Page 9
Then, press 4 / ¢ to start playing. 3 Turn the volume knob to adjust the volume. COUNTRY; NOSTALGA; PUBLIC; It will search for [BUILT-IN AUX]. (page 5) 1 Press SRC to the other playback source ...". OFF *: Cancels (stereo effect resumes). MUSIC; INFORM; TALK; ROCK; JAZZ; CLASSICL; R & B; LANGUAGE; REL (religious) MUSC; WEATHER The unit will be lost). ; Listening to select "AUX". 2 Turn on the external component and start searching. ■ [TI] is selectable only when the source is...
Then, press 4 / ¢ to start playing. 3 Turn the volume knob to adjust the volume. COUNTRY; NOSTALGA; PUBLIC; It will search for [BUILT-IN AUX]. (page 5) 1 Press SRC to the other playback source ...". OFF *: Cancels (stereo effect resumes). MUSIC; INFORM; TALK; ROCK; JAZZ; CLASSICL; R & B; LANGUAGE; REL (religious) MUSC; WEATHER The unit will be lost). ; Listening to select "AUX". 2 Turn on the external component and start searching. ■ [TI] is selectable only when the source is...

Instruction Manual
Page 10
...) KCA-iP102 (optional accessory) Removing the USB device or iPod 1 Press SRC to the USB terminal. Start playing a USB device or iPod 1 Press SRC to turn on the power. 2 Slide open the cover. 3 Connect a USB device or iPod to select a source other than "USB" or "iPod". 2 Remove the USB device or... iPod. Start playing the disc changer 1 Press SRC to turn on the power. 2 Press SRC to select next disc of CD changer. Listening to a Disc/ USB device/ iPod Ejects the disc. ("NO DISC" appears and...
...) KCA-iP102 (optional accessory) Removing the USB device or iPod 1 Press SRC to the USB terminal. Start playing a USB device or iPod 1 Press SRC to turn on the power. 2 Slide open the cover. 3 Connect a USB device or iPod to select a source other than "USB" or "iPod". 2 Remove the USB device or... iPod. Start playing the disc changer 1 Press SRC to turn on the power. 2 Press SRC to select next disc of CD changer. Listening to a Disc/ USB device/ iPod Ejects the disc. ("NO DISC" appears and...
Instruction Manual
Page 11
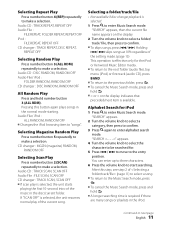
.... Continued to "songs". Holding 4/ ¢ skips songs at 10% regardless of the setting made. (page 13) This operation is effective only for the iPod or Kenwood Music Editor media. ■ To return to the root folder (audio file), top menu (iPod) or first track (audio CD), press BAND. ■ To return... to the previous folder, press . ■ To cancel the Music Search mode, press and hold . ■ < or > on the display. 2 Turn the volume knob to select a folder/ track/ file, then press to confirm. ■ To skips songs, press 4/ ¢. "SEARCH " appears...
.... Continued to "songs". Holding 4/ ¢ skips songs at 10% regardless of the setting made. (page 13) This operation is effective only for the iPod or Kenwood Music Editor media. ■ To return to the root folder (audio file), top menu (iPod) or first track (audio CD), press BAND. ■ To return... to the previous folder, press . ■ To cancel the Music Search mode, press and hold . ■ < or > on the display. 2 Turn the volume knob to select a folder/ track/ file, then press to confirm. ■ To skips songs, press 4/ ¢. "SEARCH " appears...

Instruction Manual
Page 12
...ENT 38 : Confirms selection. 5 / ∞ : Selects folder/file/track. : Returns to enter the disc number. 3 Press #FM+ / *AM- "MY PLAYLIST" appears. 2 Turn the volume knob to select the song you want to delete, then press and hold number button 5 (MEMO MY LIST) to register. "- -" appears. 2 Press the...cannot be skipped during search. Direct Disc Search using the remote controller (RC-405) • Not available if Random Play, Scan Play, KENWOOD Music Editor media, iPod playback is selected. 1 Press DIRECT to enter Direct Disc Search mode. My Playlist for iPod Registering songs in the ...
...ENT 38 : Confirms selection. 5 / ∞ : Selects folder/file/track. : Returns to enter the disc number. 3 Press #FM+ / *AM- "MY PLAYLIST" appears. 2 Turn the volume knob to select the song you want to delete, then press and hold number button 5 (MEMO MY LIST) to register. "- -" appears. 2 Press the...cannot be skipped during search. Direct Disc Search using the remote controller (RC-405) • Not available if Random Play, Scan Play, KENWOOD Music Editor media, iPod playback is selected. 1 Press DIRECT to enter Direct Disc Search mode. My Playlist for iPod Registering songs in the ...
Instruction Manual
Page 13
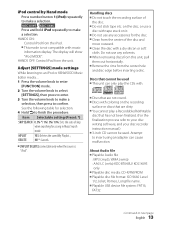
... SKIP SEARCH 0.5% */ 1%/ 5%/ 10%: Sets the ratio of the disc. ■ Do not stick tape etc. The display will show "iPod MODE". KDC-X395 / KDC-348U Press and hold iPod repeatedly to make a selection. See the following table for a song in Music Search mode. Do not use any solvents. ■ ...the procedure. Adjust [SETTINGS] mode settings While listening to an iPod or KENWOOD Music Editor media ... 1 Press the volume knob to enter [FUNCTION] mode. 2 Turn the volume knob to select [SETTINGS], then press to enter. 3 Turn the volume knob to make a selection, then press to next page English...
... SKIP SEARCH 0.5% */ 1%/ 5%/ 10%: Sets the ratio of the disc. ■ Do not stick tape etc. The display will show "iPod MODE". KDC-X395 / KDC-348U Press and hold iPod repeatedly to make a selection. See the following table for a song in Music Search mode. Do not use any solvents. ■ ...the procedure. Adjust [SETTINGS] mode settings While listening to an iPod or KENWOOD Music Editor media ... 1 Press the volume knob to enter [FUNCTION] mode. 2 Turn the volume knob to select [SETTINGS], then press to enter. 3 Turn the volume knob to make a selection, then press to next page English...

Instruction Manual
Page 15
...Pairing (Registering from the list of Hands-Free Phoning Preparation : KDC-X395/ KDC-348U: Only with the hands-free function, see (page 34). Select "KCABT300" or "KCA-BT200" from Bluetooth devices) 1 Press SRC to turn on the power. 2 Start registering this unit. ■ For...enter easy pairing mode "PAIRING" is displayed. 2 "SEARCHING" is necessary. Check that registration is displayed during paring, see (page 22). KDC-X395/ KDC-348U ■ Press and hold to answer an incoming call . ■ Press and hold for the Bluetooth device. Step 1. Operation of ...
...Pairing (Registering from the list of Hands-Free Phoning Preparation : KDC-X395/ KDC-348U: Only with the hands-free function, see (page 34). Select "KCABT300" or "KCA-BT200" from Bluetooth devices) 1 Press SRC to turn on the power. 2 Start registering this unit. ■ For...enter easy pairing mode "PAIRING" is displayed. 2 "SEARCHING" is necessary. Check that registration is displayed during paring, see (page 22). KDC-X395/ KDC-348U ■ Press and hold to answer an incoming call . ■ Press and hold for the Bluetooth device. Step 1. Operation of ...
Instruction Manual
Page 16
... press to enter. 3 Press to enter alphabet search mode. 4 Turn the volume knob to select the character to be downloaded to (page 19). Refer to this unit. Calling a Number in advance. Refer to enter. ■ Operation method of them. Step 3. KDC-X395 / KDC-348U Press and hold . ■ To exit Bluetooth mode, press SRC...
... press to enter. 3 Press to enter alphabet search mode. 4 Turn the volume knob to select the character to be downloaded to (page 19). Refer to this unit. Calling a Number in advance. Refer to enter. ■ Operation method of them. Step 3. KDC-X395 / KDC-348U Press and hold . ■ To exit Bluetooth mode, press SRC...
Instruction Manual
Page 17
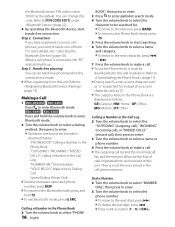
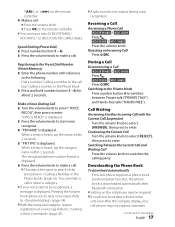
...seconds. "V-RECG READY" is displayed. 3 Press the volume knob to enter. You can input max 25 (KDC-BT648U/ KDC-X695) / 32 (KDC-X395/ KDC-348U) digits. During a Call Disconnecting a Call KDC-BT648U / KDC-X695 Press . Call Waiting Answering Another Incoming Call with reference to (page 20). ■ Audio sound ...name and category require registration of the procedure in (page 16). KDC-X395 / KDC-348U Press the volume knob. Switching to the Private Mode Press number button 6 to enter. Continuing the Current Call Turn the volume knob to select [REJECT], then press to switches ...
...seconds. "V-RECG READY" is displayed. 3 Press the volume knob to enter. You can input max 25 (KDC-BT648U/ KDC-X695) / 32 (KDC-X395/ KDC-348U) digits. During a Call Disconnecting a Call KDC-BT648U / KDC-X695 Press . Call Waiting Answering Another Incoming Call with reference to (page 20). ■ Audio sound ...name and category require registration of the procedure in (page 16). KDC-X395 / KDC-348U Press the volume knob. Switching to the Private Mode Press number button 6 to enter. Continuing the Current Call Turn the volume knob to select [REJECT], then press to switches ...
Instruction Manual
Page 18
...When registering a cell- Fewer characters can be input depending on cell-phone registration condition: - Bluetooth Setup Preparation : KDC-X395/ KDC-348U: Only with the Current Call Suspended. "DEVICE FULL": When maximum of phone book data. "(cell-phone name)": ...KDC-BT648U/ KDC-X695)/ 32 (KDC-X395/ KDC-348U) digits can be registered for the Bluetooth device. Easy Pairing function • KDC-BT648U/ KDC-X695 only. 1 Press and hold to confirm. In this unit. ■ During downloading: "DOWNLOADING" is displayed. ■ After completion of the following is displayed. 3 Turn...
...When registering a cell- Fewer characters can be input depending on cell-phone registration condition: - Bluetooth Setup Preparation : KDC-X395/ KDC-348U: Only with the Current Call Suspended. "DEVICE FULL": When maximum of phone book data. "(cell-phone name)": ...KDC-BT648U/ KDC-X695)/ 32 (KDC-X395/ KDC-348U) digits can be registered for the Bluetooth device. Easy Pairing function • KDC-BT648U/ KDC-X695 only. 1 Press and hold to confirm. In this unit. ■ During downloading: "DOWNLOADING" is displayed. ■ After completion of the following is displayed. 3 Turn...
Instruction Manual
Page 19
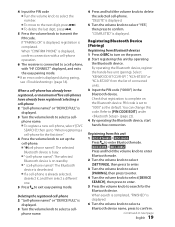
... / KDC-X695 Press to turn on the power. 2 Start registering this unit by operating the Bluetooth device. Continued to select a cell- When a cell-phone has already been registered, or maximum of connected units. 3 Input the PIN code ("0000") in the Bluetooth device. Select "KENWOOD BT CD/R-3P1", "KCA-BT300" or "KCA-BT200" from.... ■ "-(cell-phone name)": The selected Bluetooth device is already selected, deselect it, and then select a different one. 5 Press to delete the selected cell-phone. KDC-X395 / KDC-348U Press and hold the volume knob to exit easy pairing mode.
... / KDC-X695 Press to turn on the power. 2 Start registering this unit by operating the Bluetooth device. Continued to select a cell- When a cell-phone has already been registered, or maximum of connected units. 3 Input the PIN code ("0000") in the Bluetooth device. Select "KENWOOD BT CD/R-3P1", "KCA-BT300" or "KCA-BT200" from.... ■ "-(cell-phone name)": The selected Bluetooth device is already selected, deselect it, and then select a different one. 5 Press to delete the selected cell-phone. KDC-X395 / KDC-348U Press and hold the volume knob to exit easy pairing mode.
Instruction Manual
Page 20
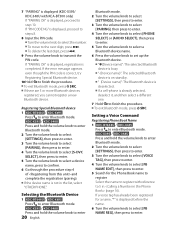
... knob to step 10. Setting a Voice Command Registering Phone Book Name 1 KDC-BT648U / KDC-X695 Press to enter Bluetooth mode. Registering Special Bluetooth device 1 KDC-BT648U / KDC-X695 Press to enter Bluetooth mode. KDC-X395 / KDC-348U Press and hold the volume knob to enter Bluetooth mode. 2 Turn the volume knob to select [SETTINGS], then press to enter...
... knob to step 10. Setting a Voice Command Registering Phone Book Name 1 KDC-BT648U / KDC-X695 Press to enter Bluetooth mode. Registering Special Bluetooth device 1 KDC-BT648U / KDC-X695 Press to enter Bluetooth mode. KDC-X395 / KDC-348U Press and hold the volume knob to enter Bluetooth mode. 2 Turn the volume knob to select [SETTINGS], then press to enter...
Instruction Manual
Page 21
...table below for all the 5 categories. KDC-X395 / KDC-348U Press and hold the volume knob to enter Bluetooth mode. 2 Turn the volume knob to select [SETTINGS], then press to enter. 3 Turn the volume knob to select [VOICE TAG], then press to enter. 4 Turn the volume knob to select [PN TYPE... for selection. ■ Repeat step 3 until the desired item is displayed. KDC-X395 / KDC-348U Press and hold the volume knob to enter Bluetooth mode. 2 Turn the volume knob to select [SETTINGS], then press to enter. 3 Turn the volume knob to make a selection, then press to finish the procedure. ...
...table below for all the 5 categories. KDC-X395 / KDC-348U Press and hold the volume knob to enter Bluetooth mode. 2 Turn the volume knob to select [SETTINGS], then press to enter. 3 Turn the volume knob to select [VOICE TAG], then press to enter. 4 Turn the volume knob to select [PN TYPE... for selection. ■ Repeat step 3 until the desired item is displayed. KDC-X395 / KDC-348U Press and hold the volume knob to enter Bluetooth mode. 2 Turn the volume knob to select [SETTINGS], then press to enter. 3 Turn the volume knob to make a selection, then press to finish the procedure. ...
Instruction Manual
Page 22
..., KDC-X695 and KDC-X395/KDC-348U with KCA-BT300. BT F/W UPDATE Display the firmware version and update the firmware. SMS DOWNLOAD Download a short message. (For details, see page 20.) DETAILED SET PIN CODE EDIT Specify the PIN code required when registering this function is turned ON, the Bluetooth device...-in or external microphone is not clear. However, it is to communicate with the Bluetooth Standard following URL: 22 English www.kenwood.com/cs/ce/bt/ ■ The units supporting the Bluetooth function have been certified for such units to be impossible for...
..., KDC-X695 and KDC-X395/KDC-348U with KCA-BT300. BT F/W UPDATE Display the firmware version and update the firmware. SMS DOWNLOAD Download a short message. (For details, see page 20.) DETAILED SET PIN CODE EDIT Specify the PIN code required when registering this function is turned ON, the Bluetooth device...-in or external microphone is not clear. However, it is to communicate with the Bluetooth Standard following URL: 22 English www.kenwood.com/cs/ce/bt/ ■ The units supporting the Bluetooth function have been certified for such units to be impossible for...
Instruction Manual
Page 23
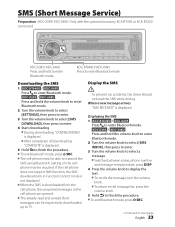
...-phone are opened. ■ The already-read the SMS while driving. KDC-X395/ KDC-348U Press and hold the volume knob to enter Bluetooth mode. 2 Turn the volume knob to select [SMS INBOX], then press to enter. 3 Turn the volume knob to select a message. ■ Switches between name,... exit Bluetooth mode, press SRC. ■ The cell-phone must be required. KDC-X395 / KDC-348U Press and hold the volume knob to enter Bluetooth mode. 2 Turn the volume knob to select [SETTINGS], then press to enter. 3 Turn the volume knob to select [SMS DOWNLOAD], then press to enter. 4 Start ...
...-phone are opened. ■ The already-read the SMS while driving. KDC-X395/ KDC-348U Press and hold the volume knob to enter Bluetooth mode. 2 Turn the volume knob to select [SMS INBOX], then press to enter. 3 Turn the volume knob to select a message. ■ Switches between name,... exit Bluetooth mode, press SRC. ■ The cell-phone must be required. KDC-X395 / KDC-348U Press and hold the volume knob to enter Bluetooth mode. 2 Turn the volume knob to select [SETTINGS], then press to enter. 3 Turn the volume knob to select [SMS DOWNLOAD], then press to enter. 4 Start ...

Instruction Manual
Page 25
... confirm. English 25 Adjust [SETTINGS] mode settings While listening to the radio... 1 Press the volume knob to enter [FUNCTION] mode. 2 Turn the volume knob to select [SETTINGS], then press to enter. 3 Turn the volume knob to make no digital broadcast. ; iTunes Tagging • Only with good reception. ; Item Selectable setting (Preset: *) SEEK...
... confirm. English 25 Adjust [SETTINGS] mode settings While listening to the radio... 1 Press the volume knob to enter [FUNCTION] mode. 2 Turn the volume knob to select [SETTINGS], then press to enter. 3 Turn the volume knob to make no digital broadcast. ; iTunes Tagging • Only with good reception. ; Item Selectable setting (Preset: *) SEEK...
Instruction Manual
Page 26
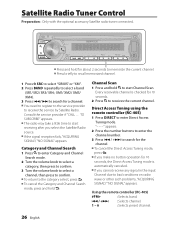
... channel. 26 English Channel Scan 1 Press and hold . Category and Channel Search 1 Press to enter Category and Channel Search mode. 2 Turn the volume knob to select a category, then press to confirm. 3 Turn the volume knob to select a channel, then press to confirm. ■ To return to the category select, press . ■ To...
... channel. 26 English Channel Scan 1 Press and hold . Category and Channel Search 1 Press to enter Category and Channel Search mode. 2 Turn the volume knob to select a category, then press to confirm. 3 Turn the volume knob to select a channel, then press to confirm. ■ To return to the category select, press . ■ To...


