
Instruction Manuals
Page 1
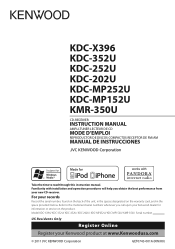
... KDC-202U KDC-MP252U KDC-MP152U KMR-350U CD-RECEIVER INSTRUCTION MANUAL AMPLI-TUNER LECTEUR DE CD MODE D'EMPLOI REPRODUCTOR DE DISCOS COMPACTOS RECEPTOR DE FM/AM MANUAL DE INSTRUCCIONES Take the time to the model and serial numbers whenever you obtain the best performance from your Kenwood product at www.Kenwoodusa.com © 2011 JVC KENWOOD Corporation GET0743-001A (KW/K0) Familiarity with installation and operation...
... KDC-202U KDC-MP252U KDC-MP152U KMR-350U CD-RECEIVER INSTRUCTION MANUAL AMPLI-TUNER LECTEUR DE CD MODE D'EMPLOI REPRODUCTOR DE DISCOS COMPACTOS RECEPTOR DE FM/AM MANUAL DE INSTRUCCIONES Take the time to the model and serial numbers whenever you obtain the best performance from your Kenwood product at www.Kenwoodusa.com © 2011 JVC KENWOOD Corporation GET0743-001A (KW/K0) Familiarity with installation and operation...
Instruction Manuals
Page 2
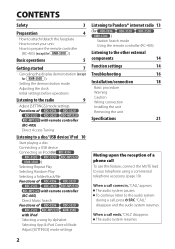
...-405) Direct Music Search Functions of Listening to Pandora® internet radio 13 (For ) Station Search mode Using the remote controller (RC-405) Listening to the other external components 14 Function settings 14 Troubleshooting 16 Installation/connection 18 Basic procedure Warning Caution Wiring connection Installing the unit Removing the unit Specifications 21 Muting upon the reception of with iPod Selecting a song by alphabet Selecting App & iPod Control Mode Adjust [SETTINGS] mode settings When a call ends, "CALL" disappear. "CALL" disappear and the audio system...
...-405) Direct Music Search Functions of Listening to Pandora® internet radio 13 (For ) Station Search mode Using the remote controller (RC-405) Listening to the other external components 14 Function settings 14 Troubleshooting 16 Installation/connection 18 Basic procedure Warning Caution Wiring connection Installing the unit Removing the unit Specifications 21 Muting upon the reception of with iPod Selecting a song by alphabet Selecting App & iPod Control Mode Adjust [SETTINGS] mode settings When a call ends, "CALL" disappear. "CALL" disappear and the audio system...
Instruction Manuals
Page 3
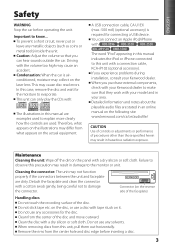
... exposure. If you experience problems during installation, consult your Kenwood dealer to observe this case, remove the disc and wait for connecting a USB device. Failure to make sure that you purchase external components, check with tape stuck on the disc, or use any accessories for the disc. Connector (on the following site: www.kenwood.com/cs/ce/audiofile/ CAUTION Use of controls or adjustments or performance of procedures...
... exposure. If you experience problems during installation, consult your Kenwood dealer to observe this case, remove the disc and wait for connecting a USB device. Failure to make sure that you purchase external components, check with tape stuck on the disc, or use any accessories for the disc. Connector (on the following site: www.kenwood.com/cs/ce/audiofile/ CAUTION Use of controls or adjustments or performance of procedures...
Instruction Manuals
Page 6
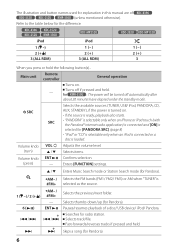
... selection. Selects the available sources (TUNER, USB/ iPod, PANDORA, CD, SRC AUX, STANDBY), if the power is turned on . - Enters [FUNCTION] settings. 5 / ∞ Enters Music Search mode or Station Search mode (for the difference: iPod 1 ( -) 2 (+ ) 3 (ALL RDM) iPod 1 (-) 2 (+) 3 (ALL RDM) 1 (-) 2 (+) 3 When you press or hold the following button(s)... Main unit Remote controller General operation Turns on . • If the source is #FM+ selected as the source. *AM- / Selects the previous/next folder. 1 ( -) / 2 (+ ) #FM+ - Selects track/file. Selects items. Volume...
... selection. Selects the available sources (TUNER, USB/ iPod, PANDORA, CD, SRC AUX, STANDBY), if the power is turned on . - Enters [FUNCTION] settings. 5 / ∞ Enters Music Search mode or Station Search mode (for the difference: iPod 1 ( -) 2 (+ ) 3 (ALL RDM) iPod 1 (-) 2 (+) 3 (ALL RDM) 1 (-) 2 (+) 3 When you press or hold the following button(s)... Main unit Remote controller General operation Turns on . • If the source is #FM+ selected as the source. *AM- / Selects the previous/next folder. 1 ( -) / 2 (+ ) #FM+ - Selects track/file. Selects items. Volume...
Instruction Manuals
Page 7
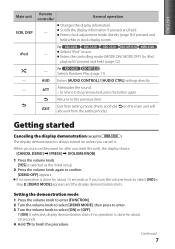
... [AUDIO CONTROL] / [AUDIO CTRL] settings directly. - Returns to the previous level, press the button again. EXIT Exit from setting mode. (Press and hold on the power (or after you turn on the main unit will also exit from the setting mode.) Getting started Canceling the display demonstration (except for about 20 seconds. 4 Hold to select [NO] in clock display screen. Setting the demonstration mode 1 Press the volume knob to enter [FUNCTION]. 2 Turn the volume knob...
... [AUDIO CONTROL] / [AUDIO CTRL] settings directly. - Returns to the previous level, press the button again. EXIT Exit from setting mode. (Press and hold on the power (or after you turn on the main unit will also exit from the setting mode.) Getting started Canceling the display demonstration (except for about 20 seconds. 4 Hold to select [NO] in clock display screen. Setting the demonstration mode 1 Press the volume knob to enter [FUNCTION]. 2 Turn the volume knob...
Instruction Manuals
Page 8
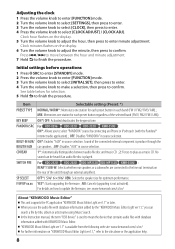
... between audio file disc and music CD. ; 2: Forces to the line out terminals on the display. 6 Turn the volume knob to adjust the minute, then press to select [CLOCK ADJUST] / [CLOCK ADJ]. SWITCH PRE For : REAR*/ SUB-W: Selects whether rear speakers or a subwoofer are connected to play as a music CD. For details on the display. 5 Turn the volume knob to adjust the hour, then press to update the firmware, see: www.kenwood.com/cs/ce/ About "KENWOOD Music Editor" This unit supports...
... between audio file disc and music CD. ; 2: Forces to the line out terminals on the display. 6 Turn the volume knob to adjust the minute, then press to select [CLOCK ADJUST] / [CLOCK ADJ]. SWITCH PRE For : REAR*/ SUB-W: Selects whether rear speakers or a subwoofer are connected to play as a music CD. For details on the display. 5 Turn the volume knob to adjust the hour, then press to update the firmware, see: www.kenwood.com/cs/ce/ About "KENWOOD Music Editor" This unit supports...
Instruction Manuals
Page 9
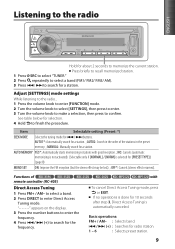
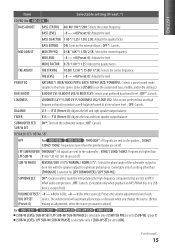
... volume knob to make a selection, then press to finish the procedure. See table below for selection. 4 Hold to confirm. Item Selectable setting (Preset: *) SEEK MODE Selects the tuning mode for radio station. 1 - 6 : Selects preset station. 9 AUTO MEMORY YES*: Automatically starts memorizing 6 stations with To cancel Direct Access Tuning mode, press or EXIT. Basic operations: FM+ / AM- : Selects band. 4 / ¢ (+) : Searches for 4 / ¢ buttons. AUTO1*: Automatically search for a station. with good reception. ; MANUAL: Manually search for a station. ; Functions...
... volume knob to make a selection, then press to finish the procedure. See table below for selection. 4 Hold to confirm. Item Selectable setting (Preset: *) SEEK MODE Selects the tuning mode for radio station. 1 - 6 : Selects preset station. 9 AUTO MEMORY YES*: Automatically starts memorizing 6 stations with To cancel Direct Access Tuning mode, press or EXIT. Basic operations: FM+ / AM- : Selects band. 4 / ¢ (+) : Searches for 4 / ¢ buttons. AUTO1*: Automatically search for a station. with good reception. ; MANUAL: Manually search for a station. ; Functions...
Instruction Manuals
Page 10
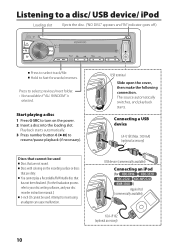
... number button 6 ( ) to fast-forwards/reverses. USB terminal Slide open the cover, then make the following connection. The source automatically switches, and playback starts. Press to insert using an adapter can cause malfunction. You cannot play a Recordable/ReWritable disc that has not been finalized. (For the finalization process refer to your disc writing software, and your disc recorder instruction manual.) 3-inch CD cannot be used . Connecting a USB device CA...
... number button 6 ( ) to fast-forwards/reverses. USB terminal Slide open the cover, then make the following connection. The source automatically switches, and playback starts. Press to insert using an adapter can cause malfunction. You cannot play a Recordable/ReWritable disc that has not been finalized. (For the finalization process refer to your disc writing software, and your disc recorder instruction manual.) 3-inch CD cannot be used . Connecting a USB device CA...
Instruction Manuals
Page 11
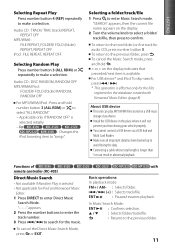
... REPEAT, REPEAT OFF Selecting Random Play Press number button 3 (ALL RDM) or repeatedly to make a selection. To return to the root folder (or first track for iPod and Kenwood Music Editor. 1 Press DIRECT to enter Direct Music Search Mode. Functions of remote controller (RC-405) Direct Music Search • Not available if Random Play is selected initially. - ENGLISH Selecting Repeat Play Press number button 4 (REP) repeatedly to make a selection. To cancel the Direct Music Search Mode, press or EXIT...
... REPEAT, REPEAT OFF Selecting Random Play Press number button 3 (ALL RDM) or repeatedly to make a selection. To return to the root folder (or first track for iPod and Kenwood Music Editor. 1 Press DIRECT to enter Direct Music Search Mode. Functions of remote controller (RC-405) Direct Music Search • Not available if Random Play is selected initially. - ENGLISH Selecting Repeat Play Press number button 4 (REP) repeatedly to make a selection. To cancel the Direct Music Search Mode, press or EXIT...
Instruction Manuals
Page 12
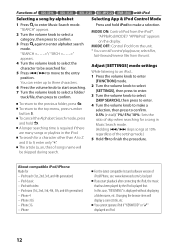
... playlists in Music Search mode. (Holding 4 / ¢ skips songs at 10% regardless of skip when searching for - Adjust [SETTINGS] mode settings While listening to an iPod... 1 Press the volume knob to enter [FUNCTION] mode. 2 Turn the volume knob to select [SETTINGS], then press to enter. 3 Turn the volume knob to select [SKIP SEARCH], then press to enter. 4 Turn the volume knob to make a selection. To return to the top menu, press number button 5. To...
... playlists in Music Search mode. (Holding 4 / ¢ skips songs at 10% regardless of skip when searching for - Adjust [SETTINGS] mode settings While listening to an iPod... 1 Press the volume knob to enter [FUNCTION] mode. 2 Turn the volume knob to select [SETTINGS], then press to enter. 3 Turn the volume knob to select [SKIP SEARCH], then press to enter. 4 Turn the volume knob to make a selection. To return to the top menu, press number button 5. To...
Instruction Manuals
Page 13
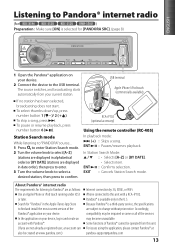
... select thumbs down/up, press number button 1 ( - )/ 2 ( + ). The source switches, and broadcasting starts automatically from this unit with Pandora®. (If you are subject to select [A-Z] (stations are displayed in alphabetical order) or [BY DATE] (stations are as follows: Use an Apple iPhone or iPod touch running under iOS3 or later. Station Search mode While listening to "PANDORA" source... 1 Press to enter Station Search mode. 2 Turn the volume knob to change...
... select thumbs down/up, press number button 1 ( - )/ 2 ( + ). The source switches, and broadcasting starts automatically from this unit with Pandora®. (If you are subject to select [A-Z] (stations are displayed in alphabetical order) or [BY DATE] (stations are as follows: Use an Apple iPhone or iPod touch running under iOS3 or later. Station Search mode While listening to "PANDORA" source... 1 Press to enter Station Search mode. 2 Turn the volume knob to change...
Instruction Manuals
Page 14
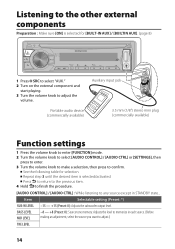
... the subwoofer output level. Portable audio device (commercially available) Auxiliary input jack 3.5 mm (1/8") stereo mini plug (commercially available) Function settings 1 Press the volume knob to enter [FUNCTION] mode. 2 Turn the volume knob to select [AUDIO CONTROL] / [AUDIO CTRL] or [SETTINGS], then press to enter. 3 Turn the volume knob to make a selection, then press to memorize in STANDBY state... Listening to the other external components Preparation : Make sure [ON] is selected/activated. BASS LEVEL MID LEVEL -8 - +8 (Preset: 0): Source tone memory: Adjusts the level to...
... the subwoofer output level. Portable audio device (commercially available) Auxiliary input jack 3.5 mm (1/8") stereo mini plug (commercially available) Function settings 1 Press the volume knob to enter [FUNCTION] mode. 2 Turn the volume knob to select [AUDIO CONTROL] / [AUDIO CTRL] or [SETTINGS], then press to enter. 3 Turn the volume knob to make a selection, then press to memorize in STANDBY state... Listening to the other external components Preparation : Make sure [ON] is selected/activated. BASS LEVEL MID LEVEL -8 - +8 (Preset: 0): Source tone memory: Adjusts the level to...
Instruction Manuals
Page 15
.../WMA disc or a USB device, except iPod.) VOLUME OFFSET/ -8 - +8 (for AUX) ; -8 - 0 (for [LPF SUBWOOFER] / [LPF SUB-W].) SUPREME SET ON*: Creates realistic sound by interpolating the high-frequency components that are cut off . The volume level will automatically increase or decrease when you change the source. (Before (Preset: 0) making an adjustment, select the source you want to adjust.) For : [SUB-W LEVEL/ SUB-W SET/ LPF SUB-W/ SUB-W PHASE] is selectable only if [SWITCH PRE] is set to produce a well-balanced sound at a low volume level. ; BALANCE L15...
.../WMA disc or a USB device, except iPod.) VOLUME OFFSET/ -8 - +8 (for AUX) ; -8 - 0 (for [LPF SUBWOOFER] / [LPF SUB-W].) SUPREME SET ON*: Creates realistic sound by interpolating the high-frequency components that are cut off . The volume level will automatically increase or decrease when you change the source. (Before (Preset: 0) making an adjustment, select the source you want to adjust.) For : [SUB-W LEVEL/ SUB-W SET/ LPF SUB-W/ SUB-W PHASE] is selectable only if [SWITCH PRE] is set to produce a well-balanced sound at a low volume level. ; BALANCE L15...
Instruction Manuals
Page 16
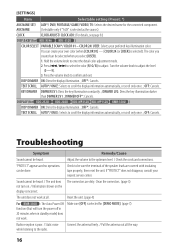
... connections. OFF*: Cancels. Adjust the volume to scroll the display information automatically, or scroll only once. ; The unit does not work . Troubleshooting Symptom Remedy/Cause Sound cannot be heard. / The unit does The connectors are covered with insulating tape properly, then reset the unit. AUX NAME (Selectable only if "AUX" is selected as the source.) CLOCK CLOCK ADJUST/ CLOCK ADJ: (For details, see page 8.) DISP & KEY (for [DEMO MODE]. (page 7) Radio reception is selected). DISP DIMMER...
... connections. OFF*: Cancels. Adjust the volume to scroll the display information automatically, or scroll only once. ; The unit does not work . Troubleshooting Symptom Remedy/Cause Sound cannot be heard. / The unit does The connectors are covered with insulating tape properly, then reset the unit. AUX NAME (Selectable only if "AUX" is selected as the source.) CLOCK CLOCK ADJUST/ CLOCK ADJ: (For details, see page 8.) DISP & KEY (for [DEMO MODE]. (page 7) Radio reception is selected). DISP DIMMER...
Instruction Manuals
Page 17
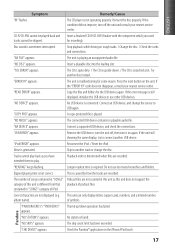
... reset button on the iPhone/iPod touch. 17 Tracks cannot play . Do not use other USB devices. No station is sometimes interrupted. Reinsert the disc properly. Disc sound is found. The unit is scratched a lot. The CD is quite dirty. / The CD is upside-down operation has failed. The unit is generated. If the "ERROR 99" code does not disappear, consult your nearest service center. Connect an USB device, and change the disc...
... reset button on the iPhone/iPod touch. 17 Tracks cannot play . Do not use other USB devices. No station is sometimes interrupted. Reinsert the disc properly. Disc sound is found. The unit is scratched a lot. The CD is quite dirty. / The CD is upside-down operation has failed. The unit is generated. If the "ERROR 99" code does not disappear, consult your nearest service center. Connect an USB device, and change the disc...
Instruction Manuals
Page 18
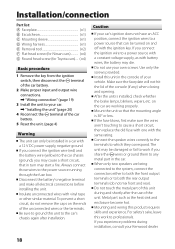
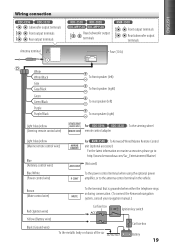
...Installation/connection Part list: A Faceplate 1) B Escutcheon 1) C Mounting sleeve 1) D Wiring harness 1) E Removal tool 2) F Flat head screw (for Nissan cars 4) G Round head screw (for Toyota cars).... (×4) Basic procedure 1 Remove the key from the ignition switch, then disconnect the · terminal of the car battery. 2 Make proper input and output wire connections. \ "Wiring connection" (page 19) 3 Install the unit to your car. \ "Installing the unit" (page 20) 4 Reconnect the · terminal of the car battery. 5 Reset the unit. (page 4) Warning The unit can be turned...
...Installation/connection Part list: A Faceplate 1) B Escutcheon 1) C Mounting sleeve 1) D Wiring harness 1) E Removal tool 2) F Flat head screw (for Nissan cars 4) G Round head screw (for Toyota cars).... (×4) Basic procedure 1 Remove the key from the ignition switch, then disconnect the · terminal of the car battery. 2 Make proper input and output wire connections. \ "Wiring connection" (page 19) 3 Install the unit to your car. \ "Installing the unit" (page 20) 4 Reconnect the · terminal of the car battery. 5 Reset the unit. (page 4) Warning The unit can be turned...
Instruction Manuals
Page 19
... remote control wire) Blue (Antenna control wire) Blue/White (Power control wire) MARINE REMOTE For : To Kenwood Wired Marine Remote Control unit (optional accessory) For the latest information on marine accessories please go to the antenna control terminal in the vehicle. Brown (Mute control wire) Red (Ignition wire) Yellow (Battery wire) Black (Ground wire) To the terminal that is grounded when either the telephone rings or during conversation. (To connect the Kenwood navigation MUTE system, consult your navigation manual.) Car fuse box...
... remote control wire) Blue (Antenna control wire) Blue/White (Power control wire) MARINE REMOTE For : To Kenwood Wired Marine Remote Control unit (optional accessory) For the latest information on marine accessories please go to the antenna control terminal in the vehicle. Brown (Mute control wire) Red (Ignition wire) Yellow (Battery wire) Black (Ground wire) To the terminal that is grounded when either the telephone rings or during conversation. (To connect the Kenwood navigation MUTE system, consult your navigation manual.) Car fuse box...
Instruction Manuals
Page 20
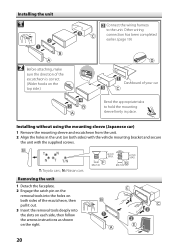
Installing the unit 1 Connect the wiring harness to hold the mounting sleeve firmly in the unit (on both sides) with the vehicle mounting bracket and secure the unit with the supplied screws. N: Nissan cars Removing the unit 1 Detach the faceplate. 2 Engage the catch pin on the removal tools into the slots on each side, then follow the arrows instructions as shown on the right. 20 Installing without using the...
Installing the unit 1 Connect the wiring harness to hold the mounting sleeve firmly in the unit (on both sides) with the vehicle mounting bracket and secure the unit with the supplied screws. N: Nissan cars Removing the unit 1 Detach the faceplate. 2 Engage the catch pin on the removal tools into the slots on each side, then follow the arrows instructions as shown on the right. 20 Installing without using the...
Instruction Manuals
Page 21
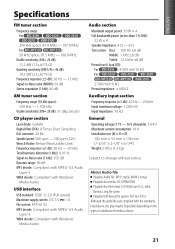
.../ROM Playable disc file format: ISO 9660 Level 1/2, Joliet, Romeo, Long file name. Playable USB device file system: FAT16, FAT32 Although the audio files are complied with Windows Media Audio Audio section Maximum output power: 50 W × 4 Full bandwidth power (at less than 1 % THD): 22 W × 4 Speaker impedance: 4 Ω - 8 Ω Tone action: Bass: 100 Hz ±8 dB Middle: 1 kHz ±8 dB Treble: 12...
.../ROM Playable disc file format: ISO 9660 Level 1/2, Joliet, Romeo, Long file name. Playable USB device file system: FAT16, FAT32 Although the audio files are complied with Windows Media Audio Audio section Maximum output power: 50 W × 4 Full bandwidth power (at less than 1 % THD): 22 W × 4 Speaker impedance: 4 Ω - 8 Ω Tone action: Bass: 100 Hz ±8 dB Middle: 1 kHz ±8 dB Treble: 12...
Instruction Manuals
Page 62
... measures: Reorient or relocate the receiving antenna. "Made for iPod," and "Made for help. Consult the dealer or an experienced radio/TV technician for iPhone" mean that an electronic accessory has been designed to connect specifically to iPod, or iPhone, respectively, and has been certified by one or more of Pandora Media, Inc., used in the instruction manual. PANDORA, the PANDORA logo, and...
... measures: Reorient or relocate the receiving antenna. "Made for iPod," and "Made for help. Consult the dealer or an experienced radio/TV technician for iPhone" mean that an electronic accessory has been designed to connect specifically to iPod, or iPhone, respectively, and has been certified by one or more of Pandora Media, Inc., used in the instruction manual. PANDORA, the PANDORA logo, and...


