Instruction Manual
Page 2
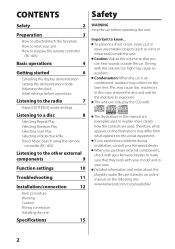
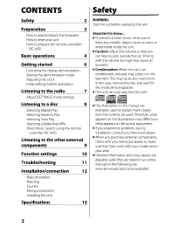
CONTENTS Safety Safety 2 Preparation 3 How to attach/detach the faceplate How to reset your area. In this manual are examples used to the other external components 9 Function settings 10 Troubleshooting 11 Installation/connection 12 Basic ... metal tools) inside the unit. Driving with : The illustrations in an online manual on the actual equipment. Therefore, what appears on the following site: www.kenwood.com/cs/ce/audiofile/ 2 If you can only play the CDs with the volume too high may differ from what appears on the laser lens...
CONTENTS Safety Safety 2 Preparation 3 How to attach/detach the faceplate How to reset your area. In this manual are examples used to the other external components 9 Function settings 10 Troubleshooting 11 Installation/connection 12 Basic ... metal tools) inside the unit. Driving with : The illustrations in an online manual on the actual equipment. Therefore, what appears on the following site: www.kenwood.com/cs/ce/audiofile/ 2 If you can only play the CDs with the volume too high may differ from what appears on the laser lens...
Instruction Manual
Page 3
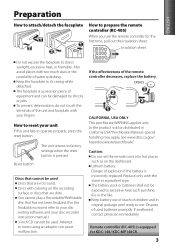
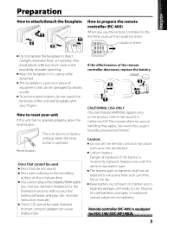
... discs that cannot be damaged by shocks or jolts. If swallowed contact physician immediately. Remote controller (RC-405) is pressed. The faceplate is incorrectly replaced. How to reset your disc recorder instruction manual.) 3-inch CD cannot be exposed to excessive heat such sunshine, fire...not set the remote control in original package until ready to use the remote controller for KDC-148/ KDC-MP148CR. 3 To prevent deterioration, do not touch the terminals of the unit and faceplate with too much dust or the possibility of equipment and can cause malfunction. Also avoid ...
... discs that cannot be damaged by shocks or jolts. If swallowed contact physician immediately. Remote controller (RC-405) is pressed. The faceplate is incorrectly replaced. How to reset your disc recorder instruction manual.) 3-inch CD cannot be exposed to excessive heat such sunshine, fire...not set the remote control in original package until ready to use the remote controller for KDC-148/ KDC-MP148CR. 3 To prevent deterioration, do not touch the terminals of the unit and faceplate with too much dust or the possibility of equipment and can cause malfunction. Also avoid ...
Instruction Manual
Page 4
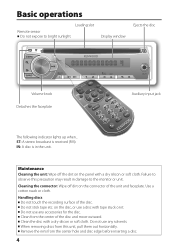
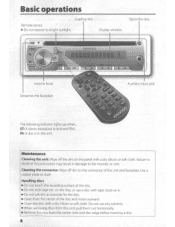
... the center of the disc. Cleaning the connector: Wipe off the dirt on the panel with tape stuck on the connector of the unit and faceplate. Basic operations Loading slot Remote sensor Do not expose to observe this unit, pull them out horizontally. IN: A disc is received (FM). Handling discs Do...
... the center of the disc. Cleaning the connector: Wipe off the dirt on the panel with tape stuck on the connector of the unit and faceplate. Basic operations Loading slot Remote sensor Do not expose to observe this unit, pull them out horizontally. IN: A disc is received (FM). Handling discs Do...
Instruction Manual
Page 12
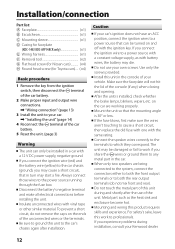
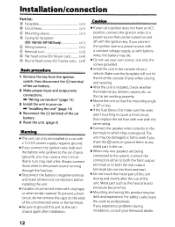
... your Kenwood dealer. 12 Use only the screws provided. Make sure the faceplate will not hit the lid of the console (if any metal part in a car with a 12 V DC power supply, negative ground. Always connect those wires to which they correspond. Installation/connection Part list: A Faceplate 1) B Escutcheon 1) C Mounting sleeve 1) D Casing for faceplate (KDC-148/ KDC-MP148CR...
... your Kenwood dealer. 12 Use only the screws provided. Make sure the faceplate will not hit the lid of the console (if any metal part in a car with a 12 V DC power supply, negative ground. Always connect those wires to which they correspond. Installation/connection Part list: A Faceplate 1) B Escutcheon 1) C Mounting sleeve 1) D Casing for faceplate (KDC-148/ KDC-MP148CR...
Instruction Manual
Page 14
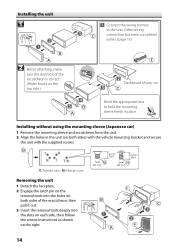
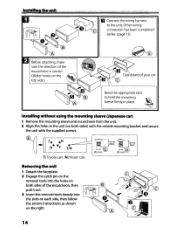
T: Toyota cars ; N: Nissan cars Removing the unit 1 Detach the faceplate. 2 Engage the catch pin on the removal tools into the holes on both sides) with the vehicle mounting bracket and secure the unit with the ...
T: Toyota cars ; N: Nissan cars Removing the unit 1 Detach the faceplate. 2 Engage the catch pin on the removal tools into the holes on both sides) with the vehicle mounting bracket and secure the unit with the ...
User Manual
Page 2
...fleWritabl4!. • The illustrations in an online manual on the actual equipment. • If you experience problems during installation, consult your Kenwood dealer. • When you purchase external components, check with your area. • Detailed information and notes about the playable audio ..., moisture may collect on the illustrations may cause disc read errors. CONTENTS Safety Safety 2 Preparation 3 How to attach/detach the faceplate How to reset your unit How to prepare the remote controller (RC-405) Basic operations 4 Getting started 6 Canceling the display ...
...fleWritabl4!. • The illustrations in an online manual on the actual equipment. • If you experience problems during installation, consult your Kenwood dealer. • When you purchase external components, check with your area. • Detailed information and notes about the playable audio ..., moisture may collect on the illustrations may cause disc read errors. CONTENTS Safety Safety 2 Preparation 3 How to attach/detach the faceplate How to reset your unit How to prepare the remote controller (RC-405) Basic operations 4 Getting started 6 Canceling the display ...
User Manual
Page 3
... is pressed. Attempt to insert using an adapter can be used batteries promptly. If swallowed contact physician immediately. Danger of the unit and faceplate with coloring on the dashboard. • Lithium battery. Discs that cannot be exposed to prepare the remote controller (RC-40S) When you... such sunshine, fire or the like. • Keep battery out of reach of children and in its casing while detached. • The faceplate is a precision piece of equipment and can cause malfunction. ~ OOOOgg 0o0o0o0g If the effectiveness of used . Replace only with the same or ...
... is pressed. Attempt to insert using an adapter can be used batteries promptly. If swallowed contact physician immediately. Danger of the unit and faceplate with coloring on the dashboard. • Lithium battery. Discs that cannot be exposed to prepare the remote controller (RC-40S) When you... such sunshine, fire or the like. • Keep battery out of reach of children and in its casing while detached. • The faceplate is a precision piece of equipment and can cause malfunction. ~ OOOOgg 0o0o0o0g If the effectiveness of used . Replace only with the same or ...
User Manual
Page 4
...8226; When removing discs from this precaution may result in the unit. Handling discs • Do not touch the recording surface of the unit and faceplate. Do not use a disc with tape stuck on the panel with a dry silicon or soft cloth. Maintenance Cleaning the unit: Wipe off dirt on... the connector of the disc. • Do not stick tape etc. Display window Ejects the disc Volume knob Detaches the faceplate Auxiliary input jack The following indicator lights up when ... on the disc, or use any accessories for the disc. • Clean from the center...
...8226; When removing discs from this precaution may result in the unit. Handling discs • Do not touch the recording surface of the unit and faceplate. Do not use a disc with tape stuck on the panel with a dry silicon or soft cloth. Maintenance Cleaning the unit: Wipe off dirt on... the connector of the disc. • Do not stick tape etc. Display window Ejects the disc Volume knob Detaches the faceplate Auxiliary input jack The following indicator lights up when ... on the disc, or use any accessories for the disc. • Clean from the center...
User Manual
Page 12
...Do not touch the metal part of this work if you may die. • Do not use of your Kenwood dealer. 12 Make sure the faceplate will not hit the lid of the console (if any metal part in turn may be installed in the console.... ... Use only the screws provided. • Install this product requires skills and experience. Installation/connection Part list: ® Faceplate (xl) ® Escutcheon (xl) © Mounting sleeve (xl) @ Casing for faceplate (KDC-148/ KDC-MP148CR only) (xl) ® Wiring harness (xl) ® Removal tool (x2) ® Flat head screw (for ...
...Do not touch the metal part of this work if you may die. • Do not use of your Kenwood dealer. 12 Make sure the faceplate will not hit the lid of the console (if any metal part in turn may be installed in the console.... ... Use only the screws provided. • Install this product requires skills and experience. Installation/connection Part list: ® Faceplate (xl) ® Escutcheon (xl) © Mounting sleeve (xl) @ Casing for faceplate (KDC-148/ KDC-MP148CR only) (xl) ® Wiring harness (xl) ® Removal tool (x2) ® Flat head screw (for ...
User Manual
Page 14
T: Toyota cars, N. Nlssan cars Removing the unit 1 Detach the faceplate. 2 Engage the catch pin on the removal tools into the holes on both sides) with the vehicle mounting bracket and secure the unit with the ...
T: Toyota cars, N. Nlssan cars Removing the unit 1 Detach the faceplate. 2 Engage the catch pin on the removal tools into the holes on both sides) with the vehicle mounting bracket and secure the unit with the ...


