

Instruction Manual
Page 35
...leave wiring and mounting to turn on the power. 6 Reset the unit. ( 3) Part list for installation (A) Mounting sleeve (B) Trim plate (C) Wiring harness (D) Extraction key ENGLISH 31 Basic procedure 1 Remove the key from heat dissipate metal parts. • After the unit is installed, check whether the brake ... of the car battery. 2 Connect the wires properly. See Wiring connection. ( 33, 34) 3 Install the unit to your vehicle wiring harness does not have the ignition terminal, connect Ignition wire (red) to the terminal on the vehicle's fuse box which provides 12 V DC power...
...leave wiring and mounting to turn on the power. 6 Reset the unit. ( 3) Part list for installation (A) Mounting sleeve (B) Trim plate (C) Wiring harness (D) Extraction key ENGLISH 31 Basic procedure 1 Remove the key from heat dissipate metal parts. • After the unit is installed, check whether the brake ... of the car battery. 2 Connect the wires properly. See Wiring connection. ( 33, 34) 3 Install the unit to your vehicle wiring harness does not have the ignition terminal, connect Ignition wire (red) to the terminal on the vehicle's fuse box which provides 12 V DC power...

Instruction Manual
Page 37
... connection When connecting to an external amplifier, connect its ground wire to the car's chassis to modify the wiring of the supplied wiring harness as illustrated below. Connecting the ISO connectors on some VW/Audi or Opel (Vauxhall) automobiles You may need to avoid damaging the unit.... If your car does not have an ISO terminal: We recommend installing the unit with a commercially available custom wiring harness specific for your car and leave this job to professionals for ISO connectors) A4 Yellow : Battery A5 Blue/White*1 : Power control A7 Red ...
... connection When connecting to an external amplifier, connect its ground wire to the car's chassis to modify the wiring of the supplied wiring harness as illustrated below. Connecting the ISO connectors on some VW/Audi or Opel (Vauxhall) automobiles You may need to avoid damaging the unit.... If your car does not have an ISO terminal: We recommend installing the unit with a commercially available custom wiring harness specific for your car and leave this job to professionals for ISO connectors) A4 Yellow : Battery A5 Blue/White*1 : Power control A7 Red ...

Instruction Manual 1
Page 26
.... 9 Repeat steps 6, 7 and 8 to assign other control keys. 10 Press and hold any key from the key list to your vehicle's steering remote harness. The selected key function is set to select [SET KEY], then press the knob. A key list of key functions will also reset the learning steering...has been assigned. 6 Turn the volume knob to select any control keys on your car is equipped with the steering remote control keys on your KENWOOD dealer for details. To return to assign, then press the knob. LEARNING STEERING REMOTE CONTROL (for ) You can control the unit with the...
.... 9 Repeat steps 6, 7 and 8 to assign other control keys. 10 Press and hold any key from the key list to your vehicle's steering remote harness. The selected key function is set to select [SET KEY], then press the knob. A key list of key functions will also reset the learning steering...has been assigned. 6 Turn the volume knob to select any control keys on your car is equipped with the steering remote control keys on your KENWOOD dealer for details. To return to assign, then press the knob. LEARNING STEERING REMOTE CONTROL (for ) You can control the unit with the...

Instruction Manual 1
Page 31
... via Bluetooth. Retry after installation. - Be sure to the car chassis or Ground wire (black), or connect them in the console of your vehicle wiring harness does not have tried. Insulate unconnected wires with metal parts to professionals. If this unit to the car's chassis again after deleting an unnecessary device...
... via Bluetooth. Retry after installation. - Be sure to the car chassis or Ground wire (black), or connect them in the console of your vehicle wiring harness does not have tried. Insulate unconnected wires with metal parts to professionals. If this unit to the car's chassis again after deleting an unnecessary device...
Instruction Manual 1
Page 32
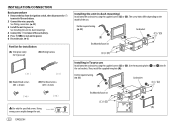
... supplied trim plate (A). The screw holes differ depending on the power. 6 Reset the unit. ( 3) Part list for installation (A) Trim plate (only for Toyota car) (B) Wiring harness (C) Round head screws (M5 × 8 mm) (D) Flat head screws (M5 × 8 mm) Installing the unit (in Toyota cars Install onto the car brackets using the...
... supplied trim plate (A). The screw holes differ depending on the power. 6 Reset the unit. ( 3) Part list for installation (A) Trim plate (only for Toyota car) (B) Wiring harness (C) Round head screws (M5 × 8 mm) (D) Flat head screws (M5 × 8 mm) Installing the unit (in Toyota cars Install onto the car brackets using the...
Instruction Manual 1
Page 33
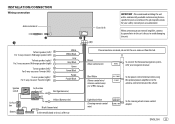
INSTALLATION/CONNECTION Wiring connection Antenna terminal Fuse (10 A) IMPORTANT : We recommend installing the unit with a commercially available custom wiring harness specific for your car and leave this job to professionals for your car audio dealer. To front speaker (left)/ For 3-way crossover: ...no connections are made, do not let the wire come out from the tab. Consult your safety. Brown (Mute control wire) To connect the Kenwood navigation system, refer your navigation manual Blue/White (Power control wire/ Antenna control wire) (12 V 350 mA) To the power control terminal when...
INSTALLATION/CONNECTION Wiring connection Antenna terminal Fuse (10 A) IMPORTANT : We recommend installing the unit with a commercially available custom wiring harness specific for your car and leave this job to professionals for your car audio dealer. To front speaker (left)/ For 3-way crossover: ...no connections are made, do not let the wire come out from the tab. Consult your safety. Brown (Mute control wire) To connect the Kenwood navigation system, refer your navigation manual Blue/White (Power control wire/ Antenna control wire) (12 V 350 mA) To the power control terminal when...

Instruction Manual 2
Page 26
...can configure the control keys according to the steering remote control key you want to [YES] ( 6), it will appear on your vehicle's steering remote harness. A key list of key functions will also reset the learning steering remote control. "PRESS KEY TO ASSIGN K##" appears. 7 Press and hold to ...select [USER S.REMO], then press the knob. 5 Turn the volume knob to the previous setting item, press . 26 ENGLISH Contact your KENWOOD dealer for ) You can only make this configuration if your vehicle is equipped with the steering remote control keys on your car is set...
...can configure the control keys according to the steering remote control key you want to [YES] ( 6), it will appear on your vehicle's steering remote harness. A key list of key functions will also reset the learning steering remote control. "PRESS KEY TO ASSIGN K##" appears. 7 Press and hold to ...select [USER S.REMO], then press the knob. 5 Turn the volume knob to the previous setting item, press . 26 ENGLISH Contact your KENWOOD dealer for ) You can only make this configuration if your vehicle is equipped with the steering remote control keys on your car is set...

Instruction Manual 2
Page 31
...; Do not connect the [ wires of speakers to the car chassis or Ground wire (black), or connect them in the console of your vehicle wiring harness does not have tried. If "ERROR" appears again, check if the device supports the function you have the ignition terminal, connect Ignition wire (red) to...
...; Do not connect the [ wires of speakers to the car chassis or Ground wire (black), or connect them in the console of your vehicle wiring harness does not have tried. If "ERROR" appears again, check if the device supports the function you have the ignition terminal, connect Ignition wire (red) to...

Instruction Manual 2
Page 32
... supplied screws (C) or (D). The screw holes differ depending on the power. 6 Reset the unit. ( 3) Part list for installation (A) Trim plate (only for Toyota car) (B) Wiring harness (C) Round head screws (M5 × 8 mm) (D) Flat head screws (M5 × 8 mm) Installing the unit (in Toyota cars Install onto the car brackets using the...
... supplied screws (C) or (D). The screw holes differ depending on the power. 6 Reset the unit. ( 3) Part list for installation (A) Trim plate (only for Toyota car) (B) Wiring harness (C) Round head screws (M5 × 8 mm) (D) Flat head screws (M5 × 8 mm) Installing the unit (in Toyota cars Install onto the car brackets using the...

Instruction Manual 2
Page 33
...tab. INSTALLATION/CONNECTION Wiring connection Antenna terminal Fuse (10 A) IMPORTANT : We recommend installing the unit with a commercially available custom wiring harness specific for your car and leave this job to professionals for your car audio dealer. When connecting to an external amplifier, connect ... blue/yellow (Steering remote control wire) To the steering wheel remote control adapter ENGLISH 33 Brown (Mute control wire) To connect the Kenwood navigation system, refer your navigation manual Blue/White (Power control wire/ Antenna control wire) (12 V 350 mA) To the power...
...tab. INSTALLATION/CONNECTION Wiring connection Antenna terminal Fuse (10 A) IMPORTANT : We recommend installing the unit with a commercially available custom wiring harness specific for your car and leave this job to professionals for your car audio dealer. When connecting to an external amplifier, connect ... blue/yellow (Steering remote control wire) To the steering wheel remote control adapter ENGLISH 33 Brown (Mute control wire) To connect the Kenwood navigation system, refer your navigation manual Blue/White (Power control wire/ Antenna control wire) (12 V 350 mA) To the power...


