
Installation Manual
Page 2
... power supply must wait while the system acquires satellite signals for fastest acquisition. Make sure your car. 7. DNX9960 only ..........1 ..........1 4 @ DNX9960 only ..........1 ..........1 5 # ..........2 ..........1 6 $ DNX9960 only ..........1 ..........1 7 % DNX9960 only ..........1 ..........1 8 ..........6 2 DNX SERIES/ DDX SERIES Installation Procedure 1. Accessories 1 9 ..........1 ..........6 2 0 ..........1 ..........1 3 ! Perform the Initial Setup. (Refer to the Instruction Manual.) 2WARNING • If you may cause a short circuit...
... power supply must wait while the system acquires satellite signals for fastest acquisition. Make sure your car. 7. DNX9960 only ..........1 ..........1 4 @ DNX9960 only ..........1 ..........1 5 # ..........2 ..........1 6 $ DNX9960 only ..........1 ..........1 7 % DNX9960 only ..........1 ..........1 8 ..........6 2 DNX SERIES/ DDX SERIES Installation Procedure 1. Accessories 1 9 ..........1 ..........6 2 0 ..........1 ..........1 3 ! Perform the Initial Setup. (Refer to the Instruction Manual.) 2WARNING • If you may cause a short circuit...
Installation Manual
Page 5
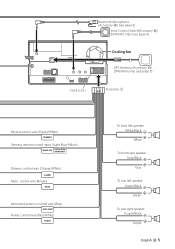
... rear left speaker Green/Black + Green To rear right speaker Purple/Black Purple + English 5 Bluetooth Microphone (Accessory #) (see page 8) Voice Control Switch(Accessory $) (DNX9960 only) (see page 8) Cooling fan GPS Antenna (Accessory !) (DNX9960 only) (see page 8) FUSE (15A ) Accessory 1 Reverse sensor wire (Purple/White) REVERSE Steering remote control input (Light Blue/Yellow) REMOTE CONT STEERING WHEEL...
... rear left speaker Green/Black + Green To rear right speaker Purple/Black Purple + English 5 Bluetooth Microphone (Accessory #) (see page 8) Voice Control Switch(Accessory $) (DNX9960 only) (see page 8) Cooling fan GPS Antenna (Accessory !) (DNX9960 only) (see page 8) FUSE (15A ) Accessory 1 Reverse sensor wire (Purple/White) REVERSE Steering remote control input (Light Blue/Yellow) REMOTE CONT STEERING WHEEL...
Installation Manual
Page 6
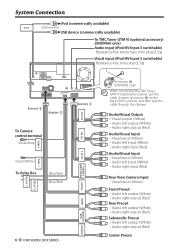
... (Red) Center Preout System Connection iPod (commercially available) iPod USB terminal USB device (commercially available) To TMC Tuner GTM10 (optional accessory) (DNX9960 only) Audio input (iPod/AV Input 3 switchable) Resistance-free stereo type mini plug (3.5φ) Visual input (iPod/AV Input 3...SERIES CENTER SUB WOOFER REAR FRONT REAR VIEW CAMERA AV IN 2 AV IN1 AV OUT Accessory 4 Accessory % (DNX9960 only) ⁄ When connecting the TMC Tuner GTM10 (optional accessory), put the cable clamper (accessory %) to the back of this unit first, and then wire the cable through the ...
... (Red) Center Preout System Connection iPod (commercially available) iPod USB terminal USB device (commercially available) To TMC Tuner GTM10 (optional accessory) (DNX9960 only) Audio input (iPod/AV Input 3 switchable) Resistance-free stereo type mini plug (3.5φ) Visual input (iPod/AV Input 3...SERIES CENTER SUB WOOFER REAR FRONT REAR VIEW CAMERA AV IN 2 AV IN1 AV OUT Accessory 4 Accessory % (DNX9960 only) ⁄ When connecting the TMC Tuner GTM10 (optional accessory), put the cable clamper (accessory %) to the back of this unit first, and then wire the cable through the ...

Installation Manual
Page 7
...2009): • KNA-G610 • KNA-G630 For latest information, access the www.kenwood.com/cs/ce/. English 7 TV Tuner (Optional Accessory) TV ANTENNA INPUT Navigation System (Optional Accessory) (DDX896/DDX8046BT only) Connection cable (Included in the Navigation System) TO MONITOR UNIT ... cable (Included in the TV tuner) ⁄ Navigation units that can be necessary for details. Optional Accessory Connection iPod (commercially available) KCA-iP301V (Optional Accessory) Visual Output (Yellow) Audio Output (Black) USB terminal iPod DDX896/DDX8046BT only USB terminal USB device ...
...2009): • KNA-G610 • KNA-G630 For latest information, access the www.kenwood.com/cs/ce/. English 7 TV Tuner (Optional Accessory) TV ANTENNA INPUT Navigation System (Optional Accessory) (DDX896/DDX8046BT only) Connection cable (Included in the Navigation System) TO MONITOR UNIT ... cable (Included in the TV tuner) ⁄ Navigation units that can be necessary for details. Optional Accessory Connection iPod (commercially available) KCA-iP301V (Optional Accessory) Visual Output (Yellow) Audio Output (Black) USB terminal iPod DDX896/DDX8046BT only USB terminal USB device ...
Installation Manual
Page 8
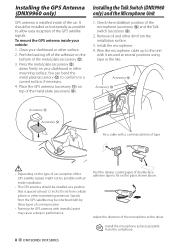
.... 2. Installing the Talk Switch (DNX9960 only) and the Microphone Unit 1. Accessory @ Fix a cable with a commercial item of tape. ¤ • Depending on top of the microphone (accessory #) and the Talk switch (accessory $). 2. Clean your vehicle: 1. Place the GPS antenna (accessory !) on the type of car,... curved surface, if necessary. 4. Adjust the direction of the car. Press the metal plate (accessory @) down firmly on the place shown above. Installing the GPS Antenna (DNX9960 only) GPS antenna is spaced at several positions using tape or the like. Peel the release ...
.... 2. Installing the Talk Switch (DNX9960 only) and the Microphone Unit 1. Accessory @ Fix a cable with a commercial item of tape. ¤ • Depending on top of the microphone (accessory #) and the Talk switch (accessory $). 2. Clean your vehicle: 1. Place the GPS antenna (accessory !) on the type of car,... curved surface, if necessary. 4. Adjust the direction of the car. Press the metal plate (accessory @) down firmly on the place shown above. Installing the GPS Antenna (DNX9960 only) GPS antenna is spaced at several positions using tape or the like. Peel the release ...
Installation Manual
Page 9
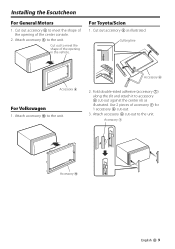
Cut out to meet the shape of the opening in the vehicle. Accessory 7 Accessory 0 English 9 Attach accessory 6 cut -out. 3. Cutting line Accessory 6 For Volkswagen 1. Accessory 6 2. Attach accessory 6 to the unit. For Toyota/Scion 1. Use 2 pieces of the opening of the center console. 2. Fold double-sided adhesive (accessory 7) along the slit and attach it to the unit. Installing the...
Cut out to meet the shape of the opening in the vehicle. Accessory 7 Accessory 0 English 9 Attach accessory 6 cut -out. 3. Cutting line Accessory 6 For Volkswagen 1. Accessory 6 2. Attach accessory 6 to the unit. For Toyota/Scion 1. Use 2 pieces of the opening of the center console. 2. Fold double-sided adhesive (accessory 7) along the slit and attach it to the unit. Installing the...
Installation Manual
Page 10
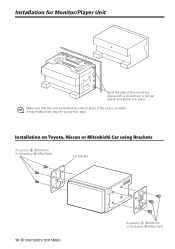
If the unit is installed securely in place. ⁄ Make sure that the unit is unstable, it may malfunction (eg, the sound may skip). Installation on Toyota, Nissan or Mitsubishi Car using Brackets Accessory 8 (M5x6mm) or Accessory 9 (M5x7mm) Car Bracket 10 DNX SERIES/ DDX SERIES Accessory 8 (M5x6mm) or Accessory 9 (M5x7mm) Installation for Monitor/Player Unit Bend the tabs of the mounting sleeve with a screwdriver or similar utensil and attach it in place.
If the unit is installed securely in place. ⁄ Make sure that the unit is unstable, it may malfunction (eg, the sound may skip). Installation on Toyota, Nissan or Mitsubishi Car using Brackets Accessory 8 (M5x6mm) or Accessory 9 (M5x7mm) Car Bracket 10 DNX SERIES/ DDX SERIES Accessory 8 (M5x6mm) or Accessory 9 (M5x7mm) Installation for Monitor/Player Unit Bend the tabs of the mounting sleeve with a screwdriver or similar utensil and attach it in place.
Installation Manual
Page 11
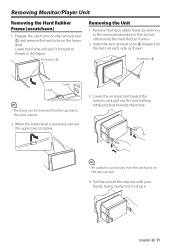
...the unit halfway while pressing towards the inside. ⁄ • Be careful to avoid injury from the top side in the same manner. 2. English 11 Accessory 5 Catch Lock ⁄ • The frame can be removed from the catch pins on the removal tool. 4. Removing Monitor/Player Unit Removing the Hard ... the unit all the way out with your hands, being careful not to the removal procedure in the figure. Lower the frame and pull it . Accessory 5 Removing the Unit 1. When the lower level is removed, remove the upper two locations. 3. Engage the catch pins on the removal tool 5 and ...
...the unit halfway while pressing towards the inside. ⁄ • Be careful to avoid injury from the top side in the same manner. 2. English 11 Accessory 5 Catch Lock ⁄ • The frame can be removed from the catch pins on the removal tool. 4. Removing Monitor/Player Unit Removing the Hard ... the unit all the way out with your hands, being careful not to the removal procedure in the figure. Lower the frame and pull it . Accessory 5 Removing the Unit 1. When the lower level is removed, remove the upper two locations. 3. Engage the catch pins on the removal tool 5 and ...
Instruction Manual
Page 4
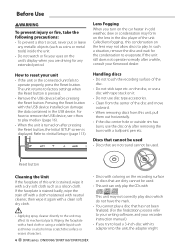
... the disc, or use a disc with tape stuck on it. • Do not use disc type accessories. • Clean from this unit, pull them out horizontally. • If the disc center hole or...it with coloring on the lens may affect its adapter into the unit, the adapter might 4 DNX series DNX9960/ DNX7160/ DNX7020EX Discs that cannot be used . • This unit can damage the data contained in ...unit • If the unit or the connected unit fails to (page 113). How to reset your Kenwood dealer. For how to play the CDs with its mechanical parts. Called lens fogging, this unit is...
... the disc, or use a disc with tape stuck on it. • Do not use disc type accessories. • Clean from this unit, pull them out horizontally. • If the disc center hole or...it with coloring on the lens may affect its adapter into the unit, the adapter might 4 DNX series DNX9960/ DNX7160/ DNX7020EX Discs that cannot be used . • This unit can damage the data contained in ...unit • If the unit or the connected unit fails to (page 113). How to reset your Kenwood dealer. For how to play the CDs with its mechanical parts. Called lens fogging, this unit is...
Instruction Manual
Page 5
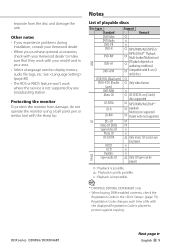
Other notes • If you experience problems during installation, consult your Kenwood dealer. • When you purchase optional accessories, check with your Kenwood dealer to make sure that they work where the service is not supported by any broadcasting station. DDX series... DVD DVD+R ‡ (Playback depends on authoring conditions) DVD+RW ‡ Compatible with the displayed Registration Code is impossible. ⁄ *1 DNX9960, DDX896, DDX8046BT only • When buying DRM enabled contents, check the Registration Code in your model and in the (page 79). See (...
Other notes • If you experience problems during installation, consult your Kenwood dealer. • When you purchase optional accessories, check with your Kenwood dealer to make sure that they work where the service is not supported by any broadcasting station. DDX series... DVD DVD+R ‡ (Playback depends on authoring conditions) DVD+RW ‡ Compatible with the displayed Registration Code is impossible. ⁄ *1 DNX9960, DDX896, DDX8046BT only • When buying DRM enabled contents, check the Registration Code in your model and in the (page 79). See (...

Instruction Manual
Page 7
... this unit, "KENWOOD" or "✓" is displayed on . ⁄ • If you start playback after connecting the DDX series DDX896/ DDX8046BT iPod, the music that has been played by connecting an iPod/iPhone (commercial product) with Dock connector using an optional accessory iPod connection cable ...• iPod with video • iPod classic • iPod touch (1st generation) • iPod touch (2nd generation) Works with an optional accessory iPod connection cable (KCA-iP301V), you cannot operate the iPod. However, the power of the USB device. About USB device • In this ...
... this unit, "KENWOOD" or "✓" is displayed on . ⁄ • If you start playback after connecting the DDX series DDX896/ DDX8046BT iPod, the music that has been played by connecting an iPod/iPhone (commercial product) with Dock connector using an optional accessory iPod connection cable ...• iPod with video • iPod classic • iPod touch (1st generation) • iPod touch (2nd generation) Works with an optional accessory iPod connection cable (KCA-iP301V), you cannot operate the iPod. However, the power of the USB device. About USB device • In this ...

Instruction Manual
Page 8
... AVRCP is a profile used to transfer data such as a phone book between units. Optional accessories below are released by SIRIUS and XM. For how to update the software, refer to the ... (Synchronization Profile) For the cell-phones verified for compatibility, access the following URL: http://www.kenwood.com/cs/ce/bt/ ⁄ • The units supporting the Bluetooth function have been certified...This unit conforms to the following the procedure prescribed by an audio player. 8 DNX series DNX9960/ DNX7160/ DNX7020EX Notes Navigation units that can be connected to this unit • KTC-...
... AVRCP is a profile used to transfer data such as a phone book between units. Optional accessories below are released by SIRIUS and XM. For how to update the software, refer to the ... (Synchronization Profile) For the cell-phones verified for compatibility, access the following URL: http://www.kenwood.com/cs/ce/bt/ ⁄ • The units supporting the Bluetooth function have been certified...This unit conforms to the following the procedure prescribed by an audio player. 8 DNX series DNX9960/ DNX7160/ DNX7020EX Notes Navigation units that can be connected to this unit • KTC-...
Instruction Manual
Page 33
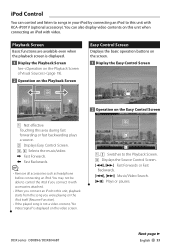
... is displayed on the video screen. 1 2 3 1, 2 Switches to control the iPod if you connect it with KCA-iP301V (optional accessory). iPod Control You can also display video contents on the Easy Control Screen 1 Not effective Touching this area during fast forwarding or fast backwarding... plays a source. 2 Displays Easy Control Screen. 3, 4 Selects the music/video. \ Fast Forwards. | Fast Backwards. ⁄ • Remove all accessories such as headphone before connecting an iPod. DDX series DDX896/ DDX8046BT Next page 3 English 33 You can control and listen to songs in your iPod...
... is displayed on the video screen. 1 2 3 1, 2 Switches to control the iPod if you connect it with KCA-iP301V (optional accessory). iPod Control You can also display video contents on the Easy Control Screen 1 Not effective Touching this area during fast forwarding or fast backwarding... plays a source. 2 Displays Easy Control Screen. 3, 4 Selects the music/video. \ Fast Forwards. | Fast Backwards. ⁄ • Remove all accessories such as headphone before connecting an iPod. DDX series DDX896/ DDX8046BT Next page 3 English 33 You can control and listen to songs in your iPod...
Instruction Manual
Page 41
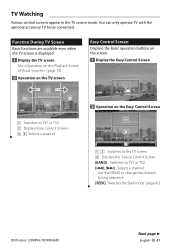
... Next page 3 English 41 Use the [SEEK] to TV1 or TV2. 2 Displays Easy Control Screen. 3, 4 Selects a channel. You can only operate TV with the optional accessory TV Tuner connected. TV Watching Various control screens appear in the TV source mode.
... Next page 3 English 41 Use the [SEEK] to TV1 or TV2. 2 Displays Easy Control Screen. 3, 4 Selects a channel. You can only operate TV with the optional accessory TV Tuner connected. TV Watching Various control screens appear in the TV source mode.

Instruction Manual
Page 45
...Screen Switches to control screen to connect the XM tuner, an XM interface Box KCA-XM100V (optional accessory) is switched in the Satellite radio source mode. (Only with the optional accessory Satellite radio connected. XM Changes the display from Channel Name, Song Title Name, Artist Name, ...Composer Name, to Category Name. To connect the SIRIUS tuner, a conversion cable CA-SR20V (optional accessory) is scrolled by touching it. "SR"/ "XM" Band display "Preset" Preset number "ch"/ "CH" Channel display [ ] When appears, the text...
...Screen Switches to control screen to connect the XM tuner, an XM interface Box KCA-XM100V (optional accessory) is switched in the Satellite radio source mode. (Only with the optional accessory Satellite radio connected. XM Changes the display from Channel Name, Song Title Name, Artist Name, ...Composer Name, to Category Name. To connect the SIRIUS tuner, a conversion cable CA-SR20V (optional accessory) is scrolled by touching it. "SR"/ "XM" Band display "Preset" Preset number "ch"/ "CH" Channel display [ ] When appears, the text...
Instruction Manual
Page 49
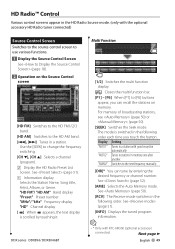
... the text display is switched in the following order. Display "AUTO1" "AUTO2" "MANU" Setting Tunes in a station with the optional accessory HD Radio tuner connected) Source Control Screen Switches to the source control screen to use various functions. 1 Display the Source Control Screen See...AME] Selects the Auto Memory mode. See (page 51). [INFO] Displays the tuned program information. ⁄ • * Only with KTC-HR300 (optional accessory) connected. Use the [SEEK] to [P6] buttons appear, you touch the button. Switches to the HD AM band. [4], [¢] Tunes in a ...
... the text display is switched in the following order. Display "AUTO1" "AUTO2" "MANU" Setting Tunes in a station with the optional accessory HD Radio tuner connected) Source Control Screen Switches to the source control screen to use various functions. 1 Display the Source Control Screen See...AME] Selects the Auto Memory mode. See (page 51). [INFO] Displays the tuned program information. ⁄ • * Only with KTC-HR300 (optional accessory) connected. Use the [SEEK] to [P6] buttons appear, you touch the button. Switches to the HD AM band. [4], [¢] Tunes in a ...

Instruction Manual
Page 52
Only with KTC-HR300 (optional accessory) connected. 1 Display the Source Control Screen See (page 49). 2 Start Direct Search 3 Enter the frequency or channel number iTunes Tagging Using an iTunes Tagging enabled ... or channel number. The song's information will then be checked 1 Display the Source Control Screen See (page 49). 2 Display the Information Screen 52 DNX series DNX9960/ DNX7160/ DNX7020EX "TAG" will then show up in a playlist called "Purchased" in the frequency or channel 1 sec. The saved songs will be indicated on your...
Only with KTC-HR300 (optional accessory) connected. 1 Display the Source Control Screen See (page 49). 2 Start Direct Search 3 Enter the frequency or channel number iTunes Tagging Using an iTunes Tagging enabled ... or channel number. The song's information will then be checked 1 Display the Source Control Screen See (page 49). 2 Display the Information Screen 52 DNX series DNX9960/ DNX7160/ DNX7020EX "TAG" will then show up in a playlist called "Purchased" in the frequency or channel 1 sec. The saved songs will be indicated on your...

Instruction Manual
Page 55
.... ⁄ • You must connect a commercially available relay unit in order to use the TEL Mute feature, you need to your telephone using a commercial telephone accessory. Other Functions External Device Power Supply Control Controlling the external device power supply. 1 Display the Source Select Screen 2 Display the EXT SW Control screen Muting...
.... ⁄ • You must connect a commercially available relay unit in order to use the TEL Mute feature, you need to your telephone using a commercial telephone accessory. Other Functions External Device Power Supply Control Controlling the external device power supply. 1 Display the Source Select Screen 2 Display the EXT SW Control screen Muting...
Instruction Manual
Page 102
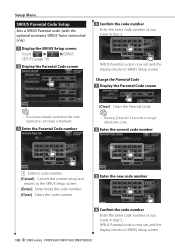
... screen. SIRIUS Parental code is now set , and the display returns to SIRIUS Setup screen. 102 DNX series DNX9960/ DNX7160/ DNX7020EX Setup Menu SIRIUS Parental Code Setup Sets a SIRIUS Parental code. (with the optional accessory SIRIUS Tuner connected only) 1 Display the SIRIUS Setup screen Touch [ ] > [ ] > [SIRIUS SETUP]. (page 78) 2 Display the Parental...
... screen. SIRIUS Parental code is now set , and the display returns to SIRIUS Setup screen. 102 DNX series DNX9960/ DNX7160/ DNX7020EX Setup Menu SIRIUS Parental Code Setup Sets a SIRIUS Parental code. (with the optional accessory SIRIUS Tuner connected only) 1 Display the SIRIUS Setup screen Touch [ ] > [ ] > [SIRIUS SETUP]. (page 78) 2 Display the Parental...
Instruction Manual
Page 104
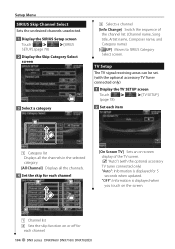
.... 4 Set the skip for each channel 1 2 [On Screen TV] Sets an on or off for each channel. 104 DNX series DNX9960/ DNX7160/ DNX7020EX "OFF": Information is displayed for 5 seconds when updated. Setup Menu SIRIUS Skip Channel Select Sets the undesired channels unselected. ...Category Select screen 3 Select a category 1 3 Selects a channel [Info Change] Switch the sequence of the TV screen. ( "Auto") (with the optional accessory TV tuner connected only) "Auto": Information is displayed when you touch on the screen. 3 1 Channel list 2 Sets the skip function on -screen display ...
.... 4 Set the skip for each channel 1 2 [On Screen TV] Sets an on or off for each channel. 104 DNX series DNX9960/ DNX7160/ DNX7020EX "OFF": Information is displayed for 5 seconds when updated. Setup Menu SIRIUS Skip Channel Select Sets the undesired channels unselected. ...Category Select screen 3 Select a category 1 3 Selects a channel [Info Change] Switch the sequence of the TV screen. ( "Auto") (with the optional accessory TV tuner connected only) "Auto": Information is displayed when you touch on the screen. 3 1 Channel list 2 Sets the skip function on -screen display ...


