
Installation Manual
Page 2
... ignition and disconnect the battery. 2. Connect the wiring harness connector to the power source running through the fuse box. • Do not cut out the fuse from the box or installing it will acquire satellites quickly each unit. 3. Always connect those wires to the unit. 6. Make sure your car. 7. About the Front Panel When removing the product from the ignition wire (red) and the battery wire (yellow). The power supply must wait while...
... ignition and disconnect the battery. 2. Connect the wiring harness connector to the power source running through the fuse box. • Do not cut out the fuse from the box or installing it will acquire satellites quickly each unit. 3. Always connect those wires to the unit. 6. Make sure your car. 7. About the Front Panel When removing the product from the ignition wire (red) and the battery wire (yellow). The power supply must wait while...
Installation Manual
Page 3
... ignition key. Bluetooth antenna unit ¤ CAUTION Install this unit in a spot exposed to direct sunlight or excessive heat or humidity. To prevent a short circuit, do not remove the caps on the car are blocked. Do not mount the unit in the car. • When only two speakers are metal objects near the Bluetooth antenna. For example, if you connect the ignition wire to a power source with a constant...
... ignition key. Bluetooth antenna unit ¤ CAUTION Install this unit in a spot exposed to direct sunlight or excessive heat or humidity. To prevent a short circuit, do not remove the caps on the car are blocked. Do not mount the unit in the car. • When only two speakers are metal objects near the Bluetooth antenna. For example, if you connect the ignition wire to a power source with a constant...
Installation Manual
Page 4
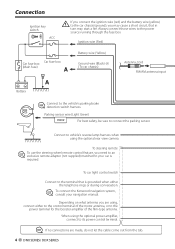
... Kenwood navigation system, consult your navigation manual. When using the optional power amplifier, connect to the power terminal for the booster amplifier of the film-type antenna. Ignition wire (Red) Car fuse box (Main fuse) Car fuse box A A Battery Battery wire (Yellow) Ground wire (Black) (To car chassis) Antenna Cord FM/AM antenna input ⁄ Connect to the terminal that in turn may cause a short circuit, that is required. To car light control switch Connect to the vehicle's parking brake detection switch harness...
... Kenwood navigation system, consult your navigation manual. When using the optional power amplifier, connect to the power terminal for the booster amplifier of the film-type antenna. Ignition wire (Red) Car fuse box (Main fuse) Car fuse box A A Battery Battery wire (Yellow) Ground wire (Black) (To car chassis) Antenna Cord FM/AM antenna input ⁄ Connect to the terminal that in turn may cause a short circuit, that is required. To car light control switch Connect to the vehicle's parking brake detection switch harness...

Instruction Manual
Page 3
... 85 Panel Color Coordinate 86 Screen Control 87 Registering Bluetooth Unit 88 Registering Bluetooth Unit PIN Code 89 Bluetooth Unit Connection 90 Bluetooth Hands-Free/Audio Output Setup 90 AV Input Setup 91 AV Output Interface Setup 91 Camera Setup 92 Navigation Setup 93 DSP Bypass Control (DNX7 series) 93 Speaker Setup 94 Car Type (DTA) Setup 95 Channel Level (DNX9/ DDX8 series) 97 DVD Setup 98 DVD Language Setup 99 DVD Parental Level Setup 99 Disc Setup 100 USB Setup 101 iPod Setup 101 SIRIUS Parental Code Setup 102 SIRIUS Parental Lock Setup 103...
... 85 Panel Color Coordinate 86 Screen Control 87 Registering Bluetooth Unit 88 Registering Bluetooth Unit PIN Code 89 Bluetooth Unit Connection 90 Bluetooth Hands-Free/Audio Output Setup 90 AV Input Setup 91 AV Output Interface Setup 91 Camera Setup 92 Navigation Setup 93 DSP Bypass Control (DNX7 series) 93 Speaker Setup 94 Car Type (DTA) Setup 95 Channel Level (DNX9/ DDX8 series) 97 DVD Setup 98 DVD Language Setup 99 DVD Parental Level Setup 99 Disc Setup 100 USB Setup 101 iPod Setup 101 SIRIUS Parental Code Setup 102 SIRIUS Parental Lock Setup 103...
Instruction Manual
Page 4
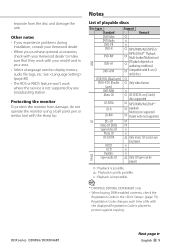
... fix your Kenwood dealer. The unit returns to (page 113). Refer to factory settings when the Reset button is displayed. on the disc, or use a disc with tape stuck on it. • Do not use the disc only after pressing the Reset button, the Initial SETUP screen is pressed. • Remove the USB device before pressing the Reset button. Discs that cannot be used • Discs that are dirty cannot be used . • This unit can damage...
... fix your Kenwood dealer. The unit returns to (page 113). Refer to factory settings when the Reset button is displayed. on the disc, or use a disc with tape stuck on it. • Do not use the disc only after pressing the Reset button, the Initial SETUP screen is pressed. • Remove the USB device before pressing the Reset button. Discs that cannot be used • Discs that are dirty cannot be used . • This unit can damage...
Instruction Manual
Page 5
... on authoring conditions) DVD+RW ‡ Compatible with the displayed Registration Code is impossible. ⁄ *1 DNX9960, DDX896, DDX8046BT only • When buying DRM enabled contents, check the Registration Code in your area. • Select a language used to protect against copying. Registration Code changes each time a file with 8-cm (3 inch) discs DVD-R DL (Dual layer) ‡ DVD+R DL (Double ‡ Only video format layer) DVD-RAM Music CD ×...
... on authoring conditions) DVD+RW ‡ Compatible with the displayed Registration Code is impossible. ⁄ *1 DNX9960, DDX896, DDX8046BT only • When buying DRM enabled contents, check the Registration Code in your area. • Select a language used to protect against copying. Registration Code changes each time a file with 8-cm (3 inch) discs DVD-R DL (Dual layer) ‡ DVD+R DL (Double ‡ Only video format layer) DVD-RAM Music CD ×...

Instruction Manual
Page 7
... a cable other than 5 m can control an iPod/iPhone from any erased data. • No USB device comes with this unit by the iPod is recommended. The files can be erased depending on the iPod to this unit must be on. ⁄ • If you cannot operate the iPod. Connecting a cable whose total length is longer than the USB compatible cable is displayed on the operating conditions of this unit, "KENWOOD" or...
... a cable other than 5 m can control an iPod/iPhone from any erased data. • No USB device comes with this unit by the iPod is recommended. The files can be erased depending on the iPod to this unit must be on. ⁄ • If you cannot operate the iPod. Connecting a cable whose total length is longer than the USB compatible cable is displayed on the operating conditions of this unit, "KENWOOD" or...
Instruction Manual
Page 10
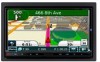
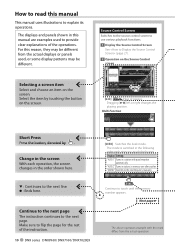
... right changes the playing position. Change in the screen With each time you touch the button. How to read this manual This manual uses illustrations to flip the page for the rest of the operations. "AUTO2" Tunes in stations in memory one after another. Make sure to explain its operations. For this reason, they may be different from the actual operation. Continue to use various playback functions. 1 Display the Source Control Screen...
... right changes the playing position. Change in the screen With each time you touch the button. How to read this manual This manual uses illustrations to flip the page for the rest of the operations. "AUTO2" Tunes in stations in memory one after another. Make sure to explain its operations. For this reason, they may be different from the actual operation. Continue to use various playback functions. 1 Display the Source Control Screen...
Instruction Manual
Page 44
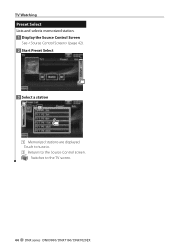
TV Watching Preset Select Lists and selects memorized station. 1 Display the Source Control Screen See (page 42). 2 Start Preset Select 3 Select a station 2 1 1 Memorized stations are displayed. Touch to tune in. 2 Returns to the Source Control screen. [ ] Switches to the TV screen. 44 DNX series DNX9960/ DNX7160/ DNX7020EX
TV Watching Preset Select Lists and selects memorized station. 1 Display the Source Control Screen See (page 42). 2 Start Preset Select 3 Select a station 2 1 1 Memorized stations are displayed. Touch to tune in. 2 Returns to the Source Control screen. [ ] Switches to the TV screen. 44 DNX series DNX9960/ DNX7160/ DNX7020EX
Instruction Manual
Page 59
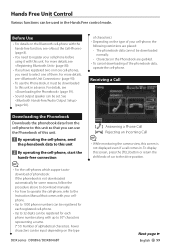
.... (* 50: Number of car to this unit. The phonebook data cannot be used in . Receiving a Call Downloading the Phonebook Downloads the phonebook data from the cell-phone to the drive position. Hands Free Unit Control Various functions can be downloaded normally. - For more details, see (page 88). • If you have registered two or more details, see (page 59). • Sound output speaker can be input depending on...
.... (* 50: Number of car to this unit. The phonebook data cannot be used in . Receiving a Call Downloading the Phonebook Downloads the phonebook data from the cell-phone to the drive position. Hands Free Unit Control Various functions can be downloaded normally. - For more details, see (page 88). • If you have registered two or more details, see (page 59). • Sound output speaker can be input depending on...
Instruction Manual
Page 73
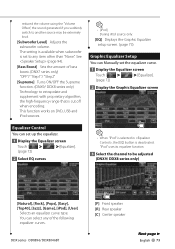
... the Equalizer screen Touch [ ] > [ ] > [Equalizer]. (page 72) 2 Display the Graphic Equalizer screen Equalizer Control You can select any item other than "None". This function works on DVD, USB and iPod sources. ⁄ • [iPod] During iPod source only. [EQ] Displays the Graphic Equalizer setup screen. (page 73) Graphic Equalizer Setup You can Manually set to be extremely loud. [Subwoofer Level] Adjusts the subwoofer volume. DDX series DDX896/ DDX8046BT [F] Front speaker [R] Rear speaker [C] Center speaker Next page 3 English 73 See (page 94). [Bass Boost] Sets the...
... the Equalizer screen Touch [ ] > [ ] > [Equalizer]. (page 72) 2 Display the Graphic Equalizer screen Equalizer Control You can select any item other than "None". This function works on DVD, USB and iPod sources. ⁄ • [iPod] During iPod source only. [EQ] Displays the Graphic Equalizer setup screen. (page 73) Graphic Equalizer Setup You can Manually set to be extremely loud. [Subwoofer Level] Adjusts the subwoofer volume. DDX series DDX896/ DDX8046BT [F] Front speaker [R] Rear speaker [C] Center speaker Next page 3 English 73 See (page 94). [Bass Boost] Sets the...
Instruction Manual
Page 77
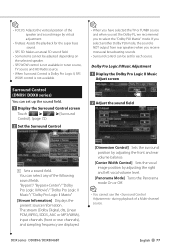
...), input channels (front or rear channels), and sampling frequency are displayed. [Dimension Control] Sets the surround position by adjusting the front and rear volume balance. [Center Width Control] Sets the vocal image position by virtual adjustment. • TruBass: Assists the playback for the super bass sound. • SRS 3D: Makes a natural 3D sound field. • Some items cannot be adjusted depending on the selected speaker. • SRS WOW control is not available in tuner source...
...), input channels (front or rear channels), and sampling frequency are displayed. [Dimension Control] Sets the surround position by adjusting the front and rear volume balance. [Center Width Control] Sets the vocal image position by virtual adjustment. • TruBass: Assists the playback for the super bass sound. • SRS 3D: Makes a natural 3D sound field. • Some items cannot be adjusted depending on the selected speaker. • SRS WOW control is not available in tuner source...
Instruction Manual
Page 86
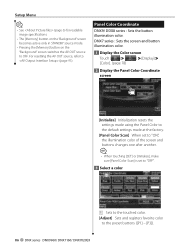
... screen and buttons changes one after another. ⁄ • When touching [SET] or [Initialize], make sure [Panel Color Scan] is set to "OFF". 3 Select a color 1 1 Sets to the touched color. [Adjust] Sets and registers favorite color to OFF. Setup Menu ⁄ • See (page 6) for readable image specifications. • The [Memory] button on the "Background" screen becomes active only in STANDBY source mode. • Pressing the [Memory] button on the "Background" screen switches the AV OUT source to the preset buttons...
... screen and buttons changes one after another. ⁄ • When touching [SET] or [Initialize], make sure [Panel Color Scan] is set to "OFF". 3 Select a color 1 1 Sets to the touched color. [Adjust] Sets and registers favorite color to OFF. Setup Menu ⁄ • See (page 6) for readable image specifications. • The [Memory] button on the "Background" screen becomes active only in STANDBY source mode. • Pressing the [Memory] button on the "Background" screen switches the AV OUT source to the preset buttons...
Instruction Manual
Page 88
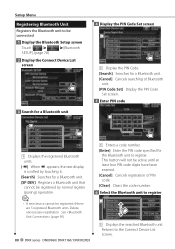
... display is scrolled by touching it. [Search] Searches for the Bluetooth unit to register. Delete unnecessary registration. Setup Menu Registering Bluetooth Unit Registers the Bluetooth unit to be connected. 1 Display the Bluetooth Setup screen Touch [ ] > [ ] > [Bluetooth SETUP]. (page 78) 2 Display the Connect Device List screen 3 Search for a Bluetooth unit 1 4 Display the PIN Code Set screen 1 1 Display the PIN Code. [Search] Searches for a Bluetooth unit. [Cancel] Cancels searching of PIN code. [Clear] Clears the code number. 6 Select the Bluetooth unit to the Connect Device...
... display is scrolled by touching it. [Search] Searches for the Bluetooth unit to register. Delete unnecessary registration. Setup Menu Registering Bluetooth Unit Registers the Bluetooth unit to be connected. 1 Display the Bluetooth Setup screen Touch [ ] > [ ] > [Bluetooth SETUP]. (page 78) 2 Display the Connect Device List screen 3 Search for a Bluetooth unit 1 4 Display the PIN Code Set screen 1 1 Display the PIN Code. [Search] Searches for a Bluetooth unit. [Cancel] Cancels searching of PIN code. [Clear] Clears the code number. 6 Select the Bluetooth unit to the Connect Device...

Instruction Manual
Page 89
...-phone or audio player side. 1 Display the Bluetooth Setup screen Touch [ ] > [ ] > [Bluetooth SETUP]. (page 78) 2 Display the Receiver PIN Code screen 2 Select a model name 3 Enter PIN code Displays the Bluetooth unit name that can be done even when the PIN code is correct, try . DDX series DDX896/ DDX8046BT 1 1 Enters a code number. [Cancel] Cancels registration of the Bluetooth unit to register ⁄ • Only models in Bluetooth unit name list can be registered. 3 Confirm whether to enter when registering (pairing) from the Bluetooth unit...
...-phone or audio player side. 1 Display the Bluetooth Setup screen Touch [ ] > [ ] > [Bluetooth SETUP]. (page 78) 2 Display the Receiver PIN Code screen 2 Select a model name 3 Enter PIN code Displays the Bluetooth unit name that can be done even when the PIN code is correct, try . DDX series DDX896/ DDX8046BT 1 1 Enters a code number. [Cancel] Cancels registration of the Bluetooth unit to register ⁄ • Only models in Bluetooth unit name list can be registered. 3 Confirm whether to enter when registering (pairing) from the Bluetooth unit...

Instruction Manual
Page 90
... speakers. Touch [Yes]. Setup Menu Bluetooth Unit Connection Selects the Bluetooth unit to connect. 1 Display the Bluetooth Setup screen Touch [ ] > [ ] > [Bluetooth SETUP]. (page 78) 2 Display the Connect Device List screen Bluetooth Hands-Free/Audio Output Setup Selects speakers to output the sound of hands-free phoning (such as phone call voice and ringing tone) and Bluetooth audio. 1 Display the Bluetooth Setup screen Touch [ ] > [ ] > [Bluetooth SETUP]. (page 78) 3 Select a registered Bluetooth unit 4 Select the service to use [Bluetooth HF/Audio] Sets the output speakers...
... speakers. Touch [Yes]. Setup Menu Bluetooth Unit Connection Selects the Bluetooth unit to connect. 1 Display the Bluetooth Setup screen Touch [ ] > [ ] > [Bluetooth SETUP]. (page 78) 2 Display the Connect Device List screen Bluetooth Hands-Free/Audio Output Setup Selects speakers to output the sound of hands-free phoning (such as phone call voice and ringing tone) and Bluetooth audio. 1 Display the Bluetooth Setup screen Touch [ ] > [ ] > [Bluetooth SETUP]. (page 78) 3 Select a registered Bluetooth unit 4 Select the service to use [Bluetooth HF/Audio] Sets the output speakers...

Instruction Manual
Page 93
... mode is set Navigation parameters. 1 Display the Navigation Setup screen Touch [ ] > [ ] > [Navigation]. (page 78) 2 Set each item [NAV Interrupt Speaker] Selects speakers used if no navigation system is connected. (The navigation display is cancelled when the AV source is switched.) [On Screen Navigation] Sets an on-screen display of the navigation screen. ( "OFF") (DDX series only) "Auto": Information is displayed for voice guidance. Navigation Setup You can be set only when [Navigation Input] is set...
... mode is set Navigation parameters. 1 Display the Navigation Setup screen Touch [ ] > [ ] > [Navigation]. (page 78) 2 Set each item [NAV Interrupt Speaker] Selects speakers used if no navigation system is connected. (The navigation display is cancelled when the AV source is switched.) [On Screen Navigation] Sets an on-screen display of the navigation screen. ( "OFF") (DDX series only) "Auto": Information is displayed for voice guidance. Navigation Setup You can be set only when [Navigation Input] is set...
Instruction Manual
Page 94
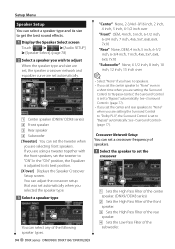
... are set, the speaker crossover network and equalizer curve are set automatically. 1 2 3 4 1 Center speaker (DNX9/ DDX8 series) 2 Front speaker 3 Rear speaker 4 Subwoofer [Tweeter] You can set the tweeter when you are using a tweeter together with the front speakers, set the tweeter to "Bypass" automatically. In the "ON" position, the Equalizer is adjusted to its size to get the best sound effects. 1 Display the Speaker Select screen Touch [ ] > [ ] > [Audio SETUP] > [Speaker Select]. (page 78) 2 Select a speaker you...
... are set, the speaker crossover network and equalizer curve are set automatically. 1 2 3 4 1 Center speaker (DNX9/ DDX8 series) 2 Front speaker 3 Rear speaker 4 Subwoofer [Tweeter] You can set the tweeter when you are using a tweeter together with the front speakers, set the tweeter to "Bypass" automatically. In the "ON" position, the Equalizer is adjusted to its size to get the best sound effects. 1 Display the Speaker Select screen Touch [ ] > [ ] > [Audio SETUP] > [Speaker Select]. (page 78) 2 Select a speaker you...
Instruction Manual
Page 96
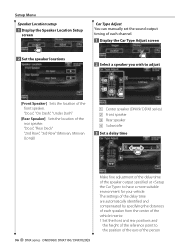
... Front speaker 3 Rear speaker 4 Subwoofer 3 Set a delay time 96 DNX series DNX9960/ DNX7160/ DNX7020EX Make fine adjustment of the delay time of the rear speaker. The settings of the delay time are automatically identified and compensated by specifying the distances of each channel. 1 Display the Car Type Adjust screen 2 Set the speaker locations 2 Select a speaker you wish to adjust 1 2 3 4 [Front Speaker] Sets the location of the front speaker. Setup Menu Speaker Location setup 1 Display the Speaker Location Setup screen Car Type Adjust You can manually set the sound output timing...
... Front speaker 3 Rear speaker 4 Subwoofer 3 Set a delay time 96 DNX series DNX9960/ DNX7160/ DNX7020EX Make fine adjustment of the delay time of the rear speaker. The settings of the delay time are automatically identified and compensated by specifying the distances of each channel. 1 Display the Car Type Adjust screen 2 Set the speaker locations 2 Select a speaker you wish to adjust 1 2 3 4 [Front Speaker] Sets the location of the front speaker. Setup Menu Speaker Location setup 1 Display the Speaker Location Setup screen Car Type Adjust You can manually set the sound output timing...

Instruction Manual
Page 116
... your unit may just be the result of the Video CD is enabled. ! • Cannot set up the equalizer. • Cannot set up subwoofer phase. • No output from the preout jack. Cannot play . ▲ The PBC function of slight misoperation or miswiring. Disc source ? Before calling service, first check the following table for possible problems. General ? Tuner source ? Audio file source ? Radio reception is poor. ✔ The car antenna...
... your unit may just be the result of the Video CD is enabled. ! • Cannot set up the equalizer. • Cannot set up subwoofer phase. • No output from the preout jack. Cannot play . ▲ The PBC function of slight misoperation or miswiring. Disc source ? Before calling service, first check the following table for possible problems. General ? Tuner source ? Audio file source ? Radio reception is poor. ✔ The car antenna...


