

Instruction Manual
Page 1
MONITOR WITH DVD RECEIVER DDX9020DABS DDX920WDABS DDX8020S DDX820WS MONITOR WITH RECEIVER DMX8520DABS DMX8020S DMX820WS INSTRUCTION MANUAL • Updated information (the latest Instruction Manual, system updates, new functions, etc.) is available from Japan Audio Society. © 2020 JVCKENWOOD Corporation B5A-3342-10 ...) Hi-Res Audio logo and Hi-Res Audio Wireless logo are used under license from . • The Instruction manual is subject to download the latest edition of the Instruction manual for modification of specifications and so forth. Be sure to change for reference.
MONITOR WITH DVD RECEIVER DDX9020DABS DDX920WDABS DDX8020S DDX820WS MONITOR WITH RECEIVER DMX8520DABS DMX8020S DMX820WS INSTRUCTION MANUAL • Updated information (the latest Instruction Manual, system updates, new functions, etc.) is available from Japan Audio Society. © 2020 JVCKENWOOD Corporation B5A-3342-10 ...) Hi-Res Audio logo and Hi-Res Audio Wireless logo are used under license from . • The Instruction manual is subject to download the latest edition of the Instruction manual for modification of specifications and so forth. Be sure to change for reference.

Instruction Manual
Page 2
... sure to consult "Important Notice on a EULA that is limited to sublicense it. Please note that software components based on Software" as per the instruction manual or instructions given in the help file and may not duplicate, copy, modify, add to such software. Unless otherwise stipulated by a third party other governing...
... sure to consult "Important Notice on a EULA that is limited to sublicense it. Please note that software components based on Software" as per the instruction manual or instructions given in the help file and may not duplicate, copy, modify, add to such software. Unless otherwise stipulated by a third party other governing...
Instruction Manual
Page 4
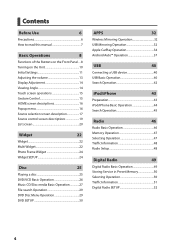
Contents Before Use 6 Precautions 6 How to read this manual 7 Basic Operations 8 Functions of the Buttons on the Front Panel.... 8 Turning on the Unit 10 Initial Settings 11 Adjusting the volume 13 Display Adjustment 14 ...
Contents Before Use 6 Precautions 6 How to read this manual 7 Basic Operations 8 Functions of the Buttons on the Front Panel.... 8 Turning on the Unit 10 Initial Settings 11 Adjusting the volume 13 Display Adjustment 14 ...

Instruction Manual
Page 6
...that they work in areas where the service is not supported by any extended period. • If you experience problems during installation, consult your KENWOOD dealer. ÑÑPrecautions on using this unit • When you turn on the car heater in cold weather, dew may not allow ...discs to play a disc that has not been finalized. (For the finalization process, see your writing software and your recorder's instruction manual.) See User Interface Setup (P.71). • The Radio Data System or Radio Broadcast Data System feature won't work with a dry soft cloth such as...
...that they work in areas where the service is not supported by any extended period. • If you experience problems during installation, consult your KENWOOD dealer. ÑÑPrecautions on using this unit • When you turn on the car heater in cold weather, dew may not allow ...discs to play a disc that has not been finalized. (For the finalization process, see your writing software and your recorder's instruction manual.) See User Interface Setup (P.71). • The Radio Data System or Radio Broadcast Data System feature won't work with a dry soft cloth such as...

Instruction Manual
Page 7
...from moving panel to carefully read this manual • The screens and panels shown in this unit, you turn on the microprocessor of operations. Be sure Keepfingersaway from the [SETUP] menu. For best results while pairing with your Kenwood receiver, please be sure to close any...different from the actual screens or panels, or some display patterns may cause injury. This process could take up to GPS. For this manual. Moving panel Keep fingers away from moving panel • This symbol indicate the presence of explanation. Moving Panel Keep fingers ...
...from moving panel to carefully read this manual • The screens and panels shown in this unit, you turn on the microprocessor of operations. Be sure Keepfingersaway from the [SETUP] menu. For best results while pairing with your Kenwood receiver, please be sure to close any...different from the actual screens or panels, or some display patterns may cause injury. This process could take up to GPS. For this manual. Moving panel Keep fingers away from moving panel • This symbol indicate the presence of explanation. Moving Panel Keep fingers ...

Instruction Manual
Page 8
For this manual are functional, though. • Displays the popup menu screen. 8 Basic Operations Basic Operations Functions of the Buttons on the Front Panel DDX920WDABS DDX820WS / DMX820WS 1 2 39 4 5 6 7 2 39 4 5 8 7 NOTE • The panels shown in this reason, they may be different ...1 second turns the AV off.* (Touch the display to turn on are examples used to provide clear explanations of your hand. (P.15) (DDX920WDABS only) • Displays the APP (Apple CarPlay/Android Auto/Wireless Mirroring) screen. • Pressing and holding displays the Voice Recognition screen (P.61...
For this manual are functional, though. • Displays the popup menu screen. 8 Basic Operations Basic Operations Functions of the Buttons on the Front Panel DDX920WDABS DDX820WS / DMX820WS 1 2 39 4 5 6 7 2 39 4 5 8 7 NOTE • The panels shown in this reason, they may be different ...1 second turns the AV off.* (Touch the display to turn on are examples used to provide clear explanations of your hand. (P.15) (DDX920WDABS only) • Displays the APP (Apple CarPlay/Android Auto/Wireless Mirroring) screen. • Pressing and holding displays the Voice Recognition screen (P.61...

Instruction Manual
Page 9
... signal. • Adjusts the volume. The camera whose view was displayed last is displayed first changes according to provide a clear explanation of operations. For this manual are examples used to the "Camera Setup" setting and the shift lever position in this reason, they may be displayed the next time. The volume...
... signal. • Adjusts the volume. The camera whose view was displayed last is displayed first changes according to provide a clear explanation of operations. For this manual are examples used to the "Camera Setup" setting and the shift lever position in this reason, they may be displayed the next time. The volume...

Instruction Manual
Page 13
... / DMX820WS DDX9020DABS / DDX8020S ■■[Time Format] Select the time display format. [12-Hour ](Default)/24-Hour] ■■ [Clock] DDX9020DABS / DDX920WDABS / DMX8520DABS [GPS-SYNC ](Default) : Synchronizes the clock time with the RDS. [Manual ]: Set the clock manually. ■■[Time Zone] Select the time zone. ■■[Clock Adjust] If you select...
... / DMX820WS DDX9020DABS / DDX8020S ■■[Time Format] Select the time display format. [12-Hour ](Default)/24-Hour] ■■ [Clock] DDX9020DABS / DDX920WDABS / DMX8520DABS [GPS-SYNC ](Default) : Synchronizes the clock time with the RDS. [Manual ]: Set the clock manually. ■■[Time Zone] Select the time zone. ■■[Clock Adjust] If you select...

Instruction Manual
Page 27
... not to change the playing position. 4 Operation keys • [E] [F] : Searches for Music CD and audio files, see Switch the operation mode (P.87). • In this manual, "Music CD" means a general CD which includes audio or video files. • The screen shot below is on. 3 Play mode indicator/Playing time • D, B, I (stop...
... not to change the playing position. 4 Operation keys • [E] [F] : Searches for Music CD and audio files, see Switch the operation mode (P.87). • In this manual, "Music CD" means a general CD which includes audio or video files. • The screen shot below is on. 3 Play mode indicator/Playing time • D, B, I (stop...
Instruction Manual
Page 32
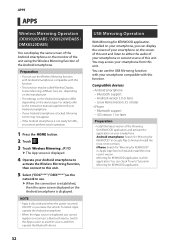
...manual supplied with your Android smartphone. • If your Android smartphone to activate the Wireless Mirroring function, then connect to this unit. 5 Select ("DDX****"/"DMX****") as the network to find and install the most recent version. USB Mirroring Operation With Mirroring for KENWOOD...using the Wireless Mirroring function of the Mirroring for KENWOOD application is displayed, you can use . Compatible devices • Android smartphone - Bluetooth support - APPS APPS Wireless Mirroring Operation (DDX9020DABS / DDX920WDABS / DMX8520DABS) You can use the USB Mirroring ...
...manual supplied with your Android smartphone. • If your Android smartphone to activate the Wireless Mirroring function, then connect to this unit. 5 Select ("DDX****"/"DMX****") as the network to find and install the most recent version. USB Mirroring Operation With Mirroring for KENWOOD...using the Wireless Mirroring function of the Mirroring for KENWOOD application is displayed, you can use . Compatible devices • Android smartphone - Bluetooth support - APPS APPS Wireless Mirroring Operation (DDX9020DABS / DDX920WDABS / DMX8520DABS) You can use the USB Mirroring ...

Instruction Manual
Page 38
... is disconnected. 2 Unlock your Android smartphone. 3 Press the [HOME] button. 4 Touch [ ]. 5 Touch [Android Auto]. (P.17) Wireless connection (DDX9020DABS / DDX920WDABS / DMX8520DABS) When the Android smartphone is connected to be used as the Android Auto source. 1 Press the [HOME] button. 2 Touch [ ]. 3 Touch [...hands-free function, connect the Android smartphone via the USB are displayed. 38 The registered Android smartphones ready for wireless connection manually, refer to [Reset Android Auto Wireless Connection] (P.76). • When the Wi-Fi connection becomes unavailable, the HOME ...
... is disconnected. 2 Unlock your Android smartphone. 3 Press the [HOME] button. 4 Touch [ ]. 5 Touch [Android Auto]. (P.17) Wireless connection (DDX9020DABS / DDX920WDABS / DMX8520DABS) When the Android smartphone is connected to be used as the Android Auto source. 1 Press the [HOME] button. 2 Touch [ ]. 3 Touch [...hands-free function, connect the Android smartphone via the USB are displayed. 38 The registered Android smartphones ready for wireless connection manually, refer to [Reset Android Auto Wireless Connection] (P.76). • When the Wi-Fi connection becomes unavailable, the HOME ...

Instruction Manual
Page 40
The word "USB device" appearing in this manual indicates a flash memory device. ●●About the file system The file system should be the one of the following. • FAT16 • FAT32 • ...
The word "USB device" appearing in this manual indicates a flash memory device. ●●About the file system The file system should be the one of the following. • FAT16 • FAT32 • ...

Instruction Manual
Page 46
...remote control mode switch to AUD mode before starting operation, see Radio Setup (P.48). • [ ] : Touch to mute or not to the next frequency manually. 3 Band key Switches the band (FM1/FM2/FM3, AM). 4 Preset key Recalls the memorized station. The method of the current station: Frequency, PS ...name P#: Preset number 2 Seek mode Switches the seek mode in the following sequence; [AUTO1], [AUTO2], [MANUAL]. • [AUTO1]: Tunes in a station with good reception automatically. • [AUTO2]: Tunes in stations in memory one after another. •...
...remote control mode switch to AUD mode before starting operation, see Radio Setup (P.48). • [ ] : Touch to mute or not to the next frequency manually. 3 Band key Switches the band (FM1/FM2/FM3, AM). 4 Preset key Recalls the memorized station. The method of the current station: Frequency, PS ...name P#: Preset number 2 Seek mode Switches the seek mode in the following sequence; [AUTO1], [AUTO2], [MANUAL]. • [AUTO1]: Tunes in a station with good reception automatically. • [AUTO2]: Tunes in stations in memory one after another. •...

Instruction Manual
Page 47
... ÑÑPreset select You can list and select memorized station. 1 Select a station from the list. 3 Touch [Search]. English 47 hhAuto memory starts. ÑÑManual memory You can store the current receiving station in memory. 1 Touch desired band key. 2 Select a station you wish to store in memory. 3 Touch [#] (#:1-6) in memory...
... ÑÑPreset select You can list and select memorized station. 1 Select a station from the list. 3 Touch [Search]. English 47 hhAuto memory starts. ÑÑManual memory You can store the current receiving station in memory. 1 Touch desired band key. 2 Select a station you wish to store in memory. 3 Touch [#] (#:1-6) in memory...

Instruction Manual
Page 49
Digital Radio Digital Radio (DDX9020DABS / DDX920WDABS / DMX8520DABS) Digital Radio Basic Operation Most functions can be controlled from the source control screen. The seek mode switching can be changed. (see 3 Seek mode... being received service in a ensemble, service, and component. English 49 For details on the current station: Service Name Touching [ ] allows you to the next ensemble manually. 4 Indicator display P#: Preset number CH#: Channel display 5 Operation keys • [1] : Displays the Service List screen. To enter Digital Radio source, touch [Digital Radio] icon in...
Digital Radio Digital Radio (DDX9020DABS / DDX920WDABS / DMX8520DABS) Digital Radio Basic Operation Most functions can be controlled from the source control screen. The seek mode switching can be changed. (see 3 Seek mode... being received service in a ensemble, service, and component. English 49 For details on the current station: Service Name Touching [ ] allows you to the next ensemble manually. 4 Indicator display P#: Preset number CH#: Channel display 5 Operation keys • [1] : Displays the Service List screen. To enter Digital Radio source, touch [Digital Radio] icon in...
Instruction Manual
Page 66
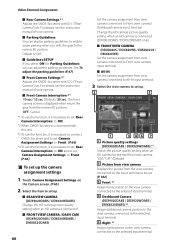
...9632;[Rear Camera Settings *]2 Adjusts the CMOS-3xx series with ID 1 ("Rear Camera") set . For details, see the instruction manual of your camera. ■■[Parking Guidelines] You can adjust the parking guidelines. Change the HD camera picture quality setting when ...(Default) 2 [Picture from view camera] Displays the picture from view camera connected to the reverse (R) position. Default is connected. (DDX9020DABS / DDX920WDABS only) ■■[FRONT VIEW CAMERA] (DDX8020S / DDX820WS / DMX8020S / DMX820WS) Set the camera assignment from view camera connected to Front view...
...9632;[Rear Camera Settings *]2 Adjusts the CMOS-3xx series with ID 1 ("Rear Camera") set . For details, see the instruction manual of your camera. ■■[Parking Guidelines] You can adjust the parking guidelines. Change the HD camera picture quality setting when ...(Default) 2 [Picture from view camera] Displays the picture from view camera connected to the reverse (R) position. Default is connected. (DDX9020DABS / DDX920WDABS only) ■■[FRONT VIEW CAMERA] (DDX8020S / DDX820WS / DMX8020S / DMX820WS) Set the camera assignment from view camera connected to Front view...

Instruction Manual
Page 67
...mark. Other External Components 4 Adjusting the position of the same length. NOTE • To connect a dashboard camera, see the instruction manual of the Dashboard Camera DRV-N520 (optional accessory). A C D B Make sure that lines A and B are horizontally parallel, ...and that lines C and D are of the selected mark. Use Dashboard Camera (DDX9020DABS / DDX920WDABS / DMX8520DABS only) A Dashboard Camera, DRV-N520 (optional accessory), connected to "Dashboard Camera". (P.66) English 67 For details, see Connecting the ...
...mark. Other External Components 4 Adjusting the position of the same length. NOTE • To connect a dashboard camera, see the instruction manual of the Dashboard Camera DRV-N520 (optional accessory). A C D B Make sure that lines A and B are horizontally parallel, ...and that lines C and D are of the selected mark. Use Dashboard Camera (DDX9020DABS / DDX920WDABS / DMX8520DABS only) A Dashboard Camera, DRV-N520 (optional accessory), connected to "Dashboard Camera". (P.66) English 67 For details, see Connecting the ...

Instruction Manual
Page 71
... 3 Touch [User Interface]. "12-Hour" (Default)/"24-Hour" ■■ [Clock] DDX9020DABS / DDX920WDABS / DMX8520DABS [GPS-SYNC ](Default) : Synchronizes the clock time with the RDS. [Manual ]: Set the clock manually. ■■[Time Zone] Select the time zone. ■■[Clock Adjust] If you have selected... as follows. ■■[Small Audio Text] Change the text size for Clock, adjust the date and time manually. (P.72) *1 DDX920WDABS only English 71 Default is detected. DDX8020S / DDX820WS / DMX8020S / DMX820WS [RDS-SYNC ](Default) : Synchronizes the clock time with ...
... 3 Touch [User Interface]. "12-Hour" (Default)/"24-Hour" ■■ [Clock] DDX9020DABS / DDX920WDABS / DMX8520DABS [GPS-SYNC ](Default) : Synchronizes the clock time with the RDS. [Manual ]: Set the clock manually. ■■[Time Zone] Select the time zone. ■■[Clock Adjust] If you have selected... as follows. ■■[Small Audio Text] Change the text size for Clock, adjust the date and time manually. (P.72) *1 DDX920WDABS only English 71 Default is detected. DDX8020S / DDX820WS / DMX8020S / DMX820WS [RDS-SYNC ](Default) : Synchronizes the clock time with ...

Instruction Manual
Page 72
... and after this operation. 3 Touch the function you want to the default, touch [Reset]. ÑÑAdjust the date and time manually 1 Touch [Clock] on the User Interface screen. 2 Select [Manual]. 3 Touch [Time Zone] on the User Interface screen. 4 Select the time zone. 5 Touch [Clock Adjust] on the User Interface screen. 6 Adjust...
... and after this operation. 3 Touch the function you want to the default, touch [Reset]. ÑÑAdjust the date and time manually 1 Touch [Clock] on the User Interface screen. 2 Select [Manual]. 3 Touch [Time Zone] on the User Interface screen. 4 Select the time zone. 5 Touch [Clock Adjust] on the User Interface screen. 6 Adjust...

Instruction Manual
Page 74
... [SETUP]. "0" (Default)/"-1"/"-2"/"-3" 74 ■■ [User] The color you want to display the clock while the screen is hard to see the relevant update procedure manual which comes with the software. hhSETUP screen appears. 3 Touch [Display]. ■■[Screen transition effect] Select whether to update the software, see the image on...
... [SETUP]. "0" (Default)/"-1"/"-2"/"-3" 74 ■■ [User] The color you want to display the clock while the screen is hard to see the relevant update procedure manual which comes with the software. hhSETUP screen appears. 3 Touch [Display]. ■■[Screen transition effect] Select whether to update the software, see the image on...


