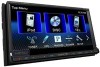

Instruction Manual
Page 2
...items 48 Memorizing/recalling the settings 52 Locking the settings 52 Adjusting the touch position 52 BLUETOOTH OPERATIONS (Only for DDX719/DDX7049BT/DDX419/ DDX4049BT) Information for using Bluetooth® devices 53 Bluetooth operations 53 Connecting Bluetooth devices 54 Using the... from the remote controller 64 REFERENCE Maintenance 68 More about this unit 69 Troubleshooting 71 Accessories/Installation Procedure 76 Connecting Wires to Terminals...78 Connecting a USB device/iPod/ iPhone 79 Connecting Other Products........80 Installing/Removing the Unit.....81 Specifications...
...items 48 Memorizing/recalling the settings 52 Locking the settings 52 Adjusting the touch position 52 BLUETOOTH OPERATIONS (Only for DDX719/DDX7049BT/DDX419/ DDX4049BT) Information for using Bluetooth® devices 53 Bluetooth operations 53 Connecting Bluetooth devices 54 Using the... from the remote controller 64 REFERENCE Maintenance 68 More about this unit 69 Troubleshooting 71 Accessories/Installation Procedure 76 Connecting Wires to Terminals...78 Connecting a USB device/iPod/ iPhone 79 Connecting Other Products........80 Installing/Removing the Unit.....81 Specifications...
Instruction Manual
Page 3
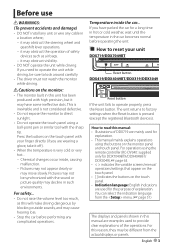
...while driving, be sure to provide clear explanations of explanation. For operations using a ball-point pen or similar tool with your unit DDX719/DDX7049BT Reset button DDX419/DDX4049BT/DDX319/DDX3049 Reset button If the unit fails to read this will make driving dangerous by blocking outside sounds...8226; DO NOT operate the unit while driving. Before use WARNINGS: (To prevent accidents and damage) • DO NOT install any unit or wire any complicated operations. it may move slowly. Cautions on the touch panel with the sharp tip. Press the buttons on the monitor: • ...
...while driving, be sure to provide clear explanations of explanation. For operations using a ball-point pen or similar tool with your unit DDX719/DDX7049BT Reset button DDX419/DDX4049BT/DDX319/DDX3049 Reset button If the unit fails to read this will make driving dangerous by blocking outside sounds...8226; DO NOT operate the unit while driving. Before use WARNINGS: (To prevent accidents and damage) • DO NOT install any unit or wire any complicated operations. it may move slowly. Cautions on the touch panel with the sharp tip. Press the buttons on the monitor: • ...
Instruction Manual
Page 71
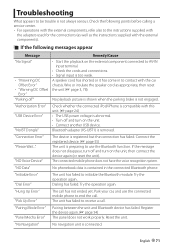
.... • Turn off and turn on the unit. • Connect another USB device. Try the operation again. "Hung Up Error" "Pick Up Error" The call . Wire or insulate the speaker cord as the instructions supplied with the external components). Connect the registered device. (☞ page 55) The unit is preparing to...
.... • Turn off and turn on the unit. • Connect another USB device. Try the operation again. "Hung Up Error" "Pick Up Error" The call . Wire or insulate the speaker cord as the instructions supplied with the external components). Connect the registered device. (☞ page 55) The unit is preparing to...

Instruction Manual
Page 76
...to a power source with a constant voltage supply, such as with battery wires, the battery may be turned on and off with the same rating. 76 DDX719/DDX7049BT/DDX419/DDX4049BT/DDX319/DDX3049 Also avoid places with too much dust or... fuse with one with the ignition key. Therefore, the speaker wire should be connected to the instruction manual. ..........6 ..........1 4 9*3 ..........6 ..........1 (3m: 9.8 ft) 5 *1 DDX419/DDX4049BT/ DDX319/DDX3049 only. *2 DDX719/DDX7049BT only. ..........1 *3 DDX719/DDX7049BT/ DDX419/DDX4049BT only. After the Installation After the installation...
...to a power source with a constant voltage supply, such as with battery wires, the battery may be turned on and off with the same rating. 76 DDX719/DDX7049BT/DDX419/DDX4049BT/DDX319/DDX3049 Also avoid places with too much dust or... fuse with one with the ignition key. Therefore, the speaker wire should be connected to the instruction manual. ..........6 ..........1 4 9*3 ..........6 ..........1 (3m: 9.8 ft) 5 *1 DDX419/DDX4049BT/ DDX319/DDX3049 only. *2 DDX719/DDX7049BT only. ..........1 *3 DDX719/DDX7049BT/ DDX419/DDX4049BT only. After the Installation After the installation...
Instruction Manual
Page 77
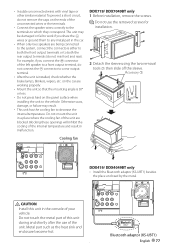
DDX719/ DDX7049BT only 1 Before installation, remove the screws. ⁄ Do not use of the unit. connector ... the heat sink and enclosure become hot. . Bluetooth adaptor (KS-UBT1) English 77 For example, if you share the wires or ground them to any metal part in the car. • When only two speakers are blocked. Do not mount ... where the cooling fan of the internal temperature and result in the console of the unconnected wires or the terminals. • Connect the speaker wires correctly to the terminals to decrease the internal temperature. Do not touch the metal part of...
DDX719/ DDX7049BT only 1 Before installation, remove the screws. ⁄ Do not use of the unit. connector ... the heat sink and enclosure become hot. . Bluetooth adaptor (KS-UBT1) English 77 For example, if you share the wires or ground them to any metal part in the car. • When only two speakers are blocked. Do not mount ... where the cooling fan of the internal temperature and result in the console of the unconnected wires or the terminals. • Connect the speaker wires correctly to the terminals to decrease the internal temperature. Do not touch the metal part of...
Instruction Manual
Page 78
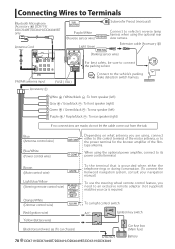
...control wire) To car light control switch Red (Ignition wire) ACC Ignition key switch Yellow (Battery wire) Black (Ground wire) - (To car chassis) Car fuse box (Main fuse) 78 DDX719/DDX7049BT/DDX419/DDX4049BT/DDX319/DDX3049 Battery Connecting Wires to Terminals Bluetooth Microphone (Accessory 9) DDX719/ DDX7049BT...; Connect to vehicle's reverse lamp harness when using , connect either the telephone rings or during conversation. (To connect the Kenwood navigation system, consult your navigation manual.) To use the steering wheel remote control feature, you are made, do not let ...
...control wire) To car light control switch Red (Ignition wire) ACC Ignition key switch Yellow (Battery wire) Black (Ground wire) - (To car chassis) Car fuse box (Main fuse) 78 DDX719/DDX7049BT/DDX419/DDX4049BT/DDX319/DDX3049 Battery Connecting Wires to Terminals Bluetooth Microphone (Accessory 9) DDX719/ DDX7049BT...; Connect to vehicle's reverse lamp harness when using , connect either the telephone rings or during conversation. (To connect the Kenwood navigation system, consult your navigation manual.) To use the steering wheel remote control feature, you are made, do not let ...
Instruction Manual
Page 82
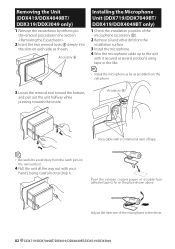
...DDX719/DDX7049BT/ DDX419/DDX4049BT only) 1 Check the installation position of the microphone to fix on the removal tool. 4 Pull the unit all the way out with it . Adjust the direction of the microphone (accessory 9). 2 Remove oil and other dirt from the installation surface. 3 Install the microphone. 4 Wire...the place shown above. Accessory 9 Fix a cable with a commercial item of double-face adhesive tape to the driver. 82 DDX719/DDX7049BT/DDX419/DDX4049BT/DDX319/DDX3049 Removing the Unit (DDX419/DDX4049BT/ DDX319/DDX3049 only) 1 Remove the escutcheon by referring to avoid ...
...DDX719/DDX7049BT/ DDX419/DDX4049BT only) 1 Check the installation position of the microphone to fix on the removal tool. 4 Pull the unit all the way out with it . Adjust the direction of the microphone (accessory 9). 2 Remove oil and other dirt from the installation surface. 3 Install the microphone. 4 Wire...the place shown above. Accessory 9 Fix a cable with a commercial item of double-face adhesive tape to the driver. 82 DDX719/DDX7049BT/DDX419/DDX4049BT/DDX319/DDX3049 Removing the Unit (DDX419/DDX4049BT/ DDX319/DDX3049 only) 1 Remove the escutcheon by referring to avoid ...


