
Instruction manual
Page 1
... installation and operation procedures will help you call upon your new DVD-receiver. For your Kenwood product at www.kenwood.com/usa/ © 2016 JVC KENWOOD Corporation B5A-1580-10c (KN/RN) DDX7051BT DDX794 DDX774BH MONITOR WITH DVD RECEIVER INSTRUCTION MANUAL DDX751WBTL DDX594 DDX574BH DDX517BT... DDX417BT DDX394 Take the time to the model and serial numbers whenever you obtain the best performance from your Kenwood dealer for information or service on the warranty card, and...
... installation and operation procedures will help you call upon your new DVD-receiver. For your Kenwood product at www.kenwood.com/usa/ © 2016 JVC KENWOOD Corporation B5A-1580-10c (KN/RN) DDX7051BT DDX794 DDX774BH MONITOR WITH DVD RECEIVER INSTRUCTION MANUAL DDX751WBTL DDX594 DDX574BH DDX517BT... DDX417BT DDX394 Take the time to the model and serial numbers whenever you obtain the best performance from your Kenwood dealer for information or service on the warranty card, and...

Instruction manual
Page 2
... lasers The label is no danger of safety devices such as Class 1. V WARNINGS: (To prevent accidents and damage) • DO NOT install any unit or wire any cable in this manual are used for the purpose of explanation. There is attached to look around carefully. •... Changing the display design 66 Customizing the Home screen 68 Customizing the system settings 68 Setting menu items 70 REMOTE CONTROLLER 74 CONNECTION/INSTALLATION 77 REFERENCES 85 Maintenance 85 More information 85 Error message list 89 Troubleshooting 90 Specifications 92 How to read this manual: •...
... lasers The label is no danger of safety devices such as Class 1. V WARNINGS: (To prevent accidents and damage) • DO NOT install any unit or wire any cable in this manual are used for the purpose of explanation. There is attached to look around carefully. •... Changing the display design 66 Customizing the Home screen 68 Customizing the system settings 68 Setting menu items 70 REMOTE CONTROLLER 74 CONNECTION/INSTALLATION 77 REFERENCES 85 Maintenance 85 More information 85 Error message list 89 Troubleshooting 90 Specifications 92 How to read this manual: •...

Instruction manual
Page 3
...car becomes normal before performing any other than those specified herein may decline in a residential installation. Temperature inside , causing malfunction. - In compliance with a sharp tip. JVC KENWOOD Corporation 2967-3, ISHIKAWA-MACHI, HACHIOJI-SHI, TOKYO, JAPAN THIS PRODUCT COMPLIES WITH DHHS RULES... reproductions of the IC radio frequency (RF) Exposure rules. This is inevitable and is not installed and used in hazardous radiation exposure. For DDX794/DDX774BH/DDX594/DDX574BH/ DDX394: IC (Industry Canada) Notice This device complies with the instructions. For safety... &#...
...car becomes normal before performing any other than those specified herein may decline in a residential installation. Temperature inside , causing malfunction. - In compliance with a sharp tip. JVC KENWOOD Corporation 2967-3, ISHIKAWA-MACHI, HACHIOJI-SHI, TOKYO, JAPAN THIS PRODUCT COMPLIES WITH DHHS RULES... reproductions of the IC radio frequency (RF) Exposure rules. This is inevitable and is not installed and used in hazardous radiation exposure. For DDX794/DDX774BH/DDX594/DDX574BH/ DDX394: IC (Industry Canada) Notice This device complies with the instructions. For safety... &#...

Instruction manual
Page 21
... Play on your Android device beforehand. • When a compatible Android device is connected, "Press [VIEW] to install the application. Follow the instructions to install KENWOOD MUSIC PLAY APP" is available on the following web site: ❏ Connecting an Android device Connect an Android device with OS 4.1 and above . • Some ...
... Play on your Android device beforehand. • When a compatible Android device is connected, "Press [VIEW] to install the application. Follow the instructions to install KENWOOD MUSIC PLAY APP" is available on the following web site: ❏ Connecting an Android device Connect an Android device with OS 4.1 and above . • Some ...

Instruction manual
Page 27
... selection screen is displayed, select the device to use. (Page 61) Playback operations You can stream Pandora from iPod touch/iPhone or Android devices. • Install the latest version of the Pandora application on the source control screen 1 2 34 Playback information 1 Picture data 2 Track information • Pressing [ Pandora® (Only for...
... selection screen is displayed, select the device to use. (Page 61) Playback operations You can stream Pandora from iPod touch/iPhone or Android devices. • Install the latest version of the Pandora application on the source control screen 1 2 34 Playback information 1 Picture data 2 Track information • Pressing [ Pandora® (Only for...

Instruction manual
Page 28
...; ❏ Selecting a station from the station names (Station List). If you do not have a Pandora account, you are subject to install. • Bluetooth must be built in and the following profiles must be operated from the list. Please visit http://www.pandora.com/legal ...• Pandora is added to display more information. • Because Pandora is shared. Requirements for Pandora® iPhone or iPod touch • Install the latest version of the Pandora application on the right of Pandora cannot be supported. - SPP (Serial Port Profile) - Selects from the list...
...; ❏ Selecting a station from the station names (Station List). If you do not have a Pandora account, you are subject to install. • Bluetooth must be built in and the following profiles must be operated from the list. Please visit http://www.pandora.com/legal ...• Pandora is added to display more information. • Because Pandora is shared. Requirements for Pandora® iPhone or iPod touch • Install the latest version of the Pandora application on the right of Pandora cannot be supported. - SPP (Serial Port Profile) - Selects from the list...

Instruction manual
Page 29
iHeartRadio (Only for DDX794/DDX774BH/DDX594/DDX574BH/DDX394) iHeartRadio is displayed, select the device to use on the screen. (Page 61) 3 Select "iHeartRadio" as the source. (Page 12) iHeartRadio application is started. &#... touch/iPhone with a cable (Page 82) or via Bluetooth (Page 53). - Playback operations You can stream iHeartRadio from iPod touch/ iPhone or Android devices. • Install the latest version of iPod touch/iPhone on . (Page 23) 2 Select the device to use . (Page 61) 1 3 2 Custom station screen: 1 3 2 Playback information 1 Picture data 2 Playback...
iHeartRadio (Only for DDX794/DDX774BH/DDX594/DDX574BH/DDX394) iHeartRadio is displayed, select the device to use on the screen. (Page 61) 3 Select "iHeartRadio" as the source. (Page 12) iHeartRadio application is started. &#... touch/iPhone with a cable (Page 82) or via Bluetooth (Page 53). - Playback operations You can stream iHeartRadio from iPod touch/ iPhone or Android devices. • Install the latest version of iPod touch/iPhone on . (Page 23) 2 Select the device to use . (Page 61) 1 3 2 Custom station screen: 1 3 2 Playback information 1 Picture data 2 Playback...

Instruction manual
Page 30
... to the top layer. • Press [ ] to return to the upper layer. 30 Requirements for iHeartRadio iPhone or iPod touch • Install the latest version of artists and track names. A2DP (Advanced Audio Distribution Profile) Android™ • Visit Google play and search for "iHeartRadio... • Bluetooth must be built in and the following profiles must be supported. - iHeartRadio ❏ Selecting the variety level for Auto" to install. • Bluetooth must be built in and the following profiles must be supported. - On the custom station screen: ❏ Searching for a...
... to the top layer. • Press [ ] to return to the upper layer. 30 Requirements for iHeartRadio iPhone or iPod touch • Install the latest version of artists and track names. A2DP (Advanced Audio Distribution Profile) Android™ • Visit Google play and search for "iHeartRadio... • Bluetooth must be built in and the following profiles must be supported. - iHeartRadio ❏ Selecting the variety level for Auto" to install. • Bluetooth must be built in and the following profiles must be supported. - On the custom station screen: ❏ Searching for a...

Instruction manual
Page 31
... (Page 53). - Be sure to the latest hits. You can operate Spotify using the remote controller*1. from connected iPod touch/iPhone or Android devices. • Install the latest version of iPod touch/iPhone on . (Page 23) 2 Select the device to use. (Page 61) 345 Playback information 1 Picture data 2 Track information •...
... (Page 53). - Be sure to the latest hits. You can operate Spotify using the remote controller*1. from connected iPod touch/iPhone or Android devices. • Install the latest version of iPod touch/iPhone on . (Page 23) 2 Select the device to use. (Page 61) 345 Playback information 1 Picture data 2 Track information •...

Instruction manual
Page 32
...) Android™ • Visit Google Play™ and search for "Spotify" in the Apple iTunes App Store to find and install the most recent version.) • Connect iPod touch/iPhone to install. • Bluetooth must be built in to the upper layer. Requirements for Spotify iPhone or iPod touch •...; Install the latest version of your smartphone application. Spotify ❏ Creating your smartphone or at www.spotify.com. • Establish an Internet connection using LTE,...
...) Android™ • Visit Google Play™ and search for "Spotify" in the Apple iTunes App Store to find and install the most recent version.) • Connect iPod touch/iPhone to install. • Bluetooth must be built in to the upper layer. Requirements for Spotify iPhone or iPod touch •...; Install the latest version of your smartphone application. Spotify ❏ Creating your smartphone or at www.spotify.com. • Establish an Internet connection using LTE,...

Instruction manual
Page 50
... the selected mark (2). Make sure that A and B are horizontally parallel, and that C and D are not displayed on the screen, touch the area shown on . • Install the rear view camera in the appropriate position according to the instructions supplied with the rear view camera. • When adjusting the parking guidelines, make...
... the selected mark (2). Make sure that A and B are horizontally parallel, and that C and D are not displayed on the screen, touch the area shown on . • Install the rear view camera in the appropriate position according to the instructions supplied with the rear view camera. • When adjusting the parking guidelines, make...

Instruction manual
Page 74
...children. DVD mode: Switch to leak fluid. with the remote controller. ❏ Battery installation Use two "AAA"/"R03"-size batteries. MODE/ TOP MENU Changes the aspect ratio. &#...Do not recharge, short, break up the incoming/current call. You can be operated using KENWOOD Remote APP. ENTER Enters options. Refer to this unit. V Caution: • Put...is possible that a child swallows the battery, immediately consult a physician. DDX794/DDX774BH/DDX594/DDX574BH/DDX394: Optional Remote Controller KNA-RCDV331 is designed for DDX7051BT/DDX794/DDX774BH/DDX751WBTL only. 74...
...children. DVD mode: Switch to leak fluid. with the remote controller. ❏ Battery installation Use two "AAA"/"R03"-size batteries. MODE/ TOP MENU Changes the aspect ratio. &#...Do not recharge, short, break up the incoming/current call. You can be operated using KENWOOD Remote APP. ENTER Enters options. Refer to this unit. V Caution: • Put...is possible that a child swallows the battery, immediately consult a physician. DDX794/DDX774BH/DDX594/DDX574BH/DDX394: Optional Remote Controller KNA-RCDV331 is designed for DDX7051BT/DDX794/DDX774BH/DDX751WBTL only. 74...

Instruction manual
Page 77
... provided. To prevent a short circuit, do not remove the caps on and off the unit when parking at a low ceiling area. ❏ Supplied accessories for installation 1 Wiring harness x 1 2 Trim plate x 1*1 3 Extension wire (2 m) x 1 4 Extraction keys x 2 *2 5 Flat head screws (M5 x 8 mm) x 6 *1 6 Round head screws (... x 6 mm) x 1 *5 = RCA cable x 1 *4 *1 Only for DDX7051BT/DDX794/DDX774BH/DDX594/DDX574BH/ DDX517BT/DDX417BT/DDX394. *2 Only for DDX794/DDX774BH/DDX594/DDX574BH/DDX394. *3 Only for DDX751WBTL. *4 Only for DDX7051BT/DDX751WBTL/DDX517BT/DDX417BT. *5 Only for DDX7051BT/DDX794/DDX774BH...
... provided. To prevent a short circuit, do not remove the caps on and off the unit when parking at a low ceiling area. ❏ Supplied accessories for installation 1 Wiring harness x 1 2 Trim plate x 1*1 3 Extension wire (2 m) x 1 4 Extraction keys x 2 *2 5 Flat head screws (M5 x 8 mm) x 6 *1 6 Round head screws (... x 6 mm) x 1 *5 = RCA cable x 1 *4 *1 Only for DDX7051BT/DDX794/DDX774BH/DDX594/DDX574BH/ DDX517BT/DDX417BT/DDX394. *2 Only for DDX794/DDX774BH/DDX594/DDX574BH/DDX394. *3 Only for DDX751WBTL. *4 Only for DDX7051BT/DDX751WBTL/DDX517BT/DDX417BT. *5 Only for DDX7051BT/DDX794/DDX774BH...
Instruction manual
Page 78
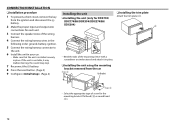
... ground, battery, ignition. 5 Connect the wiring harness connector to the unit. 6 Install the unit in your car. • Make sure that the unit is installed securely in place. CONNECTION/INSTALLATION ❏ Installation procedure 1 To prevent a short circuit, remove the key from the car 5 or ... ignition and disconnect the · battery. 2 Make the proper input and output wire Installing the unit ❏ Installing the unit (only for DDX794/ DDX774BH/DDX594/DDX574BH/ DDX394) ❏ Installing the trim plate Attach the trim plate (2). 2 connections for the mounting bracket: flat ...
... ground, battery, ignition. 5 Connect the wiring harness connector to the unit. 6 Install the unit in your car. • Make sure that the unit is installed securely in place. CONNECTION/INSTALLATION ❏ Installation procedure 1 To prevent a short circuit, remove the key from the car 5 or ... ignition and disconnect the · battery. 2 Make the proper input and output wire Installing the unit ❏ Installing the unit (only for DDX794/ DDX774BH/DDX594/DDX574BH/ DDX394) ❏ Installing the trim plate Attach the trim plate (2). 2 connections for the mounting bracket: flat ...

Instruction manual
Page 79
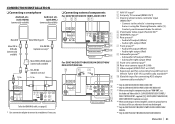
...used. Ignition key switch Fuse box Black (Ground wire) To car chassis Battery ENGLISH 79 CONNECTION/INSTALLATION Connection ❏ Connecting wires to the antenna terminal. *1 Only for DDX794/DDX774BH/DDX594/DDX574BH/DDX394. *2 Only for DDX417BT. *3 If no connections are made, do not let the ...Connect to the vehicle's parking brake detection switch harness. • For best safety, be sure to the power terminal for DDX794/DDX774BH/DDX594/DDX574BH/DDX417BT/DDX394 10 A fuse *1 See page 83. *2 USB terminal (1.0 m): See page 82. Connect the antenna cord to terminals for the...
...used. Ignition key switch Fuse box Black (Ground wire) To car chassis Battery ENGLISH 79 CONNECTION/INSTALLATION Connection ❏ Connecting wires to the antenna terminal. *1 Only for DDX794/DDX774BH/DDX594/DDX574BH/DDX394. *2 Only for DDX417BT. *3 If no connections are made, do not let the ...Connect to the vehicle's parking brake detection switch harness. • For best safety, be sure to the power terminal for DDX794/DDX774BH/DDX594/DDX574BH/DDX417BT/DDX394 10 A fuse *1 See page 83. *2 USB terminal (1.0 m): See page 82. Connect the antenna cord to terminals for the...

Instruction manual
Page 80
... light control switch. To the power control terminal when using the optional rear view camera. See page 83. 1 See page 84. See page 83. CONNECTION/INSTALLATION ❏ Connecting wires to terminals for the booster amplifier of the motor antenna or to connect the parking sensor.
... light control switch. To the power control terminal when using the optional rear view camera. See page 83. 1 See page 84. See page 83. CONNECTION/INSTALLATION ❏ Connecting wires to terminals for the booster amplifier of the motor antenna or to connect the parking sensor.

Instruction manual
Page 81
... antenna cord to the 3 vehicle's parking USB terminal (1.0 m): See page 82. Light green (Parking sensor wire) Connect to the antenna terminal. See page 83. CONNECTION/INSTALLATION ❏ Connecting wires to the vehicle's steering remote harness. • Depending on the type of vehicle, it cannot be connected. See page 83.
... antenna cord to the 3 vehicle's parking USB terminal (1.0 m): See page 82. Light green (Parking sensor wire) Connect to the antenna terminal. See page 83. CONNECTION/INSTALLATION ❏ Connecting wires to the vehicle's steering remote harness. • Depending on the type of vehicle, it cannot be connected. See page 83.

Instruction manual
Page 82
HDMI/MHL cable 82 CONNECTION/INSTALLATION ❏ Connecting a USB device USB device* (commercially available) 1.0 m ❏ Connecting iPod/iPhone iPod/iPhone (Lightning connector models) (commercially available) A KCA-iP103 (0.8 m) (optional accessory) iPod/iPhone (...
HDMI/MHL cable 82 CONNECTION/INSTALLATION ❏ Connecting a USB device USB device* (commercially available) 1.0 m ❏ Connecting iPod/iPhone iPod/iPhone (Lightning connector models) (commercially available) A KCA-iP103 (0.8 m) (optional accessory) iPod/iPhone (...
Instruction manual
Page 83
CONNECTION/INSTALLATION ❏ Connecting a smartphone Android, etc. (with HDMI) (commercially available) ...KCA-HD100 (optional accessory) 1.8 m 1.8 m FRONT VIEW CAMERA REAR VIEW CAMERA VIDEO OUT For DDX794/DDX774BH/DDX594/DDX574BH/ DDX417BT/DDX394 To fix the HDMI/MHL cable, see page 82. * Use a conversion adapter to connect to ... (REMO OUT) 3 Steering wheel remote controller input (REMO IN)*2 • Connect to smartphones if necessary. ENGLISH 83 Contact your Kenwood dealer for details. 4 iPod/Audio Video input (iPod/AV-IN)*3 5 HDMI/MHL input*1 6 Rear preout*4 • Audio left...
CONNECTION/INSTALLATION ❏ Connecting a smartphone Android, etc. (with HDMI) (commercially available) ...KCA-HD100 (optional accessory) 1.8 m 1.8 m FRONT VIEW CAMERA REAR VIEW CAMERA VIDEO OUT For DDX794/DDX774BH/DDX594/DDX574BH/ DDX417BT/DDX394 To fix the HDMI/MHL cable, see page 82. * Use a conversion adapter to connect to ... (REMO OUT) 3 Steering wheel remote controller input (REMO IN)*2 • Connect to smartphones if necessary. ENGLISH 83 Contact your Kenwood dealer for details. 4 iPod/Audio Video input (iPod/AV-IN)*3 5 HDMI/MHL input*1 6 Rear preout*4 • Audio left...

Instruction manual
Page 84
...the microphone (8) to the MIC terminal. • To install the microphone, peel off the adhesive tape, fix on the installation position, then adjust the direction of the microphone to the car with clamps (commercially available). After installing, fix the microphone cable to face the driver. Lower... two catches. • Be careful to avoid injury from the top side in the same manner. 84 CONNECTION/INSTALLATION ❏ Connecting microphone for DDX794/ DDX774BH/DDX594/DDX574BH/DDX394) ❏ Removing the trim plate 1 Engage the catch pins on the extraction key (4) and remove the...
...the microphone (8) to the MIC terminal. • To install the microphone, peel off the adhesive tape, fix on the installation position, then adjust the direction of the microphone to the car with clamps (commercially available). After installing, fix the microphone cable to face the driver. Lower... two catches. • Be careful to avoid injury from the top side in the same manner. 84 CONNECTION/INSTALLATION ❏ Connecting microphone for DDX794/ DDX774BH/DDX594/DDX574BH/DDX394) ❏ Removing the trim plate 1 Engage the catch pins on the extraction key (4) and remove the...


