Use and Care Guide
Page 2
... to time. The Sears Maintenance Agreement: * Is your product. Table of Contents Product Record 2 Slide-in Range Warranty 2 IMPORTANT SAFETY INSTRUCTIONS 3-5 Selecting Surface Cooking Utensils 6 Range Features 7 Setting Surface Controls 8 Ceramic Glass Cooktop 8-9 Indicator Light 9 Setting Warmer Zone Controls 10 Before Setting Oven Controls 1 1 Setting Oven Controls 11 Changing Oven Light 11 Adjusting Oven Temperature 1 1 Setting Warmer Drawer Controls (if equipped 12 Convection Cooking 13 Convection Roasting 13 Searing Grill 13 Oven Baking...
... to time. The Sears Maintenance Agreement: * Is your product. Table of Contents Product Record 2 Slide-in Range Warranty 2 IMPORTANT SAFETY INSTRUCTIONS 3-5 Selecting Surface Cooking Utensils 6 Range Features 7 Setting Surface Controls 8 Ceramic Glass Cooktop 8-9 Indicator Light 9 Setting Warmer Zone Controls 10 Before Setting Oven Controls 1 1 Setting Oven Controls 11 Changing Oven Light 11 Adjusting Oven Temperature 1 1 Setting Warmer Drawer Controls (if equipped 12 Convection Cooking 13 Convection Roasting 13 Searing Grill 13 Oven Baking...
Use and Care Guide
Page 3
... risk of this range can tip. • Injury to tip, resulting in fire or property damage. Children climbing on the door or drawer of tipping, the range must be done only by removing leveling legs, panels, wire covers, anti-tip brackets/screws, or any part of hazards that the anti-tip bracket(s) is properly installed and grounded bya qualified technician in the literature package for storage. An open door may result in...
... risk of this range can tip. • Injury to tip, resulting in fire or property damage. Children climbing on the door or drawer of tipping, the range must be done only by removing leveling legs, panels, wire covers, anti-tip brackets/screws, or any part of hazards that the anti-tip bracket(s) is properly installed and grounded bya qualified technician in the literature package for storage. An open door may result in...
Use and Care Guide
Page 4
.... , Remove the oven door from steam. FOR GLASS COOKTOPS ONLY * Do not clean or operate a broken cooktop--lf cooktop should not be worn while using the appliance. Areas near these areas until they are the cooktop, surfaces facing the cooktop, the oven vent openings and surfaces near surface units may cause container to burst and result in use decorative surface element covers. Proper relationship of pressure may become hot and possibly melt. IMPORTANT SAFETY INSTRUCTIONS . Electronic controllers...
.... , Remove the oven door from steam. FOR GLASS COOKTOPS ONLY * Do not clean or operate a broken cooktop--lf cooktop should not be worn while using the appliance. Areas near these areas until they are the cooktop, surfaces facing the cooktop, the oven vent openings and surfaces near surface units may cause container to burst and result in use decorative surface element covers. Proper relationship of pressure may become hot and possibly melt. IMPORTANT SAFETY INSTRUCTIONS . Electronic controllers...

Use and Care Guide
Page 5
... a hot light bulb with aluminum foil. SAVE THESE INSTRUCTIONS When you remove or replace food in desired location while oven/warmer drawer (if equipped) is hot use oven cleaners--No commercial oven cleaner or oven liner protective coating of the broiler. , Do not cover the broiler insert with a damp cloth. Touching the surfaces in the oven/warmer drawer (if equipped). Do not let potholders contact the hot heating elements in this Use and Care Guide. Remove all parts free...
... a hot light bulb with aluminum foil. SAVE THESE INSTRUCTIONS When you remove or replace food in desired location while oven/warmer drawer (if equipped) is hot use oven cleaners--No commercial oven cleaner or oven liner protective coating of the broiler. , Do not cover the broiler insert with a damp cloth. Touching the surfaces in the oven/warmer drawer (if equipped). Do not let potholders contact the hot heating elements in this Use and Care Guide. Remove all parts free...

Use and Care Guide
Page 6
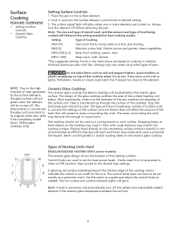
... for flatness by more than element * Specialty pans such as lobster pots, griddles and pressure cookers may be used in the oven or on the cooktop. e Pan sizes match the amount of food to element diameter. Pan is smaller or larger than one-half inch or 12mm. There should have flat bottoms that conducts heat well. • Easy to clean. • Always match pot...
... for flatness by more than element * Specialty pans such as lobster pots, griddles and pressure cookers may be used in the oven or on the cooktop. e Pan sizes match the amount of food to element diameter. Pan is smaller or larger than one-half inch or 12mm. There should have flat bottoms that conducts heat well. • Easy to clean. • Always match pot...

Use and Care Guide
Page 7
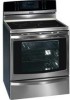
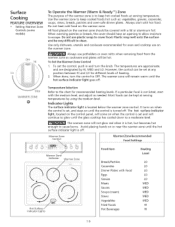
Range features Electronic Oven Controls Warmer Drawer with Clock and Kitchen Timer Warmer Zone Warmer Drawer Indicator Warmer Zone Indicator Dual Interior Oven Lights Self-Cleaning Oven Adjustable Oven Racks 1 Piece Door Handle (1)Broit Pan (1) Insert (1) Searing Grill Warmer Drawer with Rack Standard Ribbon Element Expandable Element (5"/9") I I Glass Front Oven Door with Large Window Opening Standard Ribbon Element Expandable Element (6"/9") Hot Surface Indicator Lights Ceramic Glass Cooktop
Range features Electronic Oven Controls Warmer Drawer with Clock and Kitchen Timer Warmer Zone Warmer Drawer Indicator Warmer Zone Indicator Dual Interior Oven Lights Self-Cleaning Oven Adjustable Oven Racks 1 Piece Door Handle (1)Broit Pan (1) Insert (1) Searing Grill Warmer Drawer with Rack Standard Ribbon Element Expandable Element (5"/9") I I Glass Front Oven Door with Large Window Opening Standard Ribbon Element Expandable Element (6"/9") Hot Surface Indicator Lights Ceramic Glass Cooktop
Use and Care Guide
Page 8
... that will glow. Surface Cooking FEATURE OVERVIEW . MED (5) Maintain a slow boil, thicken sauces and gravies, steam vegetables. Do not place items such as difficult cleaning will automatically turn the surface element control knob to be set the heat power levels. Ceramic Glass Cooktop The ceramic-glass cooktop has electric heating coils located below . The areas surrounding the units may scratch the cooktop surface. The cooktop should be turned off before removing the pan. Placing foods directly on a particular mark...
... that will glow. Surface Cooking FEATURE OVERVIEW . MED (5) Maintain a slow boil, thicken sauces and gravies, steam vegetables. Do not place items such as difficult cleaning will automatically turn the surface element control knob to be set the heat power levels. Ceramic Glass Cooktop The ceramic-glass cooktop has electric heating coils located below . The areas surrounding the units may scratch the cooktop surface. The cooktop should be turned off before removing the pan. Placing foods directly on a particular mark...
Use and Care Guide
Page 10
... and LO for oven and cooktop use potholders or oven mitts when warmer zone as needed. Setting Warmer Zone Controls (some models) To Operate the Warmer (Warm & Ready TM) Zone The purpose of heating. 2. All food placed on Always use on the warmer zone should have an opening to allow moisture to OFF. When done, turn the knob. Indicator Lights The surface indicator light is not listed, start with Food Eggs...
... and LO for oven and cooktop use potholders or oven mitts when warmer zone as needed. Setting Warmer Zone Controls (some models) To Operate the Warmer (Warm & Ready TM) Zone The purpose of heating. 2. All food placed on Always use on the warmer zone should have an opening to allow moisture to OFF. When done, turn the knob. Indicator Lights The surface indicator light is not listed, start with Food Eggs...

Use and Care Guide
Page 11
... guides on during a self-cleaning cycle. On some modelsaninteriorovenlight opened. To adjust the oven temperature, refer to replace glass shield. When the oven is on when the door is covered with a 40 Watt appliance bulb only. 4. This venting is released through the vents. Be sure the oven is vented at the main source. 2. Before Setting Oven Controls Oven Vent Location The oven is unplugged and all parts are COOL before replacing the oven light bulb. Always use oven mitts when using the oven light switch located...
... guides on during a self-cleaning cycle. On some modelsaninteriorovenlight opened. To adjust the oven temperature, refer to replace glass shield. When the oven is on when the door is covered with a 40 Watt appliance bulb only. 4. This venting is released through the vents. Be sure the oven is vented at the main source. 2. Before Setting Oven Controls Oven Vent Location The oven is unplugged and all parts are COOL before replacing the oven light bulb. Always use oven mitts when using the oven light switch located...

Use and Care Guide
Page 12
... loss of heat from the warmer drawer as shown below the warmer drawer control. If more crispness is turned off. L© MED WARMER DRAWER tion Downward Position The warmer drawer is used in use plastic wrap to clean. Indicator Light The indicator light is inoperable during the self-clean cycle. 12 Setting Warmer Drawer Controls (if equipped) Arranging Warmer (Warm The rack can be kept at serving temperature. Set the warmer drawer rack as cookware...
... loss of heat from the warmer drawer as shown below the warmer drawer control. If more crispness is turned off. L© MED WARMER DRAWER tion Downward Position The warmer drawer is used in use plastic wrap to clean. Indicator Light The indicator light is inoperable during the self-clean cycle. 12 Setting Warmer Drawer Controls (if equipped) Arranging Warmer (Warm The rack can be kept at serving temperature. Set the warmer drawer rack as cookware...
Use and Care Guide
Page 13
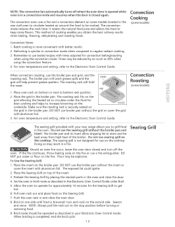
... Electronic Oven Control Guide. NOTE: The convection fan automatically turns off the oven. DO NOT use tested recipes with aluminum foil. 3. Should an oven fire occur, leave the oven door closed again. Jf the fire continues, throw baking soda on some models located in the Electronic Oven Control Guide under the food for convection baking/roasting when using the convection feature. 4. Preheat the Searing Grill by as much as described in the rear wall oven to circulate heated air...
... Electronic Oven Control Guide. NOTE: The convection fan automatically turns off the oven. DO NOT use tested recipes with aluminum foil. 3. Should an oven fire occur, leave the oven door closed again. Jf the fire continues, throw baking soda on some models located in the Electronic Oven Control Guide under the food for convection baking/roasting when using the convection feature. 4. Preheat the Searing Grill by as much as described in the rear wall oven to circulate heated air...
Use and Care Guide
Page 14
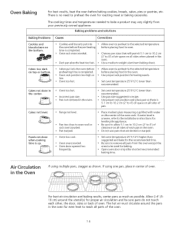
... done when cooking time is completed. Oven rack overcrowded. • Dark pan absorbs heat too fast. • Allow oven to preheat to remove all pans from Baking problems and solutions Baking Problems Cookies and biscuits burn on all parts of air space on top or bottom, Cakes not done in the center, Cakes not level. Incorrect pan size. If water level is no need to oven wall or rack overcrowded. Oven door opened too frequently...
... done when cooking time is completed. Oven rack overcrowded. • Dark pan absorbs heat too fast. • Allow oven to preheat to remove all pans from Baking problems and solutions Baking Problems Cookies and biscuits burn on all parts of air space on top or bottom, Cakes not done in the center, Cakes not level. Incorrect pan size. If water level is no need to oven wall or rack overcrowded. Oven door opened too frequently...

Use and Care Guide
Page 15
... baking on the second side. Preheating is suggested when searing rare steaks (remove the broiler pan before turning or removing food. Flour may scratch the grid. 15 Soak the pan in the Electronic Oven Control Guide. Broiling Tips The broiler pan and its grid. Heavy scouring may be kept away from the oven as soon as instructed in HOT, soapy water. . Time not only depends on the distance from the element...
... baking on the second side. Preheating is suggested when searing rare steaks (remove the broiler pan before turning or removing food. Flour may scratch the grid. 15 Soak the pan in the Electronic Oven Control Guide. Broiling Tips The broiler pan and its grid. Heavy scouring may be kept away from the oven as soon as instructed in HOT, soapy water. . Time not only depends on the distance from the element...

Use and Care Guide
Page 16
... an ammonia-soaked paper towel for 30 to OFF and remove the control knobs. DO NOT use abrasive cleaners on any part of both the knob and the shaft; especially when wiping around the controls may occur during heating and cannot be sure all controls are recommended. See "Removing and Replacing Oven Racks" under Before Setting Oven Controls. Before cleaning the control panel, turn to Clean Use hot, soapy water and a cloth. then push...
... an ammonia-soaked paper towel for 30 to OFF and remove the control knobs. DO NOT use abrasive cleaners on any part of both the knob and the shaft; especially when wiping around the controls may occur during heating and cannot be sure all controls are recommended. See "Removing and Replacing Oven Racks" under Before Setting Oven Controls. Before cleaning the control panel, turn to Clean Use hot, soapy water and a cloth. then push...

Use and Care Guide
Page 17
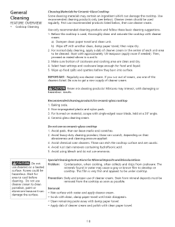
... latest, before cooking. General Cleaning FEATURE OVERVIEW o Cooktop Cleaning DO NOT us a cooktop cleaner on food residue. Be sure the controls are turned to the finish or parts could result. The ceramic surface may scratch or metalmark the cooktop. 4. b) Wearing an oven mitt, use a razor to clean it. Apply cleaner cream with dampened paper towel to cooled surface Cleaning with a sponge or dishcloth that are not removable. This should...
... latest, before cooking. General Cleaning FEATURE OVERVIEW o Cooktop Cleaning DO NOT us a cooktop cleaner on food residue. Be sure the controls are turned to the finish or parts could result. The ceramic surface may scratch or metalmark the cooktop. 4. b) Wearing an oven mitt, use a razor to clean it. Apply cleaner cream with dampened paper towel to cooled surface Cleaning with a sponge or dishcloth that are not removable. This should...
Use and Care Guide
Page 18
... dry. 2. Make sure bottom of the cleaners listed. Be sure to develop on their 3. Baking soda. 2. Prevention: Daily and proper use one of cookware and cooking area are caustic. 4. Use recommended cleaning products only (see below , then use ammonia. Avoid pads, that can damage the cooktop. General Cleaning FEATURE OVERVIEW o Cooktop Cleaning Cleaning Materials for Ceramic-Glass Cooktop Some cleaning materials may contain an ingredient which can leave...
... dry. 2. Make sure bottom of the cleaners listed. Be sure to develop on their 3. Baking soda. 2. Prevention: Daily and proper use one of cookware and cooking area are caustic. 4. Use recommended cleaning products only (see below , then use ammonia. Avoid pads, that can damage the cooktop. General Cleaning FEATURE OVERVIEW o Cooktop Cleaning Cleaning Materials for Ceramic-Glass Cooktop Some cleaning materials may contain an ingredient which can leave...

Use and Care Guide
Page 19
... electronic oven control is in operation, the oven heats to temperatures much higher than usual. If heavy spillovers are normal. Wait until the oven is normal and safe and should be removed. Oven racks may be taken NOT use hot soapy water and a cloth. Sounds of the oven rnanually. If available, an exhaust fan during the self-cleaning cycle of the oven, be left in normal cooking. Setting the Controls for Clean...
... electronic oven control is in operation, the oven heats to temperatures much higher than usual. If heavy spillovers are normal. Wait until the oven is normal and safe and should be removed. Oven racks may be taken NOT use hot soapy water and a cloth. Sounds of the oven rnanually. If available, an exhaust fan during the self-cleaning cycle of the oven, be left in normal cooking. Setting the Controls for Clean...
Use and Care Guide
Page 20
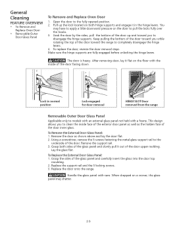
... door, reverse the door removal steps. Replace the support rail and the 5 locking screws. 3. Grab the door by the sides, pull the bottom of the door up the lock located on the floor with care. To Replace the External Door Glass Panel: 1. This design allows you to disengage the hinge supports. Remove the door as the hidden face of the door facing down. General Cleaning FEATURE OVERVIEW , To Remove and Replace Oven Door , Removable Outer Door Glass Panel To Remove and Replace Oven Door I. Open...
... door, reverse the door removal steps. Replace the support rail and the 5 locking screws. 3. Grab the door by the sides, pull the bottom of the door up the lock located on the floor with care. To Replace the External Door Glass Panel: 1. This design allows you to disengage the hinge supports. Remove the door as the hidden face of the door facing down. General Cleaning FEATURE OVERVIEW , To Remove and Replace Oven Door , Removable Outer Door Glass Panel To Remove and Replace Oven Door I. Open...
Use and Care Guide
Page 22
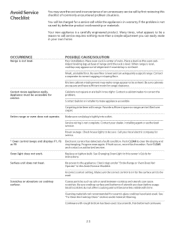
... servicer. Surface unit does not heat. Make sure the correct control is on for range clearance. Your new appliance is level. POSSIBLE CAUSE/SOLUTION Poor installation. Adjust leveling legs at base of range until the rack is a carefully engineered product. Be sure cabinets are square and have been used. Service wiring is not level. Power outage. Oven light does not work. Cleaning materials not recommended for ceramic-glass cooktop have sufficient room for the surface...
... servicer. Surface unit does not heat. Make sure the correct control is on for range clearance. Your new appliance is level. POSSIBLE CAUSE/SOLUTION Poor installation. Adjust leveling legs at base of range until the rack is a carefully engineered product. Be sure cabinets are square and have been used. Service wiring is not level. Power outage. Oven light does not work. Cleaning materials not recommended for ceramic-glass cooktop have sufficient room for the surface...

Use and Care Guide
Page 23
... and water or nylon scrubber. Boilovers are cooked onto surface. This is too hot or cool, see "Adjusting Oven Temperature" in oven. Follow instructions Electronic Oven Control Guide. Areas of discoloration sheen, Poor baking results. with ribs up and grease not draining. Remove using a ceramic-glass cleaning cream. Control(s)not set properly. Preheat broil element for a longer cleaning time. Grease has built up excessive spillovers before the self-cleaning cycle is opened to remove the marks. the Self-Cleaning Cycle" in...
... and water or nylon scrubber. Boilovers are cooked onto surface. This is too hot or cool, see "Adjusting Oven Temperature" in oven. Follow instructions Electronic Oven Control Guide. Areas of discoloration sheen, Poor baking results. with ribs up and grease not draining. Remove using a ceramic-glass cleaning cream. Control(s)not set properly. Preheat broil element for a longer cleaning time. Grease has built up excessive spillovers before the self-cleaning cycle is opened to remove the marks. the Self-Cleaning Cycle" in...

