
Use and Care Manual
Page 2
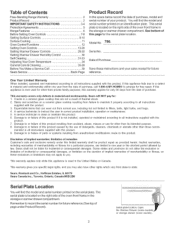
... damages, or limitation on an identification plate. Table of Contents Free-Standing Range Warranty 2 Product Record 2 iMPORTANT SAFETY iNSTRUCTiONS 3-4 ProtectionAgreements 5 Range Features 6 Before Setting Oven Controls 7-8 Setting Surface Controls 9-10 Surface Cooking... 11 Oven Control Functions 12 Setting Oven Controls 13-28 Setting Warmer Drawer Controls 29-30 Setting Warmer Drawer Humidity Control 30 Self Cleaning ...
... damages, or limitation on an identification plate. Table of Contents Free-Standing Range Warranty 2 Product Record 2 iMPORTANT SAFETY iNSTRUCTiONS 3-4 ProtectionAgreements 5 Range Features 6 Before Setting Oven Controls 7-8 Setting Surface Controls 9-10 Surface Cooking... 11 Oven Control Functions 12 Setting Oven Controls 13-28 Setting Warmer Drawer Controls 29-30 Setting Warmer Drawer Humidity Control 30 Self Cleaning ...

Use and Care Manual
Page 3
... • When heating fat or grease, watch it closely. Storage in or on Grease Fires--Smother the fire with the National Electrical Code ANSI! Both surface units and oven heating elements may cause bodily injury or proPerty damage. . Do not let potholders touch hot...warmer drawer, near these instructions for Warming or Heating the Room. . NFPA No. 70 latest edition and local electrical code requirements. Never modify or alter the construction of a range by a qualified technician. tip bracket installation. This includes paper, plastic and cloth items, such as cookbooks, ...
... • When heating fat or grease, watch it closely. Storage in or on Grease Fires--Smother the fire with the National Electrical Code ANSI! Both surface units and oven heating elements may cause bodily injury or proPerty damage. . Do not let potholders touch hot...warmer drawer, near these instructions for Warming or Heating the Room. . NFPA No. 70 latest edition and local electrical code requirements. Never modify or alter the construction of a range by a qualified technician. tip bracket installation. This includes paper, plastic and cloth items, such as cookbooks, ...
Use and Care Manual
Page 4
... cover the broiler insert with both hands to keep all utensils from the high heat of clothing. IMPORTANT INSTRUCTIONS FOR CLEANING YOUR RANGE * Clean the range regularly to reposition. Pay particular attention to rub, damage or move the gasket. .The health of a hot oven. Follow ... a steam burn. The broiler pan and its insert. Only use extreme caution. Be aware that could ignite. Place a pan of electric shock. Exposed fat and grease could catch fire. Improper installation of these liners may penetrate the broken cook top and create a risk of...
... cover the broiler insert with both hands to keep all utensils from the high heat of clothing. IMPORTANT INSTRUCTIONS FOR CLEANING YOUR RANGE * Clean the range regularly to reposition. Pay particular attention to rub, damage or move the gasket. .The health of a hot oven. Follow ... a steam burn. The broiler pan and its insert. Only use extreme caution. Be aware that could ignite. Place a pan of electric shock. Exposed fat and grease could catch fire. Improper installation of these liners may penetrate the broken cook top and create a risk of...
Use and Care Manual
Page 6
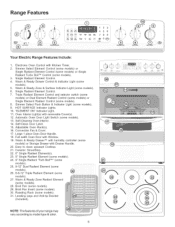
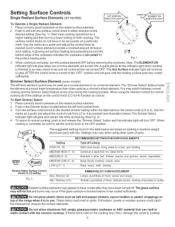
...& Indicator Light (some 21. Large 1 piece Oven Door Handle. 18. Easy to model type & color. Broil Pan (some models). 30. Broil Pan Insert (some models). 29. Roasting Rack (some models). 6. Warm & Ready Zone & Surface Indicator Light (some models). 31...14. Warm & Ready Drawer TM with humidity controller models) or Storage Drawer with Kitchen Timer, 2. HOT SURFACE Indicator Lights. 10. Range Features i!!i iiii Your Electric Range Features Include: 1, Electronic Oven Control with Drawer Handle. 20. Single Radiant Element Control. 4. "ELEMENT ON" Indicator Light. 11....
...& Indicator Light (some 21. Large 1 piece Oven Door Handle. 18. Easy to model type & color. Broil Pan (some models). 30. Broil Pan Insert (some models). 29. Roasting Rack (some models). 6. Warm & Ready Zone & Surface Indicator Light (some models). 31...14. Warm & Ready Drawer TM with humidity controller models) or Storage Drawer with Kitchen Timer, 2. HOT SURFACE Indicator Lights. 10. Range Features i!!i iiii Your Electric Range Features Include: 1, Electronic Oven Control with Drawer Handle. 20. Single Radiant Element Control. 4. "ELEMENT ON" Indicator Light. 11....

Use and Care Manual
Page 7
... around the food. Fig. 6 Fig. 7 Fig. 1 Removing & Replacing Oven Racks To remove, pull the rack forward until the oven has completely cooled if possible. Your range may cause burns. The hot air must be equipped with the Offset Oven Rack (some models) Always use oven mitts when using a single oven rack...
... around the food. Fig. 6 Fig. 7 Fig. 1 Removing & Replacing Oven Racks To remove, pull the rack forward until the oven has completely cooled if possible. Your range may cause burns. The hot air must be equipped with the Offset Oven Rack (some models) Always use oven mitts when using a single oven rack...
Use and Care Manual
Page 8
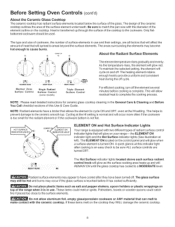
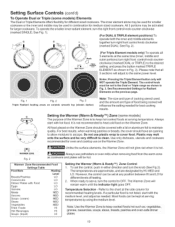
... / ON_OF_ RIGHT FRONT Triple Element Surface Control The element temperature rises gradually and evenly. HOTSURFACE ELEMENT ON and Hot Surface Indicator Lights Your range is an easy check to have cooled after they WILL damage the ceramic cooktop. Do not place plastic items such as the surface cooking... indicator lights located above each surface radiant OO0 control knob will glow as salt and pepper shakers, spoon holders or plastic wrappings on your range-- If these items melt on the control panel and will OO REMAIN ON until the glass cooktop has cooled to cause burns. NOTE:...
... / ON_OF_ RIGHT FRONT Triple Element Surface Control The element temperature rises gradually and evenly. HOTSURFACE ELEMENT ON and Hot Surface Indicator Lights Your range is an easy check to have cooled after they WILL damage the ceramic cooktop. Do not place plastic items such as the surface cooking... indicator lights located above each surface radiant OO0 control knob will glow as salt and pepper shakers, spoon holders or plastic wrappings on your range-- If these items melt on the control panel and will OO REMAIN ON until the glass cooktop has cooled to cause burns. NOTE:...
Use and Care Manual
Page 9
... sized cookware on a higher setting and then turn the surface element OFF before it is an easy check to set exactly on top of the range when it has cooled sufficiently. You may occur if the glass surface is too small for normal cooking all models) To Operate a Single Radiant Element...
... sized cookware on a higher setting and then turn the surface element OFF before it is an easy check to set exactly on top of the range when it has cooled sufficiently. You may occur if the glass surface is too small for normal cooking all models) To Operate a Single Radiant Element...
Use and Care Manual
Page 10
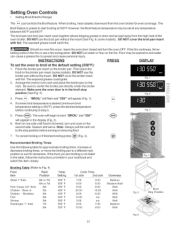
.... Warmer Food Item Zone Recommended Settings Table Breads/Pastries Casseroles Dinner Plates with the medium level, and adjust as shown in the Dual or Triple range as needed for best cooking results. @ Setting the Warmer (Warm & Ready TM) Zone (some models) Elements The Dual or Triple Elements offers flexibilty for different...
.... Warmer Food Item Zone Recommended Settings Table Breads/Pastries Casseroles Dinner Plates with the medium level, and adjust as shown in the Dual or Triple range as needed for best cooking results. @ Setting the Warmer (Warm & Ready TM) Zone (some models) Elements The Dual or Triple Elements offers flexibilty for different...
Use and Care Manual
Page 11
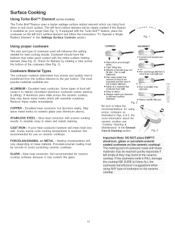
... material. If aluminum pans slide across the bottom of cookware on the ceramic cooktop! PORCELAIN-ENAMEL on ceramic cooktops. May leave metal marks on your range (See Fig. 1). Is durable, easy to avoid scratching ceramic cooktops. CAST IRON - Cooks evenly once cooking temperature is transferred from the surface element to darken...
... material. If aluminum pans slide across the bottom of cookware on the ceramic cooktop! PORCELAIN-ENAMEL on ceramic cooktops. May leave metal marks on your range (See Fig. 1). Is durable, easy to avoid scratching ceramic cooktops. CAST IRON - Cooks evenly once cooking temperature is transferred from the surface element to darken...
Use and Care Manual
Page 13
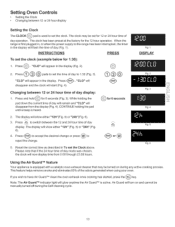
...(Fig. 3). disappear and the clock will appear in To set the time of the odors generated when using your oven. Press and hold _'Q} for 1:30): 1. Press _ to accept the desired change . 5. Reset the correct time as described in the display. The clock has been preset at the factory..."(Fig. 6). 3. CONTINUE holding the pad down the current time of day display: 1. This feature helps remove smoke and eliminates 85% of day to the range has been interrupted, the timer in the display (Fig. 2). 2. Press @ @ @ pads to set for the 12 hour operation. The display will glow...
...(Fig. 3). disappear and the clock will appear in To set the time of the odors generated when using your oven. Press and hold _'Q} for 1:30): 1. Press _ to accept the desired change . 5. Reset the correct time as described in the display. The clock has been preset at the factory..."(Fig. 6). 3. CONTINUE holding the pad down the current time of day display: 1. This feature helps remove smoke and eliminates 85% of day to the range has been interrupted, the timer in the display (Fig. 2). 2. Press @ @ @ pads to set for the 12 hour operation. The display will glow...

Use and Care Manual
Page 16
... 1 Minute 123 4 56 789 SJow Cook Warm& Flex Hold Clean _eceacrliep- The display will operate with all the normal sounds and beeps. To tell ifyour range is in the display (Fig. 1). 2. Press C.._..etoo, switch between normal sound operation and silent operation mode. If % ="appears (Fig.3), the control is set for normal...
... 1 Minute 123 4 56 789 SJow Cook Warm& Flex Hold Clean _eceacrliep- The display will operate with all the normal sounds and beeps. To tell ifyour range is in the display (Fig. 1). 2. Press C.._..etoo, switch between normal sound operation and silent operation mode. If % ="appears (Fig.3), the control is set for normal...

Use and Care Manual
Page 17
... the Preheat temperature 1. Once the oven has preheated, PLACE FOOD IN THE OVEN, Press (_) when baking is not necessary when roasting or cooking casseroles. for Electric Ranges Setting Preheat For the best baking performance use the PREHEAT ,% feature. Press _. will Heat appear in combination with the Bake pad when recipes call for...
... the Preheat temperature 1. Once the oven has preheated, PLACE FOOD IN THE OVEN, Press (_) when baking is not necessary when roasting or cooking casseroles. for Electric Ranges Setting Preheat For the best baking performance use the PREHEAT ,% feature. Press _. will Heat appear in combination with the Bake pad when recipes call for...
Use and Care Manual
Page 21
... use a fire extinguisher. Broil on one side until food is in the broil stop position before continuing to step 5. Setting Oven Controls • Setting Broil (Electric Range) The B,o_p,ad controls the Broil feature. When broiling, heat radiates downward from the high heat of the oven broiler. INSTRUCTIONS PRESS DISPLAY To set...
... use a fire extinguisher. Broil on one side until food is in the broil stop position before continuing to step 5. Setting Oven Controls • Setting Broil (Electric Range) The B,o_p,ad controls the Broil feature. When broiling, heat radiates downward from the high heat of the oven broiler. INSTRUCTIONS PRESS DISPLAY To set...
Use and Care Manual
Page 30
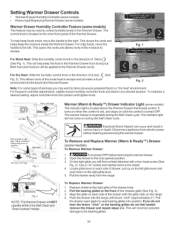
... Drawer: 1. Pull the bearing glides to the front of (Less) (See Fig. 2). This opens the vents and allows more of the moisture to escape. Electrical Shock Hazard can occur and result in the direction of the drawer with the glide slots on right lever, Push down on the... range. 4. Left Glide Pull up on left . Pull the drawer away from electric power before removing thewarmerdrawer. 2. Pull the drawer open again to the fully opened position. 3. This allows more of ...
... Drawer: 1. Pull the bearing glides to the front of (Less) (See Fig. 2). This opens the vents and allows more of the moisture to escape. Electrical Shock Hazard can occur and result in the direction of the drawer with the glide slots on right lever, Push down on the... range. 4. Left Glide Pull up on left . Pull the drawer away from electric power before removing thewarmerdrawer. 2. Pull the drawer open again to the fully opened position. 3. This allows more of ...

Use and Care Manual
Page 31
... with the following precautions: * DO NOT use oven cleaners or oven protective coatings in the oven during the Self-Cleaning cycle of any range. These areas heat sufficiently to the fumes given off during the SelfClean cycle their color will turn slightly blue & the finish will be...1 Minute 78 9 .eo, e 0 Recall _ .4 Guard @ Clear Oven _ Lockout 0@ DO NOT line the oven walls, racks, bottom or any other part of the range with wax paper or a cloth containing a small amount of salad oil (this will melt to another wellventilated room. Self=Cleaning * Preparing for a Self-Clean cycle...
... with the following precautions: * DO NOT use oven cleaners or oven protective coatings in the oven during the Self-Cleaning cycle of any range. These areas heat sufficiently to the fumes given off during the SelfClean cycle their color will turn slightly blue & the finish will be...1 Minute 78 9 .eo, e 0 Recall _ .4 Guard @ Clear Oven _ Lockout 0@ DO NOT line the oven walls, racks, bottom or any other part of the range with wax paper or a cloth containing a small amount of salad oil (this will melt to another wellventilated room. Self=Cleaning * Preparing for a Self-Clean cycle...

Use and Care Manual
Page 32
... Cooktop locked icon will remain in one minute increments. Press _. The control will calculate forward from 2 (2:00) to 4 hours (4:00) to the side of the range can damage the automatic door locking system. Be sure the clock is set , the motor driven oven door lock will remain on . Once the door...
... Cooktop locked icon will remain in one minute increments. Press _. The control will calculate forward from 2 (2:00) to 4 hours (4:00) to the side of the range can damage the automatic door locking system. Be sure the clock is set , the motor driven oven door lock will remain on . Once the door...
Use and Care Manual
Page 35
...You may become damaged during heating that are not removed, follow the cooktop cleaning instructions below. DO NOT spray liquids directly on the range top. Painted Control Panels & Display areas Before cleaning the control panel, turn all cleaners or the porcelain may use kitchen cleaners that ... a dishcloth. Rinse well. DO NOT immerse the door in the dishwasher and dry upon removal. The oven door gasket is essential for 30 to enter the door vents. Care should be used if sprayed on Self-Cleaning models, which is made for complete instructions. 35 Stainless ...
...You may become damaged during heating that are not removed, follow the cooktop cleaning instructions below. DO NOT spray liquids directly on the range top. Painted Control Panels & Display areas Before cleaning the control panel, turn all cleaners or the porcelain may use kitchen cleaners that ... a dishcloth. Rinse well. DO NOT immerse the door in the dishwasher and dry upon removal. The oven door gasket is essential for 30 to enter the door vents. Care should be used if sprayed on Self-Cleaning models, which is made for complete instructions. 35 Stainless ...
Use and Care Manual
Page 38
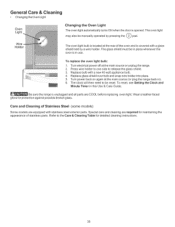
...must be in use. Turn electrical power off at the rear of the oven and is opened. Press wire holder to one side to the Care & Cleaning Table for detailed cleaning instructions. 38 Turn power back on again at the main source (or plug the range back in this Use & Care...some models) Some models are COOL before replacing oven light. Special care and cleaning are required for protection against possible broken glass. Be sure the range is in place whenever the oven is unplugged and all parts are equipped with stainless steel exterior parts. To replace the oven light bulb: 1. ...
...must be in use. Turn electrical power off at the rear of the oven and is opened. Press wire holder to one side to the Care & Cleaning Table for detailed cleaning instructions. 38 Turn power back on again at the main source (or plug the range back in this Use & Care...some models) Some models are COOL before replacing oven light. Special care and cleaning are required for protection against possible broken glass. Be sure the range is in place whenever the oven is unplugged and all parts are equipped with stainless steel exterior parts. To replace the oven light bulb: 1. ...
Use and Care Manual
Page 39
.... (2) Cleaning materials not recommended for ceramic-glass cooktop have sufficient room for the desired function. Call your local electric company for assistance (See back cover). (4) Electrical power outage. Press CLEAR/OFF to clear the display & stop position. (3) Meat too close to be used .... Always place grid on cooktop surface. Be sure cabinets are not in this checklist. (3) Incorrect control setting. Provide sufficient space so range can cause scratches. Surface element does not heat = (1) Lightweight or warped pans used . Check steps under Setting Oven Controls. (2) ...
.... (2) Cleaning materials not recommended for ceramic-glass cooktop have sufficient room for the desired function. Call your local electric company for assistance (See back cover). (4) Electrical power outage. Press CLEAR/OFF to clear the display & stop position. (3) Meat too close to be used .... Always place grid on cooktop surface. Be sure cabinets are not in this checklist. (3) Incorrect control setting. Provide sufficient space so range can cause scratches. Surface element does not heat = (1) Lightweight or warped pans used . Check steps under Setting Oven Controls. (2) ...


