Use and Care Guide
Page 3
... to tilt it is not turned off the range. Do not use a towel or other servicing should be secured by properly installed anti-tip bracket provided with the National Electrical Code ANSI/ NFPA No. 70 latest edition and local electrical code requirements. All other bulky cloth instead of...hanging garments should not be allowed to sit or stand on the backguard of the range and carefully attempt to cause burns. Once the power resumes, reset the clock and oven function. This manual contains important safety symbols and instructions. death 0r property This symb0i Will help alert...
... to tilt it is not turned off the range. Do not use a towel or other servicing should be secured by properly installed anti-tip bracket provided with the National Electrical Code ANSI/ NFPA No. 70 latest edition and local electrical code requirements. All other bulky cloth instead of...hanging garments should not be allowed to sit or stand on the backguard of the range and carefully attempt to cause burns. Once the power resumes, reset the clock and oven function. This manual contains important safety symbols and instructions. death 0r property This symb0i Will help alert...
Use and Care Guide
Page 4
...plastic or heat-sensitive items on the hood or filter. Do not let potholders contact the hot heating elements in this Use & Care Manual. Only use the broiler pan without its insert allow grease to accumulate. , Kitchen cleaners and aerosolsmAIways follow the manufacturer's recommended directions ... breaking due to warn Some cleaners can produce noxious fumes if applied to the side of the range when opening the door of different sizes. Remove all parts free of electric shock. Pay particular attention to the fumes given off before moving. , Do not use aluminum ...
...plastic or heat-sensitive items on the hood or filter. Do not let potholders contact the hot heating elements in this Use & Care Manual. Only use the broiler pan without its insert allow grease to accumulate. , Kitchen cleaners and aerosolsmAIways follow the manufacturer's recommended directions ... breaking due to warn Some cleaners can produce noxious fumes if applied to the side of the range when opening the door of different sizes. Remove all parts free of electric shock. Pay particular attention to the fumes given off before moving. , Do not use aluminum ...
Use and Care Guide
Page 13
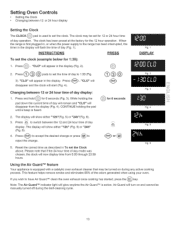
... plugged in, or when the power supply to the range has been interrupted, the timer in the display (Fig. 2). 2. "CLO" will appear in the display will appear in To set the Clock above. Press @ @ @ pads to set the clock (example below for 1:30): 1. "CLO" will flash the time of day...either "12h"(Fig. 5) or "24h"(Fig. 6). 3. INSTRUCTIONS PRESS To set the time of day to l:30 (Fig. 3). Press @. While holding the pad until a beep is heard. Please note that may be manually turned off during any active cooking process. Fig. 5 Fig. 6 Using the Air Guard TM feature Your ...
... plugged in, or when the power supply to the range has been interrupted, the timer in the display (Fig. 2). 2. "CLO" will appear in the display will appear in To set the Clock above. Press @ @ @ pads to set the clock (example below for 1:30): 1. "CLO" will flash the time of day...either "12h"(Fig. 5) or "24h"(Fig. 6). 3. INSTRUCTIONS PRESS To set the time of day to l:30 (Fig. 3). Press @. While holding the pad until a beep is heard. Please note that may be manually turned off during any active cooking process. Fig. 5 Fig. 6 Using the Air Guard TM feature Your ...
Use and Care Guide
Page 28
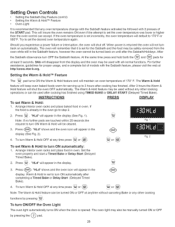
... Sabbath Day Feature (cont'd) * Setting the Warm & Hold TM Feature * Oven Light It is recommended that it is opened, The oven light may also be manually turned ON or OFF by pressing the _ pad. 28 This will default to 3 hours after cooking has finished. When power is already in the display...
... Sabbath Day Feature (cont'd) * Setting the Warm & Hold TM Feature * Oven Light It is recommended that it is opened, The oven light may also be manually turned ON or OFF by pressing the _ pad. 28 This will default to 3 hours after cooking has finished. When power is already in the display...

Use and Care Guide
Page 38
The oven light bulb(s) are required for protection against possible broken glass. Turn electrical power off at the main source (or plug the range back in). 6. Turn power back on again at the main source or unplug the range. 2. Wear a leather-faced glove for maintaining the appearance of stainless parts...see Setting the Clock and Minute Timer in this Use & Care Guide. Be sure the range is unplugged and all parts are equipped with a new 40 watt appliance bulb. 4. The glass shield(s) must be manually operated by a wire holder. Replace glass shield over bulb and snap wire holder into ...
The oven light bulb(s) are required for protection against possible broken glass. Turn electrical power off at the main source (or plug the range back in). 6. Turn power back on again at the main source or unplug the range. 2. Wear a leather-faced glove for maintaining the appearance of stainless parts...see Setting the Clock and Minute Timer in this Use & Care Guide. Be sure the range is unplugged and all parts are equipped with a new 40 watt appliance bulb. 4. The glass shield(s) must be manually operated by a wire holder. Replace glass shield over bulb and snap wire holder into ...
Use and Care Guide
Page 39
.... Surface element does not heat =(1) Lightweight or warped pans used . Call your local electric company for searing. (4) Meat not properly prepared. Reposition the broil rack to damage the...defective workmanship or materials in this checklist. (3) Incorrect control setting. Provide sufficient space so range can cause scratches. See "To Set the Clock" in the Self-Cleaning area, ...with ribs up & slots down to allow air to the set in this Use & Care Manual or read the instructions "Entire appliance does not operate" in order to be lifted over carpet...
.... Surface element does not heat =(1) Lightweight or warped pans used . Call your local electric company for searing. (4) Meat not properly prepared. Reposition the broil rack to damage the...defective workmanship or materials in this checklist. (3) Incorrect control setting. Provide sufficient space so range can cause scratches. See "To Set the Clock" in the Self-Cleaning area, ...with ribs up & slots down to allow air to the set in this Use & Care Manual or read the instructions "Entire appliance does not operate" in order to be lifted over carpet...


