Installation Instructions
Page 1
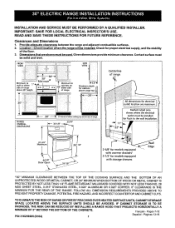
..." __-_ ®o 1_ e_hraenrgied Maximum depth fa_ro_ab_nneto_Sp.e _25"--_ RANGE OVERALL DIMENSIONS i :ii! Dimensions that are maximum, Dashed cubedarea shows where the electrical outlet must be installed for flush to the wall installation 44 5/8' _ Door Open _ 9 / ,,_....ak_> / Wall -_.._Edge 2-5/8" for models equipped "'" with storage drawers *30" MINIMUM CLEARANCE BETWEEN THE TOP OF THE COOKING...
..." __-_ ®o 1_ e_hraenrgied Maximum depth fa_ro_ab_nneto_Sp.e _25"--_ RANGE OVERALL DIMENSIONS i :ii! Dimensions that are maximum, Dashed cubedarea shows where the electrical outlet must be installed for flush to the wall installation 44 5/8' _ Door Open _ 9 / ,,_....ak_> / Wall -_.._Edge 2-5/8" for models equipped "'" with storage drawers *30" MINIMUM CLEARANCE BETWEEN THE TOP OF THE COOKING...
Installation Instructions
Page 2
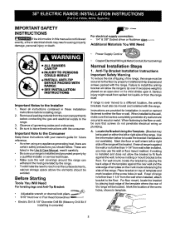
...Place bracket on top of the template against the wall or nofurtherthan 1-1/4" from the range itself. read it . When installedtothe wall, make sure that screws do not penetrate electrical wiring or plumbing. If molding is placed on the mark made referencingthe side of...a different location, the anti-tip brackets must also be moved and installed with your range is not available). Read all governing codes and ordinances. 4. Instructions are listed in concrete) Copper Electrical Wiring & Metal Conduit (for installation in template. 2 Locate the Bracket Using the ...
...Place bracket on top of the template against the wall or nofurtherthan 1-1/4" from the range itself. read it . When installedtothe wall, make sure that screws do not penetrate electrical wiring or plumbing. If molding is placed on the mark made referencingthe side of...a different location, the anti-tip brackets must also be moved and installed with your range is not available). Read all governing codes and ordinances. 4. Instructions are listed in concrete) Copper Electrical Wiring & Metal Conduit (for installation in template. 2 Locate the Bracket Using the ...
Installation Instructions
Page 3
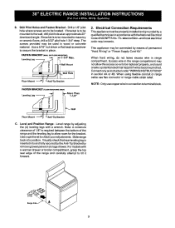
Drill Pilot Holes and Fasten Bracket- Drilla 1/8" pilot hole where screws ere to be located, If bracket is to be mountedto the wall, drillpilotholeat an approximate20 ° downwardangle, If bracket isto be used in wood or concrete material, Use a 5/16" nut-driveror flat head screwdriver to secure the bracket in place. B. The screws provided may be mountedto masonry or ceramic floors,drilla 5/32" pilothole 1-3/4"deep. FASTEN BRACKET (W_LLORF1-OOMROUNTING) "--_1 E
Drill Pilot Holes and Fasten Bracket- Drilla 1/8" pilot hole where screws ere to be located, If bracket is to be mountedto the wall, drillpilotholeat an approximate20 ° downwardangle, If bracket isto be used in wood or concrete material, Use a 5/16" nut-driveror flat head screwdriver to secure the bracket in place. B. The screws provided may be mountedto masonry or ceramic floors,drilla 5/32" pilothole 1-3/4"deep. FASTEN BRACKET (W_LLORF1-OOMROUNTING) "--_1 E

Installation Instructions
Page 4
... loop or open -end spade lugs with upturned ends. 2B.Models Requiring Power Supply Cord Kit RISK OF FIRE OR ELECTRICAL SHOCK MAY OCCUR IF AN INCORRECT SIZE RANGE CORD KIT IS USED, THE INSTALLATION INSTRUCTIONS ARE NOT FOLLOWED OR STRAIN RELIEF BRACKET IS DISCARDED. Reassemble the Rear Wall...connected by sliding the plate out of a power supply cord. Cord must be either three (3) or four (4) conductors. Cord must be accessible. Electrical Connection to the unit using the blunt point screw removed from the Rear Wall Shield by means of the pockets. 4. The terminal blockwill then be...
... loop or open -end spade lugs with upturned ends. 2B.Models Requiring Power Supply Cord Kit RISK OF FIRE OR ELECTRICAL SHOCK MAY OCCUR IF AN INCORRECT SIZE RANGE CORD KIT IS USED, THE INSTALLATION INSTRUCTIONS ARE NOT FOLLOWED OR STRAIN RELIEF BRACKET IS DISCARDED. Reassemble the Rear Wall...connected by sliding the plate out of a power supply cord. Cord must be either three (3) or four (4) conductors. Cord must be accessible. Electrical Connection to the unit using the blunt point screw removed from the Rear Wall Shield by means of the pockets. 4. The terminal blockwill then be...
Installation Instructions
Page 5
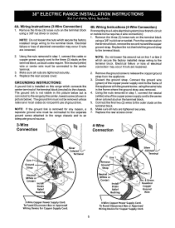
...below but is removed for any reason, a separate ground wire must be removed unless national or local codes do not permit use of electrical connection may occur if nuts are loosened. 2. Connect the ground wire (green) of the copper power supply cordto the frame of the ...factory installed range wiring to the center terminal. 3. To Fused Disconnect Box or Approved Wiring Device for Copper Supply Cord. 40. 8 Green Insulated Copper Ground Wire 4-Wire Copper Power Supply Cord. Remove the three (3) loose nuts on the terminal block usinga 3/8" nut driveror socket. Electrical failure or...
...below but is removed for any reason, a separate ground wire must be removed unless national or local codes do not permit use of electrical connection may occur if nuts are loosened. 2. Connect the ground wire (green) of the copper power supply cordto the frame of the ...factory installed range wiring to the center terminal. 3. To Fused Disconnect Box or Approved Wiring Device for Copper Supply Cord. 40. 8 Green Insulated Copper Ground Wire 4-Wire Copper Power Supply Cord. Remove the three (3) loose nuts on the terminal block usinga 3/8" nut driveror socket. Electrical failure or...
Installation Instructions
Page 6
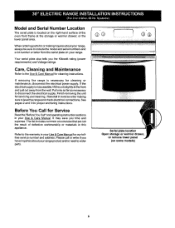
...you the Kilowatt rating (power requirements) and Voltage ratings Care, Cleaning and Maintenance Refer to disconnect the electrical supply. Please call or write if you have inquiries about your range, always be sure to include the model and serial numbers and a lot number or letter from the...or warmer drawer; Refer to the warranty in your Use & Care Manual for or making inquires about your range product and/or need to level the range and check electrical connections. When ordering parts for our tollfree service number and address. Serial plate location Open storage or warmer...
...you the Kilowatt rating (power requirements) and Voltage ratings Care, Cleaning and Maintenance Refer to disconnect the electrical supply. Please call or write if you have inquiries about your range, always be sure to include the model and serial numbers and a lot number or letter from the...or warmer drawer; Refer to the warranty in your Use & Care Manual for or making inquires about your range product and/or need to level the range and check electrical connections. When ordering parts for our tollfree service number and address. Serial plate location Open storage or warmer...


