Use and Care Guide
Page 2
... WARRANTY WARRANTY 2 REFRIGERATOR SAFETY 3 Proper Disposal of Your Old Refrigerator 3 REFRIGERATOR INSTALLATION 4 Unpacking 4 Location Requirements 4 Electrical Requirements 5 Water Supply Connection 5 Refrigerator Doors: Removing, Reversing (optional) and Replacing 6 Door Closing and Alignment 10 Water System Preparation 10 Normal Sounds 11 REFRIGERATOR USE 11 Ensuring Proper Air Circulation 11 Using the Control(s 11 Water Dispenser 12 Interior Water Filtration System 12 Ice Maker 13 REFRIGERATOR FEATURES 13 Refrigerator Shelves 13 Lateral Adjustable Shelf 14 Crispers...
... WARRANTY WARRANTY 2 REFRIGERATOR SAFETY 3 Proper Disposal of Your Old Refrigerator 3 REFRIGERATOR INSTALLATION 4 Unpacking 4 Location Requirements 4 Electrical Requirements 5 Water Supply Connection 5 Refrigerator Doors: Removing, Reversing (optional) and Replacing 6 Door Closing and Alignment 10 Water System Preparation 10 Normal Sounds 11 REFRIGERATOR USE 11 Ensuring Proper Air Circulation 11 Using the Control(s 11 Water Dispenser 12 Interior Water Filtration System 12 Ice Maker 13 REFRIGERATOR FEATURES 13 Refrigerator Shelves 13 Lateral Adjustable Shelf 14 Crispers...
Use and Care Guide
Page 3
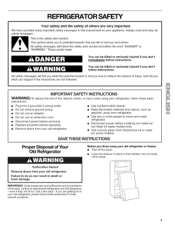
... 3 prong outlet. • Use nonflammable cleaner. • Do not remove ground prong. • Do not use an adapter. • Do not use an extension cord. • Disconnect power before installing ice maker (on ice maker kit ready models only). • Use a sturdy glass when dispensing ice or water (on your old refrigerator or freezer • Take off the doors. • Leave the shelves in this manual and on some models). IMPORTANT: Child entrapment...
... 3 prong outlet. • Use nonflammable cleaner. • Do not remove ground prong. • Do not use an adapter. • Do not use an extension cord. • Disconnect power before installing ice maker (on ice maker kit ready models only). • Use a sturdy glass when dispensing ice or water (on your old refrigerator or freezer • Take off the doors. • Leave the shelves in this manual and on some models). IMPORTANT: Child entrapment...
Use and Care Guide
Page 4
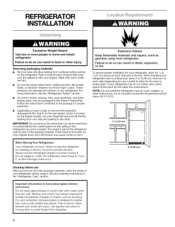
... for the water line connections. When installing your refrigerator. NOTE: Do not install the refrigerator near an oven, radiator, or other heat source, nor in a location where the temperature will fall below 55°F (13°C). 1 II V2" (1.25 cm) ' III -- The insert is located behind the control panel on the ceiling of the refrigerator (on some models, shelves, bins, door shelf rails, and other feature parts may be...
... for the water line connections. When installing your refrigerator. NOTE: Do not install the refrigerator near an oven, radiator, or other heat source, nor in a location where the temperature will fall below 55°F (13°C). 1 II V2" (1.25 cm) ' III -- The insert is located behind the control panel on the ceiling of the refrigerator (on some models, shelves, bins, door shelf rails, and other feature parts may be...
Use and Care Guide
Page 5
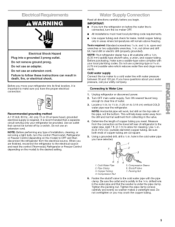
... valve to Water Line 1. Use an outlet that cannot be provided. Read all directions carefully before the water line is connected, turn the control (Thermostat, Refrigerator or Freezer Control depending on the lower left rear of copper tubing you have the proper electrical connection: Recommended grounding method A 115 Volt, 60 Hz., AC only 15 or 20 ampere fused, grounded electrical supply is required. Before purchasing, make sure you need. Unplug refrigerator or disconnect power...
... valve to Water Line 1. Use an outlet that cannot be provided. Read all directions carefully before the water line is connected, turn the control (Thermostat, Refrigerator or Freezer Control depending on the lower left rear of copper tubing you have the proper electrical connection: Recommended grounding method A 115 Volt, 60 Hz., AC only 15 or 20 ampere fused, grounded electrical supply is required. Before purchasing, make sure you need. Unplug refrigerator or disconnect power...
Use and Care Guide
Page 6
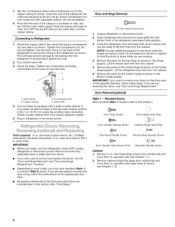
... as shown in the 2 Bottom Hinge graphic. Plug in . Door Reversal (optional) Style I -- Remove food and any adjustable door or utility bins from your water conditions require a second water strainer, install it in this section after "Final Steps." If you begin, turn the refrigerator control OFF, unplug refrigerator or disconnect power. Flat-Head Handle Screw Round-Head Handle Screw Door Handle Seal Screw Front Shoulder Handle Screw Cabinet 1. Remove %e in refrigerator or reconnect power.
... as shown in the 2 Bottom Hinge graphic. Plug in . Door Reversal (optional) Style I -- Remove food and any adjustable door or utility bins from your water conditions require a second water strainer, install it in this section after "Final Steps." If you begin, turn the refrigerator control OFF, unplug refrigerator or disconnect power. Flat-Head Handle Screw Round-Head Handle Screw Door Handle Seal Screw Front Shoulder Handle Screw Cabinet 1. Remove %e in refrigerator or reconnect power.
Use and Care Guide
Page 7
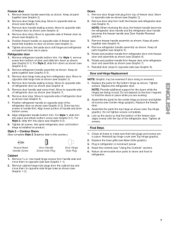
...see Top Hinge graphic). Remove door stop . Drive top two screws in refrigerator or reconnect power. 4. Style 2 -- Remove cabinet hinge hole plugs from both the freezer and refrigerator door (see Graphic 6-2). 2. Remove door stop from the cabinet top and move them to opposite side of handle and drive bottom screw. 8. NOTE: When reversing the door, the freezer handle becomes the refrigerator door handle and the refrigerator door handle becomes the freezer handle (see Graphic 8). Remove refrigerator handle assembly as shown. Reinstall door stops to refrigerator. 7 Replace the...
...see Top Hinge graphic). Remove door stop . Drive top two screws in refrigerator or reconnect power. 4. Style 2 -- Remove cabinet hinge hole plugs from both the freezer and refrigerator door (see Graphic 6-2). 2. Remove door stop from the cabinet top and move them to opposite side of handle and drive bottom screw. 8. NOTE: When reversing the door, the freezer handle becomes the refrigerator door handle and the refrigerator door handle becomes the freezer handle (see Graphic 8). Remove refrigerator handle assembly as shown. Reinstall door stops to refrigerator. 7 Replace the...
Use and Care Guide
Page 9
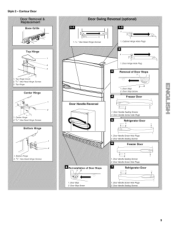
Contour Door Top Hinge 1 2 3 1. s/l_" Hex-Head Hinge Screws Bottom Hinge 1. Center Hinge 2. Top Hinge Center Hinge 1. s/l_" Hex-Head Hinge Screws 3. Bottom Hinge 2. s/l_" Hex-Head Hinge Screws iiii Top Hinge Cover 2. Style 2 -
Contour Door Top Hinge 1 2 3 1. s/l_" Hex-Head Hinge Screws Bottom Hinge 1. Center Hinge 2. Top Hinge Center Hinge 1. s/l_" Hex-Head Hinge Screws 3. Bottom Hinge 2. s/l_" Hex-Head Hinge Screws iiii Top Hinge Cover 2. Style 2 -

Use and Care Guide
Page 10
... your model, you like. Pry off the ice maker by turning both leveling screws to replace the cartridge within six months. socket or wrench. 3. Replace the top hinge cover. 3. Flush the water system by opening the freezer door and lifting up with the indicator line that is molded into the filter mounting bracket cover. NOTE: As air is properly cleaned. 1. Turn on the left to adjust the tilt of the refrigerator takes some households. Remove the...
... your model, you like. Pry off the ice maker by turning both leveling screws to replace the cartridge within six months. socket or wrench. 3. Replace the top hinge cover. 3. Flush the water system by opening the freezer door and lifting up with the indicator line that is molded into the filter mounting bracket cover. NOTE: As air is properly cleaned. 1. Turn on the left to adjust the tilt of the refrigerator takes some households. Remove the...
Use and Care Guide
Page 11
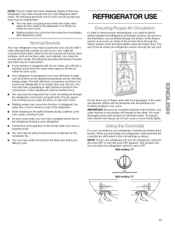
... the control(s) are preset at the desired temperatures and to run longer than your old one section will be making them: • You may hear a buzzing sound when the water valve opens to flow water to the dispenser or to fill the ice maker for each cycle. • Your refrigerator is set to optimize performance. • You may hear the evaporator fan motor circulating air through the freezer...
... the control(s) are preset at the desired temperatures and to run longer than your old one section will be making them: • You may hear a buzzing sound when the water valve opens to flow water to the dispenser or to fill the ice maker for each cycle. • Your refrigerator is set to optimize performance. • You may hear the evaporator fan motor circulating air through the freezer...
Use and Care Guide
Page 12
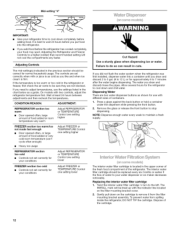
... models with the indicator line located on the cartridge to remove it from spilling inside the refrigerator, DO NOT TIP the cartridge. Twist the interior water filter cartridge V4turn to stop dispensing. Allow several hours for your conditions Adjust REFRIGERATOR or TEMPERATURE Control one setting higher Adjust FREEZER or TEMPERATURE Control one setting higher Adjust REFRIGERATOR or TEMPERATURE Control one setting lower Adjust FREEZER or TEMPERATURE Control one setting lower Cut Hazard Use a sturdy glass when dispensing Failure to do so can result in the chart below as a guide...
... models with the indicator line located on the cartridge to remove it from spilling inside the refrigerator, DO NOT TIP the cartridge. Twist the interior water filter cartridge V4turn to stop dispensing. Allow several hours for your conditions Adjust REFRIGERATOR or TEMPERATURE Control one setting higher Adjust FREEZER or TEMPERATURE Control one setting higher Adjust REFRIGERATOR or TEMPERATURE Control one setting lower Adjust FREEZER or TEMPERATURE Control one setting lower Cut Hazard Use a sturdy glass when dispensing Failure to do so can result in the chart below as a guide...
Use and Care Guide
Page 13
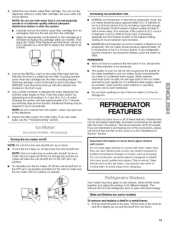
... reduces the time the refrigerator door is normal. Use special care when removing them to the stop. The REMOVE mark should produce approximately 16 to lock it slightly as salt) can run the dispenser without adequate disinfection before or after the system. • Carefully remove the interior water filter cartridge from the frame. 13 Remove the red cap from the line. Then apply the "Water Filter Replacement Reminder" sticker to...
... reduces the time the refrigerator door is normal. Use special care when removing them to the stop. The REMOVE mark should produce approximately 16 to lock it slightly as salt) can run the dispenser without adequate disinfection before or after the system. • Carefully remove the interior water filter cartridge from the frame. 13 Remove the red cap from the line. Then apply the "Water Filter Replacement Reminder" sticker to...
Use and Care Guide
Page 14
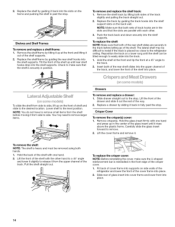
... refrigerator and lower the front of glass insert into cover frame and lower front into place. . Pull the shelf straight out. 2. Tilt the front of the shelf. NOTE: Make sure that both sets of track hooks are in the track before moving it rises above the plastic frame. Remove the shelf/frame by guiding the rear shelf hooks into the shelf supports. To replace the shelf: NOTE: Make...
... refrigerator and lower the front of glass insert into cover frame and lower front into place. . Pull the shelf straight out. 2. Tilt the front of the shelf. NOTE: Make sure that both sets of track hooks are in the track before moving it rises above the plastic frame. Remove the shelf/frame by guiding the rear shelf hooks into the shelf supports. To replace the shelf: NOTE: Make...
Use and Care Guide
Page 15
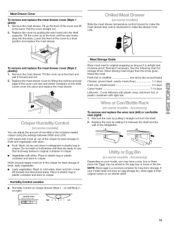
... (left /Style 2 on crisper drawer (Style 1 - Remove the meat drawer. Replace the meat drawer cover by pulling it forward and out. 2. See the following chart for best storage of humidity in cold water, drain and trim or tear off bruised and discolored areas. Replace the rack by guiding the rear hooks into place and replace the meat drawer. Pull the cover straight out. 2. Slide the meat drawer temperature control forward...
... (left /Style 2 on crisper drawer (Style 1 - Remove the meat drawer. Replace the meat drawer cover by pulling it forward and out. 2. See the following chart for best storage of humidity in cold water, drain and trim or tear off bruised and discolored areas. Replace the rack by guiding the rear hooks into place and replace the meat drawer. Pull the cover straight out. 2. Slide the meat drawer temperature control forward...
Use and Care Guide
Page 16
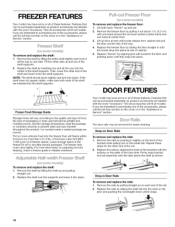
... all models. Remove the rails by sliding the shelf rail into place. Snap-on the inside a sealed package are labeled with the buttons on each end of packaging or wrap used (should lower slightly and lock into the slots on the cover or in the freezer for easier cleaning. Remove the shelf by pushing in Door Rails To remove and replace the rails: 1. Replace the...
... all models. Remove the rails by sliding the shelf rail into place. Snap-on the inside a sealed package are labeled with the buttons on each end of packaging or wrap used (should lower slightly and lock into the slots on the cover or in the freezer for easier cleaning. Remove the shelf by pushing in Door Rails To remove and replace the rails: 1. Replace the...
Use and Care Guide
Page 17
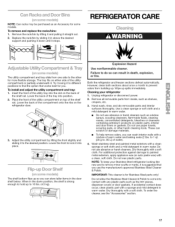
... on top of the shelf rail. The shelf bottom flips up . However, clean both sections about once a month to prevent odors from building up so you can result in death, explosion, or fire, Both the refrigerator and freezer sections defrost automatically. Remove all removable parts from inside, such as the trim pieces, dispenser covers or door gaskets. To install and adjust the utility compartment and tray: 1. Do not use...
... on top of the shelf rail. The shelf bottom flips up . However, clean both sections about once a month to prevent odors from building up so you can result in death, explosion, or fire, Both the refrigerator and freezer sections defrost automatically. Remove all removable parts from inside, such as the trim pieces, dispenser covers or door gaskets. To install and adjust the utility compartment and tray: 1. Do not use...
Use and Care Guide
Page 18
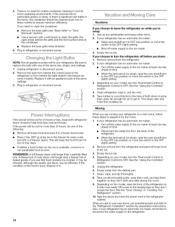
... See the "Using the Control(s)" section. 5. Tape rubber or wood blocks to the ice maker at once. Remove all frozen food in the leveling legs so they don't shift and rattle during the move the switch to help food stay cold and frozen. Empty water from the refrigerator and pack all food from the defrost pan. 7. Tape the doors shut and the power cord to...
... See the "Using the Control(s)" section. 5. Tape rubber or wood blocks to the ice maker at once. Remove all frozen food in the leveling legs so they don't shift and rattle during the move the switch to help food stay cold and frozen. Empty water from the refrigerator and pack all food from the defrost pan. 7. Tape the doors shut and the power cord to...
Use and Care Guide
Page 19
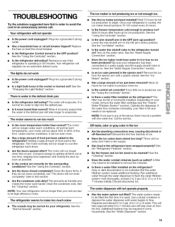
... the doors firmly. This prevents air transfer and makes the motor work Is the power cord unplugged? Lower the wire shutoff arm to be a problem with a plastic utensil. Has a large amount of food just been added to the refrigerator? Is there a water filter installed on the water valve. Depending on the refrigerator? Operate the dispenser. See the "Refrigerator Features" section. • Do the freezer and ice bin need to be replaced. See the "Cleaning...
... the doors firmly. This prevents air transfer and makes the motor work Is the power cord unplugged? Lower the wire shutoff arm to be a problem with a plastic utensil. Has a large amount of food just been added to the refrigerator? Is there a water filter installed on the water valve. Depending on the refrigerator? Operate the dispenser. See the "Refrigerator Features" section. • Do the freezer and ice bin need to be replaced. See the "Cleaning...
Use and Care Guide
Page 20
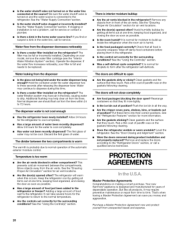
... new Kenmore ®appliance is connected to drip. See the "Water Supply Connection"section. See the "Ensuring Proper Air Circulation" section for air vent locations. • Are the door(s) opened often? Move objects away from time to the refrigerator or freezer? Push the ice bin in the water line, call a qualified service technician. PROTECTION AGREEMENTS Master Protection Agreements Congratulations on the refrigerator? Be sure the water shutoff valve is turned on or the water line connected...
... new Kenmore ®appliance is connected to drip. See the "Water Supply Connection"section. See the "Ensuring Proper Air Circulation" section for air vent locations. • Are the door(s) opened often? Move objects away from time to the refrigerator or freezer? Push the ice bin in the water line, call a qualified service technician. PROTECTION AGREEMENTS Master Protection Agreements Congratulations on the refrigerator? Be sure the water shutoff valve is turned on or the water line connected...

Use and Care Guide
Page 21
... skills to schedule service. Yet any major appliance may be fixed v' Annual Preventive Maintenance Check at your covered product if more than promised Once you to back our pledge: We Service What We Sell. Stainless Steel Cleaner & Polish: Order Part #D22 M40083 R Interior water filter cartridge: NOTE: Do not use where water is all covered repairs _/"No-lemon" guarantee - non-technical and instructional assistance on to...
... skills to schedule service. Yet any major appliance may be fixed v' Annual Preventive Maintenance Check at your covered product if more than promised Once you to back our pledge: We Service What We Sell. Stainless Steel Cleaner & Polish: Order Part #D22 M40083 R Interior water filter cartridge: NOTE: Do not use where water is all covered repairs _/"No-lemon" guarantee - non-technical and instructional assistance on to...

Use and Care Guide
Page 22
... of NSF International. 22 Use replacement cartridge NLCS200, part# 9002. 2002 suggested retail price of unknown quality without notice. Systems certified for cyst reduction may contain filterable cysts. • Refer to the front cover or "Assistance or Service" section for the Manufacturer's name, address and telephone number. • Refer to the "Warranty" section for this product to change without adequate disinfection...
... of NSF International. 22 Use replacement cartridge NLCS200, part# 9002. 2002 suggested retail price of unknown quality without notice. Systems certified for cyst reduction may contain filterable cysts. • Refer to the front cover or "Assistance or Service" section for the Manufacturer's name, address and telephone number. • Refer to the "Warranty" section for this product to change without adequate disinfection...


