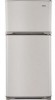
Use and Care Guide
Page 2
... 11 Inside Walls 23 Replacing Freezer Door 11 Door Line and Gaskets 23 Reversing Doors 12 Plastic Parts 23 Reversing Freezer Door 12 Back Cover 23 Reversing and Reattaching Refrigerator Door 13 Light Bulb Replacement 23 Reattaching Freezer Door 15 Power Interruptions 24 Door Closing and Alignment 16 When you go on vacation 24 USING YOUR REFRIGERATOR 17 When you move 24 Ensuring Proper Air Circulation 17 ABOUT AUTOMATIC ICEMAKER 25 Setting the Controls 17 CONNECTING THE WATER LINE 26 Adjusting Control Settings 18 TROUBLESHOOTING GUIDE 29 Water Dispenser...
... 11 Inside Walls 23 Replacing Freezer Door 11 Door Line and Gaskets 23 Reversing Doors 12 Plastic Parts 23 Reversing Freezer Door 12 Back Cover 23 Reversing and Reattaching Refrigerator Door 13 Light Bulb Replacement 23 Reattaching Freezer Door 15 Power Interruptions 24 Door Closing and Alignment 16 When you go on vacation 24 USING YOUR REFRIGERATOR 17 When you move 24 Ensuring Proper Air Circulation 17 ABOUT AUTOMATIC ICEMAKER 25 Setting the Controls 17 CONNECTING THE WATER LINE 26 Adjusting Control Settings 18 TROUBLESHOOTING GUIDE 29 Water Dispenser...
Use and Care Guide
Page 3
... use of this limited warranty shall be liable for free repair. BOTTOM FREEZER REFRIGERATOR ® I(enmore Appliance Warranty One Year Limited Warranty When installed, operated and maintained according to all instructions supplied with the product, if this appliance fails due to a defect in all instructions supplied with the product. 7. Sears will NOT pay for only 90 days from the date of implied warranties; A service technician to instruct...
... use of this limited warranty shall be liable for free repair. BOTTOM FREEZER REFRIGERATOR ® I(enmore Appliance Warranty One Year Limited Warranty When installed, operated and maintained according to all instructions supplied with the product, if this appliance fails due to a defect in all instructions supplied with the product. 7. Sears will NOT pay for only 90 days from the date of implied warranties; A service technician to instruct...
Use and Care Guide
Page 4
... normal use, not just defects. phone support from coverage - Sears installation Service For Sears professional installation of Purchase Serial No. You wilt find the model and serial number printed on an identification label located on making a smart purchase. Model No. Or, a prorated refund anytime after the product warranty period expires. replacement of your product. [] Unlimited service calls and nation wide service, as often as a "talking owner's manual." [] Power surge...
... normal use, not just defects. phone support from coverage - Sears installation Service For Sears professional installation of Purchase Serial No. You wilt find the model and serial number printed on an identification label located on making a smart purchase. Model No. Or, a prorated refund anytime after the product warranty period expires. replacement of your product. [] Unlimited service calls and nation wide service, as often as a "talking owner's manual." [] Power surge...
Use and Care Guide
Page 5
... you open the doors when children are in the area. ° Unplug your refrigerator is plugged in. ° DO NOT refreeze frozen foods which , if not avoided, _ result in the freezer compartment when hands are not followed. . Be careful when you don't follow instructions. _ Indicates an imminently hazardous situation which have any servicing be performedby a qualified individual. ° Before replacing...
... you open the doors when children are in the area. ° Unplug your refrigerator is plugged in. ° DO NOT refreeze frozen foods which , if not avoided, _ result in the freezer compartment when hands are not followed. . Be careful when you don't follow instructions. _ Indicates an imminently hazardous situation which have any servicing be performedby a qualified individual. ° Before replacing...
Use and Care Guide
Page 6
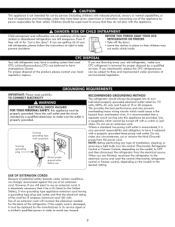
... type of the refrigerator. Have the wall outlet and the circuit checked by person responsible for the back of installation, cleaning, or removing a light bulb, turn the control (Thermostat, Refrigerator Control or Freezer Control, depending on the model) to the desired setting. RECOMMENDED GROUNDING METHOD The refrigerator should be plugged into its service agent or a similarly qualified person in place so that, children may not easily climb inside. [e] e Your old refrigerator...
... type of the refrigerator. Have the wall outlet and the circuit checked by person responsible for the back of installation, cleaning, or removing a light bulb, turn the control (Thermostat, Refrigerator Control or Freezer Control, depending on the model) to the desired setting. RECOMMENDED GROUNDING METHOD The refrigerator should be plugged into its service agent or a similarly qualified person in place so that, children may not easily climb inside. [e] e Your old refrigerator...
Use and Care Guide
Page 7
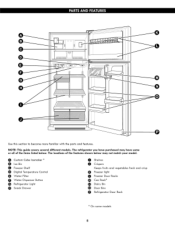
... some models Use this section to become more familiar with the parts and features. CIcuestoBmin Cube Icemaker _ Freezer Shelf Dicjitai Temperature Control Water Filter Water Dispenser Button Refrigerator Light 0 Snack Drawer 00 SChriesplveerss Keeps fruits and vecjetabies fresh and crisp (_ Freezer iicjht 0 Freezer Door Racks _ Can Rack _ _ Dairy Bin _) Door Bins Refrigerator Door Rack On some or all of the features shown below may have purchased may not match your model. The locations of the items listed...
... some models Use this section to become more familiar with the parts and features. CIcuestoBmin Cube Icemaker _ Freezer Shelf Dicjitai Temperature Control Water Filter Water Dispenser Button Refrigerator Light 0 Snack Drawer 00 SChriesplveerss Keeps fruits and vecjetabies fresh and crisp (_ Freezer iicjht 0 Freezer Door Racks _ Can Rack _ _ Dairy Bin _) Door Bins Refrigerator Door Rack On some or all of the features shown below may have purchased may not match your model. The locations of the items listed...
Use and Care Guide
Page 8
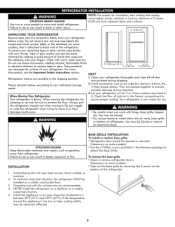
... noise and vibration, the refrigerator MUST be sure to move and install refrigerator. Do not remove any remaining tape or glue, rub the area briskly with your individual storage needs. Do not use . • Be careful when you work with warm water and dry. install accessories such as floor damage could occur. To remove the base grille • Open or remove refrigerator doors. (Necessary on some models). • Use...
... noise and vibration, the refrigerator MUST be sure to move and install refrigerator. Do not remove any remaining tape or glue, rub the area briskly with your individual storage needs. Do not use . • Be careful when you work with warm water and dry. install accessories such as floor damage could occur. To remove the base grille • Open or remove refrigerator doors. (Necessary on some models). • Use...
Use and Care Guide
Page 14
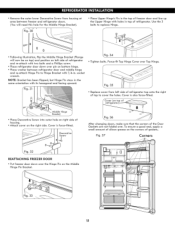
... Corners REATTACNING FREEZER DOOR ° Put freezer door down over the Hinge Pin on the right side. Use the 3 bolts to replace Hinge. ,f © © ° Following illustration, flip the Middle Hinge Bracket (Flange will need this hole for the Middle Hinge Bracket). 30 ° Place Upper Hinge's Pin in . ° Remove the outer lower Decorative Screw from left side of refrigerator. Force-fit Top Hinge Cover over...
... Corners REATTACNING FREEZER DOOR ° Put freezer door down over the Hinge Pin on the right side. Use the 3 bolts to replace Hinge. ,f © © ° Following illustration, flip the Middle Hinge Bracket (Flange will need this hole for the Middle Hinge Bracket). 30 ° Place Upper Hinge's Pin in . ° Remove the outer lower Decorative Screw from left side of refrigerator. Force-fit Top Hinge Cover over...

Use and Care Guide
Page 16
... last temperature level before adjusting temperature. REFRIGERATOR CONTROL Initially set the Refrigerator Control on the middle setting, number 3. The higher the number, the colder the refrigerator compartment wili become. R.. After 24 hours, adjust the compartment temperature as desired. ECOMME.N...S. To do so, push the temperature adjust button until your desired number is lit up to the freezer. NOTE: When you go past the desired number, keep pushing the temperature adjust button until the number 3 LED light...
... last temperature level before adjusting temperature. REFRIGERATOR CONTROL Initially set the Refrigerator Control on the middle setting, number 3. The higher the number, the colder the refrigerator compartment wili become. R.. After 24 hours, adjust the compartment temperature as desired. ECOMME.N...S. To do so, push the temperature adjust button until your desired number is lit up to the freezer. NOTE: When you go past the desired number, keep pushing the temperature adjust button until the number 3 LED light...
Use and Care Guide
Page 17
...; Very cold room temperature (can also be correct for your conditions Turn FREEZER control to next lower number, wait 24 hours, then re-check WATER DISPENSER There are ready to use them in the chart below as the thermostat for water lea ks. Open the refrigerator door and shelf area to activate the water dispenser. 1. When storing an extra supply, wrap in freezer packaging and freeze. _ Store in crisper. _ Use fresh fish...
...; Very cold room temperature (can also be correct for your conditions Turn FREEZER control to next lower number, wait 24 hours, then re-check WATER DISPENSER There are ready to use them in the chart below as the thermostat for water lea ks. Open the refrigerator door and shelf area to activate the water dispenser. 1. When storing an extra supply, wrap in freezer packaging and freeze. _ Store in crisper. _ Use fresh fish...
Use and Care Guide
Page 19
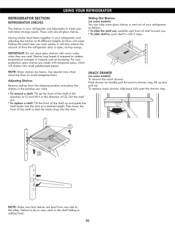
... your refrigerator as bumping. SNACK DRAWER (on some models) You can slide some models) To remove the snack drawer: Hold drawer by handle, pull forward to drawer stop . * To remove a shelf: Tilt up the front of the shelf in the shelf failing or spilling food. 20 Sliding Out Shelves (on some glass shelves in and out of your protection, glass shelves are made with warm water when they are cold. Use special care when removing...
... your refrigerator as bumping. SNACK DRAWER (on some models) You can slide some models) To remove the snack drawer: Hold drawer by handle, pull forward to drawer stop . * To remove a shelf: Tilt up the front of the shelf in the shelf failing or spilling food. 20 Sliding Out Shelves (on some glass shelves in and out of your protection, glass shelves are made with warm water when they are cold. Use special care when removing...
Use and Care Guide
Page 20
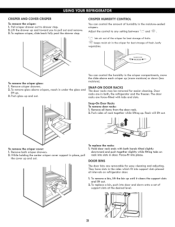
... in both, the refrigerator and the freezer. Door racks are in the moisture-sealed crispers. Remove all items from the door rack. 2. Push sides of support slots at intervals on rack into place. DOOR BINS The door bins are force-fitted with both crisper drawers. 2. CRISPER AND COVER CRISPER To remove the crisper: 1. Adjust the control to drawer stop . Push glass up . While holding the center crisper cover support in place, pull the cover up and toward...
... in both, the refrigerator and the freezer. Door racks are in the moisture-sealed crispers. Remove all items from the door rack. 2. Push sides of support slots at intervals on rack into place. DOOR BINS The door bins are force-fitted with both crisper drawers. 2. CRISPER AND COVER CRISPER To remove the crisper: 1. Adjust the control to drawer stop . Push glass up . While holding the center crisper cover support in place, pull the cover up and toward...
Use and Care Guide
Page 21
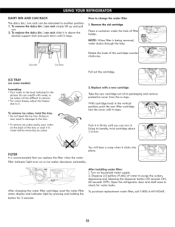
... it stops. After changing the water filter cartridge, reset the water filter status display and indicator light by pressing and holding the button for water leaks. DAIRY BiN AND CAN RACK The dairy bin/can rack can rack slide it in above the desired support slots and push down until you replace the filter when the water filter indicator light turns on or ice maker decreases noticeably. To replace the dairy bin / can be difflcuit to the tray. * To remove ice...
... it stops. After changing the water filter cartridge, reset the water filter status display and indicator light by pressing and holding the button for water leaks. DAIRY BiN AND CAN RACK The dairy bin/can rack can rack slide it in above the desired support slots and push down until you replace the filter when the water filter indicator light turns on or ice maker decreases noticeably. To replace the dairy bin / can be difflcuit to the tray. * To remove ice...

Use and Care Guide
Page 22
.... Remove the light shield and remove bulb. 3. a month to 1 liter water). NOTE: Back cover should only be removed by a qualified technician. INSIDE WALLS (allow freezer to replace the bulb with a mixture of water (26 g soda to prevent GENERAL CLEANING TIPS " Unplug refrigerator or disconnect power. • Remove aii removable parts, such as shelves, crispers, etc. • Use a clean sponge or soft cloth and a mild detergent in warm water. NOTE: Not oil appliance bulbs wiii to warm up...
.... Remove the light shield and remove bulb. 3. a month to 1 liter water). NOTE: Back cover should only be removed by a qualified technician. INSIDE WALLS (allow freezer to replace the bulb with a mixture of water (26 g soda to prevent GENERAL CLEANING TIPS " Unplug refrigerator or disconnect power. • Remove aii removable parts, such as shelves, crispers, etc. • Use a clean sponge or soft cloth and a mild detergent in warm water. NOTE: Not oil appliance bulbs wiii to warm up...

Use and Care Guide
Page 23
... freezer space. See the Setting the Controls section. 3. While handling dry ice, wear gloves to protect your refrigerator to a new home, follow these steps to help foods stay cold and frozen. 2. Depending on your model, turn the refrigerator off . 1. If you leave, follow these steps. To replace light shield, position fornt tab into slot and carefully force-fit side tabs into the outlet. Replace the refrigerator shelves. 8. Use...
... freezer space. See the Setting the Controls section. 3. While handling dry ice, wear gloves to protect your refrigerator to a new home, follow these steps to help foods stay cold and frozen. 2. Depending on your model, turn the refrigerator off . 1. If you leave, follow these steps. To replace light shield, position fornt tab into slot and carefully force-fit side tabs into the outlet. Replace the refrigerator shelves. 8. Use...
Use and Care Guide
Page 24
... the first few batches of ice to allow the water line to flooding from ruptured water lines or connections. Please check your product specification. NOTE: Keeping the power switch in the I (OFF) position before the water connection to the icemaker, set the power switch to the refrigerator. If the surrounding air temperature will hear the sound of cubes dropping into the bin and water running in . A newly-installed refrigerator may take 12 to...
... the first few batches of ice to allow the water line to flooding from ruptured water lines or connections. Please check your product specification. NOTE: Keeping the power switch in the I (OFF) position before the water connection to the icemaker, set the power switch to the refrigerator. If the surrounding air temperature will hear the sound of cubes dropping into the bin and water running in . A newly-installed refrigerator may take 12 to...
Use and Care Guide
Page 25
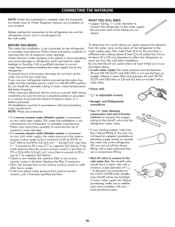
BEFORE YOU BEGIN This water line installation is battery-powered. Follow these instructions carefully to water leakage or flooding. Then add 8 feet (2,4 m). Before purchasing, make sure the icemaker power switch is not plugged into 3 turns of about 10 in [25 cm] diameter) to allow the refrigerator to see whether the sediment filter in the reverse osmosis system is Jessthan 21 PSI or 0,14 MPa (1,5 kg'f/cm 2, more than...
BEFORE YOU BEGIN This water line installation is battery-powered. Follow these instructions carefully to water leakage or flooding. Then add 8 feet (2,4 m). Before purchasing, make sure the icemaker power switch is not plugged into 3 turns of about 10 in [25 cm] diameter) to allow the refrigerator to see whether the sediment filter in the reverse osmosis system is Jessthan 21 PSI or 0,14 MPa (1,5 kg'f/cm 2, more than...
Use and Care Guide
Page 28
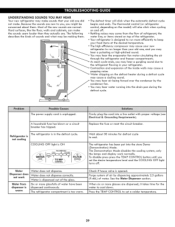
.... Water does not dispense correctly. UNDERSTANDINSGOUNDS YOU MAY HEAR Your new refrigerator may make sounds that your old one , and you set a colder temperature. 29 The power supply cord is opened. Purge system of air by the condenser fan. ° You may hear water running into the drain pan during a defrost cycle may cause a popping noise. Check if house valve is unplugged. COOLING OFF light is warm Water does not dispense. Water Dispenser does not work normally. Water...
.... Water does not dispense correctly. UNDERSTANDINSGOUNDS YOU MAY HEAR Your new refrigerator may make sounds that your old one , and you set a colder temperature. 29 The power supply cord is opened. Purge system of air by the condenser fan. ° You may hear water running into the drain pan during a defrost cycle may cause a popping noise. Check if house valve is unplugged. COOLING OFF light is warm Water does not dispense. Water Dispenser does not work normally. Water...
Use and Care Guide
Page 29
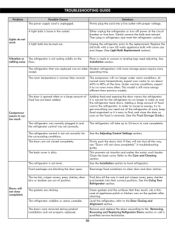
... fuse box. Doors will not close completely The ice bin, crisper covers, pans, shelves, door bins or baskets are blocking the door open. Gently remove the bulb and reinsert. Compressor seems to get everything you need adjusting. The refrigerator is dirty. See the Adjusting Control Settings section. See the Installation section to clear door and door shelves. Rearrange food containers to level refrigerator. The gaskets are not closed completely. The room temperature is warmer than previous models. The compressor will not...
... fuse box. Doors will not close completely The ice bin, crisper covers, pans, shelves, door bins or baskets are blocking the door open. Gently remove the bulb and reinsert. Compressor seems to get everything you need adjusting. The refrigerator is dirty. See the Adjusting Control Settings section. See the Installation section to clear door and door shelves. Rearrange food containers to level refrigerator. The gaskets are not closed completely. The room temperature is warmer than previous models. The compressor will not...

Use and Care Guide
Page 30
... connected to evaporate. The door is more humid than normal. It is opened , warm, humid air is water in the defrost drain pan The refrigerator seems to your refrigerator. New installation. Expect that the water in troubleshooting guide. Reverse osmosis water filtration system is not closing properly. Frost or ice crystals on . Refer to begin. A filter may need to drip into the defrost pan. Ice storage bin needs cleaning. Wait 24 hours after icemaker installation for water to be normal for your cold water supply...
... connected to evaporate. The door is more humid than normal. It is opened , warm, humid air is water in the defrost drain pan The refrigerator seems to your refrigerator. New installation. Expect that the water in troubleshooting guide. Reverse osmosis water filtration system is not closing properly. Frost or ice crystals on . Refer to begin. A filter may need to drip into the defrost pan. Ice storage bin needs cleaning. Wait 24 hours after icemaker installation for water to be normal for your cold water supply...


