Use and Care Guide
Page 2
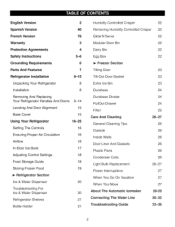
Freezer Section Tilting Door 23 Tilt-Out Door Basket 23 Extra Ice Bin 23 Durabase 24 Durabase Divider 24 PullOut Drawer 24 Filter 25 Care And Cleaning General Cleaning Tips Outside Inside Walls Door Liner And Gaskets Plastic Parts Condenser Coils 26... 16 16 16 17 Adjusting Control Settings 18 Food Storage Guide 18 Storing Frozen Food 19 P,- Refrigerator Section Ice & Water Dispenser 20 Troubleshooting For Ice & Water Dispenser 20 Refrigerator Shelves 21 Bottle Holder 21 Humidity Controlled Crisper 22 Removing Humidity Controlled Crisper 22 Glide'N'Serve 22...
Freezer Section Tilting Door 23 Tilt-Out Door Basket 23 Extra Ice Bin 23 Durabase 24 Durabase Divider 24 PullOut Drawer 24 Filter 25 Care And Cleaning General Cleaning Tips Outside Inside Walls Door Liner And Gaskets Plastic Parts Condenser Coils 26... 16 16 16 17 Adjusting Control Settings 18 Food Storage Guide 18 Storing Frozen Food 19 P,- Refrigerator Section Ice & Water Dispenser 20 Troubleshooting For Ice & Water Dispenser 20 Refrigerator Shelves 21 Bottle Holder 21 Humidity Controlled Crisper 22 Removing Humidity Controlled Crisper 22 Glide'N'Serve 22...
Use and Care Guide
Page 3
...from accident, abuse, misuse or use for free repair. This warranty gives you specific legal rights, and you may not apply to you. BOTTOM FREEZER REFRIGERATOR WARRANTY ® f Kenmore Elite Limited Warranty When installed, operated and maintained according to all instructions supplied with the product, if this appliance fails due to a defect in...implied warranties of implied warranties; This warranty applies for only 90 days from the date of purchase if this product. 4. If the sealed refrigerant system is ever used in the United States or Canada. Sears will NOT pay for: 1.
...from accident, abuse, misuse or use for free repair. This warranty gives you specific legal rights, and you may not apply to you. BOTTOM FREEZER REFRIGERATOR WARRANTY ® f Kenmore Elite Limited Warranty When installed, operated and maintained according to all instructions supplied with the product, if this appliance fails due to a defect in...implied warranties of implied warranties; This warranty applies for only 90 days from the date of purchase if this product. 4. If the sealed refrigerant system is ever used in the United States or Canada. Sears will NOT pay for: 1.
Use and Care Guide
Page 4
... 10,000 authorized Sears service technicians, which means someone you contact Sears concerning your request - Serial No. Your new Kenmore ® product is the result of mechanical failure of any covered refrigerator or freezer. Our coverage goes well beyond the product warranty. If you money and aggravation. or Canada call 1=800-827=6655...
... 10,000 authorized Sears service technicians, which means someone you contact Sears concerning your request - Serial No. Your new Kenmore ® product is the result of mechanical failure of any covered refrigerator or freezer. Our coverage goes well beyond the product warranty. If you money and aggravation. or Canada call 1=800-827=6655...
Use and Care Guide
Page 5
... crystals or if they are finished, reconnect the refrigerator to the electrical source and reset the controls. (Thermostat, Refrigerator Control, and or Freezer Control, depending on the model) to the desired setting. •This refrigerator must be preceded by pulling on the refrigerator doors or shelves in the refrigerator. NOTE: Setting either the plug or connector...
... crystals or if they are finished, reconnect the refrigerator to the electrical source and reset the controls. (Thermostat, Refrigerator Control, and or Freezer Control, depending on the model) to the desired setting. •This refrigerator must be preceded by pulling on the refrigerator doors or shelves in the refrigerator. NOTE: Setting either the plug or connector...
Use and Care Guide
Page 6
...of potential safety hazards under provisions of installation, cleaning, or removing a light bulb, disconnect the refrigerator from the electrical source. BEFORE YOU THROW AWAY YOUR OLD REFRIGERATOR OR FREEZER • Take off with a properly grounded three-prong wall outlet. Where a standard two-prong... always be 15 amperes (minimum) and 120 volts. CFCs are finished, reconnect the refrigerator to the electrical source and reset the control (Thermostat, Refrigerator Control, or Freezer Control, depending on the model) to fines and imprisonment under certain conditions, we strongly...
...of potential safety hazards under provisions of installation, cleaning, or removing a light bulb, disconnect the refrigerator from the electrical source. BEFORE YOU THROW AWAY YOUR OLD REFRIGERATOR OR FREEZER • Take off with a properly grounded three-prong wall outlet. Where a standard two-prong... always be 15 amperes (minimum) and 120 volts. CFCs are finished, reconnect the refrigerator to the electrical source and reset the control (Thermostat, Refrigerator Control, or Freezer Control, depending on the model) to fines and imprisonment under certain conditions, we strongly...

Use and Care Guide
Page 7
...) _) Fixed Door Bin Fixed Door Bin Refrigerator Shelves (p. 21) (_ Ice Room (p. 17) (Ice Maker and Ice Bucket) _D Humidity Controlled Crisper (p. 22) _[_ Glide'N'Serve (p. 22) Extra Ice Bin (p. 23) Pullout Drawer (p. 24) Durabase (p. 24) (_) Divider (p. 24) _) Tilt-Out Door Basket (p. 23) (_ Dairy Bin (p. 22) Bottle Holder (p. 21) (795.7874* Model Only) (_) Water Tank Cover Egg...
...) _) Fixed Door Bin Fixed Door Bin Refrigerator Shelves (p. 21) (_ Ice Room (p. 17) (Ice Maker and Ice Bucket) _D Humidity Controlled Crisper (p. 22) _[_ Glide'N'Serve (p. 22) Extra Ice Bin (p. 23) Pullout Drawer (p. 24) Durabase (p. 24) (_) Divider (p. 24) _) Tilt-Out Door Basket (p. 23) (_ Dairy Bin (p. 22) Bottle Holder (p. 21) (795.7874* Model Only) (_) Water Tank Cover Egg...
Use and Care Guide
Page 8
...solidly constructed floor. • Carpeting and soft tile surfaces are not recommended. • Never install the refrigerator on a platform or weakly supported structure. 1. Allow the clearance of at least 24 in. (61 cm) in death, explosion, or fire. • To reduce the risk of liquid...and vapors, such as gasoline, away from adjacent items may be slightly higher than the rear to move and install refrigerator. NEXT 1. They are installed in the freezer compartment to compensate for the automatic icemaker. & CAUTION: Avoid placing the unit near heat sources, direct sunlight or ...
...solidly constructed floor. • Carpeting and soft tile surfaces are not recommended. • Never install the refrigerator on a platform or weakly supported structure. 1. Allow the clearance of at least 24 in. (61 cm) in death, explosion, or fire. • To reduce the risk of liquid...and vapors, such as gasoline, away from adjacent items may be slightly higher than the rear to move and install refrigerator. NEXT 1. They are installed in the freezer compartment to compensate for the automatic icemaker. & CAUTION: Avoid placing the unit near heat sources, direct sunlight or ...
Use and Care Guide
Page 9
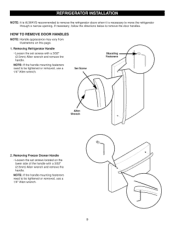
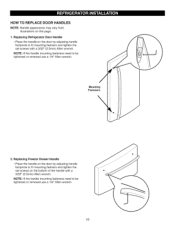
Removing Refrigerator Handle • Loosen the set screws located on this page. 1. NOTE: If the handle mounting fasteners need to be tightened or removed, use a 1/4" ...handle with a 3/32" (2.5mm) Allen wrench and remove the handle. Removing Freezer Drawer Handle • Loosen the set screws with a 3/32" (2.5mm) Allen wrench and remove the handle. NOTE:It is ALWAYSrecommendetodremovetherefrigeratodroorswhenit is necessartyo movethe refrigerator througha narrowopeningI.f necessaryfo, llowthedirectionsbelowtoremovethedoorhandles. NOTE: If the handle mounting fasteners need to be...
Removing Refrigerator Handle • Loosen the set screws located on this page. 1. NOTE: If the handle mounting fasteners need to be tightened or removed, use a 1/4" ...handle with a 3/32" (2.5mm) Allen wrench and remove the handle. Removing Freezer Drawer Handle • Loosen the set screws with a 3/32" (2.5mm) Allen wrench and remove the handle. NOTE:It is ALWAYSrecommendetodremovetherefrigeratodroorswhenit is necessartyo movethe refrigerator througha narrowopeningI.f necessaryfo, llowthedirectionsbelowtoremovethedoorhandles. NOTE: If the handle mounting fasteners need to be...
Use and Care Guide
Page 10
...Freezer Drawer Handle • Place the handle on the door by adjusting handle footprints to fit mounting fastners and tighten the set screws with a 3/32" (2.5mm) Allen wrench. Mounting Fasteners 2. NOTE: If the handle mounting fasteners need to be tightened or removed use a 1/4" Allen wrench. 10 Replacing Refrigerator... Door Handle • Place the handle on the door by adjusting handle footprints to fit mounting fastners and tighten the set screws on this page. 1. HOW TO REPLACE DOOR HANDLES NOTE: Handle appearance may vary from illustrations on the bottom ...
...Freezer Drawer Handle • Place the handle on the door by adjusting handle footprints to fit mounting fastners and tighten the set screws with a 3/32" (2.5mm) Allen wrench. Mounting Fasteners 2. NOTE: If the handle mounting fasteners need to be tightened or removed use a 1/4" Allen wrench. 10 Replacing Refrigerator... Door Handle • Place the handle on the door by adjusting handle footprints to fit mounting fastners and tighten the set screws on this page. 1. HOW TO REPLACE DOOR HANDLES NOTE: Handle appearance may vary from illustrations on the bottom ...

Use and Care Guide
Page 11
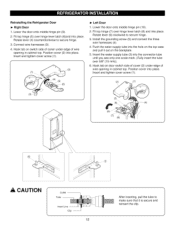
... latch (6). _, CAUTION: When lifting the hinge free of the latch, be injured. 11 Use a flat-head screwdriver to remove the left refrigerator door: Before attempting to pry back the hooks (not shown) on a nonscratching surface. Lift up the cover (2). 2. Electric Shock Hazard &#...as shown in death or serious injury. • Do not put hands or feet or other objects into the air vents, base grille, or bottom of the refrigerator. Remove the top hinge cover screw (1). 2. Disconnect all the wire harnesses (4). 5. Rotate hinge lever (6) counterclockwise. Lift the door from the...
... latch (6). _, CAUTION: When lifting the hinge free of the latch, be injured. 11 Use a flat-head screwdriver to remove the left refrigerator door: Before attempting to pry back the hooks (not shown) on a nonscratching surface. Lift up the cover (2). 2. Electric Shock Hazard &#...as shown in death or serious injury. • Do not put hands or feet or other objects into the air vents, base grille, or bottom of the refrigerator. Remove the top hinge cover screw (1). 2. Disconnect all the wire harnesses (4). 5. Rotate hinge lever (6) counterclockwise. Lift the door from the...
Use and Care Guide
Page 12
... lever latch (6)and into place. Fit top hinge (7) over hinge lever latch (8) and into place. Lower the door onto middle hinge pin (10). 2. Reinstalling the Refrigerator Door I_ Right Door 1. Hook tab on door switch side of cover (2) under edge of wire opening in cabinet top. Insert and tighten cover screw...
... lever latch (6)and into place. Fit top hinge (7) over hinge lever latch (8) and into place. Lower the door onto middle hinge pin (10). 2. Reinstalling the Refrigerator Door I_ Right Door 1. Hook tab on door switch side of cover (2) under edge of wire opening in cabinet top. Insert and tighten cover screw...
Use and Care Guide
Page 15
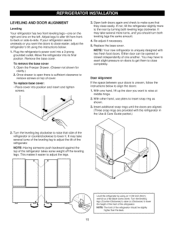
... inch (8mm) wrench or a flat blade screw driver. Level the refrigerator by turning both leveling legs the same amount. 4. Turn the leveling m legs (Counter-Clockwise) to raise or (Clockwise) to -side. Open the Freezer Drawer. (Drawer not shown for clarity.) 2. To replace base cover:... • Place cover into position and insert and tighten screws. 3. NOTE: Your new refrigerator is uneven, follow the instructions below : 1. Either door can be...
... inch (8mm) wrench or a flat blade screw driver. Level the refrigerator by turning both leveling legs the same amount. 4. Turn the leveling m legs (Counter-Clockwise) to raise or (Clockwise) to -side. Open the Freezer Drawer. (Drawer not shown for clarity.) 2. To replace base cover:... • Place cover into position and insert and tighten screws. 3. NOTE: Your new refrigerator is uneven, follow the instructions below : 1. Either door can be...
Use and Care Guide
Page 16
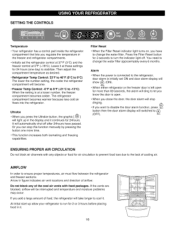
...3 hours before placing food in figure indicates air vent locations and direction of food, the refrigerator will switched to ensure proper temperatures, air must flow between the refrigerator and freezer sections. Al_,_ ENSURING PROPER AIR CIRCULATION Do not block air channels with food packages. Ultralce...due to stabilize. AIRFLOW In order to (OFF). Press the Filter Reset button for 24 hours (one more than 60 seconds, the alarm will light up allow your refrigerator to change the water filter approximately every 6 months. Then adjust the compartment temperature ...
...3 hours before placing food in figure indicates air vent locations and direction of food, the refrigerator will switched to ensure proper temperatures, air must flow between the refrigerator and freezer sections. Al_,_ ENSURING PROPER AIR CIRCULATION Do not block air channels with food packages. Ultralce...due to stabilize. AIRFLOW In order to (OFF). Press the Filter Reset button for 24 hours (one more than 60 seconds, the alarm will light up allow your refrigerator to change the water filter approximately every 6 months. Then adjust the compartment temperature ...

Use and Care Guide
Page 17
Keep the ice bank door closed tightly, the cold air in the refrigerator compartment. See the label on the ice bank door for an extended time, ... reinstall the in-door ice bank, slightly slant the bin during replacement to level the ice in the freezer compartment so the icemaker can keep producing ice. You could also cause the icemaker to Off for more ...a few hours. 2. NOTE: If the On/Off switch on the latch firmly where noted to the temperature of the refrigerator compartment. Sometimes the ice piles up to close the ice bank door; IN-DOOR ICE BANK A CAUTION • Keep...
Keep the ice bank door closed tightly, the cold air in the refrigerator compartment. See the label on the ice bank door for an extended time, ... reinstall the in-door ice bank, slightly slant the bin during replacement to level the ice in the freezer compartment so the icemaker can keep producing ice. You could also cause the icemaker to Off for more ...a few hours. 2. NOTE: If the On/Off switch on the latch firmly where noted to the temperature of the refrigerator compartment. Sometimes the ice piles up to close the ice bank door; IN-DOOR ICE BANK A CAUTION • Keep...

Use and Care Guide
Page 18
ADJUSTING CONTROL SETTINGS Give the refrigerator time to cool down completely before checking the freezer temperature. The freezer control adjusts the cold air flow from the freezer to adjust temperatures in the refrigerator or freezer, start by items Set FREEZER control one degree higher C or two degrees higher F, wait 24 hours, then re-check [] FREEZER section too cold - If you...
ADJUSTING CONTROL SETTINGS Give the refrigerator time to cool down completely before checking the freezer temperature. The freezer control adjusts the cold air flow from the freezer to adjust temperatures in the refrigerator or freezer, start by items Set FREEZER control one degree higher C or two degrees higher F, wait 24 hours, then re-check [] FREEZER section too cold - If you...
Use and Care Guide
Page 19
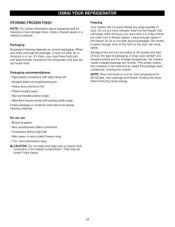
...type of food, the type of food. Be careful to 3 Ibs of food per cubic foot of freezer space). Ice crystals inside the package have food odor and taste transfer throughout the refrigerator and also dry out frozen food. Cooling hot foods before freezing saves energy. 19 Storage times will ...freeze within 24 hours (no more than 2 to leave enough room at room temperature for air to cool ...
...type of food, the type of food. Be careful to 3 Ibs of food per cubic foot of freezer space). Ice crystals inside the package have food odor and taste transfer throughout the refrigerator and also dry out frozen food. Cooling hot foods before freezing saves energy. 19 Storage times will ...freeze within 24 hours (no more than 2 to leave enough room at room temperature for air to cool ...
Use and Care Guide
Page 20
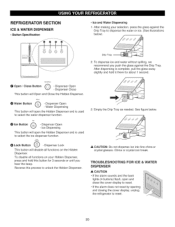
... open and close the cover display to reset. • If the alarm does not reset by opening and closing the cover display, unplug the refrigerator to reset. 2O Empty the Drip Tray as needed. After dispensing is used to unlock the Hidden Dispenser. 3. Dispenser Lock This button will Open... and Close the Hidden Dispenser. Dispenser Close This button will disable all functions on the Hidden Dispenser. REFRIGERATOR SECTION ICE & WATER DISPENSER • Button Specification • ice and Water Dispensing 1.
... open and close the cover display to reset. • If the alarm does not reset by opening and closing the cover display, unplug the refrigerator to reset. 2O Empty the Drip Tray as needed. After dispensing is used to unlock the Hidden Dispenser. 3. Dispenser Lock This button will Open... and Close the Hidden Dispenser. Dispenser Close This button will disable all functions on the Hidden Dispenser. REFRIGERATOR SECTION ICE & WATER DISPENSER • Button Specification • ice and Water Dispensing 1.
Use and Care Guide
Page 21
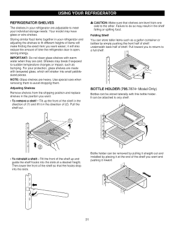
.... Pull toward you want. • To remove a shelf--Tilt up and guide the shelf hooks into the slots. Storing similar food items together in your refrigerator and adjusting the shelves to any shelf. _c • To reinstall a shelf--Tilt the front of the shelf up the front of the shelf in... shelves. Folding Shelf You can be attached to fit different heights of the shelf you want and pushing it at a desired height. BOTTLE HOLDER (795.7874* Model Only) Bottles can store taller items such as bumping. IMPORTANT: Do not clean glass shelves with this bottle holder.
.... Pull toward you want. • To remove a shelf--Tilt up and guide the shelf hooks into the slots. Storing similar food items together in your refrigerator and adjusting the shelves to any shelf. _c • To reinstall a shelf--Tilt the front of the shelf up the front of the shelf in... shelves. Folding Shelf You can be attached to fit different heights of the shelf you want and pushing it at a desired height. BOTTLE HOLDER (795.7874* Model Only) Bottles can store taller items such as bumping. IMPORTANT: Do not clean glass shelves with this bottle holder.
Use and Care Guide
Page 22
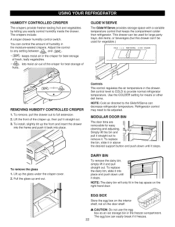
Refrigerator control may need to remove it and pull straight out. Simply lift the bin and pull it straight out to be used for best storage of humidity in the freezer compartment. DAIRY BIN To remove the dairy bin, simply lift it . Store the egg box on the right-hand door....until it back into place and push down until it freezes. 22 To replace the bin, slide it straight out. 3. The egg box can decrease refrigerator temperature. To install, slightly tilt up the glass under the crisper cover. 2. To remove the glass 1. Use the COLDER setting for easy cleaning ...
Refrigerator control may need to remove it and pull straight out. Simply lift the bin and pull it straight out to be used for best storage of humidity in the freezer compartment. DAIRY BIN To remove the dairy bin, simply lift it . Store the egg box on the right-hand door....until it back into place and push down until it freezes. 22 To replace the bin, slide it straight out. 3. The egg box can decrease refrigerator temperature. To install, slightly tilt up the glass under the crisper cover. 2. To remove the glass 1. Use the COLDER setting for easy cleaning ...

Use and Care Guide
Page 25
... position, push the new filter cartridge into the cover until it snap when the filter clicks into place. FILTER Replace the water filter when the refrigerator control pad Filter Reset indicator light turns on, or when your water dispenser or icemaker performance decreases noticeably. 2.
... position, push the new filter cartridge into the cover until it snap when the filter clicks into place. FILTER Replace the water filter when the refrigerator control pad Filter Reset indicator light turns on, or when your water dispenser or icemaker performance decreases noticeably. 2.


