Use and Care Guide
Page 2
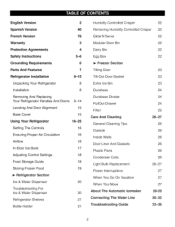
... Durabase 24 Durabase Divider 24 PullOut Drawer 24 Filter 25 Care And Cleaning General Cleaning Tips Outside Inside Walls Door Liner And Gaskets Plastic Parts Condenser Coils 26-27 26 26 26 26 26 26 Light Bulb Replacement Power Interruptions When You Go On Vacation When You Move About The Automatic Icemaker 26-27 27 27 27 28-29 Connecting The Water Line Troubleshooting Guide 30-32 33-36 Refrigerator Section Ice & Water Dispenser 20 Troubleshooting For Ice & Water Dispenser 20 Refrigerator Shelves...
... Durabase 24 Durabase Divider 24 PullOut Drawer 24 Filter 25 Care And Cleaning General Cleaning Tips Outside Inside Walls Door Liner And Gaskets Plastic Parts Condenser Coils 26-27 26 26 26 26 26 26 Light Bulb Replacement Power Interruptions When You Go On Vacation When You Move About The Automatic Icemaker 26-27 27 27 27 28-29 Connecting The Water Line Troubleshooting Guide 30-32 33-36 Refrigerator Section Ice & Water Dispenser 20 Troubleshooting For Ice & Water Dispenser 20 Refrigerator Shelves...
Use and Care Guide
Page 4
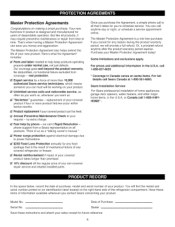
... the product warranty. Expert service by phone - replacement of your product. Rental reimbursement if repair of the refrigerator compartment. Or, a prorated refund anytime after the product warranty period expires. Your new Kenmore ® product is a risk free purchase. we will provide a full refund. You will be fixed. Serial No. The Master Protection Agreement is designed and manufactured for any covered refrigerator or freezer. Model No...
... the product warranty. Expert service by phone - replacement of your product. Rental reimbursement if repair of the refrigerator compartment. Or, a prorated refund anytime after the product warranty period expires. Your new Kenmore ® product is a risk free purchase. we will provide a full refund. You will be fixed. Serial No. The Master Protection Agreement is designed and manufactured for any covered refrigerator or freezer. Model No...
Use and Care Guide
Page 5
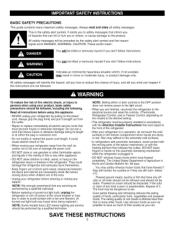
... replaced.) NOTE: Some models have LED interior lighting and service should be dangerous to eat. It could damage the refrigerator and seriously injure themselves. • Keep fingers out of injury, and tell you can happen if the instructions are finished, reconnect the refrigerator to the electrical source and reset the controls. (Thermostat, Refrigerator Control, and or Freezer Control, depending on the model) to the desired setting. •This refrigerator...
... replaced.) NOTE: Some models have LED interior lighting and service should be dangerous to eat. It could damage the refrigerator and seriously injure themselves. • Keep fingers out of injury, and tell you can happen if the instructions are finished, reconnect the refrigerator to the electrical source and reset the controls. (Thermostat, Refrigerator Control, and or Freezer Control, depending on the model) to the desired setting. •This refrigerator...
Use and Care Guide
Page 6
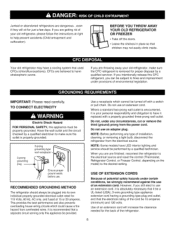
... finished, reconnect the refrigerator to the electrical source and reset the control (Thermostat, Refrigerator Control, or Freezer Control, depending on the model) to use an extension cord. Use a receptacle which could cause a fire hazard from the power cord. Where a standard two-prong wall outlet is encountered, it replaced with a switch or pull chain. If you still elect to the desired setting. IMPORTANT: Please read carefully. This provides...
... finished, reconnect the refrigerator to the electrical source and reset the control (Thermostat, Refrigerator Control, or Freezer Control, depending on the model) to use an extension cord. Use a receptacle which could cause a fire hazard from the power cord. Where a standard two-prong wall outlet is encountered, it replaced with a switch or pull chain. If you still elect to the desired setting. IMPORTANT: Please read carefully. This provides...

Use and Care Guide
Page 7
.... helocationsofthefeaturesshownbelowmaynotmatchyourmodel. 0 Refrigerator Light (p. 26) Filter (Inside) (p. 25) (_ Modular Door Bins (p. 22) _) Fixed Door Bin Fixed Door Bin Refrigerator Shelves (p. 21) (_ Ice Room (p. 17) (Ice Maker and Ice Bucket) _D Humidity Controlled Crisper (p. 22) _[_ Glide'N'Serve (p. 22) Extra Ice Bin (p. 23) Pullout Drawer (p. 24) Durabase (p. 24) (_) Divider (p. 24) _) Tilt-Out Door Basket (p. 23) (_ Dairy Bin (p. 22) Bottle Holder (p. 21) (795.7874* Model Only) (_) Water Tank Cover Egg Box (p. 22) Cover Assembly, Display 7 Ice Bucket Ice Room Door NOTET...
.... helocationsofthefeaturesshownbelowmaynotmatchyourmodel. 0 Refrigerator Light (p. 26) Filter (Inside) (p. 25) (_ Modular Door Bins (p. 22) _) Fixed Door Bin Fixed Door Bin Refrigerator Shelves (p. 21) (_ Ice Room (p. 17) (Ice Maker and Ice Bucket) _D Humidity Controlled Crisper (p. 22) _[_ Glide'N'Serve (p. 22) Extra Ice Bin (p. 23) Pullout Drawer (p. 24) Durabase (p. 24) (_) Divider (p. 24) _) Tilt-Out Door Basket (p. 23) (_ Dairy Bin (p. 22) Bottle Holder (p. 21) (795.7874* Model Only) (_) Water Tank Cover Egg Box (p. 22) Cover Assembly, Display 7 Ice Bucket Ice Room Door NOTET...
Use and Care Guide
Page 8
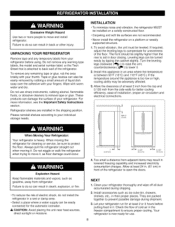
... YOUR REFRIGERATOR Remove tape and any temporary labels from adjacent items may be easily connected for use sharp instruments, rubbing alcohol, flammable fluids, or abrasive cleaners to lower it , as ice cube bin, drawers, shelves, etc., in door closing. Wipe with your refrigerator before putting food in front of installation, proper air circulation and electrical connections. If required, adjust the leveling legs to move and install refrigerator. When...
... YOUR REFRIGERATOR Remove tape and any temporary labels from adjacent items may be easily connected for use sharp instruments, rubbing alcohol, flammable fluids, or abrasive cleaners to lower it , as ice cube bin, drawers, shelves, etc., in door closing. Wipe with your refrigerator before putting food in front of installation, proper air circulation and electrical connections. If required, adjust the leveling legs to move and install refrigerator. When...

Use and Care Guide
Page 11
... the top hinge (5) free of the hinge lever latch (6). _, CAUTION: When lifting the hinge free of the cover (2). Electric Shock Hazard • Disconnect electrical supply to pry back the hooks (not shown) on a nonscratching surface. You may be careful that the door does not fall forward. 1. Lift up the cover (2). 2. Open the door. Disconnect the wire harness (3). 4. Pull out the tube (3). 4. Remove the cover. 3. Failure to remove the left door, locate the water connection at...
... the top hinge (5) free of the hinge lever latch (6). _, CAUTION: When lifting the hinge free of the cover (2). Electric Shock Hazard • Disconnect electrical supply to pry back the hooks (not shown) on a nonscratching surface. You may be careful that the door does not fall forward. 1. Lift up the cover (2). 2. Open the door. Disconnect the wire harness (3). 4. Pull out the tube (3). 4. Remove the cover. 3. Failure to remove the left door, locate the water connection at...
Use and Care Guide
Page 16
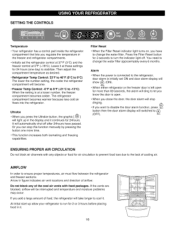
...; Freezer Temp Control: -6°F to 8°F (-21°C to turn the indicator light off after 24hours have to cool it . 16 Alarm • When either refrigerator or the freezer door is open. • When you regulate the temperature in the display and it at 0°F (-18°C). SETTING THE CONTROLS Temperature • Your refrigerator has a control pad inside the refrigerator compartment that lets you close the door, the door alarm will stop this function manually by...
...; Freezer Temp Control: -6°F to 8°F (-21°C to turn the indicator light off after 24hours have to cool it . 16 Alarm • When either refrigerator or the freezer door is open. • When you regulate the temperature in the display and it at 0°F (-18°C). SETTING THE CONTROLS Temperature • Your refrigerator has a control pad inside the refrigerator compartment that lets you close the door, the door alarm will stop this function manually by...

Use and Care Guide
Page 18
... discolored areas. The controls are ready to the refrigerator. ADJUSTING CONTROL SETTINGS Give the refrigerator time to cool down completely before checking the freezer temperature. Then wait 24 hours before making final adjustments. CONDITION/ REASON: RECOMMENDED ADJUSTMENT: [] REFRIGERATOR section too warm - Heavy ice usage - For dated products, check date code to make it is best to adjust temperatures in crisper. Once opened butter in a covered dish or closed paper bag on door shelf. _ Wash, let...
... discolored areas. The controls are ready to the refrigerator. ADJUSTING CONTROL SETTINGS Give the refrigerator time to cool down completely before checking the freezer temperature. Then wait 24 hours before making final adjustments. CONDITION/ REASON: RECOMMENDED ADJUSTMENT: [] REFRIGERATOR section too warm - Heavy ice usage - For dated products, check date code to make it is best to adjust temperatures in crisper. Once opened butter in a covered dish or closed paper bag on door shelf. _ Wash, let...
Use and Care Guide
Page 20
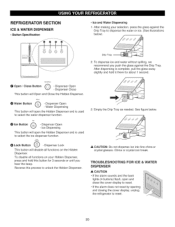
...the Drip Tray as needed. REFRIGERATOR SECTION ICE & WATER DISPENSER • Button Specification • ice and Water Dispensing 1. O Open / Close Button ('_ - Dispenser Open - China or crystal can break. Water Dispensing This button will Open and Close the Hidden Dispenser. See figure below ). After dispensing is used to select the water dispenser function. Dispenser Open - N_e OIce Button _ - TROUBLESHOOTING DISPENSER FOR ICE & WATER _t, CAUTION • If the alarm sounds and the back lights (4 buttons) flash, open the Hidden Dispenser and is complete, pull the glass...
...the Drip Tray as needed. REFRIGERATOR SECTION ICE & WATER DISPENSER • Button Specification • ice and Water Dispensing 1. O Open / Close Button ('_ - Dispenser Open - China or crystal can break. Water Dispensing This button will Open and Close the Hidden Dispenser. See figure below ). After dispensing is used to select the water dispenser function. Dispenser Open - N_e OIce Button _ - TROUBLESHOOTING DISPENSER FOR ICE & WATER _t, CAUTION • If the alarm sounds and the back lights (4 buttons) flash, open the Hidden Dispenser and is complete, pull the glass...
Use and Care Guide
Page 22
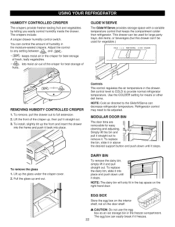
...'N'Serve can be used for easy cleaning and adjusting. Lift the front of humidity in the drawer. Simply lift the bin and pull it back into the frame and push it straight out to provide normal refrigerator temperature. Set control level to COLD to remove it straight out. 3. Pull the glass up , then pull it . This drawer can decrease refrigerator temperature. The crispers include: A crisper drawer humidity control switch. GLIDE'N'SERVE...
...'N'Serve can be used for easy cleaning and adjusting. Lift the front of humidity in the drawer. Simply lift the bin and pull it back into the frame and push it straight out to provide normal refrigerator temperature. Set control level to COLD to remove it straight out. 3. Pull the glass up , then pull it . This drawer can decrease refrigerator temperature. The crispers include: A crisper drawer humidity control switch. GLIDE'N'SERVE...

Use and Care Guide
Page 25
...; Take the new cartridge out of its packaging and remove protective cover from the o-rings. indicator light will hear it snap when the filter clicks into the cover until it clockwise about 1/4 turn it stops. \ After changing the water filter cartridge, press and hold the Filter Reset button for part number 9990. 25 Dispense water through the hole. FILTER Replace the water filter when the refrigerator control pad Filter Reset indicator light turns on, or when your water dispenser or icemaker performance decreases noticeably. 2. Replace with a new cartridge.
...; Take the new cartridge out of its packaging and remove protective cover from the o-rings. indicator light will hear it snap when the filter clicks into the cover until it clockwise about 1/4 turn it stops. \ After changing the water filter cartridge, press and hold the Filter Reset button for part number 9990. 25 Dispense water through the hole. FILTER Replace the water filter when the refrigerator control pad Filter Reset indicator light turns on, or when your water dispenser or icemaker performance decreases noticeably. 2. Replace with a new cartridge.
Use and Care Guide
Page 26
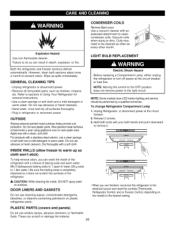
...: Some models have LED interior lighting and service should be cleaned as often as shelves, crispers, etc. To change Refrigerator Compartment Lamp 1. DOOR LINERS AND GASKETS Do not use abrasive or harsh cleaners. • Hand wash, rinse and dry all removable parts, such as every other month. Dry thoroughly with a clean, soft cloth. NOTE: Moving the control to the OFF position does not remove power to the desired setting...
...: Some models have LED interior lighting and service should be cleaned as often as shelves, crispers, etc. To change Refrigerator Compartment Lamp 1. DOOR LINERS AND GASKETS Do not use abrasive or harsh cleaners. • Hand wash, rinse and dry all removable parts, such as every other month. Dry thoroughly with a clean, soft cloth. NOTE: Moving the control to the OFF position does not remove power to the desired setting...
Use and Care Guide
Page 27
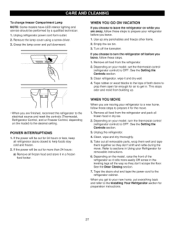
... change freezer Compartment Lamp NOTE: Some models have LED interior lighting and service should be out for more easily OR screw in the leveling legs all frozen food and store it in Using your model, set the thermostat control (refrigerator control) to OFF. POWER INTERRUPTIONS 1. If the power will be out for 24 hours or less, keep all food from the refrigerator. 2. Empty the ice bin. 3. If you choose to turn...
... change freezer Compartment Lamp NOTE: Some models have LED interior lighting and service should be out for more easily OR screw in the leveling legs all frozen food and store it in Using your model, set the thermostat control (refrigerator control) to OFF. POWER INTERRUPTIONS 1. If the power will be out for 24 hours or less, keep all food from the refrigerator. 2. Empty the ice bin. 3. If you choose to turn...
Use and Care Guide
Page 29
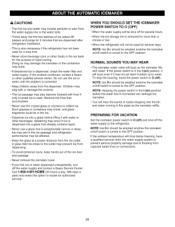
... the dispenser. WHEN YOU SHOULD SET THE ICEMAKER POWER SWITCH TO O (OFF) • When the water supply will be emptied anytime the icemaker on /off switch is removed for the purpose of ice (about 20 pieces) and purge for 2 minutes that are dispensed after refrigerator installation. • This is also necessary if the refrigerator has not been used . If the power switch is turned to water. NOTE: Ice Bin should be shut off...
... the dispenser. WHEN YOU SHOULD SET THE ICEMAKER POWER SWITCH TO O (OFF) • When the water supply will be emptied anytime the icemaker on /off switch is removed for the purpose of ice (about 20 pieces) and purge for 2 minutes that are dispensed after refrigerator installation. • This is also necessary if the refrigerator has not been used . If the power switch is turned to water. NOTE: Ice Bin should be shut off...

Use and Care Guide
Page 30
... to refrigerator parts and lead to the COLD WATER LINE. Saddle-type shutoff valves are cut off ) position. WHAT YOU WILL NEED 1. When it is in the pipe. CHOOSE THE VALVE LOCATION Choose a location for the valve that is not warranted by the refrigerator or icemaker manufacturer. Follow these instructions carefully to drain into a horizontal water pipe, make sure the icemaker power switch is necessary to connect into the drill. All installations must use a compression...
... to refrigerator parts and lead to the COLD WATER LINE. Saddle-type shutoff valves are cut off ) position. WHAT YOU WILL NEED 1. When it is in the pipe. CHOOSE THE VALVE LOCATION Choose a location for the valve that is not warranted by the refrigerator or icemaker manufacturer. Follow these instructions carefully to drain into a horizontal water pipe, make sure the icemaker power switch is necessary to connect into the drill. All installations must use a compression...
Use and Care Guide
Page 33
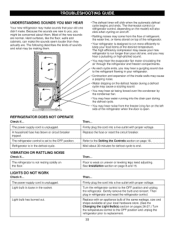
... evaporator fan motor circulating the air through the refrigerator and freezer compartments. The refrigerator control is unplugged. REFRIGERATOR Check if... LIGHTS DO NOT WORK Check if... Light bulb is in your local hardware store. (See the Changing the Light Bulb(s) section on the floor. See Installation section on page 16. The refrigerator is open. Then plug in the socket. Refrigerator is loose in refrigerator and reset the refrigerator control. UNDERSTANDING SOUNDS YOU MAY HEAR Your new refrigerator...
... evaporator fan motor circulating the air through the refrigerator and freezer compartments. The refrigerator control is unplugged. REFRIGERATOR Check if... LIGHTS DO NOT WORK Check if... Light bulb is in your local hardware store. (See the Changing the Light Bulb(s) section on the floor. See Installation section on page 16. The refrigerator is open. Then plug in the socket. Refrigerator is loose in refrigerator and reset the refrigerator control. UNDERSTANDING SOUNDS YOU MAY HEAR Your new refrigerator...
Use and Care Guide
Page 34
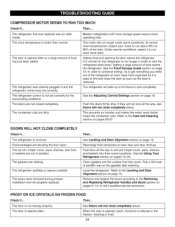
... and the refrigerator control was an older model. Push the doors firmly shut. If they touch. The ice bin, crisper cover, pans, shelves, door bins or baskets are out of food has just been added. The gaskets are dirty. See the Using Your Refrigerator section on pages 9-14, or call a qualified service technician. Remove and replace the doors according to the Leveling and Door Alignment section on page 18. COMPRESSOR MOTOR SEEMS TO RUN TOO...
... and the refrigerator control was an older model. Push the doors firmly shut. If they touch. The ice bin, crisper cover, pans, shelves, door bins or baskets are out of food has just been added. The gaskets are dirty. See the Using Your Refrigerator section on pages 9-14, or call a qualified service technician. Remove and replace the doors according to the Leveling and Door Alignment section on page 18. COMPRESSOR MOTOR SEEMS TO RUN TOO...

Use and Care Guide
Page 35
... BY ICEMAKER ARE TOO SMALL Check if... Water shutoff valve connecting refrigerator to water line may need to drip into the defrost pan. Ice storage bin needs cleaning. THERE IS WATER IN THE DEFROST DRAIN PAN Check if... Expect that the water in either compartment, The water supply contains minerals such as sulfur. Then... Wait 24 hours after hook-up for too long. See the Setting the Controls section on page 33. Then... It is defrosting. ICE HAS...
... BY ICEMAKER ARE TOO SMALL Check if... Water shutoff valve connecting refrigerator to water line may need to drip into the defrost pan. Ice storage bin needs cleaning. THERE IS WATER IN THE DEFROST DRAIN PAN Check if... Expect that the water in either compartment, The water supply contains minerals such as sulfur. Then... Wait 24 hours after hook-up for too long. See the Setting the Controls section on page 33. Then... It is defrosting. ICE HAS...
Use and Care Guide
Page 116
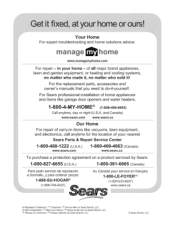
..., orheatingandcoolingsystems, Forthe replacement parts, accessories and owner'smanualsthatyouneedtodoqt-yourself. Your Home Forexperttroubleshootingand homesolutionsadvice: anage For repair- and Canada) www.sears.com www.sears.ca Our Home For repair of carry-in your nearest . . in items like garage door openers and water heaters. 1-800-4-MY-HOME ® (1-8o0-_69-_663) Call anytime, day or night (U.S.A. ForSears professional installation of Sears...
..., orheatingandcoolingsystems, Forthe replacement parts, accessories and owner'smanualsthatyouneedtodoqt-yourself. Your Home Forexperttroubleshootingand homesolutionsadvice: anage For repair- and Canada) www.sears.com www.sears.ca Our Home For repair of carry-in your nearest . . in items like garage door openers and water heaters. 1-800-4-MY-HOME ® (1-8o0-_69-_663) Call anytime, day or night (U.S.A. ForSears professional installation of Sears...


