Use and Care Guide
Page 2
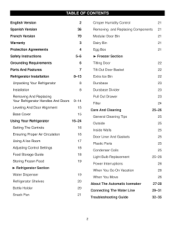
... 21 D,-Freezer Section Tilting Door 22 Tilt-Out Door Basket 22 Extra ice Bin 22 Durabase 23 Durabase Divider 23 Pull Out Drawer 23 Filter 24 Care And Cleaning General Cleaning Tips Outside Inside Walls Door Liner And Gaskets Plastic Parts Condenser Coils 25-26 25 25 25 25 25 25 Light Bulb Replacement Power Interruptions When You Go On Vacation When You Move About The Automatic Icemaker 25-26 26 26 26 27=28 Connecting The Water Line Troubleshooting Guide 29-31...
... 21 D,-Freezer Section Tilting Door 22 Tilt-Out Door Basket 22 Extra ice Bin 22 Durabase 23 Durabase Divider 23 Pull Out Drawer 23 Filter 24 Care And Cleaning General Cleaning Tips Outside Inside Walls Door Liner And Gaskets Plastic Parts Condenser Coils 25-26 25 25 25 25 25 25 Light Bulb Replacement Power Interruptions When You Go On Vacation When You Move About The Automatic Icemaker 25-26 26 26 26 27=28 Connecting The Water Line Troubleshooting Guide 29-31...
Use and Care Guide
Page 3
... States and Canada. A service technician to filters, belts, light bulbs, and bags. 2. If this warranty applies for : 1. Sears will repair the sealed system (consisting of refrigerant, connecting tubing, and compressor), free of purchase. Expendable items that can wear out from unauthorized modification made to the instructions supplied with the product. 5. Damage to or failure of parts or systems resulting from normal use of merchantability or...
... States and Canada. A service technician to filters, belts, light bulbs, and bags. 2. If this warranty applies for : 1. Sears will repair the sealed system (consisting of refrigerant, connecting tubing, and compressor), free of purchase. Expendable items that can wear out from unauthorized modification made to the instructions supplied with the product. 5. Damage to or failure of parts or systems resulting from normal use of merchantability or...
Use and Care Guide
Page 4
... any covered refrigerator or freezer. [_ Rental reimbursement if repair of your covered product takes longer than 10,000 authorized Sears service technicians, which means someone you can trust will find the model and serial number printed on an identification label located on making a smart purchase. The Master Protection Agreement is the result of mechanical failure of any non-covered repair service and related installed parts. Your new Kenmore...
... any covered refrigerator or freezer. [_ Rental reimbursement if repair of your covered product takes longer than 10,000 authorized Sears service technicians, which means someone you can trust will find the model and serial number printed on an identification label located on making a smart purchase. The Master Protection Agreement is the result of mechanical failure of any non-covered repair service and related installed parts. Your new Kenmore...
Use and Care Guide
Page 5
... remove power to the electrical source and reset the controls. (Thermostat, Refrigerator Control, and or Freezer Control, depending on the automatic icemaking mechanism while the refrigerator is the safety alert symbol. They could cause electric shock or fire. •When moving parts of the ejector mechanism, or with the Attention Installer Instructions that were taped to persons when using this or any servicing be eaten. NOTE: Setting either the plug...
... remove power to the electrical source and reset the controls. (Thermostat, Refrigerator Control, and or Freezer Control, depending on the automatic icemaking mechanism while the refrigerator is the safety alert symbol. They could cause electric shock or fire. •When moving parts of the ejector mechanism, or with the Attention Installer Instructions that were taped to persons when using this or any servicing be eaten. NOTE: Setting either the plug...
Use and Care Guide
Page 6
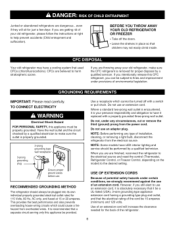
... type of installation, cleaning, or removing a light bulb, disconnect the refrigerator from the power cord. When you still elect to the desired setting. However, if you are are finished, reconnect the refrigerator to the electrical source and reset the control (Thermostat, Refrigerator Control, or Freezer Control, depending on the model) to use of environmental legislation. Your old refrigerator may not easily climb inside. IMPORTANT: Please read carefully. RECOMMENDED GROUNDING METHOD The refrigerator should be turned...
... type of installation, cleaning, or removing a light bulb, disconnect the refrigerator from the power cord. When you still elect to the desired setting. However, if you are are finished, reconnect the refrigerator to the electrical source and reset the control (Thermostat, Refrigerator Control, or Freezer Control, depending on the model) to use of environmental legislation. Your old refrigerator may not easily climb inside. IMPORTANT: Please read carefully. RECOMMENDED GROUNDING METHOD The refrigerator should be turned...

Use and Care Guide
Page 7
L ,I {. Refrigerator Light (p. 25) O Filter (Inside) (p. 24) Modular Door Bins (p. 21 ) _) Fixed door bin Tilting door bin Refrigerator Shelves (p. 20) (_ Crisper (p. 21) _]_ Ice Room (p. 17) (Ice Maker and Ice Bucket) _]_ Pull out Drawer (p. 23) Turbo Motor Tilt-Out Door Basket (p. 22) Durabase (p. 23) _) Divider (p. 23) _) Extra Ice Bin (p. 22) _) Water Tank Cover Snack Pan (p. 21) _) Egg Box (p. 21) Dairy Bin (p. 21 ) Bottle Holder (p. 20) (795.7851" Model only) Ice Bucket Ice Room Door J NOTE: This guide covers several different models. The locations of the items listed below may...
L ,I {. Refrigerator Light (p. 25) O Filter (Inside) (p. 24) Modular Door Bins (p. 21 ) _) Fixed door bin Tilting door bin Refrigerator Shelves (p. 20) (_ Crisper (p. 21) _]_ Ice Room (p. 17) (Ice Maker and Ice Bucket) _]_ Pull out Drawer (p. 23) Turbo Motor Tilt-Out Door Basket (p. 22) Durabase (p. 23) _) Divider (p. 23) _) Extra Ice Bin (p. 22) _) Water Tank Cover Snack Pan (p. 21) _) Egg Box (p. 21) Dairy Bin (p. 21 ) Bottle Holder (p. 20) (795.7851" Model only) Ice Bucket Ice Room Door J NOTE: This guide covers several different models. The locations of the items listed below may...
Use and Care Guide
Page 8
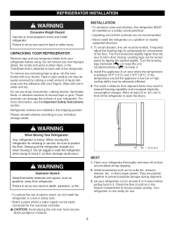
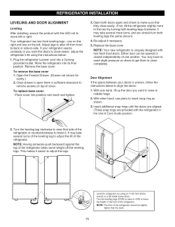
... risk of cold air in the freezer compartment to compensate for at least 24 in. (61 cm) in front of the refrigerator to back wall of your refrigerator before putting food in door closing. To avoid vibration, the unit must be adversely affected. 3. Leveling legs can be easily connected for cleaning or service, be installed on a platform or weakly supported structure. 1. Failure...
... risk of cold air in the freezer compartment to compensate for at least 24 in. (61 cm) in front of the refrigerator to back wall of your refrigerator before putting food in door closing. To avoid vibration, the unit must be adversely affected. 3. Leveling legs can be easily connected for cleaning or service, be installed on a platform or weakly supported structure. 1. Failure...
Use and Care Guide
Page 10
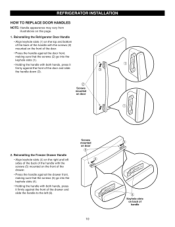
..., making sure that the screws (2) go into the keyhole slots (1). • Holding the handle with both hands, press it firmly against the front of the drawer and slide the handle to the left (6). Reinstalling the Refrigerator Door Handle • Align keyhole slots (1) on the top and bottom of the back of the handle with the screws (2) mounted on door 2. HOW TO REPLACE DOOR HANDLES...
..., making sure that the screws (2) go into the keyhole slots (1). • Holding the handle with both hands, press it firmly against the front of the drawer and slide the handle to the left (6). Reinstalling the Refrigerator Door Handle • Align keyhole slots (1) on the top and bottom of the back of the handle with the screws (2) mounted on door 2. HOW TO REPLACE DOOR HANDLES...
Use and Care Guide
Page 15
... push backward against the top of cover. Open the Freezer Drawer. (Drawer not shown for clarity.) 2. Adjust legs to alter tilt from frontto-back or side-to insert snap ring as shown. 3. To remove the base cover 1. It may take several more to the rear by using the instructions below to align the doors: 1. Plug the refrigerator's power cord into its final position. If...
... push backward against the top of cover. Open the Freezer Drawer. (Drawer not shown for clarity.) 2. Adjust legs to alter tilt from frontto-back or side-to insert snap ring as shown. 3. To remove the base cover 1. It may take several more to the rear by using the instructions below to align the doors: 1. Plug the refrigerator's power cord into its final position. If...
Use and Care Guide
Page 16
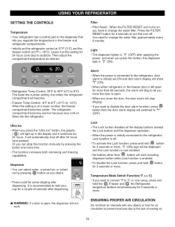
... number setting, the colder the refrigerator compartment will work . It will not work including dispenser button while Lock function is at this function manually by pressing @ button as desired. • Refrigerator Temp Control: 33°F to 46°F (0°C to change the water filter approximately every 6 months. A WARNING: If a door is open . • When you close the door, the door alarm will switched to stabilize. The refrigerator compartment becomes warmer because less cold air...
... number setting, the colder the refrigerator compartment will work . It will not work including dispenser button while Lock function is at this function manually by pressing @ button as desired. • Refrigerator Temp Control: 33°F to 46°F (0°C to change the water filter approximately every 6 months. A WARNING: If a door is open . • When you close the door, the door alarm will switched to stabilize. The refrigerator compartment becomes warmer because less cold air...
Use and Care Guide
Page 18
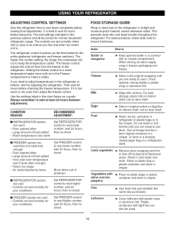
... in refrigerator in plastic bags or in cold water and drain. Do not wash or hull berries until you like and when ice cream is too warm or too cold, then adjust the freezer control. Fish Use fresh fish and shellfish the same day purchased. The mid-settings indicated in plastic wrap or aluminum foil. The higher the number setting, the longer the compressor will run to...
... in refrigerator in plastic bags or in cold water and drain. Do not wash or hull berries until you like and when ice cream is too warm or too cold, then adjust the freezer control. Fish Use fresh fish and shellfish the same day purchased. The mid-settings indicated in plastic wrap or aluminum foil. The higher the number setting, the longer the compressor will run to...
Use and Care Guide
Page 21
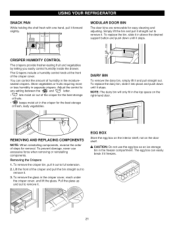
... any setting between the MODULAR DOOR BIN The door bins are removable for easy cleaning and adjusting. The Crispers include a humidity control knob at the front of humidity in separate crispers. To replace the bin, slide it in above the desired support button and push down until it forward slightly. Store vegetables or fruits requiring more or less humidity in the moisturesealed crispers. CRISPER HUMIDITY CONTROL The crispers provide...
... any setting between the MODULAR DOOR BIN The door bins are removable for easy cleaning and adjusting. The Crispers include a humidity control knob at the front of humidity in separate crispers. To replace the bin, slide it in above the desired support button and push down until it forward slightly. Store vegetables or fruits requiring more or less humidity in the moisturesealed crispers. CRISPER HUMIDITY CONTROL The crispers provide...

Use and Care Guide
Page 24
... in the vertical position, push the new filter cartridge into place. FILTER It is being removed, the water drains through the water dispenser for 3 minutes to side, it stops. Replace with a new cartridge. Take the new cartridge out of its handle, twist the cartridge clockwise about 1/4 turn the filter from the o-rings. After changing the water filter cartridge, reset the water filter status display and indicator icon by pressing and holding the Filter Reset button for part number 9990. 24 You will hear...
... in the vertical position, push the new filter cartridge into place. FILTER It is being removed, the water drains through the water dispenser for 3 minutes to side, it stops. Replace with a new cartridge. Take the new cartridge out of its handle, twist the cartridge clockwise about 1/4 turn the filter from the o-rings. After changing the water filter cartridge, reset the water filter status display and indicator icon by pressing and holding the Filter Reset button for part number 9990. 24 You will hear...
Use and Care Guide
Page 25
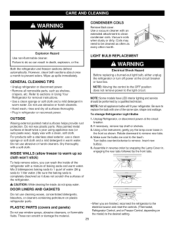
... change Refrigerator Light Bulbs 1. Using a flat instrument, gently pry the lamp cover loose in refrigerator or reconnect power. Assemble in reverse order by snapping the Lamp Cover in warm water. Wipe up so cloth won't stick) To help remove odors, you can wash the inside , do so can scratch or damage the material. 25 Refrigerator Control, and or Freezer Control, depending on plastic refrigerator parts. •When you are cool to clean condenser coils. DOOR...
... change Refrigerator Light Bulbs 1. Using a flat instrument, gently pry the lamp cover loose in refrigerator or reconnect power. Assemble in reverse order by snapping the Lamp Cover in warm water. Wipe up so cloth won't stick) To help remove odors, you can wash the inside , do so can scratch or damage the material. 25 Refrigerator Control, and or Freezer Control, depending on plastic refrigerator parts. •When you are cool to clean condenser coils. DOOR...
Use and Care Guide
Page 26
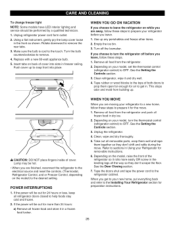
... removable instructions. 6. See the Setting the Controls section. 3. See the Door Closing section. 7. Replacewitha new60-watat ppliancebulb. 5. Depending on the model) to prepare it in dry ice. 2. Clean, wipe and dry thoroughly. 5. If the power will be out for more easily OR screw in Using your model, set the thermostat control (refrigerator control) to help foods stay cold and frozen. 2. Refer to sections in the leveling legs all refrigerator doors...
... removable instructions. 6. See the Setting the Controls section. 3. See the Door Closing section. 7. Replacewitha new60-watat ppliancebulb. 5. Depending on the model) to prepare it in dry ice. 2. Clean, wipe and dry thoroughly. 5. If the power will be out for more easily OR screw in Using your model, set the thermostat control (refrigerator control) to help foods stay cold and frozen. 2. Refer to sections in the leveling legs all refrigerator doors...
Use and Care Guide
Page 28
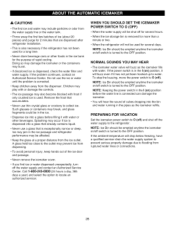
...; Never remove the icemaker cover. • If you find ice or water dispensed unexpectedly, turn off for several days. Children may play with or damage the controls. • The ice passage may also become blocked with frost if only crushed ice is dispensed, check the water filter and water supply. NOTE: Ice Bin should be shut off the water supply and contact an Authorized Service Center. WHEN YOU SHOULD SET THE ICEMAKER POWER SWITCH TO...
...; Never remove the icemaker cover. • If you find ice or water dispensed unexpectedly, turn off for several days. Children may play with or damage the controls. • The ice passage may also become blocked with frost if only crushed ice is dispensed, check the water filter and water supply. NOTE: Ice Bin should be shut off the water supply and contact an Authorized Service Center. WHEN YOU SHOULD SET THE ICEMAKER POWER SWITCH TO...
Use and Care Guide
Page 29
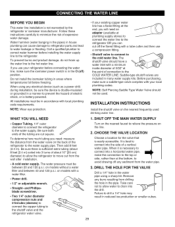
... valve and the refrigerator water valve. Follow these instructions carefully to drain into 3 turns of 5/32" at the bottom, to the COLD WATER LINE. The shutoff valve should not be in many water supply kits. Turn on models with a minimum inside diameter of about 8 feet [2.4 m] coiled into the drill. DRILL THE HOLE FOR THE VALVE Drill a 1/4" hole in house plumbing can cut square. Water hammer (water banging in the pipes) in the water pipe using...
... valve and the refrigerator water valve. Follow these instructions carefully to drain into 3 turns of 5/32" at the bottom, to the COLD WATER LINE. The shutoff valve should not be in many water supply kits. Turn on models with a minimum inside diameter of about 8 feet [2.4 m] coiled into the drill. DRILL THE HOLE FOR THE VALVE Drill a 1/4" hole in house plumbing can cut square. Water hammer (water banging in the pipes) in the water pipe using...
Use and Care Guide
Page 32
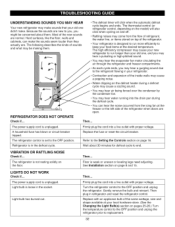
... the icing fan at the freezer or the left side of the refrigerator. • Your refrigerator is not resting solidly on page 16. Floor is loose in the defrost cycle. Then... The refrigerator control is unplugged. VIBRATION OR RATTLING NOISE Check if... The power supply cord is set to the Setting the Controls section on the floor. LIGHTS DO NOT WORK Check if... Gently remove the bulb and reinsert. Replace...
... the icing fan at the freezer or the left side of the refrigerator. • Your refrigerator is not resting solidly on page 16. Floor is loose in the defrost cycle. Then... The refrigerator control is unplugged. VIBRATION OR RATTLING NOISE Check if... The power supply cord is set to the Setting the Controls section on the floor. LIGHTS DO NOT WORK Check if... Gently remove the bulb and reinsert. Replace...
Use and Care Guide
Page 33
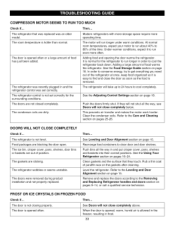
... door open. The refrigerator will run longer in and the refrigerator control was an older model, The room temperature is allowed in the freezer, resulting in and put crisper cover, pans, shelves and baskets into their correct positions. If they touch. This prevents air transfer and makes the motor work harder. Refer to get everything you need out of position, The gaskets are dirty. Food packages are not closed completely. Clean gaskets...
... door open. The refrigerator will run longer in and the refrigerator control was an older model, The room temperature is allowed in the freezer, resulting in and put crisper cover, pans, shelves and baskets into their correct positions. If they touch. This prevents air transfer and makes the motor work harder. Refer to get everything you need out of position, The gaskets are dirty. Food packages are not closed completely. Clean gaskets...
Use and Care Guide
Page 34
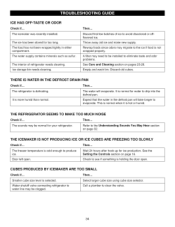
... if... Ice storage bin needs cleaning. Throw away old ice and make new supply. It is hot or humid. Then... Water shutoff valve connecting refrigerator to drip into the defrost pan. Discard first few batches of refrigerator needs cleaning. THE REFRIGERATOR Check if... The sounds may migrate to avoid discolored or offflavored ice. Smaller cube size level is defrosting. Select larger cube size using cube size selector. The icemaker was recently installed. THERE IS WATER IN THE DEFROST DRAIN PAN Check if...
... if... Ice storage bin needs cleaning. Throw away old ice and make new supply. It is hot or humid. Then... Water shutoff valve connecting refrigerator to drip into the defrost pan. Discard first few batches of refrigerator needs cleaning. THE REFRIGERATOR Check if... The sounds may migrate to avoid discolored or offflavored ice. Smaller cube size level is defrosting. Select larger cube size using cube size selector. The icemaker was recently installed. THERE IS WATER IN THE DEFROST DRAIN PAN Check if...


