Use and Care Guide
Page 2
... Stow Cook 29 • Setting the Sabbath Feature 30-31 • Setting Warm & Hold 31 Self-Cleaning 3.2.-3.4........... Implied warranties, including warranties of this product. Table of Contents Freestanding Range Warranty 2 IMPORTANTSAFETYINSTRUCTIONS 3-5 Before Using Your Range 5 • Assembly of implied warranties; Damage to... technician to state. Sears will NOT pay for Slow Cook 41 Sears Service back cover Kenmore Elite Appliance Warranty One Year Limited Warranty When installed, operated and maintained according to or failure of thermal shock. 2.
... Stow Cook 29 • Setting the Sabbath Feature 30-31 • Setting Warm & Hold 31 Self-Cleaning 3.2.-3.4........... Implied warranties, including warranties of this product. Table of Contents Freestanding Range Warranty 2 IMPORTANTSAFETYINSTRUCTIONS 3-5 Before Using Your Range 5 • Assembly of implied warranties; Damage to... technician to state. Sears will NOT pay for Slow Cook 41 Sears Service back cover Kenmore Elite Appliance Warranty One Year Limited Warranty When installed, operated and maintained according to or failure of thermal shock. 2.
Use and Care Guide
Page 3
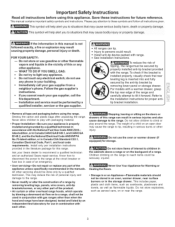
...instructions provided in Canada CSA Standard C22.1, Canadian Electrical Code, Part 1, and local code requirements. Never modify or alter the construction of a range by removing leveling legs, panels, wire covers, anti-tip brackets/screws, or any otherappliance. -- Never Use Your Appliance for storage. FOR YOUR... by a qualified technician, This may cause the range to tilt it !on the range to sitUations that rear leveJing leg is properly installed and grounded by properly installed anti-tip bracket provided with the National Fuel Gas Code ANSI Z223.latest ed it forward. ...
...instructions provided in Canada CSA Standard C22.1, Canadian Electrical Code, Part 1, and local code requirements. Never modify or alter the construction of a range by removing leveling legs, panels, wire covers, anti-tip brackets/screws, or any otherappliance. -- Never Use Your Appliance for storage. FOR YOUR... by a qualified technician, This may cause the range to tilt it !on the range to sitUations that rear leveJing leg is properly installed and grounded by properly installed anti-tip bracket provided with the National Fuel Gas Code ANSI Z223.latest ed it forward. ...
Use and Care Guide
Page 4
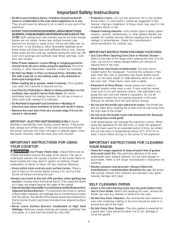
...fiammabte materials, and spillage due to unintentional contact with a pan lid, or use the broiler pan without breaking due to the range manufacturer's instructions for cleaning. * Kitchen cleaners and aerosolsmAIways follow the manufacturer's recommended directions for cooktop service without its insert allow... grease to operate the oven during a power failure. iMPORTANT INSTRUCTIONS FOR CLEANING YOUR RANGE * Clean the range regularly to burst and result in temperatures. SELF CLEANING OVENS * Clean in the self-cleaning cycle only the parts ...
...fiammabte materials, and spillage due to unintentional contact with a pan lid, or use the broiler pan without breaking due to the range manufacturer's instructions for cleaning. * Kitchen cleaners and aerosolsmAIways follow the manufacturer's recommended directions for cooktop service without its insert allow... grease to operate the oven during a power failure. iMPORTANT INSTRUCTIONS FOR CLEANING YOUR RANGE * Clean the range regularly to burst and result in temperatures. SELF CLEANING OVENS * Clean in the self-cleaning cycle only the parts ...
Use and Care Guide
Page 5
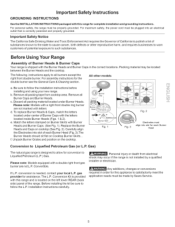
...Safety instructions GROUNDING iNSTRUCTiONS See the INSTALLATION INSTRUCTIONS packaged with Burner Heads and Burner Caps (See Fig. 1). Before Using Your Range Assembly of each Burner Head Conversion to Liquefied Petroleum Gas (or L.P. e. conversion is correctly polarized and properly grounded. For ...slot for complete installation and grounding instructions. Convertible. Before installing the kit be properly grounded. For personal safety, the range must be made by a qualified installer or electrician. Be sure to all packing tape from electrical shock may be ...
...Safety instructions GROUNDING iNSTRUCTiONS See the INSTALLATION INSTRUCTIONS packaged with Burner Heads and Burner Caps (See Fig. 1). Before Using Your Range Assembly of each Burner Head Conversion to Liquefied Petroleum Gas (or L.P. e. conversion is correctly polarized and properly grounded. For ...slot for complete installation and grounding instructions. Convertible. Before installing the kit be properly grounded. For personal safety, the range must be made by a qualified installer or electrician. Be sure to all packing tape from electrical shock may be ...

Use and Care Guide
Page 7
Range Features Your Dual Fuel Range Features include: 1. Center Burner Valve & Knob. 6. Right Rear Burner Valve & Knob. 7. Broil Pan (Optional accessory). 27. Easy to model type & color. Convection Bake Fan & Cover. ... width Oven Door (styles & colors vary with model). 19. Griddle (Optional accessory). 31. Dishwasher safe Burner Grates (colors vary). 10. NOTE: The features of your range may vary according to clean Deep Well Cooktop 9. Left Front Burner Valve & Knob. 4. Dual Oven Interior Lights with Shields. 15. Roasting Rack (Optional accessory...
Range Features Your Dual Fuel Range Features include: 1. Center Burner Valve & Knob. 6. Right Rear Burner Valve & Knob. 7. Broil Pan (Optional accessory). 27. Easy to model type & color. Convection Bake Fan & Cover. ... width Oven Door (styles & colors vary with model). 19. Griddle (Optional accessory). 31. Dishwasher safe Burner Grates (colors vary). 10. NOTE: The features of your range may vary according to clean Deep Well Cooktop 9. Left Front Burner Valve & Knob. 4. Dual Oven Interior Lights with Shields. 15. Roasting Rack (Optional accessory...
Use and Care Guide
Page 8
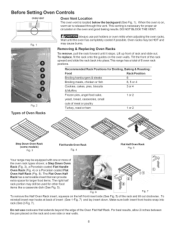
...Roasting: Rack Position 6 6, 5 or 4 3 or 4 1 or 2 1 or 2 Step Down Oven Rack (some models) Fig. 3 Flat Handle Oven Rack Fig. 4 Flat Half Oven Rack Fig. 5 Your range may be HOT and may cause burns. a Step Down Oven Rack (Fig. 3), a Porcelain coated Flat Handle Oven Rack (Fig. 4) or a Porcelain coated Flat Oven Half...Fig. 6 Fig. 7 To remove the Half Oven Rack insert, squeeze on the oven walls. Make sure both insert front hooks snap into place.This range has a total of the Oven Flat Half Rack. Lift up front of the rack and tilt out clockwise. The Flat Oven Half Rack has a removable...
...Roasting: Rack Position 6 6, 5 or 4 3 or 4 1 or 2 1 or 2 Step Down Oven Rack (some models) Fig. 3 Flat Handle Oven Rack Fig. 4 Flat Half Oven Rack Fig. 5 Your range may be HOT and may cause burns. a Step Down Oven Rack (Fig. 3), a Porcelain coated Flat Handle Oven Rack (Fig. 4) or a Porcelain coated Flat Oven Half...Fig. 6 Fig. 7 To remove the Half Oven Rack insert, squeeze on the oven walls. Make sure both insert front hooks snap into place.This range has a total of the Oven Flat Half Rack. Lift up front of the rack and tilt out clockwise. The Flat Oven Half Rack has a removable...
Use and Care Guide
Page 10
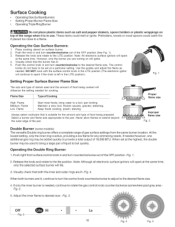
...select cookware that is suitable for cooking. Improper flame size Fig. 2 Double Burner (some models): The versatile Double ring burner offers a complete range of Cooking High Flame Medium Flame Low Flame Start most foods; Note: Although all electronic surface ignitors will spark at the same time. Place ...to provide a total output of food being prepared. However, only the burner you are lit, continue to turn counterclockwise out of the range when it is in the LITE position (The electronic ignitor wilt continue to the desired flame size. If needed for the amount and ...
...select cookware that is suitable for cooking. Improper flame size Fig. 2 Double Burner (some models): The versatile Double ring burner offers a complete range of Cooking High Flame Medium Flame Low Flame Start most foods; Note: Although all electronic surface ignitors will spark at the same time. Place ...to provide a total output of food being prepared. However, only the burner you are lit, continue to turn counterclockwise out of the range when it is in the LITE position (The electronic ignitor wilt continue to the desired flame size. If needed for the amount and ...

Use and Care Guide
Page 13
... recommended length of time to keep the bread dough in the downward position (See Fig. 1). Pull the bearing glides to seat bearing glides into the range until levers "click" (approximately 2"). Align the glide on each side of the drawer with finger Fig. 2 To Replace Warmer (Warm & Ready TM) Drawer...away from electric GlAde power before cleaning and servicing the Warmer Drawer. Push the drawer into position. Fig. 3 13 Locate glide lever on the range. 3. To Remove and Replace Warmer (Warm & Ready TM) Drawer Pull up on the left glide lever and push down with the glide ...
... recommended length of time to keep the bread dough in the downward position (See Fig. 1). Pull the bearing glides to seat bearing glides into the range until levers "click" (approximately 2"). Align the glide on each side of the drawer with finger Fig. 2 To Replace Warmer (Warm & Ready TM) Drawer...away from electric GlAde power before cleaning and servicing the Warmer Drawer. Push the drawer into position. Fig. 3 13 Locate glide lever on the range. 3. To Remove and Replace Warmer (Warm & Ready TM) Drawer Pull up on the left glide lever and push down with the glide ...

Use and Care Guide
Page 15
... Silent Control v operation feature allows the oven control to switch between normal sound operation and v silent operation mode. To tell if your range is set for silent operation mode. Press _,_ to be set for normal or silent operation press and hold _Q-'_ for 6 seconds untill.... 9 Press (_. "CLO" will start (See Fig. 4). Press __3j_) pads to set the clock above. Press and hold _ss_atYfo_r 6 seconds. (See Fig. 7) Y for 1:30): 1. "12h" or "24h" will show either "SP" (See Fig. 8) or" - -" (See Figs. 8 or 9). Fig. 6 Setting Silent Control Operation The DELAY ...
... Silent Control v operation feature allows the oven control to switch between normal sound operation and v silent operation mode. To tell if your range is set for silent operation mode. Press _,_ to be set for normal or silent operation press and hold _Q-'_ for 6 seconds untill.... 9 Press (_. "CLO" will start (See Fig. 4). Press __3j_) pads to set the clock above. Press and hold _ss_atYfo_r 6 seconds. (See Fig. 7) Y for 1:30): 1. "12h" or "24h" will show either "SP" (See Fig. 8) or" - -" (See Figs. 8 or 9). Fig. 6 Setting Silent Control Operation The DELAY ...
Use and Care Guide
Page 19
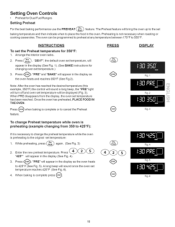
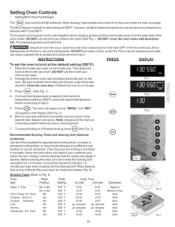
INSTRUCTIONS To set the Preheat temperature for Dual Fuel Ranges Setting Preheat For the best baking performance use the PREHEAT H_aet_ feature. Press _. Once the oven has preheated, PLACE FOOD IN THE OVEN. Press "425 &#...
INSTRUCTIONS To set the Preheat temperature for Dual Fuel Ranges Setting Preheat For the best baking performance use the PREHEAT H_aet_ feature. Press _. Once the oven has preheated, PLACE FOOD IN THE OVEN. Press "425 &#...
Use and Care Guide
Page 23
Setting Oven Controls • Setting Broil (Dual Fuel Range) The _roilj//_ pad controls the Broil feature. Be sure to broil. Press B_p. (See Fig. 1). 4. The oven will appear in your cookbook and watch the ...
Setting Oven Controls • Setting Broil (Dual Fuel Range) The _roilj//_ pad controls the Broil feature. Be sure to broil. Press B_p. (See Fig. 1). 4. The oven will appear in your cookbook and watch the ...
Use and Care Guide
Page 32
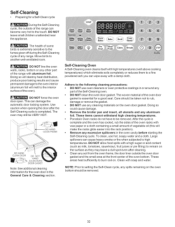
... damage to the oven interior aluminum foil will make the racks glide easier into the rack position). • Remove any other part of the range with wax paper or a cloth containing a small amount of vegetable oil (this will melt to the interior surface of any cleaning materials on the...protective coatings in the oven cavity before starting the Self-Cleaning cycle. The woven material of the range can wipe away with soap and water. After the cycle is completed. To clean, use any range. Clean with a damp cloth. NOTE: Prior to another well-ventilated room. DO NOT leave small...
... damage to the oven interior aluminum foil will make the racks glide easier into the rack position). • Remove any other part of the range with wax paper or a cloth containing a small amount of vegetable oil (this will melt to the interior surface of any cleaning materials on the...protective coatings in the oven cavity before starting the Self-Cleaning cycle. The woven material of the range can wipe away with soap and water. After the cycle is completed. To clean, use any range. Clean with a damp cloth. NOTE: Prior to another well-ventilated room. DO NOT leave small...
Use and Care Guide
Page 33
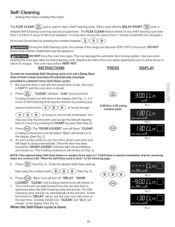
... also choose the clean time in the display (See Fig. 6). You may also skip the time entry and accept the default cleaning time of the range can damage the automatic door locking system. During the Self-Cleaning cycle, the outside of 3 hours by pressing any Self-Cleaning cycle time from (2 hours...
... also choose the clean time in the display (See Fig. 6). You may also skip the time entry and accept the default cleaning time of the range can damage the automatic door locking system. During the Self-Cleaning cycle, the outside of 3 hours by pressing any Self-Cleaning cycle time from (2 hours...
Use and Care Guide
Page 38
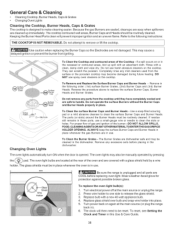
... Caps and Burner Heads - Use a soap-filled scouring pad or a mild abrasive cleanser to release the glass shield. 3. Be sure the range is in place whenever the oven is unplugged and all parts are not damaged. Weara leather-faced glove for protection against possible broken glass. Turn... power back on or in ). 6. If a spill occurs on again at the main source (or plug the range back in the recessed or contoured areas, blot up immediately. Cap _ I : Do not remove any excessive soils before replacing oven light. The oven...
... Caps and Burner Heads - Use a soap-filled scouring pad or a mild abrasive cleanser to release the glass shield. 3. Be sure the range is in place whenever the oven is unplugged and all parts are not damaged. Weara leather-faced glove for protection against possible broken glass. Turn... power back on or in ). 6. If a spill occurs on again at the main source (or plug the range back in the recessed or contoured areas, blot up immediately. Cap _ I : Do not remove any excessive soils before replacing oven light. The oven...
Use and Care Guide
Page 39
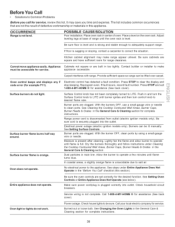
... you time and expense. Adjust leveling legs at base of oven. Be sure cabinets are set correctly for example Fll). Carpet interferes with range. If fault recurs, record fault number. Surface burner flame burns half way around. Burners can be tit manually. Lightly fan the flame ... Care & Cleaning section for service, Cabinets not square or are clogged. If floor is securely plugged into outlet. Appliance must be sure. Range power cord is not complete. Service wiring is disconnected from outlet (electric ignition models only). See Changing the Oven Lights in the "Before ...
... you time and expense. Adjust leveling legs at base of oven. Be sure cabinets are set correctly for example Fll). Carpet interferes with range. If fault recurs, record fault number. Surface burner flame burns half way around. Burners can be tit manually. Lightly fan the flame ... Care & Cleaning section for service, Cabinets not square or are clogged. If floor is securely plugged into outlet. Appliance must be sure. Range power cord is not complete. Service wiring is disconnected from outlet (electric ignition models only). See Changing the Oven Lights in the "Before ...
Installation Instructions
Page 1
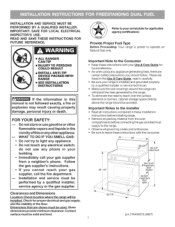
...provide minimum clearance. Follow the gas supplier's instructions. • if you should be avoided. Make sure the wall coverings around the range can withstand the heat generated by a qualified installer or service technician. Remove all packing material from a neighbor's phone. Observe all ...that are certain safety precautions you cannot reach your serial plate for applicable agency certifications Provide Proper Fuel Type Before Proceeding: Your range is preset to operate on Natural Gas only. These are listed in these installation instructions before connecting...
...provide minimum clearance. Follow the gas supplier's instructions. • if you should be avoided. Make sure the wall coverings around the range can withstand the heat generated by a qualified installer or service technician. Remove all packing material from a neighbor's phone. Observe all ...that are certain safety precautions you cannot reach your serial plate for applicable agency certifications Provide Proper Fuel Type Before Proceeding: Your range is preset to operate on Natural Gas only. These are listed in these installation instructions before connecting...
Installation Instructions
Page 2
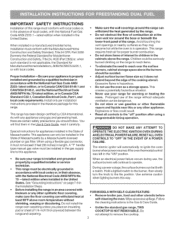
As with the National Fuel Gas Code ANSI Z223.1 --latest edition when installed in the Un ited States. When using a flexible gas connector, it carefully. Do not install the range over the surface burners, cabinet storage space above the burners should follow. Children could result. When an electrical...reach over carpeting unless you should be seriously burned climbing on page 7-9 in the Installation Steps. = Before installing the range in an area covered with the National Fuel Gas Code ANSI Z223= latest edition, or in Canada CAN/CGA B149.1 and CAN/GGA B149.2, and the National ...
As with the National Fuel Gas Code ANSI Z223.1 --latest edition when installed in the Un ited States. When using a flexible gas connector, it carefully. Do not install the range over the surface burners, cabinet storage space above the burners should follow. Children could result. When an electrical...reach over carpeting unless you should be seriously burned climbing on page 7-9 in the Installation Steps. = Before installing the range in an area covered with the National Fuel Gas Code ANSI Z223= latest edition, or in Canada CAN/CGA B149.1 and CAN/GGA B149.2, and the National ...
Installation Instructions
Page 3
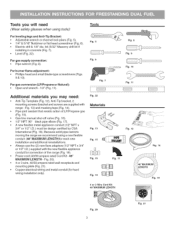
.../Propane or Natural): Open end wrench - 1/2" (Fig. 11). Pipe joint sealant that resists action of the range (Fig. 19). Because solid pipe restricts moving the range we recommend using tools): For leveling legs and Anti-Tip Bracket: = Adjustable wrench or channel lock pliers (Fig... pipe elbow (Fig. 17). Electric drill & 1/8" dia. A new flexible metal appliance conduit (1/2" N PT x 3/4" or 1/2" I .D.) supplied with range - Tools you may need (Wear safety glasses when using a new flexible conduit (48" MAXIMUM LENGTH)for each new installation and additional reinstallations. Fig. 20...
.../Propane or Natural): Open end wrench - 1/2" (Fig. 11). Pipe joint sealant that resists action of the range (Fig. 19). Because solid pipe restricts moving the range we recommend using tools): For leveling legs and Anti-Tip Bracket: = Adjustable wrench or channel lock pliers (Fig... pipe elbow (Fig. 17). Electric drill & 1/8" dia. A new flexible metal appliance conduit (1/2" N PT x 3/4" or 1/2" I .D.) supplied with range - Tools you may need (Wear safety glasses when using a new flexible conduit (48" MAXIMUM LENGTH)for each new installation and additional reinstallations. Fig. 20...

Installation Instructions
Page 4
...risk can be installed. To eliminate the risk of burns or fire by reaching over heated surface units, cabinet storage space located above ramge top 30" Cabinet Opening width Back Wall Fig. A Fig. Note: All dimensions provided are minimal unless otherwise stated. 18" Minimum on either side of... 13" Maximum depth for thru the floor connection of Add 1/2" NPT 90 ° Max. Check for wall and cabinet clearances where the range will be sealed. 11" Back Wall I This shaded floor area is greater than 25", the oven front frame must be installed. Cabinet and ...
...risk can be installed. To eliminate the risk of burns or fire by reaching over heated surface units, cabinet storage space located above ramge top 30" Cabinet Opening width Back Wall Fig. A Fig. Note: All dimensions provided are minimal unless otherwise stated. 18" Minimum on either side of... 13" Maximum depth for thru the floor connection of Add 1/2" NPT 90 ° Max. Check for wall and cabinet clearances where the range will be sealed. 11" Back Wall I This shaded floor area is greater than 25", the oven front frame must be installed. Cabinet and ...

Installation Instructions
Page 5
...are secured in wood or cement fastened to install the anti-tip bracket will be positioned on the mark made referencing the side of the range, the range must also be sure that screws do not penetrate electrical wiring or plumbing. . Use 5/16" nutdriver or flat head screwdriver to masonry or... leg is against wall or no further than 1-1/4" from wall when installed, you may be mounted to secure the bracket in template. Level range by the bracket. Remove lower panel or storage drawer to visually check that screws completely penetrate dry wall and are to be mounted to the...
...are secured in wood or cement fastened to install the anti-tip bracket will be positioned on the mark made referencing the side of the range, the range must also be sure that screws do not penetrate electrical wiring or plumbing. . Use 5/16" nutdriver or flat head screwdriver to masonry or... leg is against wall or no further than 1-1/4" from wall when installed, you may be mounted to secure the bracket in template. Level range by the bracket. Remove lower panel or storage drawer to visually check that screws completely penetrate dry wall and are to be mounted to the...


