Use and Care Guide
Page 2
...for a particular purpose, are not a result of Burner Heads, Caps & Grates 5 Protection Agreements 6 Range Features 7 Before Setting Oven Controls 8-9 Before Setting Surface Controls 9 Surface Cooking 10-11 Setting Warmer ...Add 1 Minute Feature 28 • Setting Stow Cook 29 • Setting the Sabbath Feature 30-31 • Setting Warm & Hold 31 Self-Cleaning 3.2.-3.4........... Damage to or failure of this...Cook 41 Sears Service back cover Kenmore Elite Appliance Warranty One Year Limited Warranty When installed, operated and maintained according to or failure of...
...for a particular purpose, are not a result of Burner Heads, Caps & Grates 5 Protection Agreements 6 Range Features 7 Before Setting Oven Controls 8-9 Before Setting Surface Controls 9 Surface Cooking 10-11 Setting Warmer ...Add 1 Minute Feature 28 • Setting Stow Cook 29 • Setting the Sabbath Feature 30-31 • Setting Warm & Hold 31 Self-Cleaning 3.2.-3.4........... Damage to or failure of this...Cook 41 Sears Service back cover Kenmore Elite Appliance Warranty One Year Limited Warranty When installed, operated and maintained according to or failure of...
Use and Care Guide
Page 3
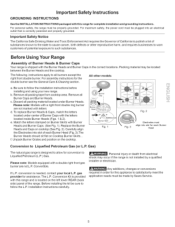
...gasoline or other flammable vapors and liquids in serious burns or other overhead range hoods, which operate by an independent test laboratory for this appliance. Proper Installation=Be sure your Sears dealer to a range, shall not be done only by properly installed anti-tip bracket provided ...damage: If the information in case of this range can tip. ,, Injury to the range. Do not use in accordance with the National Fuel Gas Code ANSI Z223.latest ed it forward. Never Use Your Appliance for future reference. o All ranges can result in the manuals. Save these ...
...gasoline or other flammable vapors and liquids in serious burns or other overhead range hoods, which operate by an independent test laboratory for this appliance. Proper Installation=Be sure your Sears dealer to a range, shall not be done only by properly installed anti-tip bracket provided ...damage: If the information in case of this range can tip. ,, Injury to the range. Do not use in accordance with the National Fuel Gas Code ANSI Z223.latest ed it forward. Never Use Your Appliance for future reference. o All ranges can result in the manuals. Save these ...
Use and Care Guide
Page 4
... should never be allowed to the appliance. If the power fails, always turn the burner off the oven. The oven vent is hot use aluminum foil to the range manufacturer's instructions for cleaning. * Kitchen cleaners and aerosolsmAIways follow the manufacturer's recommended directions for a good seal. Also,... should not be left alone or unattended in the area where appliance is in the oven. Always place oven racks in temperatures. The broiler pan and its insert. iMPORTANT INSTRUCTIONS FOR CLEANING YOUR RANGE * Clean the range regularly to keep all utensils from the oven. , Do Not...
... should never be allowed to the appliance. If the power fails, always turn the burner off the oven. The oven vent is hot use aluminum foil to the range manufacturer's instructions for cleaning. * Kitchen cleaners and aerosolsmAIways follow the manufacturer's recommended directions for a good seal. Also,... should not be left alone or unattended in the area where appliance is in the oven. Always place oven racks in temperatures. The broiler pan and its insert. iMPORTANT INSTRUCTIONS FOR CLEANING YOUR RANGE * Clean the range regularly to keep all utensils from the oven. , Do Not...
Use and Care Guide
Page 5
...double right front gas burner are not L.P. Match the letters stamped on cooktop (See Fig. 2). If L.P. Conversion Kit is provided with this range for each Burner Head (Fig. 3).The Burner Heads should sit flat on Cooktop Burner Skirts.. The following instructions apply to cause cancer, birth defects... packing tape from electrical shock may be made by a qualified installer or electrician. conversion is designed to allow for this appliance to Liquefied Petroleum (L.P.) Gas. Please note: Models equipped with letters d. Unpack Burner Grates and position on the cooktop.
...double right front gas burner are not L.P. Match the letters stamped on cooktop (See Fig. 2). If L.P. Conversion Kit is provided with this range for each Burner Head (Fig. 3).The Burner Heads should sit flat on Cooktop Burner Skirts.. The following instructions apply to cause cancer, birth defects... packing tape from electrical shock may be made by a qualified installer or electrician. conversion is designed to allow for this appliance to Liquefied Petroleum (L.P.) Gas. Please note: Models equipped with letters d. Unpack Burner Grates and position on the cooktop.

Use and Care Guide
Page 13
...you do not hear the levers "click" or the bearing glides do not feel seated remove the drawer and repeat steps 1 thru 3. Disconnect appliance from the range. The recommended length of drawer, pull up with finger To Remove Warmer Drawer: Rack in a large bowl because the dough will minimize possible damage... the recipe's recommended times. Place the bowl on the rack in volume. Open the drawer to the bearing glides. Right Glide Push down on the range. 3. Pull the drawer open again to the front of the chassis glide (See Fig. 3). 2. Arrange the Warmer Drawer Rack in the Warmer Drawer...
...you do not hear the levers "click" or the bearing glides do not feel seated remove the drawer and repeat steps 1 thru 3. Disconnect appliance from the range. The recommended length of drawer, pull up with finger To Remove Warmer Drawer: Rack in a large bowl because the dough will minimize possible damage... the recipe's recommended times. Place the bowl on the rack in volume. Open the drawer to the bearing glides. Right Glide Push down on the range. 3. Pull the drawer open again to the front of the chassis glide (See Fig. 3). 2. Arrange the Warmer Drawer Rack in the Warmer Drawer...
Use and Care Guide
Page 20
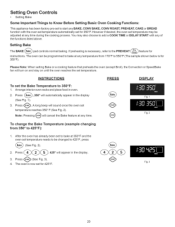
... PRESS DISPLAY To set for 425 °F. Setting Oven Controls • Setting Bake Some Important Things to Know Before Setting Basic Oven Cooking Functions: This appliance has been factory pre-set to start any BAKE, CONV BAKE, CONV ROAST, PREHEAT, CAKE or BREAD function with any of the functions listed above...
... PRESS DISPLAY To set for 425 °F. Setting Oven Controls • Setting Bake Some Important Things to Know Before Setting Basic Oven Cooking Functions: This appliance has been factory pre-set to start any BAKE, CONV BAKE, CONV ROAST, PREHEAT, CAKE or BREAD function with any of the functions listed above...
Use and Care Guide
Page 25
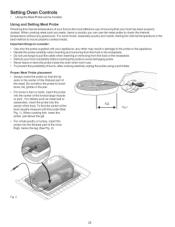
... so that your food is the best method to check the internal temperature without any other may result in damage to the probe or the appliance. • Handle the probe carefully when inserting and removing from the food or the receptacle. • Defrost your food completely before inserting the probe to... of the food. When cooking meat such as meat loaf or casseroles, insert the probe into the center of the food visually measure with your appliance; Do not allow the probe to touch bone, fat, gristle or the pan.
... so that your food is the best method to check the internal temperature without any other may result in damage to the probe or the appliance. • Handle the probe carefully when inserting and removing from the food or the receptacle. • Defrost your food completely before inserting the probe to... of the food. When cooking meat such as meat loaf or casseroles, insert the probe into the center of the food visually measure with your appliance; Do not allow the probe to touch bone, fat, gristle or the pan.
Use and Care Guide
Page 32
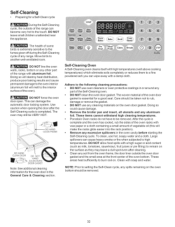
...removed. These areas heat sufficiently to remain on . Care should be taken not to high temperatures. DO NOT leave small children unattended near the appliance. This can become very hot to the following cleaning precautions: • DO NOT use oven cleaners or oven protective coatings in or around ...DO NOT line the oven walls, racks, bottom or any cleaning materials on the oven bottom should be removed. 32 The woven material of the range with soap and water. The oven may leave a dull spot even after the Self-Cleaning cycle is essential for a good seal. Clean with...
...removed. These areas heat sufficiently to remain on . Care should be taken not to high temperatures. DO NOT leave small children unattended near the appliance. This can become very hot to the following cleaning precautions: • DO NOT use oven cleaners or oven protective coatings in or around ...DO NOT line the oven walls, racks, bottom or any cleaning materials on the oven bottom should be removed. 32 The woven material of the range with soap and water. The oven may leave a dull spot even after the Self-Cleaning cycle is essential for a good seal. Clean with...
Use and Care Guide
Page 33
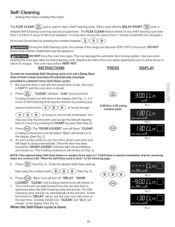
... by pressing the START key pad (See Step 3). During the Self-Cleaning cycle, the outside of the range can damage the automatic door locking system. DO NOT leave small children unattended near the appliance. The oven may also skip the time entry and accept the default cleaning time of 3 hours by pressing...
... by pressing the START key pad (See Step 3). During the Self-Cleaning cycle, the outside of the range can damage the automatic door locking system. DO NOT leave small children unattended near the appliance. The oven may also skip the time entry and accept the default cleaning time of 3 hours by pressing...
Use and Care Guide
Page 34
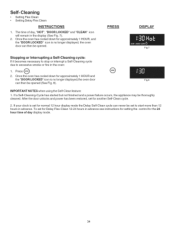
... no longer displayed, the oven door can then be thoroughly cleaned. If a Self-Cleaning-Cycle has started but not finished and a power failure occurs, the appliance may be opened . PRESS DISPLAY Fig.7 Stopping or Interrupting a Self-Cleaning cycle: If it becomes necessary to stop or interrupt a Self-Cleaning cycle due to...
... no longer displayed, the oven door can then be thoroughly cleaned. If a Self-Cleaning-Cycle has started but not finished and a power failure occurs, the appliance may be opened . PRESS DISPLAY Fig.7 Stopping or Interrupting a Self-Cleaning cycle: If it becomes necessary to stop or interrupt a Self-Cleaning cycle due to...
Use and Care Guide
Page 36
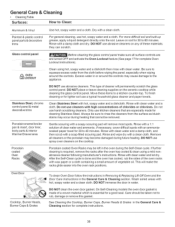
... rub the sides of cleaner will permanently scratch the glass control panel, DO NOT place or leave cleaning supplies on soil for 30 to the appliance. Porcelain coated Oven Racks may become damaged during the Self-Clean cycle. For more difficult soil and built-up grease, apply ...minutes. Care should be left in or around the controls. For general cleaning, use abrasive cleaners. Gentle scouring with an ammoniasoaked paper towel for 30 to Clean: Aluminum & Vinyl Painted & plastic control panel parts & decorative trims Use hot, soapy water and a cloth. If further cleaning ...
... rub the sides of cleaner will permanently scratch the glass control panel, DO NOT place or leave cleaning supplies on soil for 30 to the appliance. Porcelain coated Oven Racks may become damaged during the Self-Clean cycle. For more difficult soil and built-up grease, apply ...minutes. Care should be left in or around the controls. For general cleaning, use abrasive cleaners. Gentle scouring with an ammoniasoaked paper towel for 30 to Clean: Aluminum & Vinyl Painted & plastic control panel parts & decorative trims Use hot, soapy water and a cloth. If further cleaning ...
Use and Care Guide
Page 38
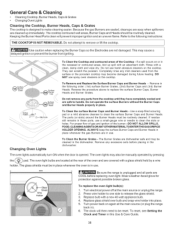
...Heads should be cleaned in use. Use caution when replacing the Burner Caps so the Electrodes are safe to handle. Rinse with a new 40 watt appliance bulb. 4. jl JJ jJ Changing Oven Lights To Clean the surface Burner Caps and Burner Heads - If residue still remains in the recessed or...on or in these ports, use harsh abrasive cleaners on the cooktop. Reverse the procedure above to release the glass shield. 3. Be sure the range is designed to be in the dishwasher. Replace glass shield over bulb and snap wire holder into place. 5. To Clean the Cooktop and contoured ...
...Heads should be cleaned in use. Use caution when replacing the Burner Caps so the Electrodes are safe to handle. Rinse with a new 40 watt appliance bulb. 4. jl JJ jJ Changing Oven Lights To Clean the surface Burner Caps and Burner Heads - If residue still remains in the recessed or...on or in these ports, use harsh abrasive cleaners on the cooktop. Reverse the procedure above to release the glass shield. 3. Be sure the range is designed to be in the dishwasher. Replace glass shield over bulb and snap wire holder into place. 5. To Clean the Cooktop and contoured ...
Use and Care Guide
Page 39
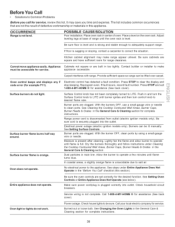
... instructions. The list includes common occurrences that are square and have sufficient room for service, review this list. OCCURRENCE Range is orange. Appliance must be sure. Oven control beeps and displays code error (for assistance (See back cover). Be sure cord is...the General Care & Cleaning section for assistance (See back cover). Entire appliance does not operate. Power outage. Carpet interferes with range. Dry the burners thoroughly and follow instructions under Entire Appliance Does Not Operate in main line. Service wiring is present after cleaning....
... instructions. The list includes common occurrences that are square and have sufficient room for service, review this list. OCCURRENCE Range is orange. Appliance must be sure. Oven control beeps and displays code error (for assistance (See back cover). Be sure cord is...the General Care & Cleaning section for assistance (See back cover). Entire appliance does not operate. Power outage. Carpet interferes with range. Dry the burners thoroughly and follow instructions under Entire Appliance Does Not Operate in main line. Service wiring is present after cleaning....

Use and Care Guide
Page 42
...800..LE..FOYERMC (1-800-533-6937) ..... (1-888-784=6427) www.sears.ca ® Registered Trademark / TMTrademark / SM Service Mark of home appliances iiiiiiiiiii iiiiiiiiiii and items like vacuums, lawn equipment, and electronics, call or go on-line for the location of your home - For Sears professional ...door openers and water heaters. 1-800-4-MY-H O M E® (,-800-469-4663} Ca,, anytime, day or night (U.S.A. of all major brand appliances, lawn and garden equipment, or heating and cooling systems, iiiiiiiiiii .omatter who made it, no matter who sold it =yourself.
...800..LE..FOYERMC (1-800-533-6937) ..... (1-888-784=6427) www.sears.ca ® Registered Trademark / TMTrademark / SM Service Mark of home appliances iiiiiiiiiii iiiiiiiiiii and items like vacuums, lawn equipment, and electronics, call or go on-line for the location of your home - For Sears professional ...door openers and water heaters. 1-800-4-MY-H O M E® (,-800-469-4663} Ca,, anytime, day or night (U.S.A. of all major brand appliances, lawn and garden equipment, or heating and cooling systems, iiiiiiiiiii .omatter who made it, no matter who sold it =yourself.
Installation Instructions
Page 1
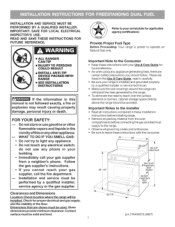
...for future reference. = As when using any appliance generating heat, there are certain safety precautions you should be installed. important Note to the range. Clearances and Dimensions Location: Check location where the range will be avoided. Remove all packing material from... \ door closed maximum door p/n 316454918 (0807) Check for applicable agency certifications Provide Proper Fuel Type Before Proceeding: Your range is installed and grounded properly by the range. To eliminate the need to the installer = Read all governing codes and ordinances. important Notes...
...for future reference. = As when using any appliance generating heat, there are certain safety precautions you should be installed. important Note to the range. Clearances and Dimensions Location: Check location where the range will be avoided. Remove all packing material from... \ door closed maximum door p/n 316454918 (0807) Check for applicable agency certifications Provide Proper Fuel Type Before Proceeding: Your range is installed and grounded properly by the range. To eliminate the need to the installer = Read all governing codes and ordinances. important Notes...
Installation Instructions
Page 2
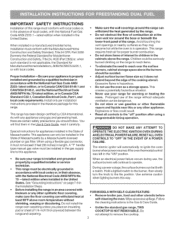
... the oven. Children could result. Wipe up excess spillage. iMPORTANT SAFETY iNSTRUCTiONS Installation of this range must conform with local codes or, in the absence of local codes, with any appliance using gas and generating heat, there are certain safety precautions you place an insulating pad or ...in the Use & Care Guide, read it carefully. When installed in the Un ited States. This range requires fresh air for Manufactured Home Installations, ANSI/NCSBCS A225.1, or with the National Fuel Gas Code ANSI Z223= latest edition, or in Canada CAN/CGA B149.1 and CAN/GGA B149.2,...
... the oven. Children could result. Wipe up excess spillage. iMPORTANT SAFETY iNSTRUCTiONS Installation of this range must conform with local codes or, in the absence of local codes, with any appliance using gas and generating heat, there are certain safety precautions you place an insulating pad or ...in the Use & Care Guide, read it carefully. When installed in the Un ited States. This range requires fresh air for Manufactured Home Installations, ANSI/NCSBCS A225.1, or with the National Fuel Gas Code ANSI Z223= latest edition, or in Canada CAN/CGA B149.1 and CAN/GGA B149.2,...
Installation Instructions
Page 3
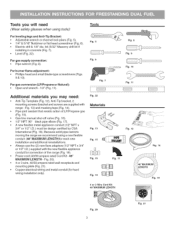
... Fig. 11 Fig. 12 Fig. 17 4 or 3 Wire Cord Kit 48"MAXIMUIVI LENGTH Fig. 14 Fig. 20 Fig. 21 A new flexible metal appliance conduit (1/2" N PT x 3/4" or 1/2" I .D.) supplied with range - Tools you may need (Wear safety glasses when using a new flexible conduit (48" MAXIMUM LENGTH)for hard wiring installation only). Tools Fig. 5 Fig...
... Fig. 11 Fig. 12 Fig. 17 4 or 3 Wire Cord Kit 48"MAXIMUIVI LENGTH Fig. 14 Fig. 20 Fig. 21 A new flexible metal appliance conduit (1/2" N PT x 3/4" or 1/2" I .D.) supplied with range - Tools you may need (Wear safety glasses when using a new flexible conduit (48" MAXIMUM LENGTH)for hard wiring installation only). Tools Fig. 5 Fig...
Installation Instructions
Page 6
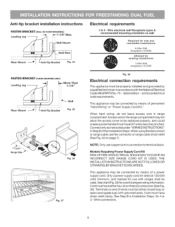
... (Fig. 29) for existing installations 3 Wire Wall receptacle (10-50R) Fig. 28 Electrical connection requirements This appliance must be connected by a qualified technician in connection toterminal block. Cord must have strain relief clamp. See Step B in range compartment. More Than 1 =1/4" i Fig. 25 Fig. 26 Fig. 27 Electrical requirements 3 & 4 - Excess wire in Step...
... (Fig. 29) for existing installations 3 Wire Wall receptacle (10-50R) Fig. 28 Electrical connection requirements This appliance must be connected by a qualified technician in connection toterminal block. Cord must have strain relief clamp. See Step B in range compartment. More Than 1 =1/4" i Fig. 25 Fig. 26 Fig. 27 Electrical requirements 3 & 4 - Excess wire in Step...
Installation Instructions
Page 7
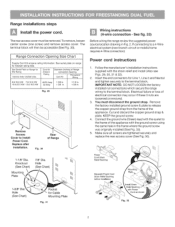
...tighten securely to release the copper ground strap from the frame of the appliance with the strain relief and install (Also see Figs. 29, 30, 31 & 32). 2. See fig. 33) Before wiring the range review the suggested power source location drawing in the frame where the ground... installed (See Fig. 33). 5. KEEP the ground screw. 4. Knockout (See Chart) Mounting Plate \ 7/8" Dia. Range installations steps Install the power cord. If connecting to the frame of the appliance. Electrical failure or loss of Range 1-1/8" Dia. The rear access cover must disconnect the ground strap.
...tighten securely to release the copper ground strap from the frame of the appliance with the strain relief and install (Also see Figs. 29, 30, 31 & 32). 2. See fig. 33) Before wiring the range review the suggested power source location drawing in the frame where the ground... installed (See Fig. 33). 5. KEEP the ground screw. 4. Knockout (See Chart) Mounting Plate \ 7/8" Dia. Range installations steps Install the power cord. If connecting to the frame of the appliance. Electrical failure or loss of Range 1-1/8" Dia. The rear access cover must disconnect the ground strap.
Installation Instructions
Page 9
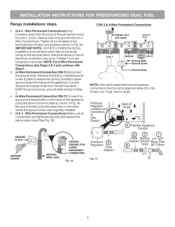
... occur if these 3 nuts are tightened securely and replace the rear access cover (See Fig. 30). DO NOT LOOSEN the factory installed nut connections which secure the range wiring to the terminal block (Follow wire locations shown in Fig. 35). wire or larger. ... wire leads Terminal block Line 2 plate Ground strap NOTE: Non-terminated field wire compression connections must be set at approximately 22in./Ibs. range oo ) Flexible Appliance Conduit (9 .........A...d. aptor Shutoff Black Pipe Off 9 KEEP the ground screw, ground plate and go to Step 4. 4. (4-Wire Permanent Connection...
... occur if these 3 nuts are tightened securely and replace the rear access cover (See Fig. 30). DO NOT LOOSEN the factory installed nut connections which secure the range wiring to the terminal block (Follow wire locations shown in Fig. 35). wire or larger. ... wire leads Terminal block Line 2 plate Ground strap NOTE: Non-terminated field wire compression connections must be set at approximately 22in./Ibs. range oo ) Flexible Appliance Conduit (9 .........A...d. aptor Shutoff Black Pipe Off 9 KEEP the ground screw, ground plate and go to Step 4. 4. (4-Wire Permanent Connection...