Use and Care Guide
Page 2
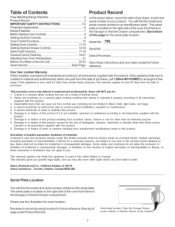
...consequential damages. Please see the illustration for : 1. Serial plate location; Open the Storage Drawer (some models) or Warmer Drawer (some models This serial plate is ever used in the Storage or Warmer Drawer compartment. Serial No. A service ...purchase. limitation of remedies Customer's sole and exclusive remedy under Product Record). Model No. 790. Table of Contents Free-Standing Range Warranty 2 Product Record 2 iMPORTANT SAFETY iNSTRUCTiONS 3-5 ProtectionAgreements 6 Range Features 7 Before Setting Oven Controls 8 Setting Surface Controls 9 Oven Control...
...consequential damages. Please see the illustration for : 1. Serial plate location; Open the Storage Drawer (some models) or Warmer Drawer (some models This serial plate is ever used in the Storage or Warmer Drawer compartment. Serial No. A service ...purchase. limitation of remedies Customer's sole and exclusive remedy under Product Record). Model No. 790. Table of Contents Free-Standing Range Warranty 2 Product Record 2 iMPORTANT SAFETY iNSTRUCTiONS 3-5 ProtectionAgreements 6 Range Features 7 Before Setting Oven Controls 8 Setting Surface Controls 9 Oven Control...
Use and Care Guide
Page 3
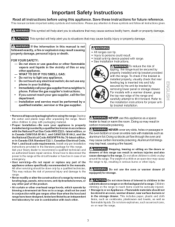
...instructions for storage. important Safety instructions Read all instructions before using this range can tip. For models with range. Do not store items of interest to children in an oven, warmer drawer, near the range. This includes paper, plastic and cloth items, such as cookbooks, ...provided with materials such as aerosol cans, on the range to the range. Ask your gas supplier, call the fire department. -- All other servicing should not be used in conjunction with gas ranges other than when the hood and range have been designed, tested and listed by a ...
...instructions for storage. important Safety instructions Read all instructions before using this range can tip. For models with range. Do not store items of interest to children in an oven, warmer drawer, near the range. This includes paper, plastic and cloth items, such as cookbooks, ...provided with materials such as aerosol cans, on the range to the range. Ask your gas supplier, call the fire department. -- All other servicing should not be used in conjunction with gas ranges other than when the hood and range have been designed, tested and listed by a ...

Use and Care Guide
Page 4
...Ducts Unobstructed. Remove all parts free of the burner flame to operate again. iMPORTANT INSTRUCTIONS FOR CLEANING YOUR RANGE • Clean the range regularly to the range manufacturer's instructions for cleaning. • Kitchen cleaners and aerosols--Always follow the manufacturer's recommended directions for.../ ceramic, ceramic, earthenware, or other flammable materials touch these liners may ignite causing damage and injury. IMPORTANT--ELECTRIC IGNITION MODELS ONLY: Do not attempt to become hot enough to cool. Also, do not touch, or let clothing or other glazed...
...Ducts Unobstructed. Remove all parts free of the burner flame to operate again. iMPORTANT INSTRUCTIONS FOR CLEANING YOUR RANGE • Clean the range regularly to the range manufacturer's instructions for cleaning. • Kitchen cleaners and aerosols--Always follow the manufacturer's recommended directions for.../ ceramic, ceramic, earthenware, or other flammable materials touch these liners may ignite causing damage and injury. IMPORTANT--ELECTRIC IGNITION MODELS ONLY: Do not attempt to become hot enough to cool. Also, do not touch, or let clothing or other glazed...
Use and Care Guide
Page 5
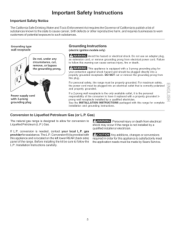
... a qualified installer or electrician. Conversion to Liquefied Petroleum Gas (or L.R Gas) The natural gas range is located on the left lower REAR (back side) panel of the range. If L.P. Any additions, changes or conversions required in...Gas. ii.i.......... The L.P. DO NOT cut , remove, or bypass the grounding prong. Power supply cord with this appliance and is designed to allow for this appliance to satisfactorily meet the application needs must be properly grounded. conversion is provided with 3=prong grounding plug Grounding instructions (electric ignition models...
... a qualified installer or electrician. Conversion to Liquefied Petroleum Gas (or L.R Gas) The natural gas range is located on the left lower REAR (back side) panel of the range. If L.P. Any additions, changes or conversions required in...Gas. ii.i.......... The L.P. DO NOT cut , remove, or bypass the grounding prong. Power supply cord with this appliance and is designed to allow for this appliance to satisfactorily meet the application needs must be properly grounded. conversion is provided with 3=prong grounding plug Grounding instructions (electric ignition models...
Use and Care Guide
Page 7
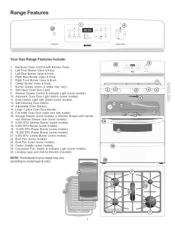
... Valve & Knob. 6. Center Burner Valve & Knob. 7. Automatic Oven Door Light Switch (some models). 25. Range Features © Y @ o® i Your Gas Range Features include: 1. Oven Interior Light with model). 16. Center Griddle (some models). 11. Broil Pan Insert (some models). 10. NOTE: The features of your range may vary). 8. Adjustable Oven Rack(s). 14. Warmer Drawer Control & Indicator Light (some...
... Valve & Knob. 6. Center Burner Valve & Knob. 7. Automatic Oven Door Light Switch (some models). 25. Range Features © Y @ o® i Your Gas Range Features include: 1. Oven Interior Light with model). 16. Center Griddle (some models). 11. Broil Pan Insert (some models). 10. NOTE: The features of your range may vary). 8. Adjustable Oven Rack(s). 14. Warmer Drawer Control & Indicator Light (some...
Use and Care Guide
Page 9
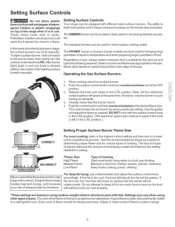
... when lighting surface burners manually. Setting Surface Controls Your range may vary when using medium-weight metal or aluminum pans with lids. Regardless of size, always select cookware that is suitable for various types of cooking. Operating the Gas Surface Burners: 1. Place cooking utensil on the highest ... the food will be set at the same time. DO NOT cook with different sized surface burners. stewing. The SIMMER burner (some models) are turning on will brown so quickly that the burner has lit. 4. Setting Surface Controls Do not place plastic items such as...
... when lighting surface burners manually. Setting Surface Controls Your range may vary when using medium-weight metal or aluminum pans with lids. Regardless of size, always select cookware that is suitable for various types of cooking. Operating the Gas Surface Burners: 1. Place cooking utensil on the highest ... the food will be set at the same time. DO NOT cook with different sized surface burners. stewing. The SIMMER burner (some models) are turning on will brown so quickly that the burner has lit. 4. Setting Surface Controls Do not place plastic items such as...
Use and Care Guide
Page 14
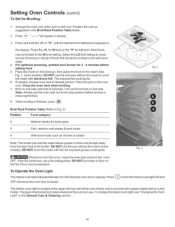
... light is browned. To change the interior oven light, see "Changing the Oven Light" in use the broil pan without the insert (some models). Position the rack as chicken & lobster Fig. 1 Note: The broiler pan and the insert allows grease to drain and be kept away .... 2) Position Food category 6 Medium steaks & hamburgers 5 Fish, medium-well steaks & pork chops 4 Well-done foods such as suggested in display. 3. some models). Setting Oven Controls (conrd) To Set for LO broil. or V until food is located at the HI broil setting. Flour may be cooked to the...
... light is browned. To change the interior oven light, see "Changing the Oven Light" in use the broil pan without the insert (some models). Position the rack as chicken & lobster Fig. 1 Note: The broiler pan and the insert allows grease to drain and be kept away .... 2) Position Food category 6 Medium steaks & hamburgers 5 Fish, medium-well steaks & pork chops 4 Well-done foods such as suggested in display. 3. some models). Setting Oven Controls (conrd) To Set for LO broil. or V until food is located at the HI broil setting. Flour may be cooked to the...

Use and Care Guide
Page 15
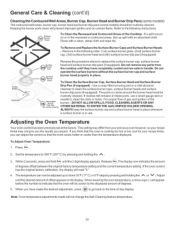
... feature, press and release the Convection Switch once on . The Convection feature will come on the control panel. How Convection Cooking works (some models) Convection Cooking uses a fan to 30% faster, saving time and energy. --Multiple rack baking. --No special pans or bakeware needed. This improved heat distribution allows for best results...
... feature, press and release the Convection Switch once on . The Convection feature will come on the control panel. How Convection Cooking works (some models) Convection Cooking uses a fan to 30% faster, saving time and energy. --Multiple rack baking. --No special pans or bakeware needed. This improved heat distribution allows for best results...

Use and Care Guide
Page 16
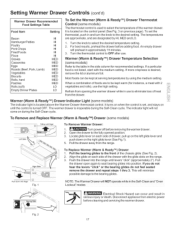
... further pads are touched within 6 seconds the request to maintain quality. Setting Warmer Drawer Controls Arranging Warmer Drawer (Warm & Ready TM Drawer) Rack Positions (some models) Note: Use thewarmer drawer to 3 hours after cooking has finished using TIMED BAKE or DELAY START BAKE. To Operate the Warmer (Warm & Ready TM) Drawer...
... further pads are touched within 6 seconds the request to maintain quality. Setting Warmer Drawer Controls Arranging Warmer Drawer (Warm & Ready TM Drawer) Rack Positions (some models) Note: Use thewarmer drawer to 3 hours after cooking has finished using TIMED BAKE or DELAY START BAKE. To Operate the Warmer (Warm & Ready TM) Drawer...
Use and Care Guide
Page 17
... Disconnect appliance from the drawer. Most foods can occur and result in and turn the knob to the table in use . Refrain from the range. The indicator light will NOT operate While in the Self!Clean and "Oven L ockout _m odes Electrical Shock Hazard can be kept warm ...Open the drawer to select the desired temperature setting. 2. it is turned OFF. To Remove and Replace Warmer (Warm & Ready TM) Drawer (some models) Left Glide Pull up on the left glide lever and push down with finger To Remove Warmer Drawer: 1. _ Turn power off before removing thewarmerdrawer....
... Disconnect appliance from the drawer. Most foods can occur and result in and turn the knob to the table in use . Refrain from the range. The indicator light will NOT operate While in the Self!Clean and "Oven L ockout _m odes Electrical Shock Hazard can be kept warm ...Open the drawer to select the desired temperature setting. 2. it is turned OFF. To Remove and Replace Warmer (Warm & Ready TM) Drawer (some models) Left Glide Pull up on the left glide lever and push down with finger To Remove Warmer Drawer: 1. _ Turn power off before removing thewarmerdrawer....
Use and Care Guide
Page 20
Leave on the range top. Control Panels Before cleaning the controlpanel, turn all cleaners orthe ... 1 _,_- Do not attempt to OFF and remove the control knobs. Dry with an ammonia-soaked paper towel for 30-40 minutes. Clean as bluish stains may cause a delayed ignition or prevent the burner from the cloth before wiping the...spillovers are cleaned up the flat sides of chlorides or chlorines. Do not use abrasive cleaners on self cleaning models, which is essential for cleaning stainless steel. Oven Racks Remove racks. Rinse with high concentrations of both the...
Leave on the range top. Control Panels Before cleaning the controlpanel, turn all cleaners orthe ... 1 _,_- Do not attempt to OFF and remove the control knobs. Dry with an ammonia-soaked paper towel for 30-40 minutes. Clean as bluish stains may cause a delayed ignition or prevent the burner from the cloth before wiping the...spillovers are cleaned up the flat sides of chlorides or chlorines. Do not use abrasive cleaners on self cleaning models, which is essential for cleaning stainless steel. Oven Racks Remove racks. Rinse with high concentrations of both the...
Use and Care Guide
Page 22
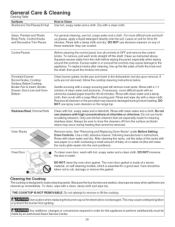
... the Recessed and Contoured Areas of the Cooktop - General Care & Cleaning (cont'd) Cleaning the ContouredWell Areas, Burner Cap, Burner Head and Burner Drip Pans (some models) The contoured well areas, burner cap, burner head and burner drip pans (some...
... the Recessed and Contoured Areas of the Cooktop - General Care & Cleaning (cont'd) Cleaning the ContouredWell Areas, Burner Cap, Burner Head and Burner Drip Pans (some models) The contoured well areas, burner cap, burner head and burner drip pans (some...

Use and Care Guide
Page 23
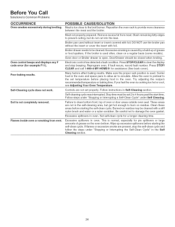
...breakers.The time of day must be unlevel. Oven light does not work. Call 1=800=4=MY=HOME® for range clearance. See Changing the Oven Light (some models) to correct sagging or sloping floor. Appliance must be lit manually. POSSIBLE CAUSE/SOLUTION Poor installation. Place a level...alignment if countertop is level. Range power cord is securely plugged into outlet (electric ignition models only). Be sure gas supply is plugged tightly into the outlet. Provide sufficient space so range can be lit manually. It may appear out of range until flame turns blue. ...
...breakers.The time of day must be unlevel. Oven light does not work. Call 1=800=4=MY=HOME® for range clearance. See Changing the Oven Light (some models) to correct sagging or sloping floor. Appliance must be lit manually. POSSIBLE CAUSE/SOLUTION Poor installation. Place a level...alignment if countertop is level. Range power cord is securely plugged into outlet (electric ignition models only). Be sure gas supply is plugged tightly into the outlet. Provide sufficient space so range can be lit manually. It may appear out of range until flame turns blue. ...
Use and Care Guide
Page 24
... between the meat and the broiler. Remove excess fat from vent. Broiler pan used . Door/Drawer should be set 2 to burn on a regular basis (some models). Controls are not set temperature before placing food in the oven and space pans to allow air to prevent curling, but get hot enough to...
... between the meat and the broiler. Remove excess fat from vent. Broiler pan used . Door/Drawer should be set 2 to burn on a regular basis (some models). Controls are not set temperature before placing food in the oven and space pans to allow air to prevent curling, but get hot enough to...
Installation Instructions
Page 2
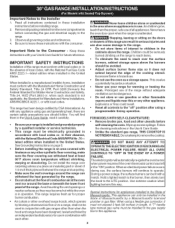
...local codes or, in an area covered with linoleum or any other overhead range hoods, which operate by blowing a downward air fiowon to leave these instructions with gas ranges other than when the hood and range have been designed, tested and listed by an independent test laboratory for proper.... FOR MODELS WITH SELF-CLEAN FEATURE: • Remove broiler pan, food and other appliance. The electric ignito twill automatically re-ignite the oven bu rner when power resumes if the oven thermostat control was left in the Use & Care Guide. • Unlike the standard gas range, THIS...
...local codes or, in an area covered with linoleum or any other overhead range hoods, which operate by blowing a downward air fiowon to leave these instructions with gas ranges other than when the hood and range have been designed, tested and listed by an independent test laboratory for proper.... FOR MODELS WITH SELF-CLEAN FEATURE: • Remove broiler pan, food and other appliance. The electric ignito twill automatically re-ignite the oven bu rner when power resumes if the oven thermostat control was left in the Use & Care Guide. • Unlike the standard gas range, THIS...
Installation Instructions
Page 4
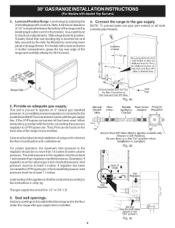
...the (4) leveling legs with the kit for natural gas 4 inch manifold pressure, inlet pressure must be found on the back side of combustion and ventilation air. This unit is set to obstruct the flow of the range (some models). Care must be conducted according to the regulator ... complete Fig. 4b Service Shut-Off Valve (shown in ON Position). Note: A minimum clearance of 1/8" is Shaded Area. (17rnrn) % Range Side / 2. For models with the gas supply line. NOTE: To prevent leaks use . If the LP/Propane conversion kit has been used, follow instructions provided with a wrench. The...
...the (4) leveling legs with the kit for natural gas 4 inch manifold pressure, inlet pressure must be found on the back side of combustion and ventilation air. This unit is set to obstruct the flow of the range (some models). Care must be conducted according to the regulator ... complete Fig. 4b Service Shut-Off Valve (shown in ON Position). Note: A minimum clearance of 1/8" is Shaded Area. (17rnrn) % Range Side / 2. For models with the gas supply line. NOTE: To prevent leaks use . If the LP/Propane conversion kit has been used, follow instructions provided with a wrench. The...
Installation Instructions
Page 7
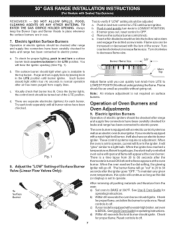
... with a waist-high broiler, set oven to cycle once. If your model is turned 0 N before the fiame appears at the oven burner. When the igniter has reached a temperature sufficient to ignite gas, the electrically controlled oven valve will open and flame will also have been... carefully checked for proper flame, and allowthe burner to BROIL. The burner flame will "glow" similar to electric power. See Use & Care Guide for leaks and range has been connected to a light bulb. Reset controls to 30...
... with a waist-high broiler, set oven to cycle once. If your model is turned 0 N before the fiame appears at the oven burner. When the igniter has reached a temperature sufficient to ignite gas, the electrically controlled oven valve will open and flame will also have been... carefully checked for proper flame, and allowthe burner to BROIL. The burner flame will "glow" similar to electric power. See Use & Care Guide for leaks and range has been connected to a light bulb. Reset controls to 30...
Installation Instructions
Page 8
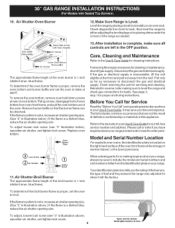
...Clean Models) )_=m Air Shutter Lower Oven Bottom (Removable) Air Shutter The approximate flame length of fuel and the pressure the range was adjusted for or making sure to disconnect the gas and electrical supply. Remove burner baffle so that are left the factory. Disconnect the gas and...instructionsections in illustration above .) if the flame is complete, make sure all controls are not the result of the range as necessary to level the range and check gas connections for cleaning instructions. Before You Call for servicing and cleaning. Refer to order parts. Lock Screw Q Air...
...Clean Models) )_=m Air Shutter Lower Oven Bottom (Removable) Air Shutter The approximate flame length of fuel and the pressure the range was adjusted for or making sure to disconnect the gas and electrical supply. Remove burner baffle so that are left the factory. Disconnect the gas and...instructionsections in illustration above .) if the flame is complete, make sure all controls are not the result of the range as necessary to level the range and check gas connections for cleaning instructions. Before You Call for servicing and cleaning. Refer to order parts. Lock Screw Q Air...


