
Owners Manual
Page 2
... 0I Us{ng the Air Conditioner t0 ControlPanel 1.1 Remote Control 12 MAINTENANCE 1.3 Air Filter Cleaning 13 Air Conditioner Cleaning 13 How to Remove the Front Grille 13 How to Replace the Front Grille 13 TROUBLESHOOTING 1.4............ ESPAI_OL 1.5 MASTER PROTECTION AGREEMENTS 30 SERVICE NUMBERS ......B.a.c.k.C..over FULL ONE YEAR WARRANTY ON ROOM AIR CONDITIONER For one year from the date of purchase, when this owners manual, Sears wilt repair the seated refrigeration system (consisting of refrigerant, connecting tubing, and compressor), free of charge,if...
... 0I Us{ng the Air Conditioner t0 ControlPanel 1.1 Remote Control 12 MAINTENANCE 1.3 Air Filter Cleaning 13 Air Conditioner Cleaning 13 How to Remove the Front Grille 13 How to Replace the Front Grille 13 TROUBLESHOOTING 1.4............ ESPAI_OL 1.5 MASTER PROTECTION AGREEMENTS 30 SERVICE NUMBERS ......B.a.c.k.C..over FULL ONE YEAR WARRANTY ON ROOM AIR CONDITIONER For one year from the date of purchase, when this owners manual, Sears wilt repair the seated refrigeration system (consisting of refrigerant, connecting tubing, and compressor), free of charge,if...

Owners Manual
Page 3
... a protective covering.This couldresult in mechanical damage withinthe air conditioner. , Do not use an extension cord or an adapter plug. Test _ --3-prong grounding type wall receptacle _ ENERGY SAVINGIDEAS =The capacityof the room air conditionermust fit the room size for protectionagainstshockhazards. • Your air conditionermust be installed in a window, youwill probablywant to remove the screencompletelybefore instaUation. • Be sure the air conditionerhas been securelyand correctlyinstalledaccordingto the separate installation instructionsprovidedwith this manual and...
... a protective covering.This couldresult in mechanical damage withinthe air conditioner. , Do not use an extension cord or an adapter plug. Test _ --3-prong grounding type wall receptacle _ ENERGY SAVINGIDEAS =The capacityof the room air conditionermust fit the room size for protectionagainstshockhazards. • Your air conditionermust be installed in a window, youwill probablywant to remove the screencompletelybefore instaUation. • Be sure the air conditionerhas been securelyand correctlyinstalledaccordingto the separate installation instructionsprovidedwith this manual and...

Owners Manual
Page 4
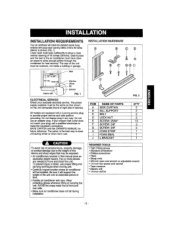
... according to have a property grounded 3-prong wall receptacle installed by f_rstpressing _he TEST butt_m and _en the RESET"b_ttonI.f the TEST button does not t_ip or if Me RESET buttonwill notstay engaged, discontinue use an adapter. Power cord may be grounded. Use a dedicated circuit, serving only this appliance must be d;fferentaccording _e its model Use Wail Receptacle Power Supply RECOMMENDED GROUNDING METHOD For your...
... according to have a property grounded 3-prong wall receptacle installed by f_rstpressing _he TEST butt_m and _en the RESET"b_ttonI.f the TEST button does not t_ip or if Me RESET buttonwill notstay engaged, discontinue use an adapter. Power cord may be grounded. Use a dedicated circuit, serving only this appliance must be d;fferentaccording _e its model Use Wail Receptacle Power Supply RECOMMENDED GROUNDING METHOD For your...
Owners Manual
Page 5
...%J ..... ," RG, t ELECTRICAL SERVICE Check your plug, c81 a qualfied electrician to move and install the unit To prevent injuryor strain, use an adapter plug, if your present wal outlet does not match your available electrical service. The power st@plyavalabte must be the same as that may be exposed: • Air conditioners coveredin thismanual pose an excessive weighthazard. Do not change plug in use. Do not use proper...
...%J ..... ," RG, t ELECTRICAL SERVICE Check your plug, c81 a qualfied electrician to move and install the unit To prevent injuryor strain, use an adapter plug, if your present wal outlet does not match your available electrical service. The power st@plyavalabte must be the same as that may be exposed: • Air conditioners coveredin thismanual pose an excessive weighthazard. Do not change plug in use. Do not use proper...
Owners Manual
Page 6
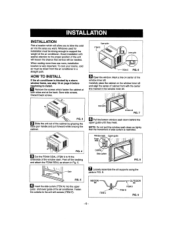
... at the back. INSTALLATION Pick a location wh_h wi_l allow you to blow the cold air into the upper guide and towsr guide of the air cond_oner, Fasten the curtains to the unit w_h screws (tTEM E}, F_G. 8 _ Loosely assemble the silt supports using the parts in FIG, 9, ITEMC _TEMB FIG. 9 -6- To coo! your morns, cold sir must be blown from the sir conditioner in a straight...
... at the back. INSTALLATION Pick a location wh_h wi_l allow you to blow the cold air into the upper guide and towsr guide of the air cond_oner, Fasten the curtains to the unit w_h screws (tTEM E}, F_G. 8 _ Loosely assemble the silt supports using the parts in FIG, 9, ITEMC _TEMB FIG. 9 -6- To coo! your morns, cold sir must be blown from the sir conditioner in a straight...
Owners Manual
Page 7
... of window opening, Attach each side curtainfully to the outside (FIG. Puli out part _ to Insert the drain pipe into the cabinet. (F}G. 16) CAUTION: For security purposes, reinstall side screws you removed In step 1. supports with the cabinet on sill (FIG. 10). l f _ _TEMB _-_ kow0rGuide FIG. 12 _Pull each side curtainto the windowsash using screw (ITEM E). _ Attach the L BRACKET (ITEM J) with part...
... of window opening, Attach each side curtainfully to the outside (FIG. Puli out part _ to Insert the drain pipe into the cabinet. (F}G. 16) CAUTION: For security purposes, reinstall side screws you removed In step 1. supports with the cabinet on sill (FIG. 10). l f _ _TEMB _-_ kow0rGuide FIG. 12 _Pull each side curtainto the windowsash using screw (ITEM E). _ Attach the L BRACKET (ITEM J) with part...

Owners Manual
Page 8
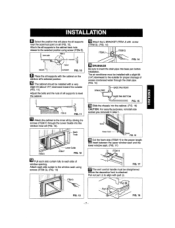
.... 19) , Open the inlet grille. (FIG. 20) , Install the ecr_t_ (ITEM E) through the front gri|te. (FIG, 20> - FrontInstallation RG. 19 FIG, 20 REMOVAL FROM WINDOW • Turn offand unplug the air conditioner. • Remove the front _Iie_ See HOW TO REMOVE THE FROI'_ GF_ILLE,Refer to the s_es of theway, • Remove the L bracket from thewindow frame. Unscrew thes,idceurtains from window frame and...
.... 19) , Open the inlet grille. (FIG. 20) , Install the ecr_t_ (ITEM E) through the front gri|te. (FIG, 20> - FrontInstallation RG. 19 FIG, 20 REMOVAL FROM WINDOW • Turn offand unplug the air conditioner. • Remove the front _Iie_ See HOW TO REMOVE THE FROI'_ GF_ILLE,Refer to the s_es of theway, • Remove the L bracket from thewindow frame. Unscrew thes,idceurtains from window frame and...

Owners Manual
Page 9
... AND WHY Your room air conditioner provides the following functions to make hot weather I]ving more olten to keep the temperature you want to cool The proper size is then returned to the room- Moisture removed from your cost of cooling power, --Compressor The mo_em high efficiency compressor may have selected, Under heavy heat icad conditions the a_r cenc_itioner may need to run longer and...
... AND WHY Your room air conditioner provides the following functions to make hot weather I]ving more olten to keep the temperature you want to cool The proper size is then returned to the room- Moisture removed from your cost of cooling power, --Compressor The mo_em high efficiency compressor may have selected, Under heavy heat icad conditions the a_r cenc_itioner may need to run longer and...
Owners Manual
Page 10
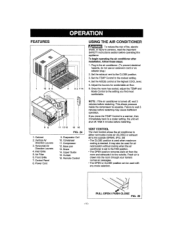
... coo|ing is set in the air conditioner. (To prevent eiectrica_ hazards, do not use an extension cord or an adapter piucj.) 2. Set the MODE con+rot at the highest COOL level. 5. EvaporatorCoiI 10, Condenser 11. Failure to persons, read the important SAFETY instructions sectionbefore operating this applianos To begin operating the air condltlorterafter installation, foJ!ow these steps: t. Horizontal Air Direction Louvers 4. Control Panel 8, Power Cord 4 32714 USING THE AIR CONDITIONER To r_duce the...
... coo|ing is set in the air conditioner. (To prevent eiectrica_ hazards, do not use an extension cord or an adapter piucj.) 2. Set the MODE con+rot at the highest COOL level. 5. EvaporatorCoiI 10, Condenser 11. Failure to persons, read the important SAFETY instructions sectionbefore operating this applianos To begin operating the air condltlorterafter installation, foJ!ow these steps: t. Horizontal Air Direction Louvers 4. Control Panel 8, Power Cord 4 32714 USING THE AIR CONDITIONER To r_duce the...

Owners Manual
Page 11
... the room. STARTTIM_ the unit wit{runatthe previous. You w_ll usually use shut-off , =Everytime youpushTimer bt_on, it advancesthe Timersettingasfollows:'_Hour_ 3 Hours_ 6 H_rs _ 10Hours m_Jm_m. a_70°F. COOL-LOW I_FAN ONLY-H! _ FAN ONLYLOW. To turn }t on, the a_rco_enei" }s on the High coolmo_e and the Temp. REMOTE CONTROLSIGNALRECEIVER - SHUT-OFF TIME - MODE = Pushthis button to shi_t the temperature setting from COOL-HI_. HORIZONTAL AIR DIRECTION CONTROL Theh_dzo...
... the room. STARTTIM_ the unit wit{runatthe previous. You w_ll usually use shut-off , =Everytime youpushTimer bt_on, it advancesthe Timersettingasfollows:'_Hour_ 3 Hours_ 6 H_rs _ 10Hours m_Jm_m. a_70°F. COOL-LOW I_FAN ONLY-H! _ FAN ONLYLOW. To turn }t on, the a_rco_enei" }s on the High coolmo_e and the Temp. REMOTE CONTROLSIGNALRECEIVER - SHUT-OFF TIME - MODE = Pushthis button to shi_t the temperature setting from COOL-HI_. HORIZONTAL AIR DIRECTION CONTROL Theh_dzo...

Owners Manual
Page 12
... button _kes _otity over any other button. If unit is running, Use Timer to set the number of hours before unit starts. , Push Timer buttons to advanse the "rimer setting as foi_ws: I Hour('_ Hour-2 Hours)I_ 3 Hsers(3 Hout_ Hours)_ 6 Hours(6 Hours.9 Hours} _" 10 Hours max_n_m. - Open the cover according to ehi_ the mode of operation from the Air Conditioner. To turn the air cond_ormrON, push _Ls button. Re-attach the cover. • Donot use rechargeable...
... button _kes _otity over any other button. If unit is running, Use Timer to set the number of hours before unit starts. , Push Timer buttons to advanse the "rimer setting as foi_ws: I Hour('_ Hour-2 Hours)I_ 3 Hsers(3 Hout_ Hours)_ 6 Hours(6 Hours.9 Hours} _" 10 Hours max_n_m. - Open the cover according to ehi_ the mode of operation from the Air Conditioner. To turn the air cond_ormrON, push _Ls button. Re-attach the cover. • Donot use rechargeable...

Owners Manual
Page 13
... or vacuumexterior coils to remove debds from fins, HOW TO REPLACE THE FRONT GRILLE Attach the front gdlle to shake off all the water before replacing the filter. (FIG.29) HOWTO REMOVETHE FRONTGRILLE = Open the tnle_ gdlte,downward. , Remove the screw securing the Front Grl_a. - Wash the Air Fi_ter under ...the gdite away from the case to lift the tap tabs out oftheir stats. \ FIG. 29 AIR CONDITIONER CLEANING Cteanthe front gdlleand inletgrii_eby wipingwi_he cloth dampened in un_l it removes dust from the inside air. _tshould be washed with warm water. FIG. 30 FiG. 32 -13-
... or vacuumexterior coils to remove debds from fins, HOW TO REPLACE THE FRONT GRILLE Attach the front gdlle to shake off all the water before replacing the filter. (FIG.29) HOWTO REMOVETHE FRONTGRILLE = Open the tnle_ gdlte,downward. , Remove the screw securing the Front Grl_a. - Wash the Air Fi_ter under ...the gdite away from the case to lift the tap tabs out oftheir stats. \ FIG. 29 AIR CONDITIONER CLEANING Cteanthe front gdlleand inletgrii_eby wipingwi_he cloth dampened in un_l it removes dust from the inside air. _tshould be washed with warm water. FIG. 30 FiG. 32 -13-

Owners Manual
Page 14
... UNIT DOES NOT FEEL COLD ENOUGH, Check if... Ali_additio_nmsetoremovsetore_d_f_ THE AIR CONDITIONER TURNS ON AND OFF RAPIDLY. i The=dr_on_tionsrisimpmpedy_i,_d. Housefuseblownorcircubitreaketrr;pped, MODEselectoisrOFFposlliorL U_was turneodffan_d _ iceq_. "rumMODE setecterto thedesiredCOOLsetgng. Press the RESET button locatedon the power cordplug if the RESET button will not slay engaged,discontinue usa of unit. 1 13oO=wi indowsr,egisters,'e'omp,en.Coktair escapes. Then... Then,., L _ieml:_mtum NOISE...
... UNIT DOES NOT FEEL COLD ENOUGH, Check if... Ali_additio_nmsetoremovsetore_d_f_ THE AIR CONDITIONER TURNS ON AND OFF RAPIDLY. i The=dr_on_tionsrisimpmpedy_i,_d. Housefuseblownorcircubitreaketrr;pped, MODEselectoisrOFFposlliorL U_was turneodffan_d _ iceq_. "rumMODE setecterto thedesiredCOOLsetgng. Press the RESET button locatedon the power cordplug if the RESET button will not slay engaged,discontinue usa of unit. 1 13oO=wi indowsr,egisters,'e'omp,en.Coktair escapes. Then... Then,., L _ieml:_mtum NOISE...

Owners Manual
Page 30
... door openers, water heaters, and other major home items, in -home repair, plus convenient repair scheduling []Power surge protection against electrical damage due to power fluctuations [_ Rental reimbursement if repair of your covered product takes longer than premised Once you to schedule service, You can count on making a smart purd'_asa. Your new Kenmore ® product is all that it may require preventive maintenance or repair from...
... door openers, water heaters, and other major home items, in -home repair, plus convenient repair scheduling []Power surge protection against electrical damage due to power fluctuations [_ Rental reimbursement if repair of your covered product takes longer than premised Once you to schedule service, You can count on making a smart purd'_asa. Your new Kenmore ® product is all that it may require preventive maintenance or repair from...

Owners Manual
Page 32
... openers and water heaters. 1-800o4-MY-HOME _ (I _ Service M_ _ S_,,__. RoebuP._ and Co, © SeaP_ Brands. anytime, day or night (U.S.A, only) www.s_zrs,com To purchase a protection agreement(U.S.A.) or maintenance agreement(Canada) on -line for the location of your home-of carry-in your nearest Sears Parts & Repair Center. 1=800-488-!222 Cal! For the replacement parts, accessories and owner's manuals...
... openers and water heaters. 1-800o4-MY-HOME _ (I _ Service M_ _ S_,,__. RoebuP._ and Co, © SeaP_ Brands. anytime, day or night (U.S.A, only) www.s_zrs,com To purchase a protection agreement(U.S.A.) or maintenance agreement(Canada) on -line for the location of your home-of carry-in your nearest Sears Parts & Repair Center. 1=800-488-!222 Cal! For the replacement parts, accessories and owner's manuals...


