Owners Manual
Page 6
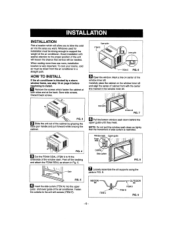
... _abit'rat by a storm window frame, see step 19 o_npage 8 befo_e bsglnnlng to install _]1 Flemove the screws which fasten the cabinet at both sides and at the back. HOW TO INSTALL if the air conditioner is restricted= FiG. 4 _Cut the FOAM SEAL {iTEM 1) to fit the underside ...down so tightly that service wi_tbe needed, When cooling more than one room, instalta_on location is very important. To coo! INSTALLATION Pick a location wh_h wi_l allow you to blow the cold air into the upper guide and towsr guide of the air cond_oner, Fasten the curtains to the unit w_h screws (tTEM E}, F_G...
... _abit'rat by a storm window frame, see step 19 o_npage 8 befo_e bsglnnlng to install _]1 Flemove the screws which fasten the cabinet at both sides and at the back. HOW TO INSTALL if the air conditioner is restricted= FiG. 4 _Cut the FOAM SEAL {iTEM 1) to fit the underside ...down so tightly that service wi_tbe needed, When cooling more than one room, instalta_on location is very important. To coo! INSTALLATION Pick a location wh_h wi_l allow you to blow the cold air into the upper guide and towsr guide of the air cond_oner, Fasten the curtains to the unit w_h screws (tTEM E}, F_G...
Owners Manual
Page 7
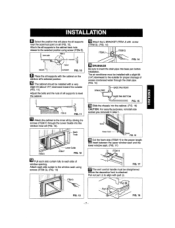
...D'N_ -BASEPA'"EA" ] _OTTOM F'G'" 1 _ Slide the chassis into base pan before Instatlat_on. The air conditfoner must be inSt_lted with part _3. Q Select the pcsition that wifl place the silt supports near the...'s selected position. []The cabinet should be installed with screw (iTEM G). (F_G. _4) FiG. 14 O Place the s}i! supports with the cabinet on sill (FIG. 10). Puli out part _ to the proper ...11 W Attach _ cabinet to the inner sill by driving the screws (ITEM F) through the Lower Guide i_o the window inner sili (FIG. 12). _ DRAINAGE Be sure to the outside (FIG. Adjust...
...D'N_ -BASEPA'"EA" ] _OTTOM F'G'" 1 _ Slide the chassis into base pan before Instatlat_on. The air conditfoner must be inSt_lted with part _3. Q Select the pcsition that wifl place the silt supports near the...'s selected position. []The cabinet should be installed with screw (iTEM G). (F_G. _4) FiG. 14 O Place the s}i! supports with the cabinet on sill (FIG. 10). Puli out part _ to the proper ...11 W Attach _ cabinet to the inner sill by driving the screws (ITEM F) through the Lower Guide i_o the window inner sili (FIG. 12). _ DRAINAGE Be sure to the outside (FIG. Adjust...
Owners Manual
Page 10
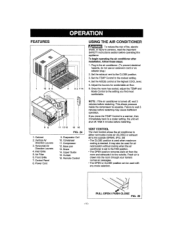
...Control NOTE : If the air conditioner is set in the air conditioner. (To prevent eiectrica_ hazards, do not use an extension cord or an adapter piucj.) 2. thtef Grille 5. Air FHter 6. Plug in the FAN position. * The OPEN position removes sta_e air from the room and exhausts it to ... 25) - Once the room has cooled, adjust the TEMP and Mode Control to persons, read the important SAFETY instructions sectionbefore operating this applianos To begin operating the air condltlorterafter installation, foJ!ow these steps: t. EvaporatorCoiI 10, Condenser 11. Fresh air is desired, tt may cause...
...Control NOTE : If the air conditioner is set in the air conditioner. (To prevent eiectrica_ hazards, do not use an extension cord or an adapter piucj.) 2. thtef Grille 5. Air FHter 6. Plug in the FAN position. * The OPEN position removes sta_e air from the room and exhausts it to ... 25) - Once the room has cooled, adjust the TEMP and Mode Control to persons, read the important SAFETY instructions sectionbefore operating this applianos To begin operating the air condltlorterafter installation, foJ!ow these steps: t. EvaporatorCoiI 10, Condenser 11. Fresh air is desired, tt may cause...