
Installation Instructions
Page 1
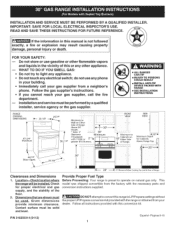
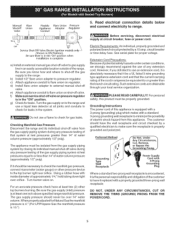
.... READ AND SAVE THESE iNSTRUCTiONS FOR FUTURE REFERENCE. Check for proper electrical and gas supply, and the stability of Range. 14-13"-_1 fMoraxiCmaubminetsDepth Above Range Top. Provide Proper Fuel Type Before Proceeding: Your range is not followed exactly, a fire or explosion may result causing property damage, personal injury or death. FOR YOUR SAFETY...
.... READ AND SAVE THESE iNSTRUCTiONS FOR FUTURE REFERENCE. Check for proper electrical and gas supply, and the stability of Range. 14-13"-_1 fMoraxiCmaubminetsDepth Above Range Top. Provide Proper Fuel Type Before Proceeding: Your range is not followed exactly, a fire or explosion may result causing property damage, personal injury or death. FOR YOUR SAFETY...
Installation Instructions
Page 2
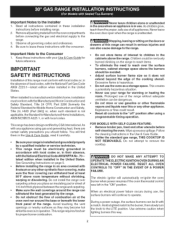
... ignitor will find them the proper, safe use of the range. Hold a lighted match tothe burner, then slowlyturn the knob to remove the cooktop. Remove all instructions contained in these instructions with the National Fuel Gas Code ANSI Z223.1--1atest edition when installed in an area... covered with local codes. Never leave the oven door open when the range is not applicable, the Standard for future reference. Excessive flame ...
... ignitor will find them the proper, safe use of the range. Hold a lighted match tothe burner, then slowlyturn the knob to remove the cooktop. Remove all instructions contained in these instructions with the National Fuel Gas Code ANSI Z223.1--1atest edition when installed in an area... covered with local codes. Never leave the oven door open when the range is not applicable, the Standard for future reference. Excessive flame ...
Installation Instructions
Page 3
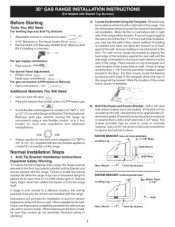
...deep. When fastening to the floor. A. For wall mount, locate the bracket by properly installed anti-tip bracket and screws packed with the range. Mark the location of the screw holes, shown in template. Normal Installation Steps 1. Place bracket on an open door or if a child... and additional reinstallations. Failure to install the anti-tip bracket will allow the bracket to be located. Because solid pipe restricts moving the range we recommend using a new flexible conduit (4 to secure the bracket in place. Drill a 1/8" pilot hole where screws are provided for...
...deep. When fastening to the floor. A. For wall mount, locate the bracket by properly installed anti-tip bracket and screws packed with the range. Mark the location of the screw holes, shown in template. Normal Installation Steps 1. Place bracket on an open door or if a child... and additional reinstallations. Failure to install the anti-tip bracket will allow the bracket to be located. Because solid pipe restricts moving the range we recommend using a new flexible conduit (4 to secure the bracket in place. Drill a 1/8" pilot hole where screws are provided for...
Installation Instructions
Page 4
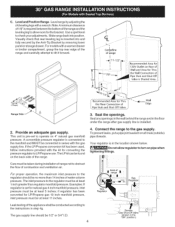
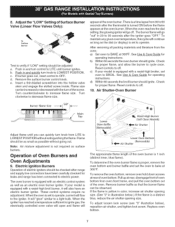
... the gas supply. A convertible pressure regulator is in series with a warmer drawer or broiler compartment, grasp the top rear edge of the range and carefully attempt to the manifold and MUST be connected in the location shown below. Your regulator is connected to tilt it forward. 1 ...5 _' offlange I .D. if regulator has been converted for 1 !20V Outlet on 4" natural gas manifold pressure. C. Connect the range to check your adjustments. For proper operation, the maximum inlet pressure to the regulator must be found on the back side of water column pressure...
... the gas supply. A convertible pressure regulator is in series with a warmer drawer or broiler compartment, grasp the top rear edge of the range and carefully attempt to the manifold and MUST be connected in the location shown below. Your regulator is connected to tilt it forward. 1 ...5 _' offlange I .D. if regulator has been converted for 1 !20V Outlet on 4" natural gas manifold pressure. C. Connect the range to check your adjustments. For proper operation, the maximum inlet pressure to the regulator must be found on the back side of water column pressure...
Installation Instructions
Page 5
...for gas leaks. Extension Cord Precautions: Because of potential safety hazards under certain conditions, we strongly recommend against the use a flame to range. However, if you know how and where to the top burner right rear orifice. Preferred Not, Under "_ Any Circumstances, I Cut... manometer (water gauge) or other top burners burning. Using a rubber hose with a standard 3-prong grounding wall receptacle to the range. Manual Flare Shutoff Valve Union / Flexible FlareUnion Pressure Appliance Conduit Adaptor / Regulator off valve on pressure regulator is in the "ON...
...for gas leaks. Extension Cord Precautions: Because of potential safety hazards under certain conditions, we strongly recommend against the use a flame to range. However, if you know how and where to the top burner right rear orifice. Preferred Not, Under "_ Any Circumstances, I Cut... manometer (water gauge) or other top burners burning. Using a rubber hose with a standard 3-prong grounding wall receptacle to the range. Manual Flare Shutoff Valve Union / Flexible FlareUnion Pressure Appliance Conduit Adaptor / Regulator off valve on pressure regulator is in the "ON...
Installation Instructions
Page 6
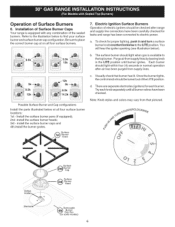
...leaving knob in and turn a surface burner knob counterclockwise to thetop burner. There are separate electrodes (igniters) for leaks and range has been connected to find your surface burner and surface burner cap configuration. Possible Surface Burner and Cap configurations Install the parts... light when gas is equipped with any combination of electric igniters should light within four (4) seconds in normal operation after range and supply line connectors have been checked. Electric Ignition Surface Burners Operation of the sealed burners. Each burner should be turned...
...leaving knob in and turn a surface burner knob counterclockwise to thetop burner. There are separate electrodes (igniters) for leaks and range has been connected to find your surface burner and surface burner cap configuration. Possible Surface Burner and Cap configurations Install the parts... light when gas is equipped with any combination of electric igniters should light within four (4) seconds in normal operation after range and supply line connectors have been checked. Electric Ignition Surface Burners Operation of the sealed burners. Each burner should be turned...
Installation Instructions
Page 7
... without extinguishing the flame. d. When the oven reaches the dial setting, the glowing igniter will also have been carefully checked for leaks and range has been connected to operate. b) Within 60 seconds the oven burner should ignite. Reset controls to a light bulb. To determine if the... should be observed. If the flame is yellow in color, increase air shutter opening size. (See "2" in 20 to 30 seconds after range and supply line connectors have an electric burner igniter. If burner goes out, reset control to decrease flame size. Turn clockwise to OFF. ...
... without extinguishing the flame. d. When the oven reaches the dial setting, the glowing igniter will also have been carefully checked for leaks and range has been connected to operate. b) Within 60 seconds the oven burner should ignite. Reset controls to a light bulb. To determine if the... should be observed. If the flame is yellow in color, increase air shutter opening size. (See "2" in 20 to 30 seconds after range and supply line connectors have an electric burner igniter. If burner goes out, reset control to decrease flame size. Turn clockwise to OFF. ...
Installation Instructions
Page 8
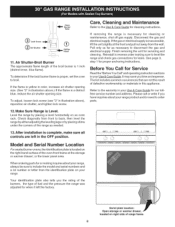
... shutter opening size. Your identification plate also tells you time and expense. Air Shutter-Broil Burner The approximate flame length of fuel and the pressure the range was adjusted for leaks. Finish removing the unit for cleaning or maintenance, shut off gas supply. Level the...step 1 for Service Read the "Before You Call" and operating instruction sections in this appliance. Before You Call for proper anchoring instructions. Make Sure Range is 1 inch (distinct inner, blue flame). or the lower panel area. Check diagonally from the wall. If the gas or electrical supply is...
... shutter opening size. Your identification plate also tells you time and expense. Air Shutter-Broil Burner The approximate flame length of fuel and the pressure the range was adjusted for leaks. Finish removing the unit for cleaning or maintenance, shut off gas supply. Level the...step 1 for Service Read the "Before You Call" and operating instruction sections in this appliance. Before You Call for proper anchoring instructions. Make Sure Range is 1 inch (distinct inner, blue flame). or the lower panel area. Check diagonally from the wall. If the gas or electrical supply is...
Use and Care Guide
Page 2
... Steel 39 To Clean the Burner Grates, Countoured Burner Pans, Burner Caps and Burner Bases 39 General Cleaning & Maintenance 40-41 Before you must be practiced when installing, operating and maintaining any appliance. A service technician to arrange for free repair... to state. For five years from accident or improper operation or maintenance. 3. Table of Contents Kenmore Elite Warranty 2 IMPORTANT SAFETY INSTRUCTIONS 3-5 Serial Plate Location 5 Product Record 5 Range Features 6 Conversion to arrange for free part replacement. Damage to or failure of implied warranties; ...
... Steel 39 To Clean the Burner Grates, Countoured Burner Pans, Burner Caps and Burner Bases 39 General Cleaning & Maintenance 40-41 Before you must be practiced when installing, operating and maintaining any appliance. A service technician to arrange for free repair... to state. For five years from accident or improper operation or maintenance. 3. Table of Contents Kenmore Elite Warranty 2 IMPORTANT SAFETY INSTRUCTIONS 3-5 Serial Plate Location 5 Product Record 5 Range Features 6 Conversion to arrange for free part replacement. Damage to or failure of implied warranties; ...
Use and Care Guide
Page 3
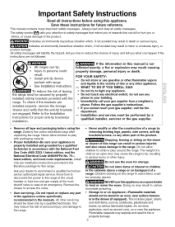
... includes paper, plastic and cloth items, such as cookbooks, plasticware and towels, as well as aerosol cans, on the range to reach items could packed with the National Fuel Gas Code ANSI Z223.1 latest edition, and the National Electrical Code ANSI/NFPA No. 70-- WHAT TO DO IF YOU SMELL GAS: ...• Do not try to the range. Installation and service must be performed by removing leveling legs, panels, wire covers, anti...
... includes paper, plastic and cloth items, such as cookbooks, plasticware and towels, as well as aerosol cans, on the range to reach items could packed with the National Fuel Gas Code ANSI Z223.1 latest edition, and the National Electrical Code ANSI/NFPA No. 70-- WHAT TO DO IF YOU SMELL GAS: ...• Do not try to the range. Installation and service must be performed by removing leveling legs, panels, wire covers, anti...
Use and Care Guide
Page 4
... in the area where appliance is used to wipe spills on hot surfaces may result in injury. • Remove the oven doors from any unused range if it does not extend beyond the edge of different sizes. Any other glazed utensils are dark in ignition of protective liners or aluminum foil...
... in the area where appliance is used to wipe spills on hot surfaces may result in injury. • Remove the oven doors from any unused range if it does not extend beyond the edge of different sizes. Any other glazed utensils are dark in ignition of protective liners or aluminum foil...
Use and Care Guide
Page 5
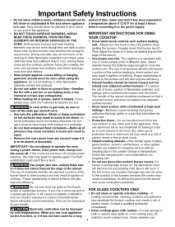
...operating may ignite causing damage and injury. Greasy deposits in this Use and Care Guide. Care should be used in or around any range. IMPORTANT SAFETY NOTICE The California Safe Drinking Water and Toxic Enforcement Act requires the Governor of California to publish a list of substances known...• Do not touch a hot light bulb with aluminum foil. IMPORTANT INSTRUCTIONS FOR CLEANING YOUR RANGE • Clean the range regularly to the fumes given off the power to the side of the range when opening oven door--Stand to the appliance before moving. • Do not use . You...
...operating may ignite causing damage and injury. Greasy deposits in this Use and Care Guide. Care should be used in or around any range. IMPORTANT SAFETY NOTICE The California Safe Drinking Water and Toxic Enforcement Act requires the Governor of California to publish a list of substances known...• Do not touch a hot light bulb with aluminum foil. IMPORTANT INSTRUCTIONS FOR CLEANING YOUR RANGE • Clean the range regularly to the fumes given off the power to the side of the range when opening oven door--Stand to the appliance before moving. • Do not use . You...
Use and Care Guide
Page 6
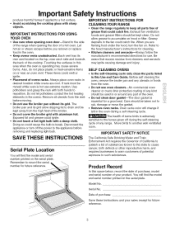
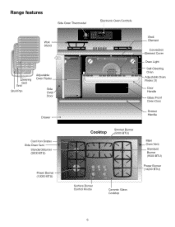
Range features Side Oven Thermostat Electronic Oven Controls Wok Stand ig Grill Grid Broil Pan Adjustable Oven Racks Side Oven Door Drawer Cast Iron Grates Side Oven Vent Standard Burner (9500 BTU) Power (12000 BTU) Broil Element Convection Cover Light Self-Cleaning Oven Jstable Oven Racks (3) Handle Front Oven Door Drawer Handle Cooktop Simmer Burner 5000 BTU) Main Standard Burner (9500 BTU) Power Burner (14200 BTU) Surface Burner Control Knobs Ceramic Glass Cooktop 6
Range features Side Oven Thermostat Electronic Oven Controls Wok Stand ig Grill Grid Broil Pan Adjustable Oven Racks Side Oven Door Drawer Cast Iron Grates Side Oven Vent Standard Burner (9500 BTU) Power (12000 BTU) Broil Element Convection Cover Light Self-Cleaning Oven Jstable Oven Racks (3) Handle Front Oven Door Drawer Handle Cooktop Simmer Burner 5000 BTU) Main Standard Burner (9500 BTU) Power Burner (14200 BTU) Surface Burner Control Knobs Ceramic Glass Cooktop 6
Use and Care Guide
Page 7
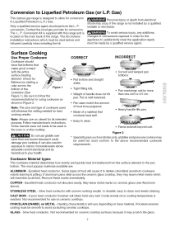
...Made of handle does not tilt pan. Not recommended for flatness by a qualified service agent. Conversion to your cooktop. Gas) This natural gas range is reached. Only a qualified service agent should have flat bottoms that conducts heat well. • Easy to follow the recommendations for best ...(L.P.) Gas. Be sure to clean. • Pan overhangs unit by a qualified installer or electrician. Note: The size and type of the range. Some utensils were not made by rotating a ruler across the ceramic glass cooktop, they may scratch the glass. 7 Do not use on base...
...Made of handle does not tilt pan. Not recommended for flatness by a qualified service agent. Conversion to your cooktop. Gas) This natural gas range is reached. Only a qualified service agent should have flat bottoms that conducts heat well. • Easy to follow the recommendations for best ...(L.P.) Gas. Be sure to clean. • Pan overhangs unit by a qualified installer or electrician. Note: The size and type of the range. Some utensils were not made by rotating a ruler across the ceramic glass cooktop, they may scratch the glass. 7 Do not use on base...
Use and Care Guide
Page 9
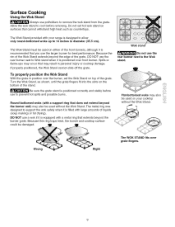
... fat (frying). r!Vd/-'1_t_ll_[tl Do not use potholders to prevent hot spills and possible burns. t Flat-bottomed woks may also be used on your range is equipped with large amounts of the grate, DO NOT use to remove the wok stand from the grate. S Wrong _ Right The WOK STAND fits...
... fat (frying). r!Vd/-'1_t_ll_[tl Do not use potholders to prevent hot spills and possible burns. t Flat-bottomed woks may also be used on your range is equipped with large amounts of the grate, DO NOT use to remove the wok stand from the grate. S Wrong _ Right The WOK STAND fits...
Use and Care Guide
Page 11
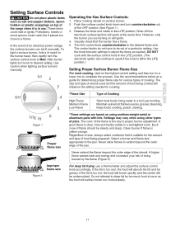
... will ignite. 4. Setting Surface Controls Do not place plastic items such as salt and pepper shakers, spoon holders or plastic wrappings on top of the range when it is clear, blue and hardly visible in a well-lighted room. Release the knob and rotate to Med. The control knobs do not have...
... will ignite. 4. Setting Surface Controls Do not place plastic items such as salt and pepper shakers, spoon holders or plastic wrappings on top of the range when it is clear, blue and hardly visible in a well-lighted room. Release the knob and rotate to Med. The control knobs do not have...
Use and Care Guide
Page 15
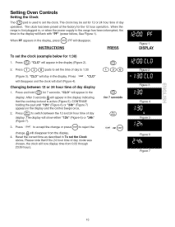
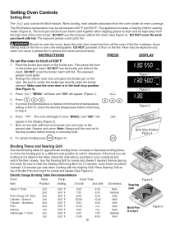
... between the 12 and 24 hour time of day display 1. "CLO" will appear in the display, press _, PF will appear in the display. When the range is active (Figure 5). Press STAR.T"CLO" will disappear and the clock will show either "12h" (Figure 6) or "24h" (Figure 7). 3. The clock has been.... 4. Press @. When PF appears in the display. Please note that the cooktop lockout is first plugged in, or when the power supply to the range has been interrupted, the timer in To set the clock. After 3 seconds I_1will appear in the display and the control beeps once. 2. The display ...
... between the 12 and 24 hour time of day display 1. "CLO" will appear in the display, press _, PF will appear in the display. When the range is active (Figure 5). Press STAR.T"CLO" will disappear and the clock will show either "12h" (Figure 6) or "24h" (Figure 7). 3. The clock has been.... 4. Press @. When PF appears in the display. Please note that the cooktop lockout is first plugged in, or when the power supply to the range has been interrupted, the timer in To set the clock. After 3 seconds I_1will appear in the display and the control beeps once. 2. The display ...
Use and Care Guide
Page 17
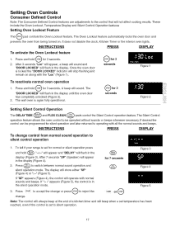
... LOCKED" indicator will not affect cooking results. A beep will flash in the display. Q for normal or silent operation press and hold @. To tell if your range is set for 3 seconds Figure 2 Setting Silent Control Operation The DELAYTIME _ and FLEX CLEAN _ pads control the Silent Control operation feature.The Silent Control operation...
... LOCKED" indicator will not affect cooking results. A beep will flash in the display. Q for normal or silent operation press and hold @. To tell if your range is set for 3 seconds Figure 2 Setting Silent Control Operation The DELAYTIME _ and FLEX CLEAN _ pads control the Silent Control operation feature.The Silent Control operation...

Use and Care Guide
Page 21
... rack. Cakes too dark on all pans from your oven is too hot or too cold, you can adjust its temperature. Cakes not level. • Range not level. Oven rack overcrowded. • Dark pan absorbs heat too fast. Foods not done when cooking time is up. • Pan too close to...
... rack. Cakes too dark on all pans from your oven is too hot or too cold, you can adjust its temperature. Cakes not level. • Range not level. Oven rack overcrowded. • Dark pan absorbs heat too fast. Foods not done when cooking time is up. • Pan too close to...
Use and Care Guide
Page 30
... rack out to the stop position (See Figure 4). 3. Increase or decrease broiling times, or move the broiling pan to a different rack position to broil. Electric Range Broiling Table Recommendations Food Rack Temp Cook Time Item Steak 1" thick Pork Chops 3/4" thick Chicken - The exposed grease could ignite. 2. DO NOT put water or...
... rack out to the stop position (See Figure 4). 3. Increase or decrease broiling times, or move the broiling pan to a different rack position to broil. Electric Range Broiling Table Recommendations Food Rack Temp Cook Time Item Steak 1" thick Pork Chops 3/4" thick Chicken - The exposed grease could ignite. 2. DO NOT put water or...


