Use and Care Guide
Page 1
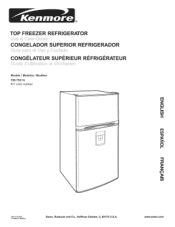
Z 0 t" m t_ Z m t_ Z_ 0 r" Z m t_ MFL61920605 Printed in Mexico Sears, Roebuck and Co., Hoffman Estates, IL 60179 U.S.A. www.sears.com ® TOP FREEZER REFRIGERATOR i CONGELADOR SUPERIOR REFRIGERADOR CONGI_LATEUR SUPI_RIEUR REFRIGI_RATEUR Models / Modelos / ModUles 795.7531 W= coJor number IT!
Z 0 t" m t_ Z m t_ Z_ 0 r" Z m t_ MFL61920605 Printed in Mexico Sears, Roebuck and Co., Hoffman Estates, IL 60179 U.S.A. www.sears.com ® TOP FREEZER REFRIGERATOR i CONGELADOR SUPERIOR REFRIGERADOR CONGI_LATEUR SUPI_RIEUR REFRIGI_RATEUR Models / Modelos / ModUles 795.7531 W= coJor number IT!
Use and Care Guide
Page 2
...Doors Reversing Doors Leveling and Door Closing/ Door Alignment 8-17 8 8 8 9-11 12-16 17 Using Your Refrigerator Ensuring Proper Air Circulation Setting the Controls Water Dispenser Food Storage Guide Storing Frozen Food Refrigerator Shelves Snack Drawer Crisper and Crisper Cover 18-23 18 18 19 19 20 21 21... 22 Crisper Humidity Control Door Racks Door Bins Dairy Bin/Can Rack Ice Tray Filter Care and Cleaning...
...Doors Reversing Doors Leveling and Door Closing/ Door Alignment 8-17 8 8 8 9-11 12-16 17 Using Your Refrigerator Ensuring Proper Air Circulation Setting the Controls Water Dispenser Food Storage Guide Storing Frozen Food Refrigerator Shelves Snack Drawer Crisper and Crisper Cover 18-23 18 18 19 19 20 21 21... 22 Crisper Humidity Control Door Racks Door Bins Dairy Bin/Can Rack Ice Tray Filter Care and Cleaning...
Use and Care Guide
Page 3
... states and provinces do not allow the exclusion or limitation of incidental or consequential damages, or limitations on the duration of implied warranties of purchase. TOP FREEZER REFRIGERATOR ® Kenrnore Appliance Warranty forte Year Limited Warranty When installed, operated and maintained according to all instructions supplied with the product. 5. A service technician to or...
... states and provinces do not allow the exclusion or limitation of incidental or consequential damages, or limitations on the duration of implied warranties of purchase. TOP FREEZER REFRIGERATOR ® Kenrnore Appliance Warranty forte Year Limited Warranty When installed, operated and maintained according to all instructions supplied with the product. 5. A service technician to or...
Use and Care Guide
Page 4
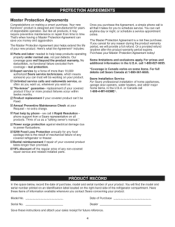
...products, it Rapid Resolution = phone support from time to power fluctuations. [] $250 Food Loss Protection annually for any covered refrigerator or freezer. [] Rental reimbursement if repair of your covered product takes longer than promised. []18% discount off the regular price of ... call 1 =800=4=MY=HOME_'. Serial No. Master Protection Agreements Congratulations on the right-hand side of dependable operation. Your new Kenmor# _ product is a risk free purchase. Sears Installation Service For Sears professional installation of your Master Protection Agreement today! You will...
...products, it Rapid Resolution = phone support from time to power fluctuations. [] $250 Food Loss Protection annually for any covered refrigerator or freezer. [] Rental reimbursement if repair of your covered product takes longer than promised. []18% discount off the regular price of ... call 1 =800=4=MY=HOME_'. Serial No. Master Protection Agreements Congratulations on the right-hand side of dependable operation. Your new Kenmor# _ product is a risk free purchase. Sears Installation Service For Sears professional installation of your Master Protection Agreement today! You will...
Use and Care Guide
Page 5
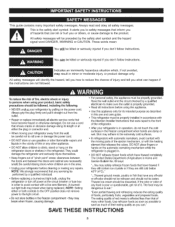
... element that can kill or hurt you what can ." DO NOT place fingers or hands on the refrigerator doors or shelves in the freezer compartment when hands are not followed. "Even partial thawing and refreezing reduces the eating quality of it...quality as much of "pinch point" areas; The eating quality of hazards that releases the cubes. Unplug your refrigerator before using your refrigerator by the safety alert symbol and the hazard signal word DANGER, WARNING or CAUTION. Imnadyicartesultaninimmminionrenotlry mhoadzearardteousinjusriytu, aotrionprowdhuiccth,daifmnaogt...
... element that can kill or hurt you what can ." DO NOT place fingers or hands on the refrigerator doors or shelves in the freezer compartment when hands are not followed. "Even partial thawing and refreezing reduces the eating quality of it...quality as much of "pinch point" areas; The eating quality of hazards that releases the cubes. Unplug your refrigerator before using your refrigerator by the safety alert symbol and the hazard signal word DANGER, WARNING or CAUTION. Imnadyicartesultaninimmminionrenotlry mhoadzearardteousinjusriytu, aotrionprowdhuiccth,daifmnaogt...
Use and Care Guide
Page 6
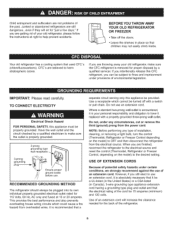
...minimum) and 120 volts. Do not, under any type of installation, cleaning, or removing a light bulb, turn the control (Thermostat, Refrigerator or Freezer Control depending on the model) to have it replaced with a switch or pull chain. BEFORE YOU THROW AWAY YOUR OLD... Use a receptacle which could cause a fire hazard from the electrical source. If you are finished, reconnect the refrigerator to the electrical source and reset the control (Thermostat, Refrigerator or Freezer Control, depending on the model) to use an extension cord. When you are still dangerous...even if they will...
...minimum) and 120 volts. Do not, under any type of installation, cleaning, or removing a light bulb, turn the control (Thermostat, Refrigerator or Freezer Control depending on the model) to have it replaced with a switch or pull chain. BEFORE YOU THROW AWAY YOUR OLD... Use a receptacle which could cause a fire hazard from the electrical source. If you are finished, reconnect the refrigerator to the electrical source and reset the control (Thermostat, Refrigerator or Freezer Control, depending on the model) to use an extension cord. When you are still dangerous...even if they will...
Use and Care Guide
Page 7
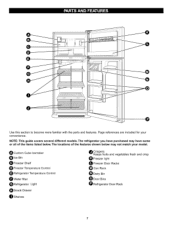
... of the features shown below . O Custom Cube Icemaker O Ice Bin Freezer Shelf O Freezer Temperature Control _ Refrigerator Temperature Control O Water filter Refrigerator Light _Snack Drawer O Shelves O Crispers Keeps fruits and vegetables fresh and crisp 40 Freezer light Freezer Door Racks Can Rack O Dairy Bin Door Bins Refrigerator Door Rack Page references are included for your model. iiiii!l!! NOTE...
... of the features shown below . O Custom Cube Icemaker O Ice Bin Freezer Shelf O Freezer Temperature Control _ Refrigerator Temperature Control O Water filter Refrigerator Light _Snack Drawer O Shelves O Crispers Keeps fruits and vegetables fresh and crisp 40 Freezer light Freezer Door Racks Can Rack O Dairy Bin Door Bins Refrigerator Door Rack Page references are included for your model. iiiii!l!! NOTE...
Use and Care Guide
Page 8
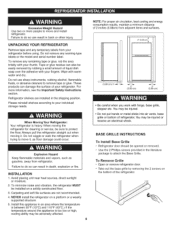
...remaining tape or glue, rub the area briskly with hinge, base grille, stopper etc. Wipe with your thumb. Refrigerator shelves are not recommended. 4. When Moving Your Refrigerator: Your refrigerator is too low or high, cooling ability may be adversely affected. 8 NOTE: For proper air circulation, best ...;F (13°C) and 110°F (43°C.) If the temperature around the appliance is heavy. Open or remove refrigerator door. UNPACKING YOUR REFRIGERATOR Remove tape and any warning-type labels or the model and serial number label. Please reinstall shelves according to remove tape ...
...remaining tape or glue, rub the area briskly with hinge, base grille, stopper etc. Wipe with your thumb. Refrigerator shelves are not recommended. 4. When Moving Your Refrigerator: Your refrigerator is too low or high, cooling ability may be adversely affected. 8 NOTE: For proper air circulation, best ...;F (13°C) and 110°F (43°C.) If the temperature around the appliance is heavy. Open or remove refrigerator door. UNPACKING YOUR REFRIGERATOR Remove tape and any warning-type labels or the model and serial number label. Please reinstall shelves according to remove tape ...
Use and Care Guide
Page 9
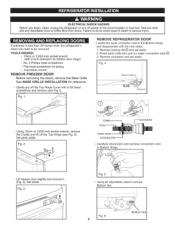
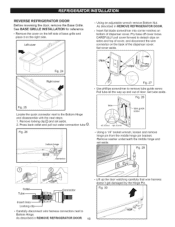
...Adjustable Door or Utility Bins from doors. Set aside. ELECTRICASLHOCK HAZARD Before you begin, either unplug the refrigerator or turn off the Top Hinge Cover with a flat head screwdriver and remove (see Fig. 2). Fig. 1 REMOVE REFRIGERATOR DOOR • Locate the quick connector next to Bottom Hinge. Fig. 4 i i i i ... Flat-head screwdriver for reference. TOOLS NEEDED: • 10mm or 13/32-inch socket wrench (with the next steps: 1. Lift freezer door slightly and remove it. (Fig. 3). Gently pry off power at the circuit breaker or fuse box. Remove locking clipQ and ...
...Adjustable Door or Utility Bins from doors. Set aside. ELECTRICASLHOCK HAZARD Before you begin, either unplug the refrigerator or turn off the Top Hinge Cover with a flat head screwdriver and remove (see Fig. 2). Fig. 1 REMOVE REFRIGERATOR DOOR • Locate the quick connector next to Bottom Hinge. Fig. 4 i i i i ... Flat-head screwdriver for reference. TOOLS NEEDED: • 10mm or 13/32-inch socket wrench (with the next steps: 1. Lift freezer door slightly and remove it. (Fig. 3). Gently pry off power at the circuit breaker or fuse box. Remove locking clipQ and ...

Use and Care Guide
Page 10
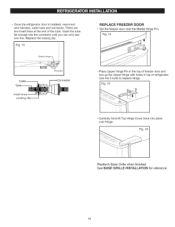
... with Bottom Hinge to damage the water tube or wire harness, feed them through the bottom hinge. Place washer between refrigerator door and Middle Hinge. Fig. 11 Fig. 12 10 Fig. 10 Fig.8 Bottom Bottom Liftupthedoorwatchingcarefullythatthe wireharnessandwatertubedon'tgetdamaged bythe BottomHinge. ...the Bottom Hinge. • Using an adjustable wrench reinstall the Bottom Nut making sure it is tight. Fig.7 REPLACE REFRIGERATOR DOOR • Insert the water tube and wire harness through the hole in the hinge plate. Loosenandremovethe2 boltsandthephillipshead screwto removetheMiddleHingeBrackeftrom ...
... with Bottom Hinge to damage the water tube or wire harness, feed them through the bottom hinge. Place washer between refrigerator door and Middle Hinge. Fig. 11 Fig. 12 10 Fig. 10 Fig.8 Bottom Bottom Liftupthedoorwatchingcarefullythatthe wireharnessandwatertubedon'tgetdamaged bythe BottomHinge. ...the Bottom Hinge. • Using an adjustable wrench reinstall the Bottom Nut making sure it is tight. Fig.7 REPLACE REFRIGERATOR DOOR • Insert the water tube and wire harness through the hole in the hinge plate. Loosenandremovethe2 boltsandthephillipshead screwto removetheMiddleHingeBrackeftrom ...
Use and Care Guide
Page 11
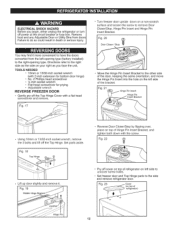
..., atertubeandconnectorT.hereare twoinsertlinesat theendof thetube.Insertthetube far enoughintotheconnectour ntilyoucanonlysee oneline.Replacethelockingclip. Place Upper Hinge Pin in the top of freezer door and line up the Upper Hinge with holes in top of refrigerator. Fig. 15 , Carefully force-fit Top Hinge Cover back into place over Hinge, Fig. 16 Reattach Base Grille when finished. See BASE...
..., atertubeandconnectorT.hereare twoinsertlinesat theendof thetube.Insertthetube far enoughintotheconnectour ntilyoucanonlysee oneline.Replacethelockingclip. Place Upper Hinge Pin in the top of freezer door and line up the Upper Hinge with holes in top of refrigerator. Fig. 15 , Carefully force-fit Top Hinge Cover back into place over Hinge, Fig. 16 Reattach Base Grille when finished. See BASE...
Use and Care Guide
Page 12
... side of the door, keeping the same orientation, and move the Hinge Pin Insert into the hole on top of refrigerator) J_ Hinge Pin 12 Fig. 22 Pry off the Top Hinge. Fig. 21 _ Hinge PHiningInesePrtin Insert Bracket • Using 10mm or 13/32-inch socket wrench,... remove the 3 bolts and lift off cover on top of refrigerator on left -openintgype(factoryinstalled) to the side and remove refrigerator door. Set freezer door and Top Hinge...
... side of the door, keeping the same orientation, and move the Hinge Pin Insert into the hole on top of refrigerator) J_ Hinge Pin 12 Fig. 22 Pry off the Top Hinge. Fig. 21 _ Hinge PHiningInesePrtin Insert Bracket • Using 10mm or 13/32-inch socket wrench,... remove the 3 bolts and lift off cover on top of refrigerator on left -openintgype(factoryinstalled) to the side and remove refrigerator door. Set freezer door and Top Hinge...
Use and Care Guide
Page 13
... the next steps: 1. Fig. 30 Insert lines Locking clip I • Carefully disconnect wire harness connectors next to detach clips on sides and top of cover, and disconnect the wire connector on the back of door. Press back collet and pull out water connection tube (::Z). 18 _tube guide ...screw left side of dispenser cover. Remove washer underneath the middle hinge and set aside. 2. As described in REMOVE REFRIGERATOR DOOR. Le_ cover Using an adjustable wrench remove Bottom Nut. Pry base off cover loose. Pull tube all the way up the door watching ...
... the next steps: 1. Fig. 30 Insert lines Locking clip I • Carefully disconnect wire harness connectors next to detach clips on sides and top of cover, and disconnect the wire connector on the back of door. Press back collet and pull out water connection tube (::Z). 18 _tube guide ...screw left side of dispenser cover. Remove washer underneath the middle hinge and set aside. 2. As described in REMOVE REFRIGERATOR DOOR. Le_ cover Using an adjustable wrench remove Bottom Nut. Pry base off cover loose. Pull tube all the way up the door watching ...

Use and Care Guide
Page 14
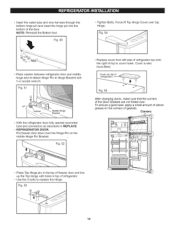
...harness into the base as shown below . Fig. 33 ............ ¼ Fig. 34 • Reattach to the left side as shown below . Fig. 38 • Turn refrigerator door upside down on a non-scratch surface and remove cap cover located on the right side. • Using a 10mm or 13/32 inch socket wrench.... Cap cover is force fitted and holds the electrical harness. Fig. 35 14 Fig. 40 Fig. 32 • Remove the bolt on bottom of refrigerator from the left side and insert it on the left Side using a flat-head screwdriver. Fig. 39 • Move the Bottom Hinge to the left...
...harness into the base as shown below . Fig. 33 ............ ¼ Fig. 34 • Reattach to the left side as shown below . Fig. 38 • Turn refrigerator door upside down on a non-scratch surface and remove cap cover located on the right side. • Using a 10mm or 13/32 inch socket wrench.... Cap cover is force fitted and holds the electrical harness. Fig. 35 14 Fig. 40 Fig. 32 • Remove the bolt on bottom of refrigerator from the left side and insert it on the left Side using a flat-head screwdriver. Fig. 39 • Move the Bottom Hinge to the left...

Use and Care Guide
Page 15
Fig. 45 Take Door Closer/Stop and flip it over the screw holes on left side of refrigerator and re-attach with the hole in the top of the dispenser cover, then insert the dispenser cover top clips into outer hole on the right side. Attach cover on right side of door. °... the wire harness out from cabinet at the base of the dispenser cavity until it into the left channel at area between freezer and refrigerator doors. (You will be on top) and position on the left corner of cabinet. S._ew Fig. 43 seudcerew• Flip the middle hinge bracket (flange now will ...
Fig. 45 Take Door Closer/Stop and flip it over the screw holes on left side of refrigerator and re-attach with the hole in the top of the dispenser cover, then insert the dispenser cover top clips into outer hole on the right side. Attach cover on right side of door. °... the wire harness out from cabinet at the base of the dispenser cavity until it into the left channel at area between freezer and refrigerator doors. (You will be on top) and position on the left corner of cabinet. S._ew Fig. 43 seudcerew• Flip the middle hinge bracket (flange now will ...
Use and Care Guide
Page 16
... over . To ensure a good seal, apply a small amount of silicon grease on top of freezer door and line up the Top Hinge with 1/4in socket wrench. , Inserthewatertubeandwireharnessthroughthe bottomhingepinandinsert hehingepinintothe bottomof thedoor. REFRIGERATOR DOOR. Fig. 52 , Replace cover from left side of refrigerator top onto the right of gaskets. Fig. 53 16 Fig.54 , Place washer between...
... over . To ensure a good seal, apply a small amount of silicon grease on top of freezer door and line up the Top Hinge with 1/4in socket wrench. , Inserthewatertubeandwireharnessthroughthe bottomhingepinandinsert hehingepinintothe bottomof thedoor. REFRIGERATOR DOOR. Fig. 52 , Replace cover from left side of refrigerator top onto the right of gaskets. Fig. 53 16 Fig.54 , Place washer between...

Use and Care Guide
Page 17
... leveling screw clockwise to raise the side of the refrigerator or counterclockwise to lower it easier to adjust the screws. 4. Have someone push against the top of the refrigerator takes some of the refrigerator. NOTE: Having someone hold the freezer door so the space between your refrigerator seems unsteady or you want the doors to close...
... leveling screw clockwise to raise the side of the refrigerator or counterclockwise to lower it easier to adjust the screws. 4. Have someone push against the top of the refrigerator takes some of the refrigerator. NOTE: Having someone hold the freezer door so the space between your refrigerator seems unsteady or you want the doors to close...
Use and Care Guide
Page 18
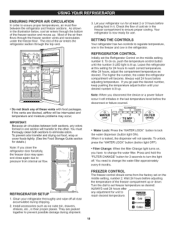
...: Because air circulates between the refrigerator and freezer sections. Always wait 24 hours before adjusting the temperature of these vents with food packages. If the vents are packed together to lock the water dispenser (button light ON). Check the flow of the air then flows through the top vent. * Do not block any...
...: Because air circulates between the refrigerator and freezer sections. Always wait 24 hours before adjusting the temperature of these vents with food packages. If the vents are packed together to lock the water dispenser (button light ON). Check the flow of the air then flows through the top vent. * Do not block any...
Use and Care Guide
Page 19
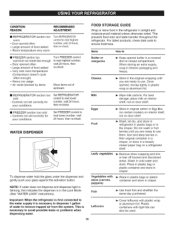
... leaks or problems when dispensing water. This prevents food odor and taste transfer throughout the refrigerator. For dated products, check date code to next highest number, wait 24 hours, then re-check [] FREEZER section too warm/ice not made fast enough - Once opened often - Wash, let dry..., and store in refrigerator in plastic bags or in freezer packaging and freeze. Plastic containers with plastic wrap or aluminum foil. Door ...
... leaks or problems when dispensing water. This prevents food odor and taste transfer throughout the refrigerator. For dated products, check date code to next highest number, wait 24 hours, then re-check [] FREEZER section too warm/ice not made fast enough - Once opened often - Wash, let dry..., and store in refrigerator in plastic bags or in freezer packaging and freeze. Plastic containers with plastic wrap or aluminum foil. Door ...
Use and Care Guide
Page 20
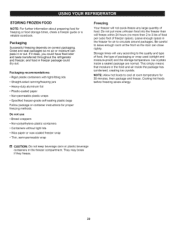
.... Cooling hot foods before freezing saves energy. [] CAUTION: Do not keep beverage cans or plastic beverage containers in freezer package could have food odor and taste transferred throughout the refrigerator and freezer, and food in the freezer compartment. Packaging recommendations: • Rigid plastic containers with tight-fitting lids • Straight-sided canning/freezing jars...
.... Cooling hot foods before freezing saves energy. [] CAUTION: Do not keep beverage cans or plastic beverage containers in freezer package could have food odor and taste transferred throughout the refrigerator and freezer, and food in the freezer compartment. Packaging recommendations: • Rigid plastic containers with tight-fitting lids • Straight-sided canning/freezing jars...


